As artists, one of the most important tools we have at our disposal is our camera. Often, a quality drawing or painting starts with a quality photo.
While photos are everywhere, it’s always best to shoot your own. We can control the light, the subject matter, the arrangement or composition, and the image is completely our own.
But for most of us, we simply don’t have access to high-end studio equipment to create professional-looking photos – or do we?
What is a Photo Box?
A photo box is simply a box that allows light to enter in a controlled manner. Subjects can be placed and arranged in the box and photographed. Since the light is controlled, we have greater control over the highlights and shadows and how they are recorded by the camera.
The light is diffused or dispersed evenly resulting in softer shadows and highlights. As a result, the light is typically more appealing.
A photo box can be used to photograph still life subjects, but it can also be used to photograph small sculptures or jewelry.
Building The Box Without Glue
I built this photo box to be reconfigurable so I could have the light originating from the left or right. This meant that I needed to make it without glue or adhesives. I also liked the idea of being able to take it apart and store it away in the studio until I needed it. I came up with a design that would result in a sturdy box, but also met my requirements.
Materials
The materials for this build are very inexpensive and easy to find at any art or craft store.
Here’s what you’ll need…
- A sharp craft knife
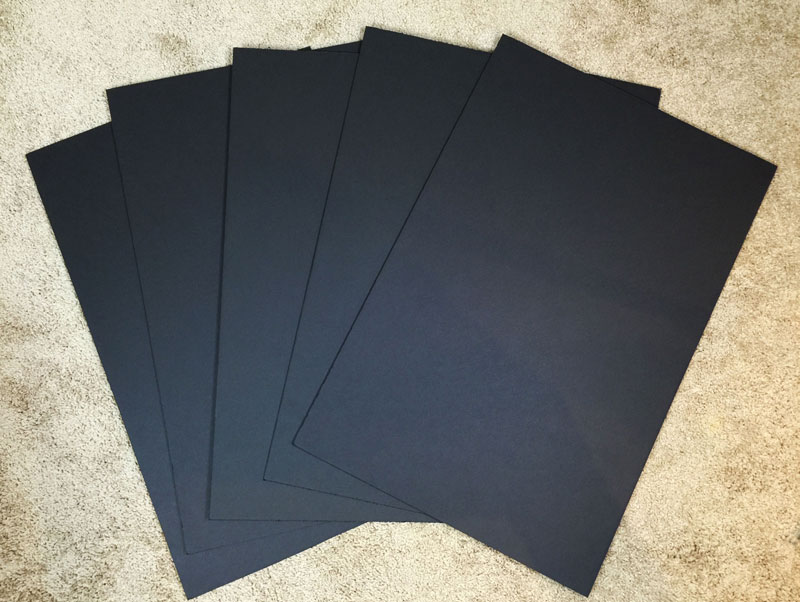
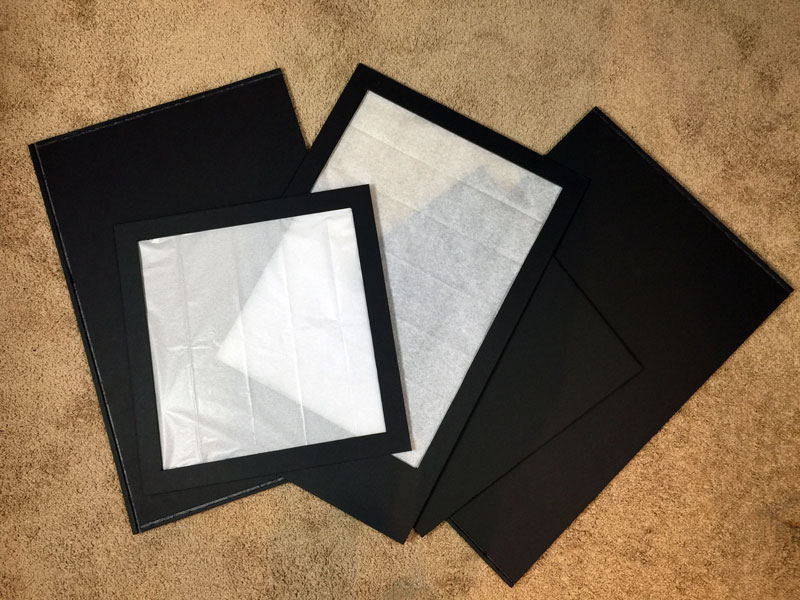
- 5 sheets of black or white foam board (20″ by 30″)
- Masking tape
- Tissue paper
- Yard stick or meter stick
- Pen or pencil
Preparing the Foam Board
Since no glue is used, we’ll cut grooves into the pieces of the foam board so that we can fit the box together allowing it stand on its own. We’ll make all of our cuts first and then simply assemble the pieces.
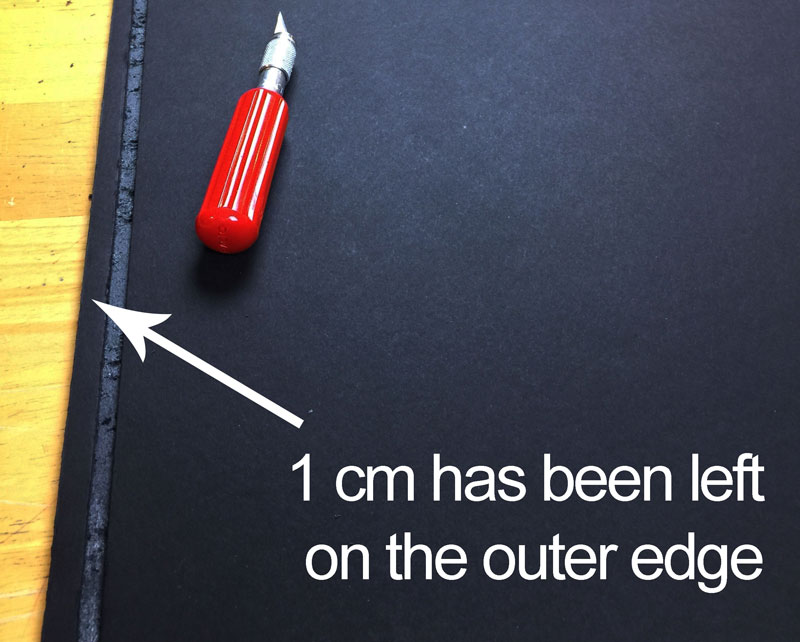
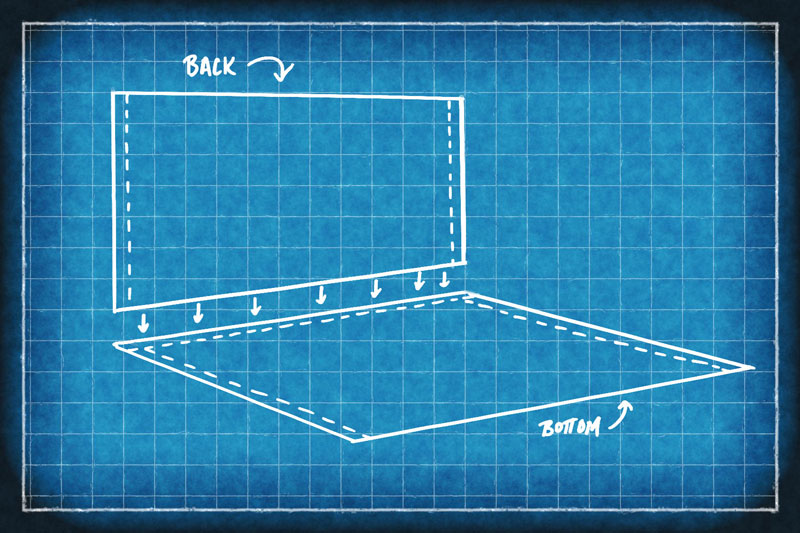
We’ll start with the bottom piece. The length and the width of the board is left intact. Grooves are cut along the sides and the bottom. The grooves that are cut are thickness of the foam core, so be sure to measure the thickness first and dig out the grooves so that a tight fit will result. The bottom of the foam core is left, be careful not to cut all the way through the board!
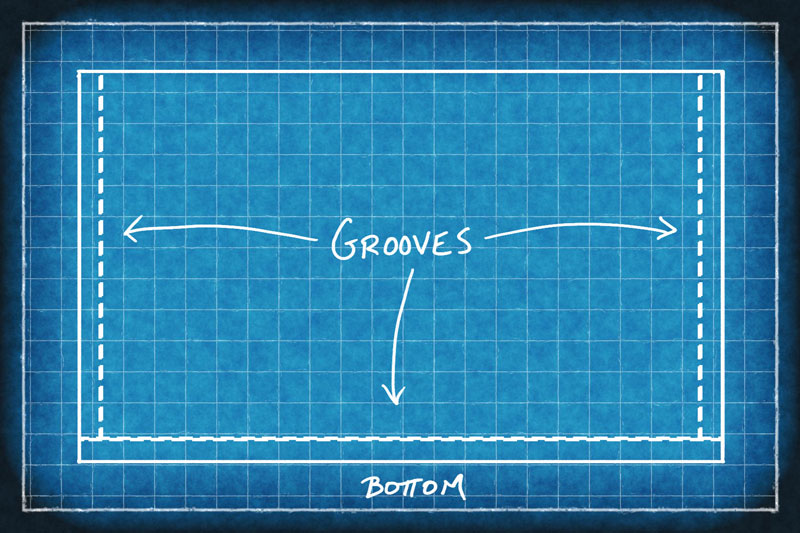
Each groove is placed a centimeter away from the edges. This centimeter adds stability and strength.
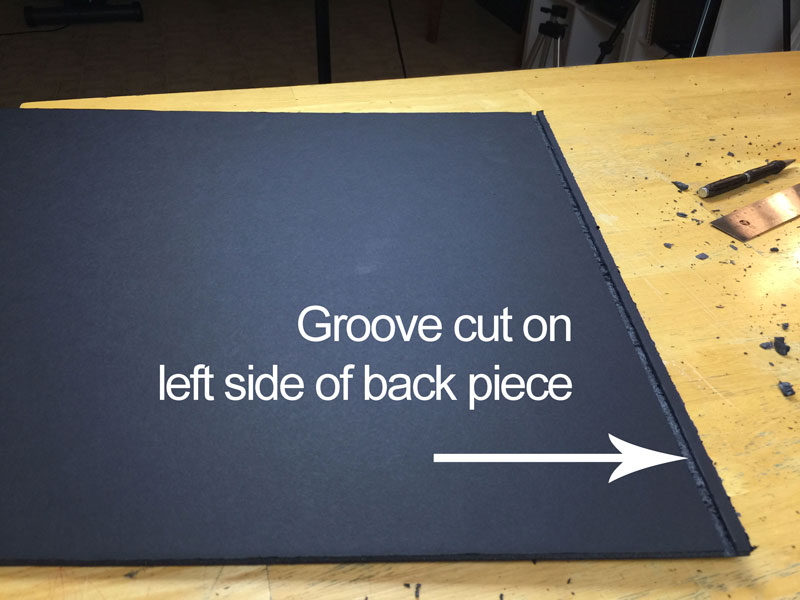
Grooves are next cut in the back piece. Instead of three grooves, as we cut with the bottom piece, we’ll only need to cut two into the back piece. We’ll again leave the foam board’s length and width intact and cut grooves in both ends of the piece. Remeber, the grooves should match the thickness of the foam board.
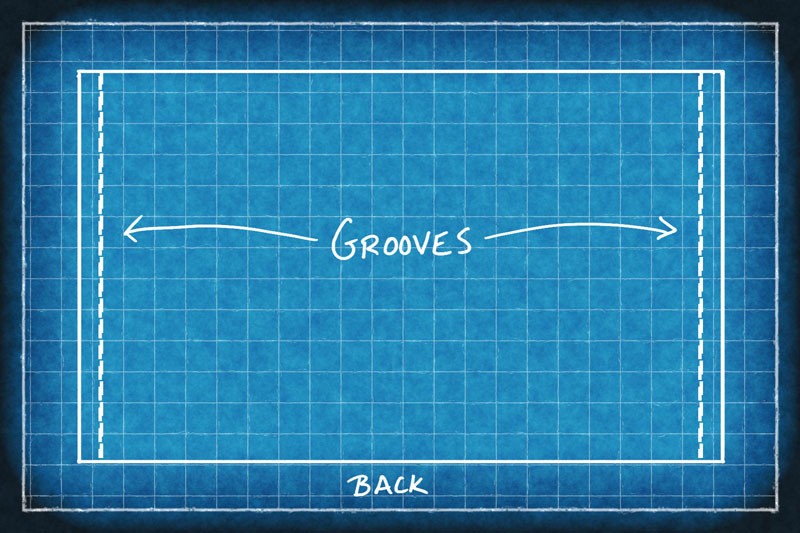
Again, we can leave a centimeter from the edge for added stability, but this time the grooves extend the entire length of the board.
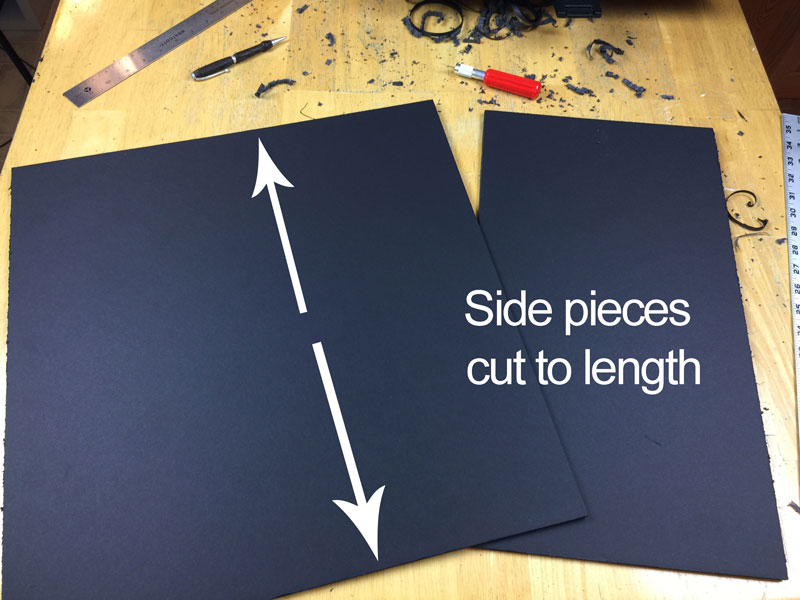
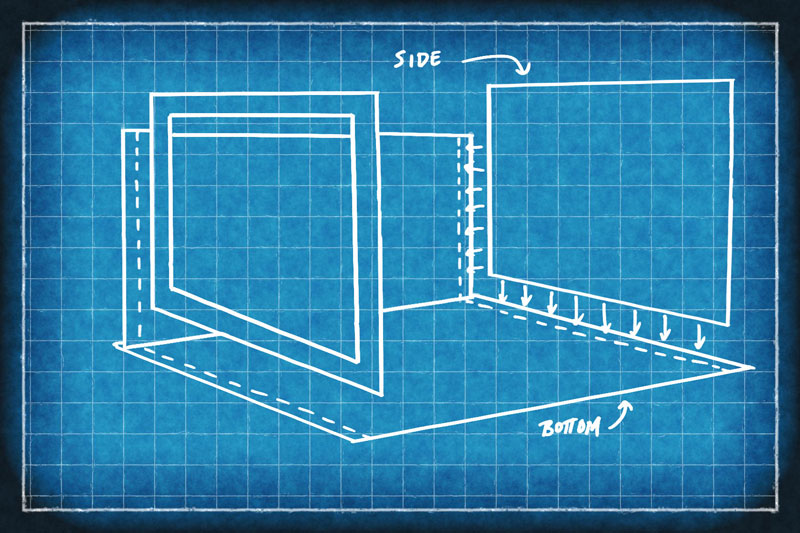
With the bottom and back pieces prepared, we can cut the side pieces. Since the side pieces fit into the grooves that we have cut in the bottom and back pieces, we’ll cut them down so that they will not extend over the front edge of the box.
For one of the side pieces, a window is cut out to allow light to enter. (If you want to create a photo box that allows for two light sources, you cut a window in both side pieces.)
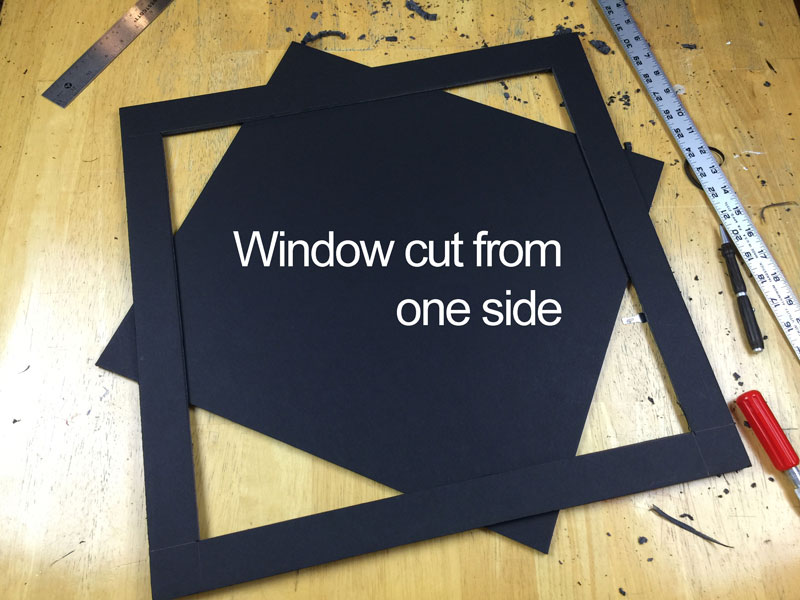
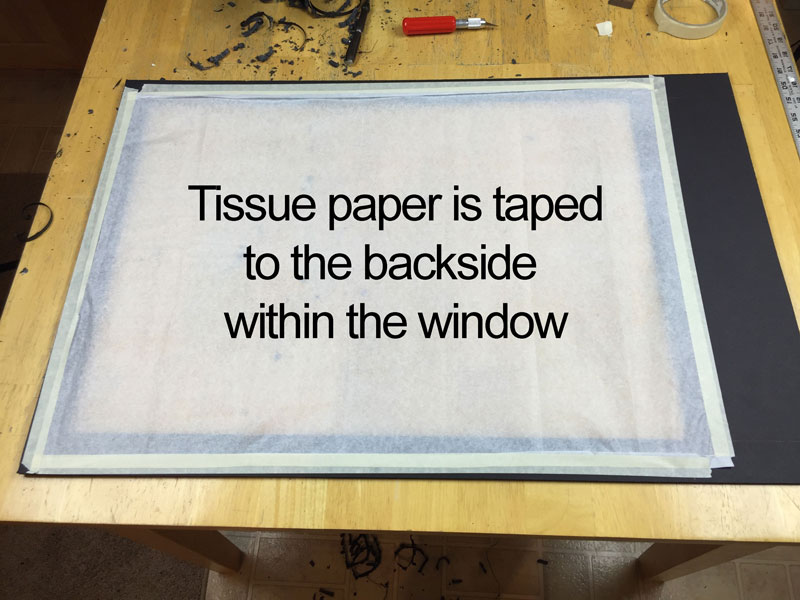
Tissue paper is folded into place and pulled tight on the back side of the window. It is adhered in place with masking tape.
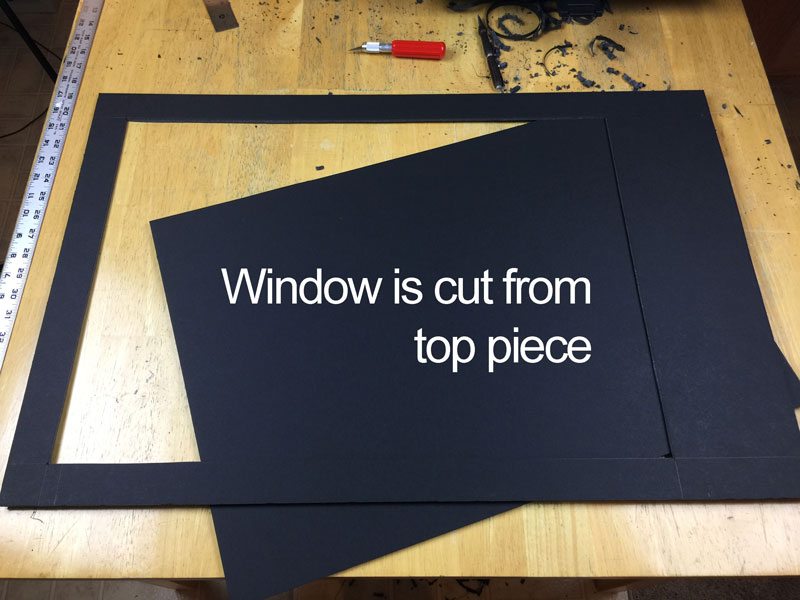
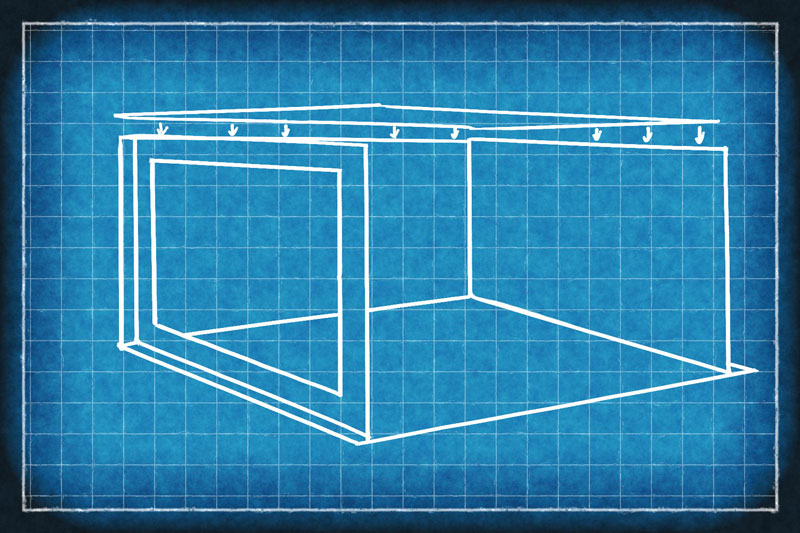
Next, we can cut a window from the top piece. The length and the width of the top piece is kept intact. No grooves are cut into this piece since it can simply rest on top of the structure.
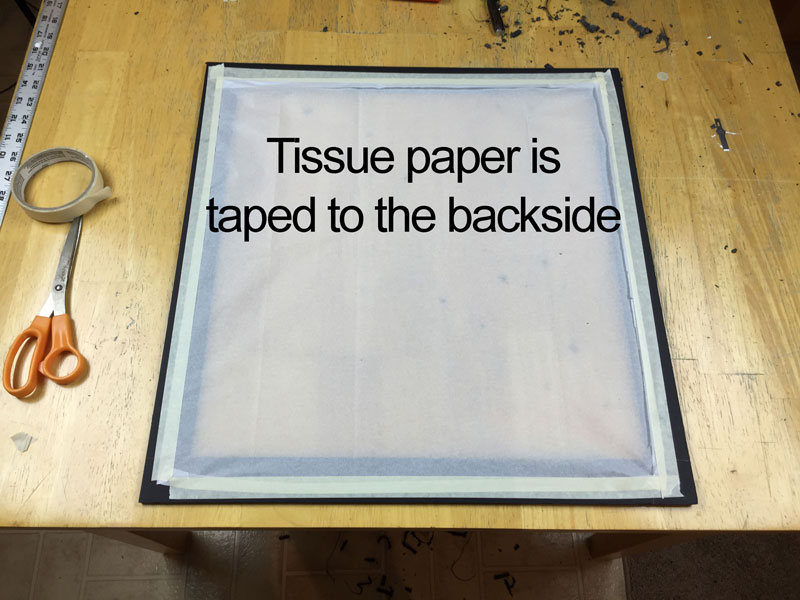
Tissue paper is cut, folded, and adhered in place over the window with masking tape.
Now that the pieces have all been prepared, we can assemble them together as a photo box.

The bottom piece is laid on a flat surface with the grooves facing upward. The back piece is fit within the back groove of the bottom piece.
The side pieces fit into the grooves of the bottom piece on each side.
The top piece simply rests on the top of the structure.
With our photo box complete, we’re ready to start taking awesome photos. The construction is reconfigurable, so we can set our box with the light originating from the left or the right.
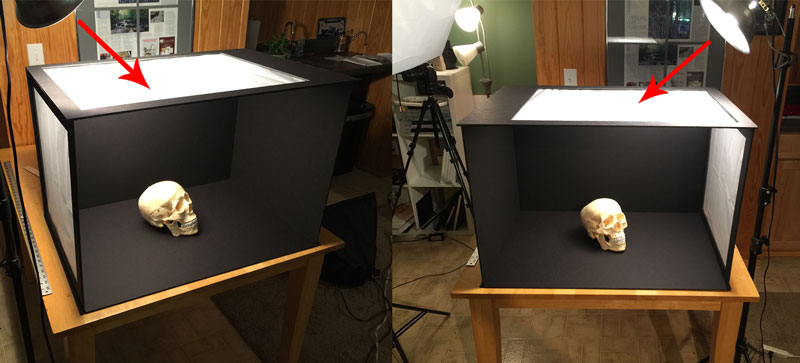
And when we’re finished with our shoot, we can simply break down the photo box and store it away until next time.
If so, join over 36,000 others that receive our newsletter with new drawing and painting lessons. Plus, check out three of our course videos and ebooks for free.

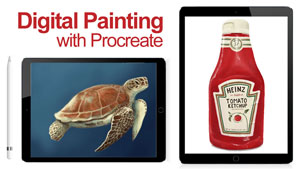
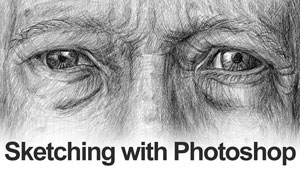
Drawing With Adobe Sketch
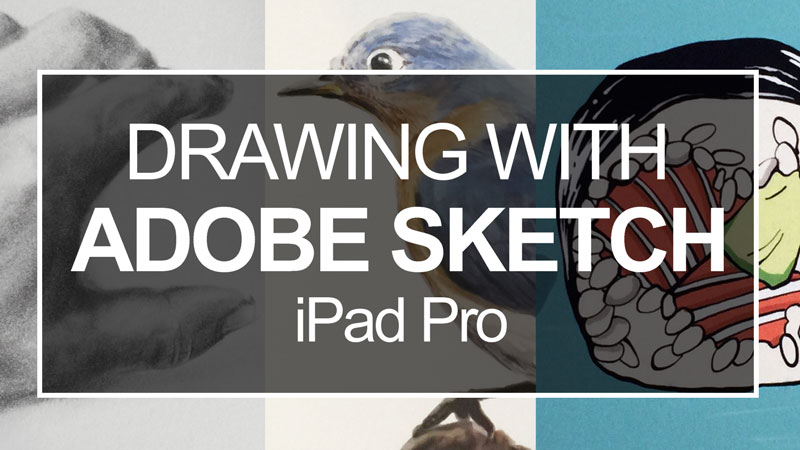
The Live Event
Last week, myself and three other artists were invited out to Adobe in San Francisco. Our challenge was to create a complete drawing every day within about 1 hour and 45 minutes on the iPad Pro using Adobe’s mobile apps for drawing. The entire process was streamed live on Adobe’s Twitch channel (twitch.tv/adobe). (The recorded videos from each day are found a little further down this page, so if you missed it, you can watch them now.)
The Artists
I was joined by three amazing artists. On day one and two, I was with Stan Prokopenko and Rob Generette III. On day three, I was with Alice Lee. We all have unique approaches to how we work, so it was great to see each of our processes in real time.
Rob works with the app Adobe Draw quite frequently, but for Stan and I, it was our first time drawing in this manner. We used Adobe Sketch to create our drawings and paintings.
The Drawing Apps
The apps that we used are exciting, allowing the artist to create digital drawings and paintings that actual resemble the real thing!
Working with these apps on the iPad Pro can definitely be compared to using a brand new medium. Although you can replicate a “graphite” drawing or a “watercolor” painting, the approach is definitely different. The “feel” of the iPad’s surface is smooth and you don’t get the feedback that you get when work on traditional surfaces, like paper.
The brushes and pencils that are available in the app are pressure sensitive. If you add more pressure with the Apple Pencil, the mark becomes wider. Less pressure results in a thinner line. Tilt the pencil on its side and you can create broad “shading strokes” with the graphite option.
Multiple layers, like we see with Photoshop, are part of the apps. This allows you to create a “sketch” layer and draw over the top on a new layer. You can change the opacity of each layer, or delete them completely when you no longer need it.
Both apps are currently free, but do require the iPad Pro and the Apple Pencil to use them as we did.
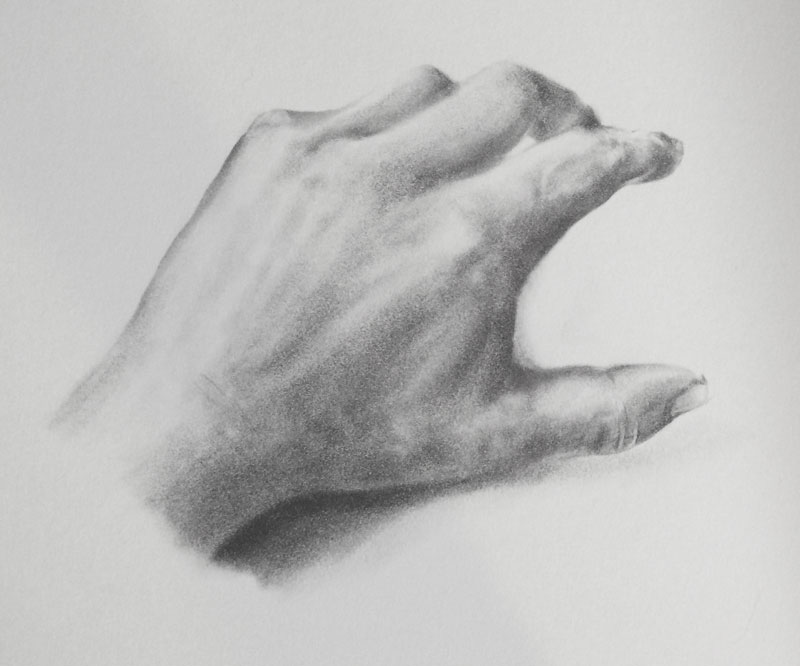
Day One – Drawing With “Graphite”
The first day I decided to test out how the app replicated graphite. After playing around with a few of the brush settings, I was able to create marks that resembled graphite.
I could adjust the value and color as well, so an endless range of “graphite pencils” were at my disposal. In the end, I stuck with a consistent tone and used layer transparencies and the eraser to adjust the values.
Tilting the side of the pencil produced an even application that closely resembled controlled shading.
Here’s a photograph of the print of the graphite drawing produced on day one…
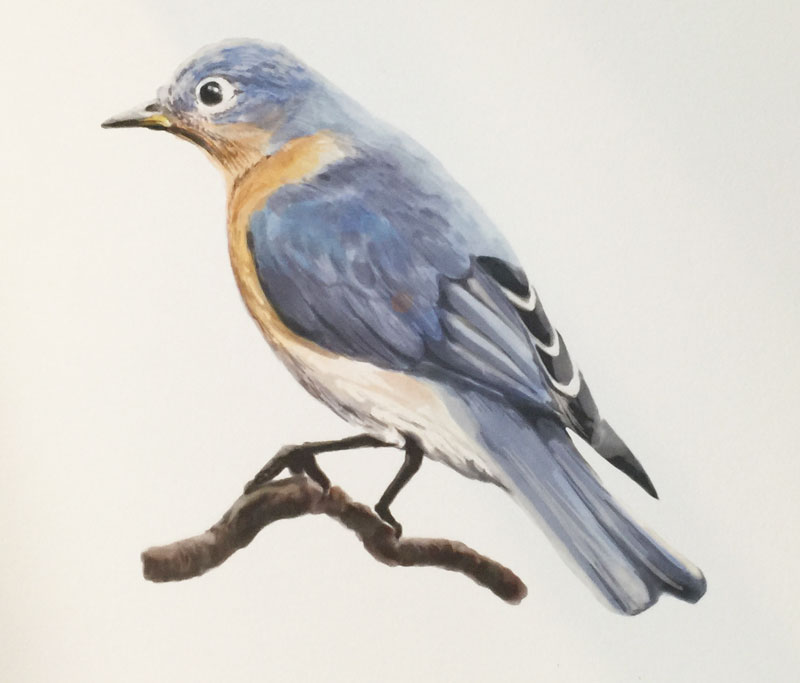
Day Two – Painting With “Watercolor”
On day two, I decided to go in a completely different direction, exploring the possibilities of the watercolor brush. There are several paint brushes included in the app, including a thick acrylic option, inks, markers, and the watercolor brush. Of these options, the watercolor brush intrigued me the most.
As color is applied, it bleeds and flows as the “paper” literally “drinks” the paint. As the color “bleeds”, surrounding colors become activated and slightly mix with the “wet” paint. A fan button can be tapped to stop the flow, holding the color in its place.
The texture of watercolor paper can be seen through the colors as well, adding to the illusion of actual watercolor.
Here’s a photograph of the print of the watercolor painting produced on day two…
Day Three – Drawing With Ink
On day three, I wanted to create a crisp image with ink and solid fields of color. Although this approach was a bit more straight-forward than what I produced on the first two days, I found that I was pressed for time. I wanted to add a few more applications of color to develop the image a bit further.
The ink brush, like the other brushes, is also pressure sensitive allowing for a broad range of line quality. More pressure produces a wider mark, while less pressure results in a thinner one.
Like with the first two images, I started with a loose sketch using graphite on its own layer. “Inks” were applied over the top on their own layers. One layer was reserved for black ink, while another was used for the colored inks.
Here’s a photograph of the print of the ink drawing produced on day three…
I’m looking forward to spending some time with the apps and creating additional drawings and paintings in the future. It’s an exciting time to create with so many different mediums, both traditional and digital!
If so, join over 36,000 others that receive our newsletter with new drawing and painting lessons. Plus, check out three of our course videos and ebooks for free.

How To Make Time For Your Art
Many of us spend a good amount of time at work, often longing for the hours that we get away from it. We spend time with friends and family and many times, our time is spent caring for those folks. We have chores, responsibilities, and many of us use our time to volunteer. The list goes on and on. There are plenty of activities that soak up our precious time.
With this considered, it’s no wonder why so many folks often dismiss their art for the sake of all of those other “responsibilities”. At the end of day, they simply just don’t “have enough time” for their art.
Or do they?
We each get the same 24 hours in a day. It’s how we choose to spend those hours that truly provides insight on who we are as people and our priorities in life.
The truth is, we only get one life. Each minute that passes and each day that goes by is gone. We cannot get it back.
For those of us that have the “creative itch”, not making time for your art can lead to regret if we don’t answer the calling. Those minutes add up to days, months, and years. We look back and wish that we would have just spent a little more time on our passions – our callings.
“Not making time for our art can lead to regret if we don’t answer the calling.”
It’s easy to say in the moment that we don’t “have enough time”. But this is just another way of saying “it’s just not a priority”. If becoming an artist is a priority and answering that “creative calling” is important to you, then you need to make time for it. If not, you could look back years later and wish that you had done so.
You are worth it. It’s okay to take a break from your other time commitments, if only for a few minutes a day, and concentrate on what makes you happy. And if developing a skill for drawing and painting is what makes you happy, like it does for me, then carve out those minutes each day. Not only will you reach your goals and avoid regret, but you’re also more likely to be happier with your life as well.
I know that talking about it is much easier than actually making it happen, so let’s look at a few strategies to help you find the time to devote to your art.
Start With Small Time Increments
We tend to look at developing a skill like drawing or painting as an overwhelming task. Our brains calculate how much work must go into developing the skill and as a result, we become overwhelmed.
The truth is that little bits of time really add up in the long run. We don’t have to feel that we need to finish a work in one sitting or work for large chunks of time every time we sit down to draw or paint.
If we just devote 15 minutes a day to our art, then we will see improvement. A 15 minute a day session is possible by just about anyone. Let’s look at how just 15 minutes a day can add up over time…
- After one week – 1 hour and 45 minutes spent on your art
- After one month – 7 hours spent on your art
- After six months – 42 hours spent on your art
- After one year – 84 hours spent on your art
I can guarantee you that after 84 hours of concentrated work on your art, you will be astounded at your improvement and what you produce. Just imagine what you could accomplish if you spend 30 minutes a day.
Make Drawing and Painting A Habit
I once heard a fitness instructor tell his students to start a habit of exercise by doing just one push-up each day. One push-up? How that can be helpful?
In this case, it’s not about the physical benefit of the push-up. It’s about the habit that is formed by doing a single push-up. The activity only takes a few seconds to undertake, so the “time excuse” is irrelevant. Most folks are willing to spend the time to do just one single push-up.
If the mindset is that just one is “required” and they are already on the ground and in position, why not do a couple more? So instead of doing just one push-up, they end up doing a few more. It’s getting to the “starting point” that’s the hard part, but once you’re there, it’s easy to keep going.
Before long, a habit is formed and daily exercise becomes part of a routine.
The same can be true about our art. It’s often getting to the “starting point” that is difficult. If we can commit to just 15 minutes a day, then we may find that we actually can work a little longer. It’s a simple shift in mindset, but it works.
Eliminate Set Up Time
Another related strategy for making time for our art is eliminating the “start up” time. Getting your materials in place and setting up our work space takes a bit of time, so why not try to cut back that start up time by eliminating as much of it as possible?
Devote a space for your art. Set yourself up with a mini-studio and use this space exclusively for your art. If possible, create this space in an area that is easy to access and in a location that is not “out of the way” in your home. If you walk past this space on a daily basis, it will help remind you of what’s important to you and you’re more likely to “find the time” to use it.
Have your materials set up and accessible so that all you need to do is sit down and work. Don’t waste time looking for that brush, just sit down and get started.
Stay Focused
Our lives are busy and distractions are always popping up. Some distractions are unavoidable, but most are unnecessary. When distractions pop up, they detour our thoughts and make us lose focus.
Most of our distractions are self-imposed. Do we really need to spend 30 minutes on Facebook or watch that entire last season of “Game of Thrones”?
Staying focused can be challenging, but one thing that has helped me stay focused is to use a timer. If I know that I’m going to dedicate a set amount of time on a task, I somehow become hyper-focused on that task during that time period. I know that it has a finite end, and when the time is up, I can go do those other things.
Most smart phones are equipped with some sort of timer. Kitchen timers work well too. Since I have a computer in my studio, right next to my drafting table, I use a web-based timer at e.ggtimer.com.

I set any amount of time I wish and as it expires, I can see how much time I have left. Whenever I start to become distracted, that timer is staring right back at me, forcing me to return to a state of focus.
Set Goals For Yourself
Setting goals for yourself is important and they should be written down somewhere, like in an art journal. When we set a goal, something happens in our mind that begins the process of achieving that goal.
But if no goal is set or recorded, we often aimlessly wander.
Once a goal is set, it also should be tracked. If your goal is to spend just 15 minutes a day on your art, then track your progress. Check off every day that you meet your goal. If you miss a day, which will happen, it’s no big deal. Try not to miss two days in a row though, as this can lead to a “habit” of inactivity.
Have an Accountability Partner
We often can make excuses for letting ourselves down. However, we will mostly avoid letting others down at all costs.
If you can set yourself up with an accountability partner, you are more likely to reach your goal of making time for your art. It doesn’t have to be someone that shares your goal. It can be anyone that will simply hold you accountable for staying focused. And that “accountability” may be as simple as a daily email or text message. It’s amazing what we accomplish when we know that others will hold us accountable for it.
Summing It Up
The truth is that we make time for things that are important to us. If you are finding it impossible to make time for your art, then maybe it’s just not that important to you.
But if it is, then we it owe it to ourselves to find and make the time for it, even it’s just for a few minutes a day.
If so, join over 36,000 others that receive our newsletter with new drawing and painting lessons. Plus, check out three of our course videos and ebooks for free.
The Results Are In. The Next Course is…

Most of you know that my goal as a teacher is to serve you as students. Part of this is teaching you what you want to learn. Each course that has been developed over the years has been the result of you telling me what you want to learn.
At the conclusion of each course that is developed, I reach out to you and ask what you want to learn next. You guys answer a simple survey with multiple options. When the results are in, I get started developing the next course, releasing course modules that include a video and ebook every week or two until the course is complete. Each course that is created is archived and becomes a part of the ever-growing library of courses for members. There are currently 8 courses available covering the following topics…
- The Secrets to Drawing
- Pastel Landscape Mastery
- The Colored Pencil Course
- Oil Painting Master Series
- The Acrylic Painting Academy
- The Watercolor Workshop
- The Pen and Ink Experience
- Portrait Drawing The Smart Way
Voting for the next course ended on May 28, 2016 and we have a clear winner. Before I share the results, I want to thank all of you that voted. 1300 votes were cast and it was quite fun watching the results flood in.
Participants in the survey were given several options with the opportunity to write-in a vote. Here are the options that were presented…
- Option #1 – Mixed Media
- Option #2 – Digital Drawing and Painting
- Option #3 – Charcoal Drawing
- Option #4 – How to Draw Hands and Feet
- Option #5 – The Ultimate Guide to Perspective
- Option #6 – Painting with Gouache
- Option #7 – Abstraction
And here’s a graphical breakdown of the results…

As you can see, the clear winner is Option #1 – Mixed Media.
So here’s a preliminary look at what will covered in the next course…
“Creative Mixed Media”
This course will examine several approaches to creating mixed media works of art through multiple project-based examples and demonstrations.
Concepts and projects that will be covered include (but are not limited to):
- Polymer clay portraits
- Altered books and book sculpture
- Paper collage
- Fabric collage
- Gel medium transfers and Decoupage
- Newspaper paintings
- Assemblage
- Artist trading cards
I’m excited to get started and I hope you are too. I expect to release the first modules for “Creative Mixed Media” to members by the end of June, 2016. Of course, as each module is released, I’ll be sure to let you know through the newsletter. If you don’t currently receive the newsletter, you can sign up it for here. (It’s free.)
Thanks again for voting! I’m excited about the new addition to the course library and I can’t wait to get started. As always, I’d love to hear what you think and what you’d like to see in the new course. Just leave your comment below…
If so, join over 30,000 others that receive our newsletter with new drawing and painting lessons. Plus, check out three of our course videos and ebooks for free.
The #1 Drawing Mistake Made by Beginners Plus 7 More
I start this post discussing imperfections because we are as imperfect as artists just as we are as human beings. All of us are – no matter our skill level. We will never be perfect, no matter how “advanced” we become as artists.
We do improve over time and our mistakes become less pronounced, less evident – to the masses anyway.
Beginners make lots of mistakes. This is true in any field, with any skill. It’s part of it. And often as beginners, we aren’t even aware that we are making mistakes.
Looking back, I never really had anyone point out the mistakes that I was making. I had to discover them on my own, even though I had a fleet of teachers that had their chances to help. If only someone would have just pointed them out to me, I could have accelerated my learning.
So let’s take a look at the most common drawing mistakes made by beginners. I’ve noticed these common mistakes with my drawing students and I have committed them all myself as well. Hopefully, after reading this list, you’ll avoid making these mistakes. They are all avoidable after all, and not based on skill. Most are simply decisions that we can make.
1 – Choosing the Wrong Paper or Surface
It’s easy to get excited about the drawing process. Sometimes we can’t wait to start making marks and we completely forget about the surface. The surface of the paper is crucially important to the success of the work. Much like the foundation of a building, the surface is what supports the material. Choosing the wrong paper for the medium, or the effect that you want to achieve, dooms your chances of success right from the start, even before any marks are made.
Educate yourself about different types of papers. Experiment with different surfaces, textures, and colors until you find what works best for the medium that you suits you. Don’t assume that the paper doesn’t matter. It does.
2 – Setting Unrealistic Expectations
Far too many drawing students become frustrated too easily and often quit. I’ve seen it many, many times. After just a few minutes of drawing, the student balls up the paper and tosses it. A comment usually follows that has the words “I can’t”.
Why is it that we don’t see this as often with artists with more experience? Experienced artists also become frustrated, but often they work through it.
Frustration is often the result of not meeting our expectations. Beginners have this nasty habit of setting unrealistic expectations for themselves and as a result, frustration isn’t far behind. Frustration is crippling and should be avoided at all costs.
And how do you avoid frustration as a beginner? The answer is to realize that you are a beginner and drawing is a complex skill that cannot be mastered “overnight”. We all have to start somewhere and our personal expectations should be in alignment with our current skill level. We should expect to consistently improve, not become experts after just a few drawings or lessons.
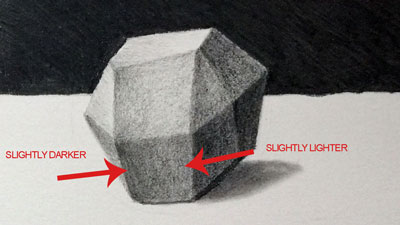
3 – Failing to Develop a Full Range of Value
Value, in terms of art, is the darkness or lightness of a color. It is one of the seven elements of art and in my opinion, the most important. It is value that informs the the viewer about the light within the scene, the volume of the subject, and the textures in the image.
If our goal is to communicate the subject representationally, then we simply cannot do it without properly using value in the drawing.
Value is measured using a value scale which positions darker values opposite from lighter values. A value scale features a gradation of tones from dark to light, with black on one end and white on the other. Darker tones are referred to as “shades”, while lighter values are called “tints”.
We understand the world around us through value relationships and most of the time, what we see has a full range of value. In other words, our eyes see a full spectrum of darks and lights no matter what we are looking at. It therefore makes logical sense that what we draw should also feature a full range of value. Our drawing should incorporate the darkest darks, the middle grays, and the lightest values as well.
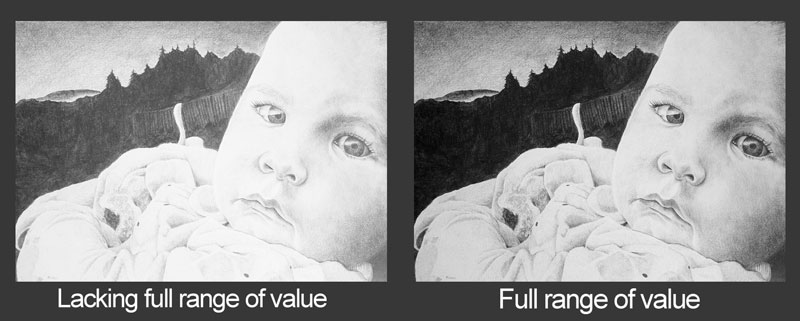
For many beginners this concept is difficult to incorporate. They may understand the concept, but may be too timid to apply it to their drawings. This mistake is often amplified because we typically work on white paper with a dark medium, forcing us to start from one end of the value scale to create a full range in the drawing.
One way to overcome this error is to practice drawing on a neutral toned surface, like gray drawing paper. Use both light and dark mediums to draw. Since you are essentially starting from the center of the value scale, it’s much easier to create a full range of value in the drawing.
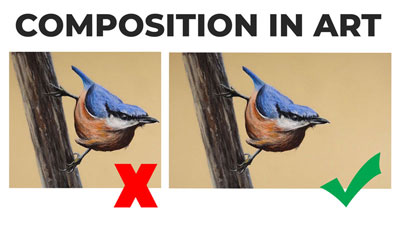
4 – Failing to Consider Composition
Composition is the arrangement of elements within the picture plane of the drawing. It is crucial to the success of the finished work. While we may be able to skillfully render a subject, if the composition is weak, then the drawing will not be successful.
Strong compositions are the result of planning. Even if we know nothing of compositional theories, we can still find success with our compositions by creating thumbnails (small preliminary drawings) before making marks on the final surface. By testing multiple layouts of the subjects, we are likely to find a composition that is aesthetically successful.
Unfortunately beginning artists often skip this step and as a result, only find successful compositions when they get lucky.
5 – Drawing with Outlines
Our very first drawings, beyond scribbles, use outlines to communicate the subject. As we develop, we continue to use outlines to establish the edges of objects in our drawings. At some point however, we realize that using outlines to describe edges isn’t the best way to communicate in a drawing. It isn’t the way that we actually see the world. Instead, what we actually see is a contrast in values, made up of a collection of shapes.
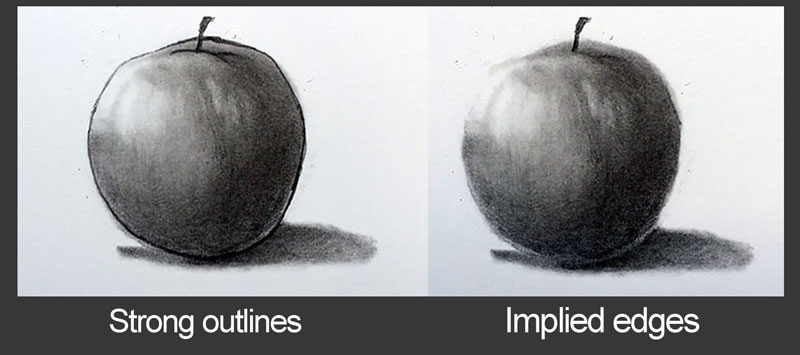
It can be difficult to move past “outlining”, but it is a crucial step in becoming better at drawing. To overcome the tendency to draw outlines, you may try drawing several subjects without using lines at all. In other words, complete the drawings using just the values that you see.
After a little practice, you can start to bring contour lines (outlines) back into the mix, when they are appropriate.
6 – Drawing Too Stiff
Sometimes the fear of making mistakes actually leads to making mistakes. This is what happens when we draw with too much control. I know this one well, since this is something I still struggle with.
When we apply marks with a “stiff hand”, the result is a drawing that appears stiff, unnatural, and “mechanical”. By loosing up and drawing loosely, especially in the beginning stages of a drawing, we actually have a better chance of communicating the subject with greater accuracy. I know it sounds counter-intuitive, but it’s true.
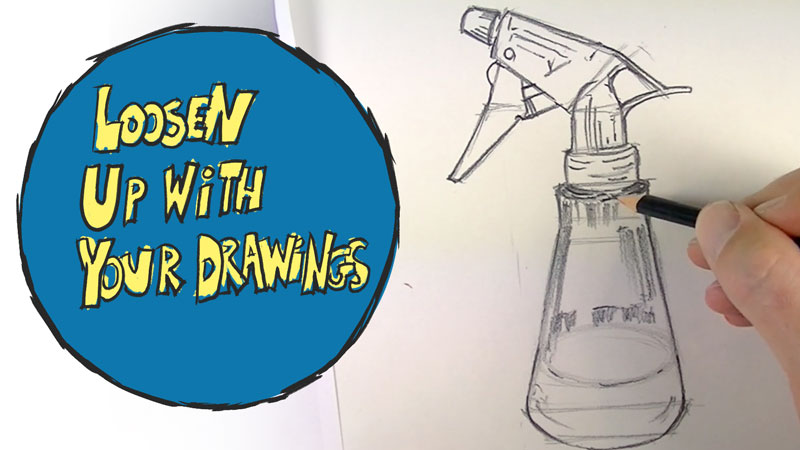
Try drawing several light lines when drawing the basic shape of the subject. You can always “tighten things up” later. You’re likely to find that your drawing speed and efficiency also improves. If you’re finding it difficult to “force” yourself into this practice, set up a timer and time your drawings. Try to create an entire drawing in just 10 minutes, then 5 minutes, and then in just 1 minute. You won’t have a masterpiece, but you will definitely loosen up.
7 – Thinking That You Are Already an Expert
Some beginning drawing students think they are already an expert. And because they think they have already figured everything out, they are not receptive to learning new skills. This is a very common mistake, especially among students that are slightly more skilled than their peers.
On top of this, they also think that they have already figured out who they are as artists. I can tell you and any other experienced artist will as well, we are constantly learning “who we are as artists”. It’s not something that you figure out as soon as you create a few drawings.
While confidence is great, over-confidence isn’t. It can greatly hinder your development. Instead, be receptive to many different styles of drawing and soak in as much instruction and experiences as you can. Keep in mind, that with art, there are always multiple solutions.
I have created countless drawings and paintings over the years, but I still learn something new every single week.
8 – Failing to Spend Enough Time on Your Drawings
Many beginning artists simply do not devote enough time to their drawings. Although listed last on this list, this is the #1 mistake I see committed by beginning artists and the easiest to remedy.
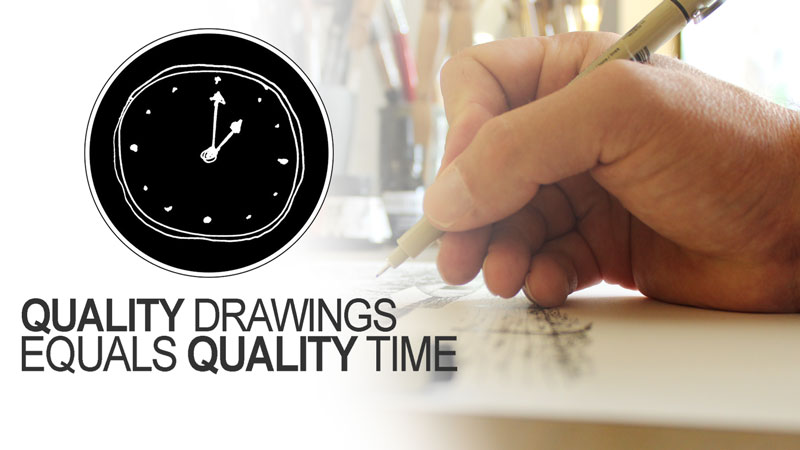
We live in a world where we have been groomed to expect instant gratification. It’s truly amazing that we can pull out our smart phones and access a world of information in just a nano-second. The world today is drastically different than it was just 20 years ago.
But instant, quality results are not a reality when it comes to drawing. We must put in the hours (not minutes) to create quality drawings. If we simply learn to slow down, and give the work the time and attention that it deserves (and requires) we are likely to find that our drawings drastically improve.
If so, join over 36,000 others that receive our newsletter with new drawing and painting lessons. Plus, check out three of our course videos and ebooks for free.
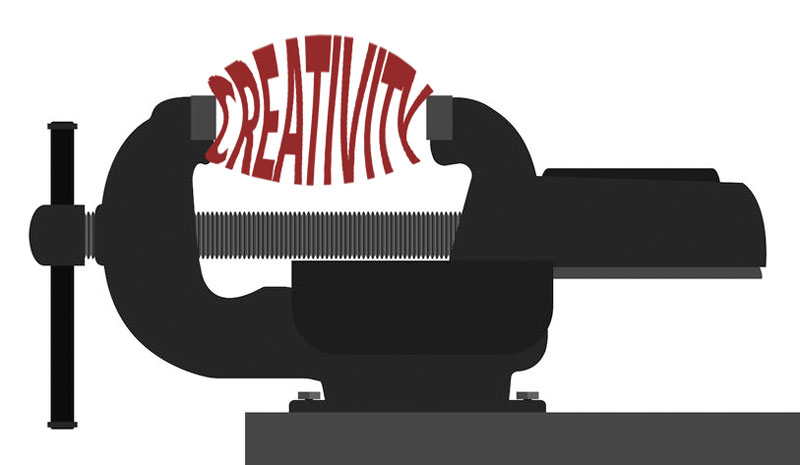
7 Ways to Get Your Creative Juices Flowing

It can be frustrating for sure. Creativity is odd creature. It seems that the more room we give to it, the more it grows. But when we try to force it to happen, the more it hides from us.
Creativity simply can’t be forced, we have to let it happen. In this post, I’ll share 7 different ways to provide some room for those creative juices to flow. When I’m stuck, these activities seem to “kick start” things for me, so hopefully they’ll work for you too.
1. Go For a Walk Outside
There’s nothing quite like going for a quiet walk on a beautiful day. Listening to the birds sing and taking in the natural beauty of the world around us clears our minds. Ditch the earbuds and let the sounds around you in.
Walking also gets the blood flowing and better blood flow means more oxygen to your brain. We think clearer when we are getting better circulation. Sometimes a simple walk can lead to lots of new ideas and renewed motivation.
2. Get Inspired By Art
We often get caught up with our own art and forget about all of the other fantastic artists and works out there for us to study. And when I say “study”, I don’t mean doing an internet search for images. Get out and go to a local gallery or museum and look at the works in person. Study the brushstrokes, the composition, and the colors used by the artist. Get “up close and personal” with the art.
When I leave the museum, I feel completely rejuvenated, inspired, and motivated. I can’t wait to get back to the studio to work.
My favorite painting to “visit” is “The Andes of Ecuador” by Fredric Church at Reynolda House Museum of American Art. It is an incredible work to see in person, measuring over 59″ by 87″. There is so much detail that it is like seeing an entire collection of works in one painting. Below is the sketch for the finished painting. You can check out the finished work, including detail images, here. (Keep in mind that an image on the internet is no comparison to seeing the work in person.)

3. Listen to Music
Music has always been a great outlet for me. Whether it’s playing it or listening it, music can take you to “other” places, especially when we close out other sounds and focus solely on the music. When was the last time you sat down with a great album and put on some headphones?
Music was an early source of inspiration for me. Music provided that extra spark for me when I was in high school and college. These days, I mostly listen to music when I am actually creating in the studio. But, if I’m in a rut, music can often pull me out of it.
We all have varied musical tastes, but if you’re hoping to find that creative spark through music, I’d suggest staying away from pop tunes. Stick to jazz, blues, soul, experimental, or progressive rock. Music that is a bit more open to interpretation, instead of having lots of lyrics getting in the way, seems to work wonders for me.
4. Free Doodle
Sometimes just making marks helps to set those creative juices in motion. Doodling is an underrated activity that can even lead to finished works. There’s nothing wrong with grabbing your favorite mark-making tool and draw random marks, shapes, and forms. Doodling can release some of the pressure that we place on ourselves to create finished “masterpieces” every time that we create.
When you doodle, allow your mind to “turn off” and just let the marks happen. Remember, we need to allow some space for creativity to grow. Don’t force it, just let go and have some fun. You’ll likely find that ideas start to swirl faster than your hand can even record them.
5. Experiment with a New Medium
Sometimes we find ourselves in an artistic “rut” when it’s simply time to broaden our horizons. Often we can be so “tuned in” to the medium that we are most comfortable using that we lose the joy and creative spark that we had when we first experienced it. If this applies to you, it may be time to try a new medium.
You don’t need to abandon your “first love”, not by any means. You may just need to take a break and explore.
Using a brand new medium is like setting out on a new adventure, one where we’re free to explore. Because you are “inexperienced”, you’re likely to be more open to experimentation and “making mistakes”. Often this mindset turns out to be a breeding ground for creativity. You may find your creativity is set afire when you allow yourself to try something new and you may fall in love with another medium all together.
6. Clear Your Mind Through Meditation
Day to day occurrences and worries create clutter in our heads. We often find ourselves overcome with all kinds of things we have to care of – paying bills, taking care of loved ones, grocery lists, and much more. With all of these thoughts in our head, how can we expect to have room left for creativity?

Meditation can be a wonderful way to “quiet all of the noise”. It’s just as important to take care of our mind as it is to care for the rest of our body. Taking a few moments each day to sit quietly and release the worrisome thoughts of day can create more room for the creative thoughts to enter.
7. Avoid Placing Pressure On Yourself
Pressure is a creativity killer. It’s even worse when you place pressure on yourself. The process of creating is at its best when it’s fun. Pressure is simply no fun at all. It will absolutely suck the creative juices from you.
It’s definitely easier said than done, but try to avoid placing pressure on yourself. You shouldn’t feel that every work that you create be a “masterpiece”. Relax, have fun, and allow the creative process to happen. From my experience, the quality of work is much higher when you are relaxed and enjoying the experience.
Freedom to “Flow”
If we expect for our creative juices to flow freely, then we have to unclog the “pipes” and create some room for our creativity to grow. These seven activities may not work for everyone, but they are sure to free up some much needed room in your mind for your true artistic self to start peeking through again.
If so, join over 36,000 others that receive our newsletter with new drawing and painting lessons. Plus, check out three of our course videos and ebooks for free.


Time To Vote On The Next Course

“Portrait Drawing The Smart Way” is now complete making it the latest addition to the collection of comprehensive courses offered here at TheVirtualInstructor.com, all of them included with membership. The addition of this course now brings the total of courses offered up to 8 with an additional mini-course. There are now over 33 hours of course video and over 1000 pages of ebooks. Each course that is created is logically sequenced and features multiple demonstrations in a variety of media, covering a variety of subjects. Each module within each course includes a High Definition video and accompanying ebook.
At the conclusion of the development of each course, I reach out to you and encourage your feedback (through voting) on the next course that you would like to see developed. This site is designed to serve you after all. When voting concludes, I begin developing the next course, releasing modules as they are developed (every week or two) to members until the course is complete.
As new courses are developed, they are added to the library of courses, recorded Live Lessons, lesson plans, and Member’s Minute episodes that are already available to members. So, the library of educational content continues to grow over time.
It is now time to vote!
Based on your suggestions and previous voting options, I have provided a list of possibilities for the next course. Below you’ll find a listing and brief description of each of the possibilities. After reading through, be sure to click on the “vote now” button to cast your vote. Voting begins May 2, 2016 and will end on May 28, 2016. The winning course will be announced on May 30. (You may vote for more than one.)
Course Options
Option #1 – “Mixed Media” – Not all media can be mixed, but there are quite a few combinations that work exceptionally well with each other. By mixing media, we can exploit the strongest characteristics of the medium and make up for the “weaknesses” with additional media. This course will focus on a variety of mixed media combinations that are exceptionally successful.
Option #2 – “Digital Drawing and Painting” – Use Adobe Photoshop and Corel Painter to create digital drawings and paintings by following the principles of traditional practices. Learn the fundamentals of light and shadow, creating textures, and the illusion of form by applying a variety of brushes and effects.
Option #3 – “Charcoal Drawing” – Learn various charcoal techniques through the exploration of a variety of subjects. Apply charcoal loosely to create expressive sketches or command control of the medium to create highly rendered and detailed drawings.
Option #4 – “How To Draw Hands and Feet” – Some consider drawing hands and feet to be the most difficult of all subjects. However, even the most difficult subjects can be simplified and mastered by anyone. This course will focus on the basic principles of drawing hands and feet including multiple layout strategies, proportion, anatomy, and rendering realistic textures.
Option #5 – “The Ultimate Guide to Perspective” – Take a journey into the world of linear perspective. Learn how to apply one-point, two-point, and three-point perspective to create the illusion of space in your drawings. Apply perspective techniques to multiple subjects including buildings, interiors, non-objective drawings, and the human figure.
Option #6 – “Painting with Gouache” – Gouache (opaque watercolor) is an exciting medium that provides the artist with the best of both worlds. Apply transparent washes to create effects similar to watercolor or layer colors with opaque applications. Explore multiple techniques with this versatile medium through a variety of subjects.
Option #7 – “Abstraction” – Learn how to abstract subjects to create your own unique works of art. We’ll explore a bit of history and take a look at several abstraction techniques. Learn how to develop your own process of abstraction that can be applied to any subject.
Don’t see a course possibility that appeals to you? You can “write in” a suggestion as well through the voting process.
Ready to vote?
I’m excited to develop the next course for you! Thanks for voting! Results will be released on May 30, 2016 and new course modules will be released starting in June 2016.
If so, join over 30,0000 others that receive our newsletter with new drawing and painting lessons. Plus, check out three of our course videos and ebooks for free.
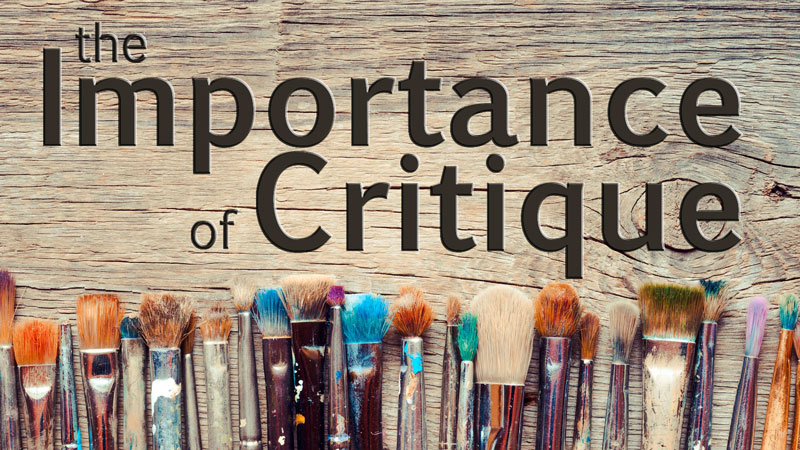
The Importance of Critique in Art
Actors need directors. When an actor acts, they clearly cannot see themselves. In their own mind, their actions and delivery may be flawless. However, the director can point out where their performance can be improved because the director sees the performance from the point of view of the audience. They can communicate to the actor how their actions and delivery are actually perceived by the most important factor in the theatre – the audience member.
As artists, we also need a second (or third) “set of eyes” on our work. We need to know how our work can be improved. We need to understand how our work is perceived by our audience – the viewer. Sometimes we can spot issues on our own, but most times we need input from others. This is where critique becomes an important part of our development as artists.
Critiques Should Not Be Scary
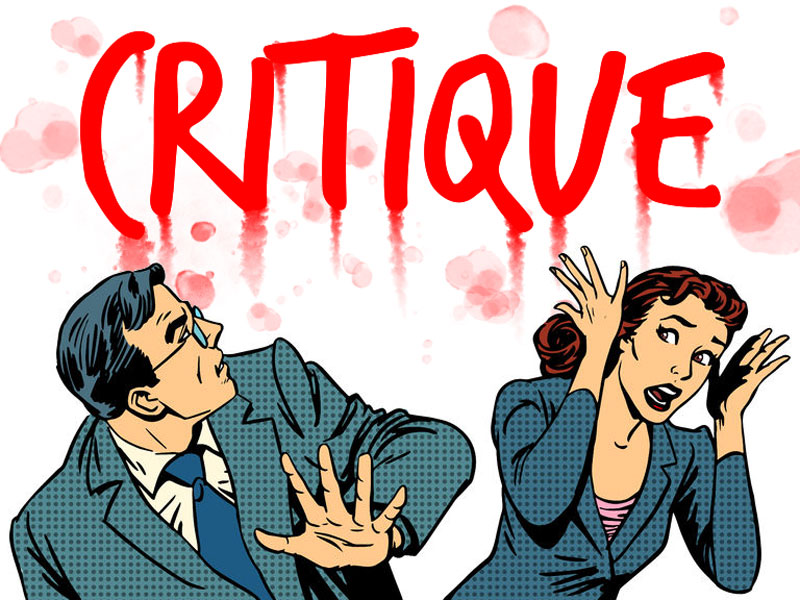
I still remember my very first critique in art school. It was scary. It shouldn’t have been, but it was. There I was, surrounded by my class and all of the focus was on my work. I still remember the room, where I was sitting, and even the smells.
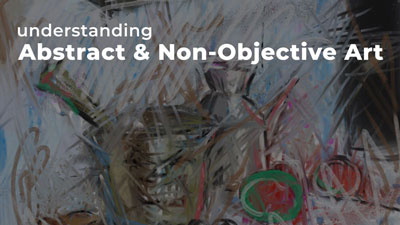
It was a unique assignment. We were to create two non-objective paintings with acrylics. The first using just primary colors and values of those colors. The second painting was to be a copy of the first, but with just the neutral values of the colors. The goal was to match the values of the color painting exactly in the second attempt, just in neutral grays. So we ended up with two paintings, one in color and one in black and white.
My professor had a camera set up and a video screen to analyze the results. (This was 20 years ago and seemed like cutting edge technology, especially for a critique). The camera was positioned to shoot the easel and the video screen presented the shot in black and white.
Our color paintings were placed on the easel while the black and white versions were held up by the video screen. We were able to see our color painting in black and white and compare the results to our black and white painting right beside it. The point was to help us see how well we matched the values of the color painting in our black and white version.
For each one of us, he held our paintings up and compared them to the color versions presented in black and white.
It was finally my turn. My palms were soaked and my mouth was incredibly dry. I had never been this nervous before in my life.
As soon as my color painting was placed on the easel, I could see through the video screen just how poorly I had done. My values were way off. Even in areas that I thought I had filled in with solid applications, I saw discrepancies in the values. I was devastated. I even felt humiliated.
My professor pointed out the issues although they were already plainly visible on the screen. At the time, I felt like a failure. But looking back, I now know that this experience was one of the most important moments in my development as an artist.
You Are Not Your Work
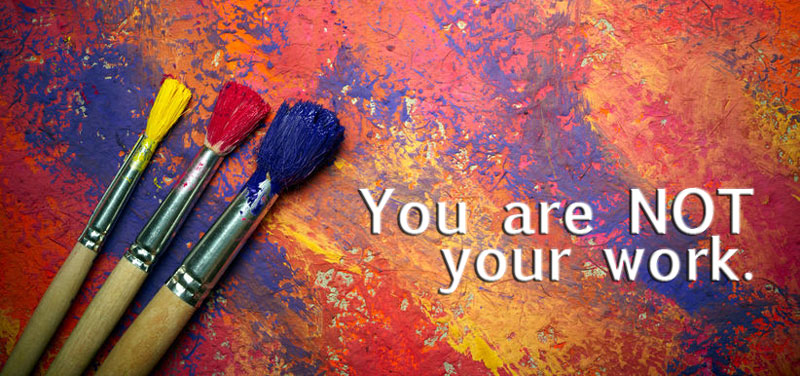
I felt like a failure, but it wasn’t me that needed work. It was the painting that needed more attention. Sure, I created the painting, but the painting wasn’t me. It was something that I produced as an artist, but it didn’t define who I was as an artist.
As artists, we create drawings and paintings and it’s often hard to separate ourselves from them. We pour so much of ourselves into them, that when they are critiqued, we feel that we are somehow being evaluated.
We must learn that our work is ultimately a product that we produce. As we better ourselves as artists, we produce better “products”. Critique can be painful at first, but if you understand that it is designed to result in a better product, then it becomes one of the most important activities in your artistic growth.
That critique, that I remember so vividly, taught me the importance of value. It was a lesson that I needed to learn and one that I may never have learned without the critique.
Getting Your Art Critiqued
I went on to experience many group critiques throughout my college years and even more after this period. As I became comfortable with the process of critique, I embraced it. I looked forward to the critique. Some of it was because I wanted to share what I created, but I also knew that I would learn something new. With every critique, I grew as an artist and what I produced became stronger.
Many of us don’t have the benefit of group critiques. We must rely on those that are close to us for feedback. Most of these folks don’t have a background in art and don’t want to chance hurting our feelings. As a result, we get “sugar-coated” responses that don’t really fit the definition of critique.
If you do have someone in your life who does have a bit of a background in art, then don’t hesitate to reach out to them and ask them for a critique every once in a while. Perhaps form a partnership with them and spend time sharing your work with each other.
If you don’t have one of these valuable people in your life, then look for other options. You can submit your work for critique in two ways on this very site…
- Submit your work on the forum – The forum has a very active group of passionate artists just like you that are more than willing to offer suggestions and feedback on your work.
- Submit your work to “The Member’s Minute” – The Member’s Minute is a weekly video that is produced for members that features a weekly critique and answers to your questions. Each week, I offer a detailed critique of a member-submitted art work. The critiques are recorded and shared with other members. So not only do you have a chance to have your work critiqued, but you can also learn from the critiques of others. (Access to The Member’s Minute requires membership.)
Critiquing Others
Not only is it important for us to experience critiques of our own work, but it’s also important to critique others. When we critique the work of others, we not only offer helpful suggestions but we also learn to find things that can be applied to our own work. We see how other artists solve problems and if their solutions are better than our own, we can borrow them. As a result, we all grow.
Critique should be specific and constructive. Those that are new to the process may offer generalized observations without supporting reasons or suggestions. Critique should be valuable to the artist, not just a list of problems with the work or vague compliments.
Here is a short list of some the comments inexperienced artists may offer in a critique…
- “I like it.”
- “I like your colors.”
- “It doesn’t look right.”
- “The face is wrong.”
- “I would buy that.”
These comments may be true, but they don’t offer any suggestions for the artist to improve the work. Instead, criticisms should be followed with suggestions or reasons that support the opinion.
Here is a list of hypothetical comments that would be more helpful…
- “I like it because you used the medium to its fullest potential and created a full range of value.”
- “I like your colors because you implemented a complementary color scheme.”
- “It doesn’t look right because the composition is too heavy with visual elements on the right side of the picture plane. You may try adding more elements on the left side to balance it out.”
- “The face is wrong because the eyes are proportionally too large compared to the other features. You may try making them a bit smaller.”
- “I would buy that because the emotive qualities of the work speak to me personally.”
Critique should always be approached with the artist in mind. It is to benefit them, not to belittle them or make them feel inferior.
Critique, in many ways, is crucial for artistic development. Don’t fear it, instead embrace what it can do for you.
If so, join over 36,000 others that receive our newsletter with new drawing and painting lessons. Plus, check out three of our course videos and ebooks for free.