
Related: My Experience with Adobe’s Sketch App
I’ve had my iPad Pro and Apple pencil for quite a while but really never invested much time in drawing digitally using this platform. Adobe makes some very powerful apps for drawing and painting on the iPad Pro and I was impressed with what is possible with them.
It was suggested by a friend of mine to check out some of the other options for the iPad Pro and Procreate was highly recommended. I downloaded the program from the App store for a modest $5.99, played around with it for a few minutes and went back to creating traditional art with traditional media.
There the app sat on my iPad for quite a while without much thought. My Apple pencil sat on a shelf in my studio collecting dust.
Even though I consider myself to be a traditional artist, I’ve always had a strong interest in digital drawing and painting. My program of choice has always been Adobe Photoshop. Of course, you have to be tied to a computer and a tablet to draw effectively with this program. However, the results that are possible can mimic that of traditional media when the right brushes are used.
So the thought of being able to create similar results without being bound to a computer is naturally appealing. I didn’t really think that was possible. That is until I really “sunk my teeth” into Procreate.
The app isn’t perfect and there are plenty of benefits for sticking with a computer and a powerful program like Photoshop, but I am impressed with what you can create – especially at such a low price.
Related: Sketching With Photoshop
Like with any traditional drawing or painting medium, it takes some getting used to and a bit of time to find your way around. But I am excited with what possibilities lie ahead for me as I continue to dive deeper into what is possible.
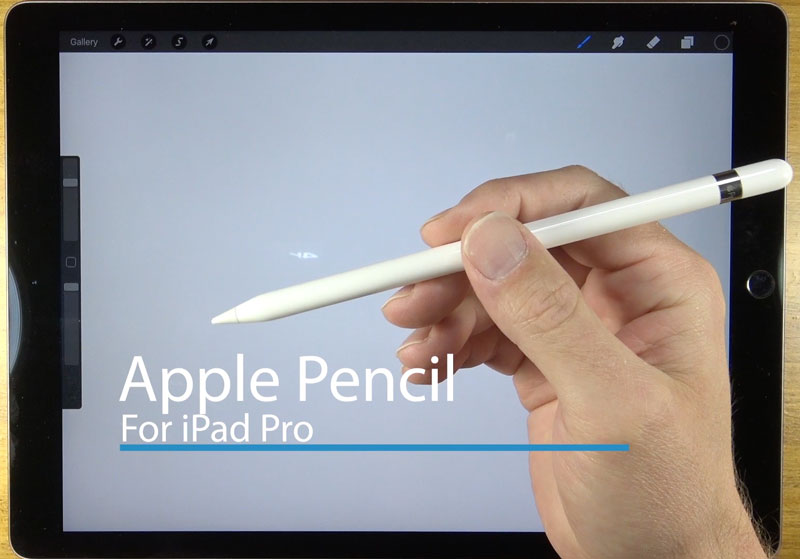
Drawing with The Apple Pencil
The Apple Pencil has the feel of a real pencil. The weight and shape are very similar. Some styluses are light, but the Apple Pencil has a nice weight that balances naturally. While making marks on the smooth surface of an iPad Pro feels much different than a sheet of paper, the responsiveness of the Apple Pencil is not too far behind what I can achieve on my Cintiq. And considering that the Apple Pencil is a fraction of the cost of my Cintiq, this is quite remarkable. (The Apple Pencil is just $99.)
Of course, if you want to use the Apple Pencil, then you’ll also have to have an iPad Pro. This makes the total price for the required equipment quite a bit more. The iPad Pro / Apple Pencil combo though is far cheaper than purchasing a tablet, a capable computer, and Photoshop.
- Buy The Apple Pencil $99 (*Affiliate Link)
The shape of the pencil is round. And while this makes it feel more like a real pencil, it can roll off of surfaces easily. It seems study enough, but I’m sure that a few falls from a table will do more harm than good.
Charging the pencil is quick and mysteriously fast. Just pop the small end off of the end and plug it into the iPad Pro’s port. The pencil charges for 30 minutes of use in just 15 seconds and fully charges in about 7 minutes.
Using Procreate
Procreate is powerful. It is capable of doing most of what a digital artist (or a converted traditional artist) requires. It has clearly been designed with the traditional artist in mind and most of the options are intuitively located. In other words, you don’t have to be “tech savvy” to find success.
That being said, it does take some getting used to. But all drawing and painting mediums, whether they be traditional or digital, require this as well.
Brushes in Procreate
There are a broad variety of brushes available in app. From graphite to pastel and acrylics to watercolor, Procreate has many of the traditional brushes that you would expect. Each of the brushes is fully customizable as well, so you have full control over the mark that the brush produces.

My only complaint is the way the brushes are organized. For example, under the “Painting” header, we find brushes organized based on the shape or texture of the brush, while under the “Artistic” header, we find the painting mediums that we would expect – watercolor, acrylics, gouache, and oils.
The amount of pressure placed on the pencil affects the opacity and with some of the brushes – the thickness of the mark. When using the “Inking” tools, for example, the line becomes much thicker with added pressure. Because the opacity changes based on the pressure, we can create a glazing effect when layering applications. This creates the impression of mixed colors.

Working with Layers
Just like with Photoshop, we can work with multiple layers in Procreate. It’s simple to create a new layer as the layer palette is always accessible in the upper right corner.

Having layers makes it easy to experiment. If you don’t like what you’ve created on a specific layer, you can simply delete the layer. If you’re apprehensive about the next section of the painting you’re about to tackle or if you’re unsure about your color choice, just work on a new layer. You can also use the layers as you would expect, creating multiple visual elements that you can move around or edit at any point in the process.
Other Editing Features
Also available are a few basic editing features that most digital artists use frequently. You can easily transform elements on a layer, changing the size or distorting the selection. Using this option makes changes to areas easy without having to redraw or repaint when you see an inconsistency later in the process.

Several adjustments can be applied to layers as well. You can change the opacity of the layer, add a motion blur, change the hue and saturation, or apply a Gaussian blur to name a few.

When you’re done working on the art in Procreate, you can easily export the image in a variety of formats. You can export the file as a PDF, JPEG, PNG or even as Photoshop document. When exported as a PSD (Photoshop document), all of the layers that you created in Procreate are exported as well. So when the file is opened in Photoshop, you can edit the document and all of the layers.
The resolution of the art isn’t compromised when exported. So if you want to print out the image on a traditional surface like watercolor paper, you can!
My Impressions
At this point, I’ve only created two paintings with Procreate and I’ve only spent about 7 hours using the app. These paintings were experimental and allowed me to appreciate what is possible. I’m looking forward to exploring more of the brush options in the future.

This post and video is clearly not a proper tutorial, but rather an introduction. But I do feel that some of you out there may want to see some tutorials using this app – perhaps even a mini-course. If you would, let me know in the comments below. Also, if you’ve used the app before, let me know your impressions.
If so, join over 36,000 others that receive our newsletter with new drawing and painting lessons. Plus, check out three of our course videos and ebooks for free.

Lesson Discussion
Comments are closed.
Awesome. I just got my iPad Pro and Apple pencil and would love to see some tutorials using the Procreate App.
This is really great post. your tips are awesome.
Count me in for Procreate tuts!
I’d love to see tutorials for drawing on a program like this!
Me too.. I have the procreate app. I would really like to see how to use the features. Right now I am using just the basics. There are so many art terms that I am not familiar with, like terms that tailor the exact features of each brush type. Looking forward to a course on procreate!
YES PLEASE! I love your teaching style and have been hoping for Procreate lessons from you!
I would love to have some procreate lessons. I have a iPad pro, pencil and procreate app so help would be great. Thanks.
I too would love to see lessons using Procreate and iPad Pro. It’s a wonderful tool to check out changes to your art work. I photograph the work in progress and then using layers on Procreate I try out possible solutions to problem areas.