Drawing with Black and White Ink
In this pen and ink lesson, we’ll take a look at drawing a bird in the snow using a combination of black ink, markers and white ink on gray sketch paper. You’ll learn how to use black and white ink to create strong contrast and a full range of value.
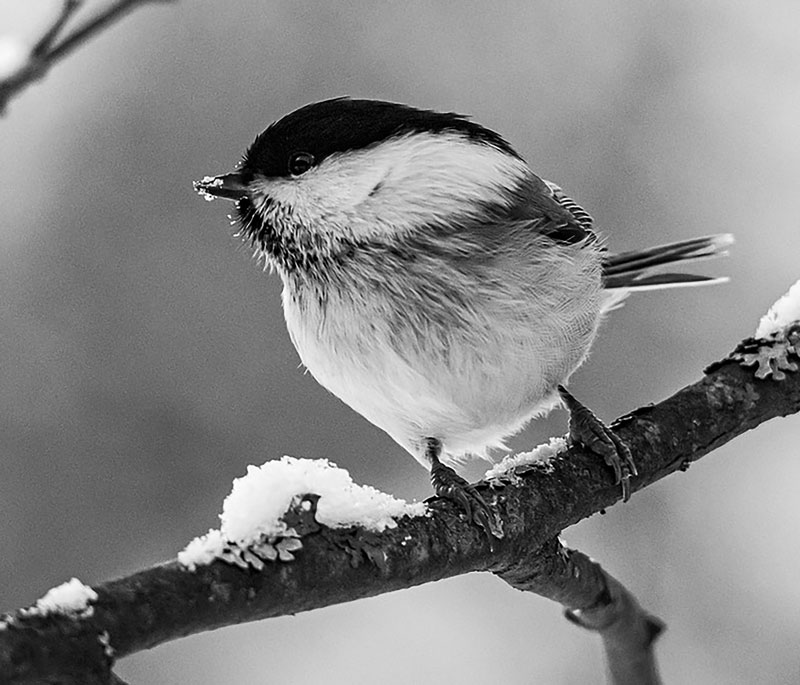
We’ll work from observation, using a photo reference. Here’s a look at the photo reference used for this drawing…
We’ll use technical black drawing pens by Staedtler, white gels pens, a white Posca marker, and a few gray scale alcohol-based markers. The paper is Strathmore Toned Gray Sketch paper. We’ll also use an H graphite pencil for sketching the subject.
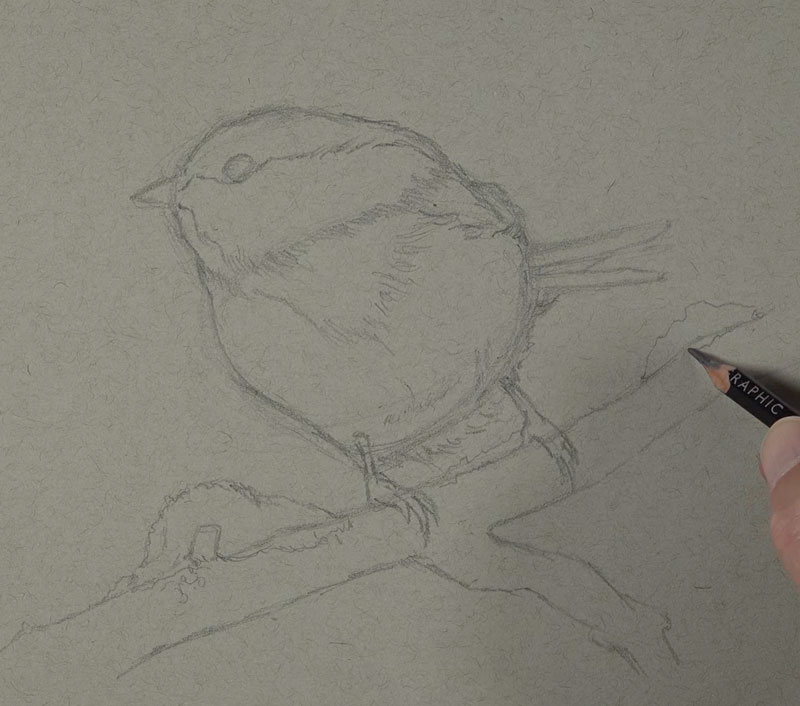
Sketching The Bird with Graphite
The picture plane measures eight inches across by seven inches tall. I’m using this picture plane to make comparisons with the edges of the picture plane and where the edges of the body of the bird are located. First, I plan out where the top of the head’s going to be located and then, the bottom of the body.
I start drawing my basic shapes, making comparisons between the edges of the picture plane. As each shape is added, I can use this information to make comparisons to ensure accuracy in the shapes that follow.
Add a Light Marker Underpainting
With our sketch in place, we’re ready to start with our marker applications. We’ll use the marker applications as an underpainting. I begin with a 20% warm gray. It’s barely visible on the surface of the paper, because these two grays are pretty similar. I like to start cautiously and gradually darken the values.
After our light applications with the 20% warm gray, we can switch to the 50% warm gray. It’s quite a bit darker and more visible on the surface. We want to be careful, in these early stages, that we don’t get too dark too quickly. We do have the advantage of using the white media that we’ll be applying later in the process, but we still need to work a little cautiously here in the beginning.
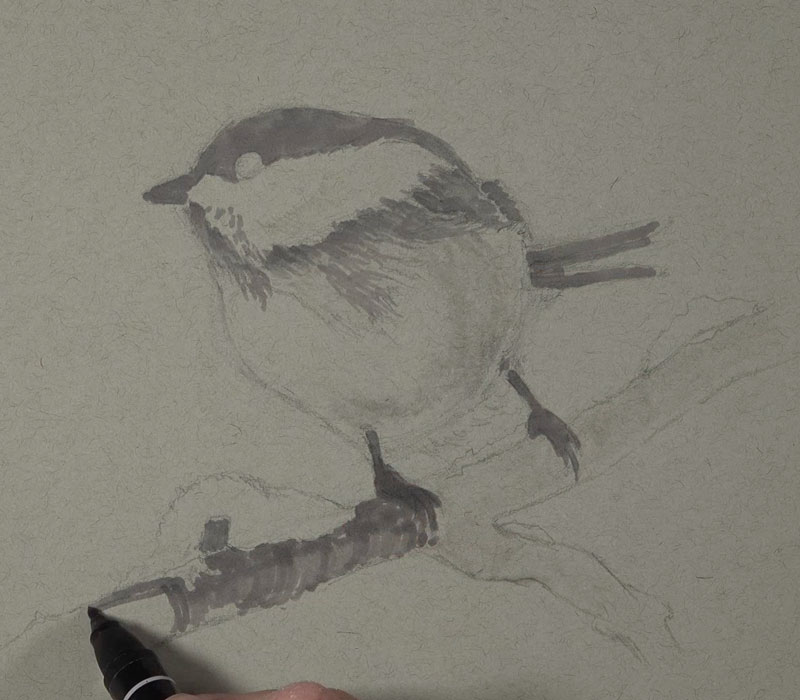
Marks added over the branch should curve over the form of the branch. This adds the value obviously, but it also gives us a little bit of information about texture and, more importantly, the form of this particular section.
Shading and Texture with Pen and Ink on the Bird
For now, we’ll go ahead and switch over to our pen and ink applications. For this entire drawing, I use the 0.1 Pigment Liner by Staedtler. Marks flow in the direction that’s consistent with how the small little feathers grow on the head. So it’s very important to think about your directional stroking, especially when you’re using a medium like pen and ink.
Although pen and ink is considered more of a precise technical medium, you can still be rather loose with your applications and still end up with a rather tight drawing. So don’t be afraid to let your hand be a little bit loose when you’re making these marks. If you overtighten or clinch up a little bit, you’re going to find that your marks are too controlled and your drawing will look lifeless.
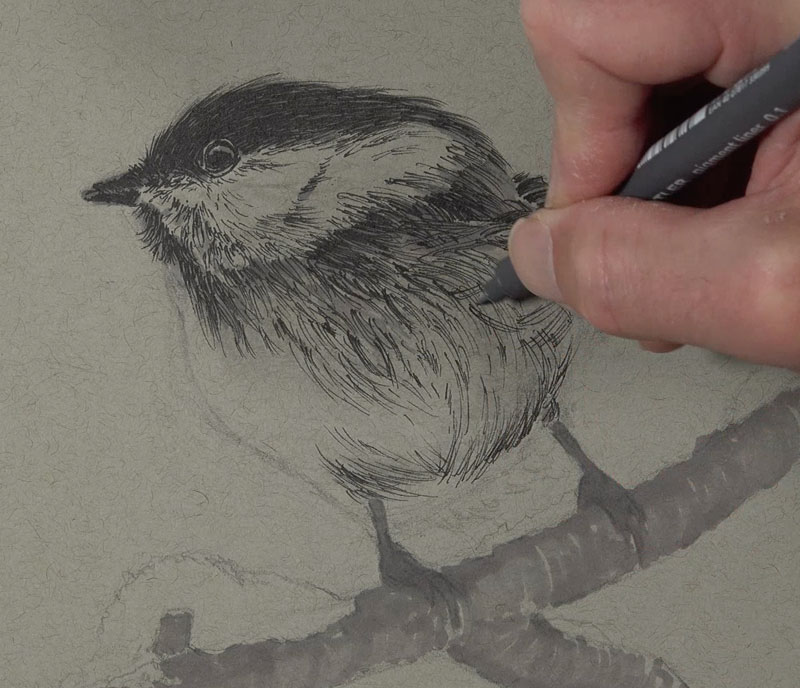
In the areas where we see lighter values, we’re going to leave those spaces open for now. We’re going to address those a bit later with the white media, but for now, we’re concentrating on the values that exist on the lower part of the value scale or the darker values.
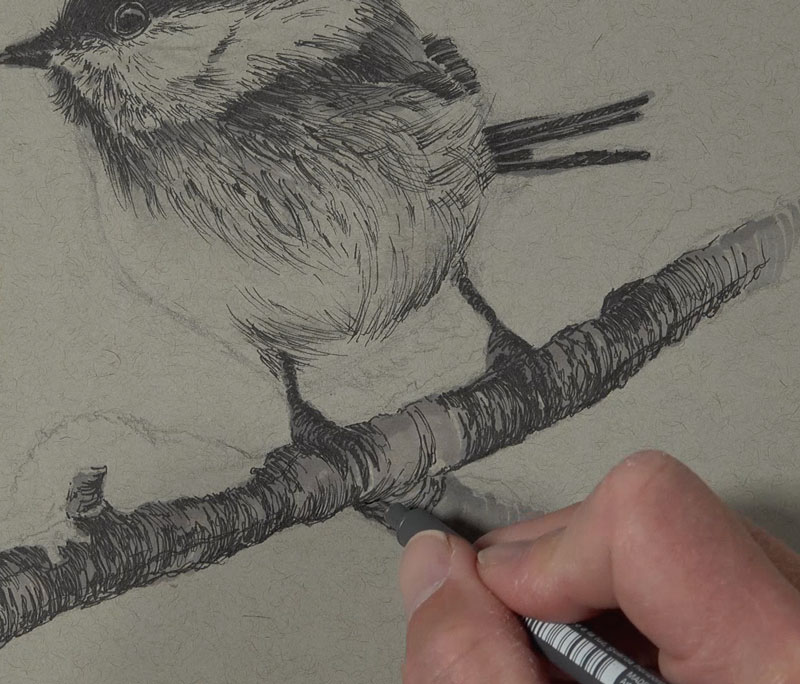
On the talons, we’ll allow these marks to curve over the curved surface. These are called cross contour lines and they help to communicate the form and the texture, while developing the value. And speaking of the branch, we’ll continue down on the branch, with the pen and ink applications. Here again, I’m adding more variety in my mark, leaving some spaces open, but more importantly, I’m making sure that my directional stroking is flowing over the form of the branch.
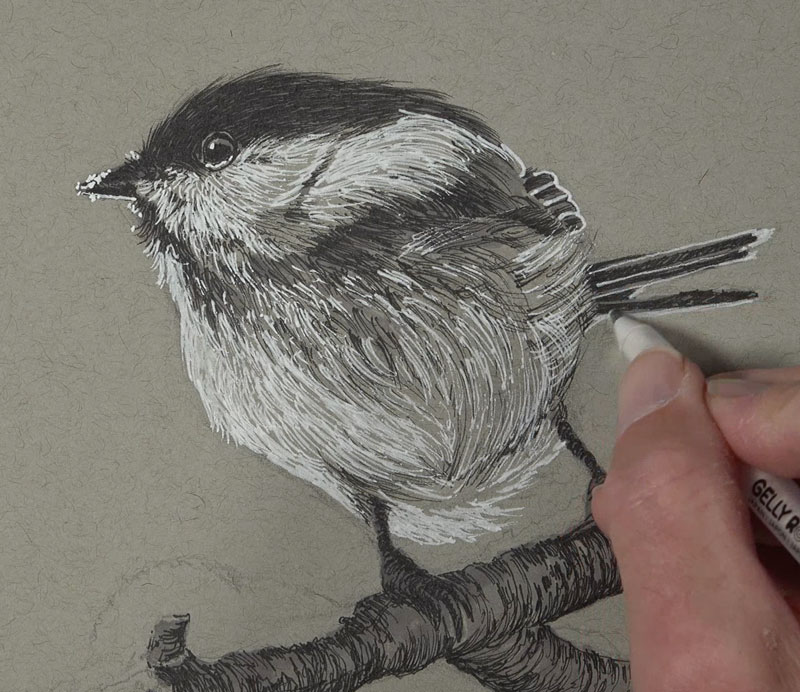
Adding White Ink to the Body of the Bird
Next, we’ll go ahead and move on to our white media. I start with a gel pen, adding the highlight in the eye and the highlights around the beak. There’s also a bit of snow on the beak here as well. At first, this isn’t going to make very much sense in our drawing, but once we get all the other bits of snow in place and all of the light values, it’ll make more sense. Initially, you can see how much contrast there is when we start applying the white pen.
We’ll go ahead and start working with the white gel pen into the white or light areas in the body of the bird, and we’ll allow some of the pen and ink applications to show through. Of course, the breast of the bird is where we’re going to see the strongest highlight, since our light source is originating from the left side. So we’re going to have a heavier application on the breast of the bird with the white media.
You’ll notice the white gel pen is not quite as consistent with the mark making as the black ink pens, so you’ll need to keep this in mind, of course. Having a somewhat broken line is oftentimes encouraged. Again, that creates more of a realistic appearance.
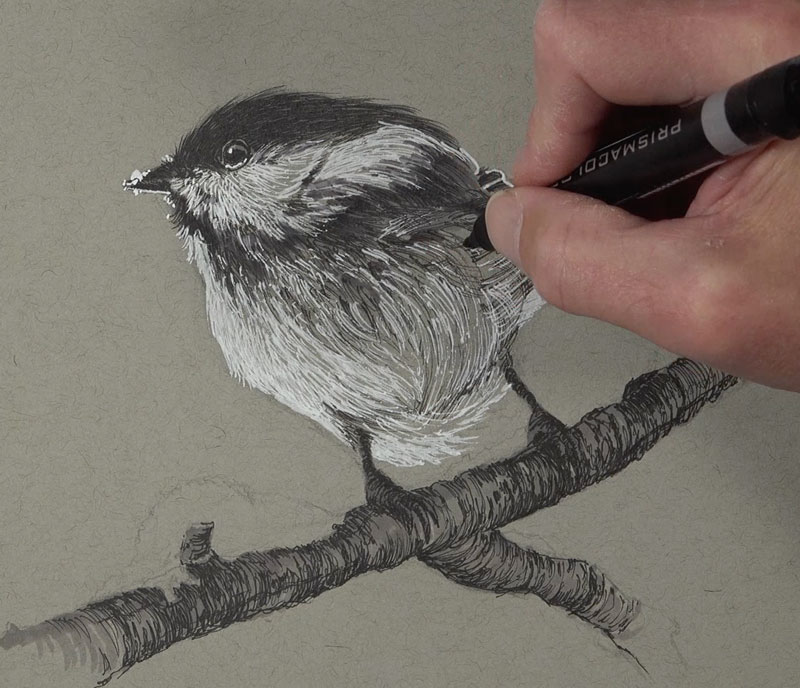
More Marker
With a good bit of white and black ink on the surface, we can evaluate the values. I see that some grays should be darker. I switch over to the 70% warm gray, which is a much darker marker. Most of these darker values that I add at this point exist on the underside of the shape of lighter value at the top of the head.
We’ll continue with this marker a little bit further down, making some of these areas just slightly darker. Then it’s back with the gel pen, adding a few more highlights.
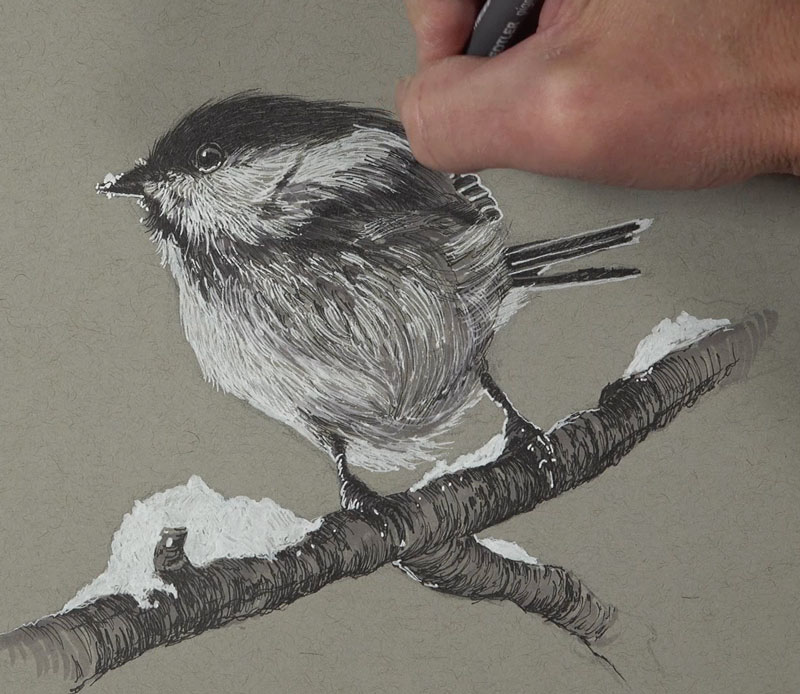
Next, we switch over to the Posca marker, filling in the shapes of snow. Then, we’ll switch back to the pen and ink. We’ll go ahead and fill in some of the areas that got a little bit too light with our applications with the white media.
Completing the Drawing of Bird
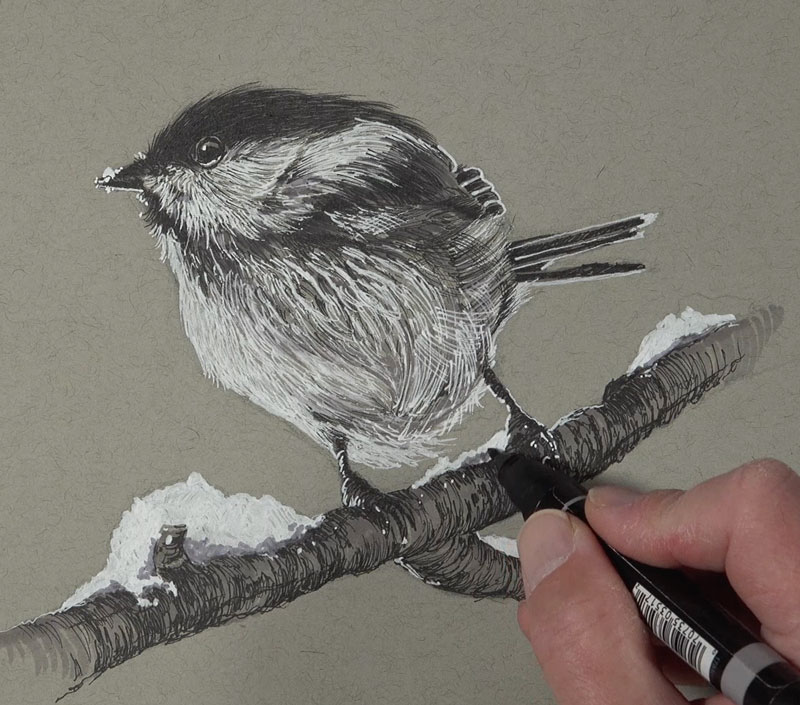
We’ll add a bit of shadow to most of the tufts of snow with 50% warm gray. Then we’ll add a bit of 20% warm gray over the top, to create a little bit of a transition.
Now, we’ll add a few last marks here with pen and ink, adding a few bits of information about some of the smaller feathers while darkening some of the values. We’ll do the same with the white gel pen. Once all of the ink has dried completely, we’ll use a kneaded eraser to remove any remaining graphite lines that are still visible.
Drawing a Bird with White and Black Ink – Conclusion
Now our drawing is complete. Here’s a look at the completed drawing…
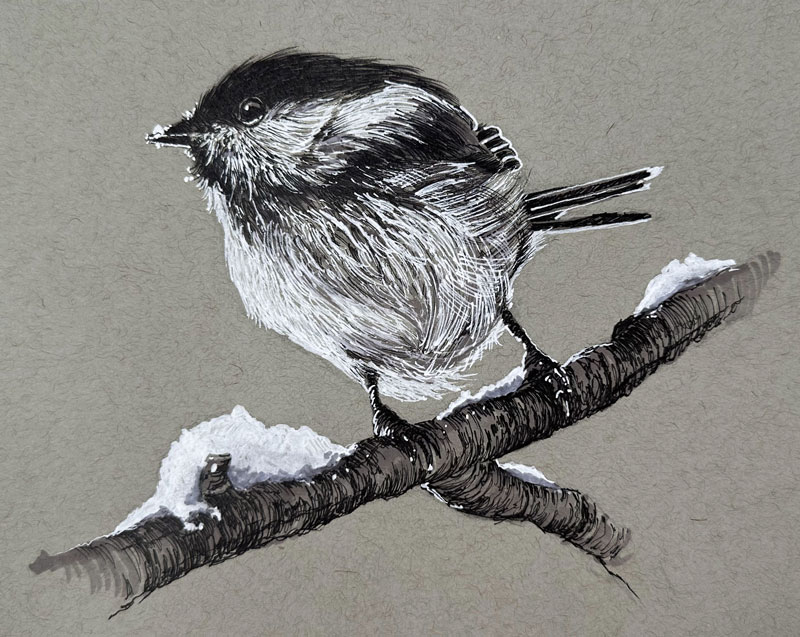
White and black ink works well together when the surface is toned. This approach is not recommended if you are working on white paper. I hope that you enjoyed this lesson, and if you drew along with me, I hope that you are happy with your results.
If so, join over 36,000 others that receive our newsletter with new drawing and painting lessons. Plus, check out three of our course videos and ebooks for free.

Realistic Drawing Hack
You Need Patience for Realistic Drawing
It’s easy in today’s world to take a look at all of the drawings and paintings that are created by amazing artists all over the world. They share their artworks on YouTube and other social media sites, and usually they’ll show you a time-lapse version of the art creation process. This fools some of us into believing that creating art in a realistic manner can be done in a short period of time.
The truth is that that’s not the case at all. In fact, creating a realistic drawing or painting does take time. In fact, a lot of time – probably more time than you might imagine. So, the mindset we need to have as artists is we need to be patient. This is going to be difficult for some of us to be patient, but if you’re just a little bit more patient with your drawings, you will see improvements. In fact, it’s the easiest way to get better at drawing and painting. Just slow down, be patient, and take each step of the process slowly.
I’m going to share with you one of the modules from one of our courses. The course is Realistic Pencil Drawing, and in this course, we share how to create realistic pencil drawings. This particular exercise is just one small fraction of the course, but it’s an exercise designed to help you get better at being patient. And if you do this exercise and carry the concepts over to your own drawings and paintings, I guarantee you’ll see improvement immediately.
Drawing Exercise to Increase Patience
How do we become more patient with our drawings and paintings? Well, the answer is we need to practice patience, and if we practice it, we’ll get better at it.
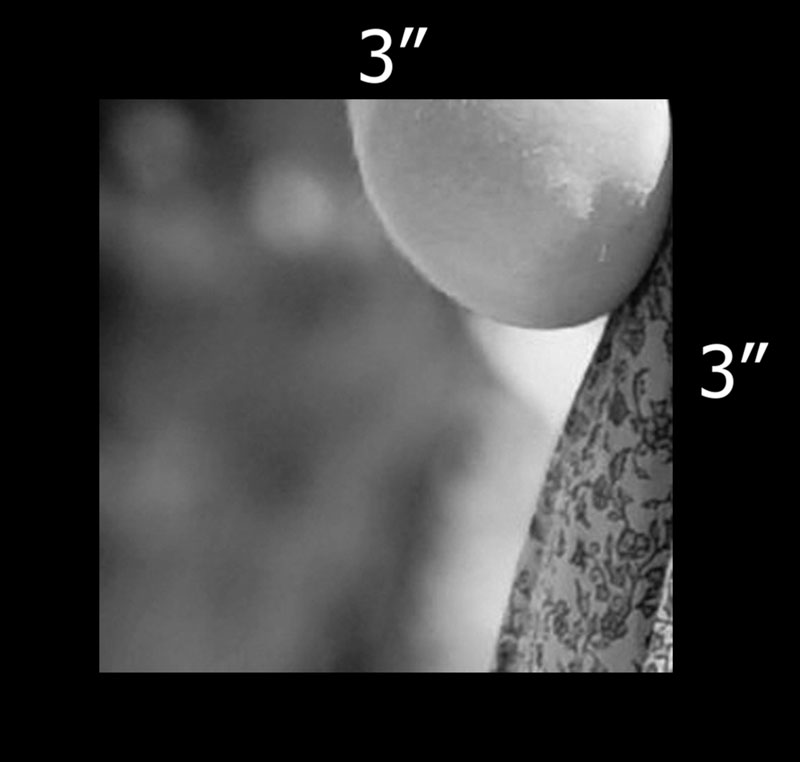
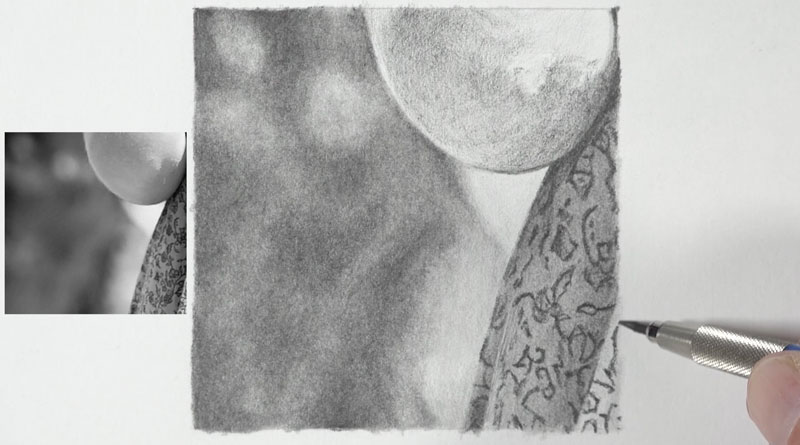
In this exercise, we’ll work from a photo reference. You’re not going to know exactly what it is we’re drawing. I’ll reveal that at the end. What I want you to do is just concentrate on the lines, shapes, and values that you see. I want you to create a 3″ by 3″ drawing. But here’s the catch. I want you to spend at least two hours drawing this 3″ by 3″ square with graphite. Take your time, work slowly and be patient.
Here’s a look at the reference photo…
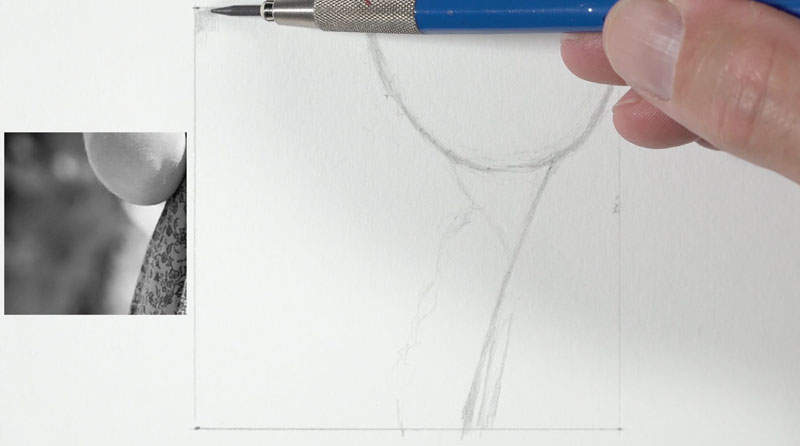
Draw the Contours
We’ll begin by drawing the contours, or outlines, of the subject. We simply need to pay attention to the larger shapes and their boundaries. Draw lightly and loosely in the beginning and use the outer edges of our 3″ by 3″ swatch to make comparisons.
Begin Shading
Next, begin gently adding graphite with the pencil. You can use a blending tool to work the material into the surface to create a smoother appearance. Pay attention to relationships of different values and try to match the darkness and the shape as closely as possible. You should continually move your eyes back and forth from the reference to the drawing paper. Remember, drawing accurately is about observation.
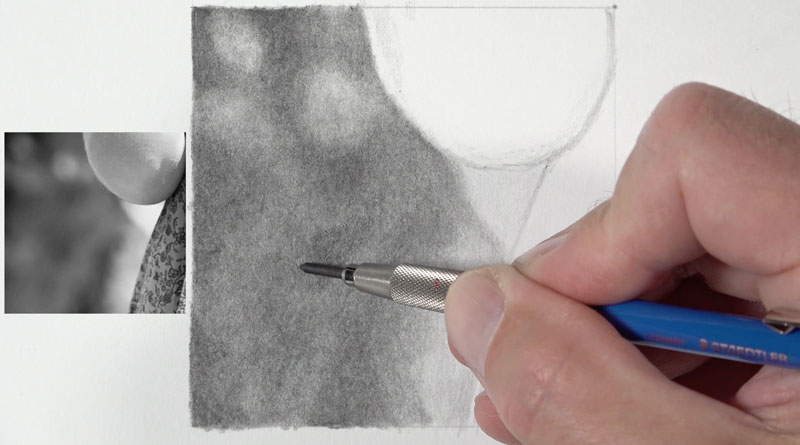
Once we have the larger section covered with graphite, move on to the next section. Here again, we’ll gradually build up darker tones and values. Start lightly and then gradually make the values darker. Be patient and work slowly, concentrating on the texture that produced by the pencil and the surface of the paper.
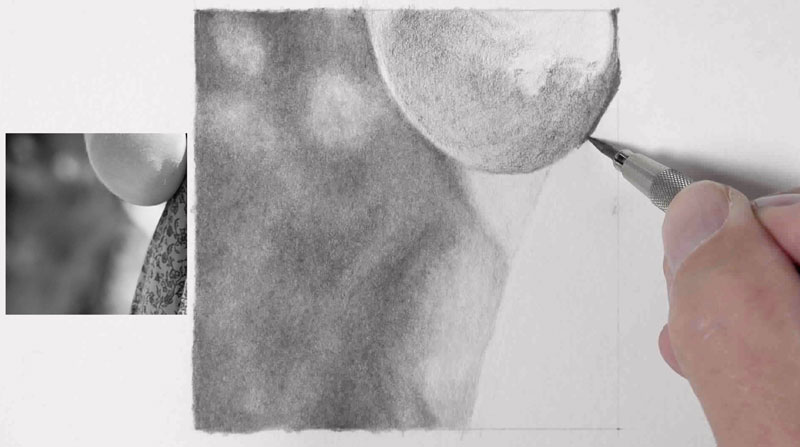
Add Details with a Sharp Pencil
Now we can add the details and finish of the last section. The detail here resembles a pattern with crisp, deliberate lines. In order to have complete control and mimic the lines that we see as marks, our pencil should be sharp. Sharpen as frequently as possible to replicate the observed pattern.
See also: How to Sharpen Any Pencil
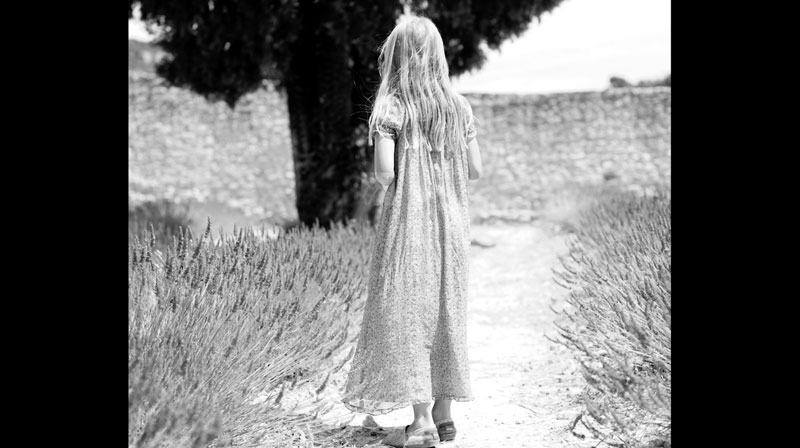
Revealing the Image
Now our small drawing is finished. So what is this? Well, it’s part of a much larger image, of course. We are actually zoomed in really close. If we zoom out, we can see that this is a small section of a larger photo reference.
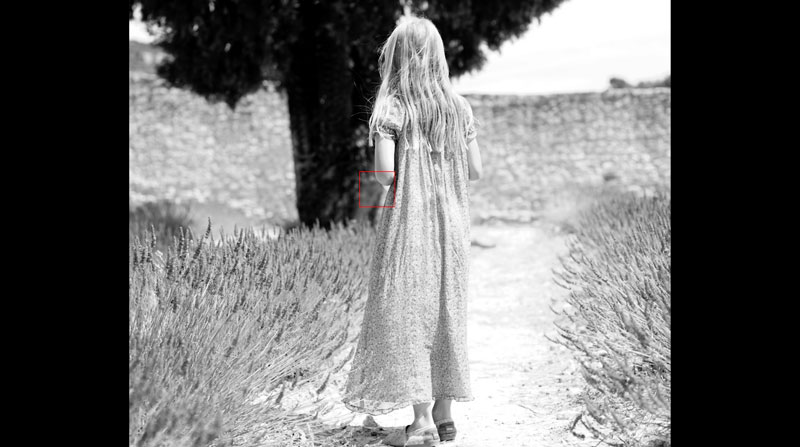
Now imagine for a moment that we took this small section and drew it in this manner on a large sheet of paper, and this was instead a three-inch by three-inch section of this larger drawing. As you can see, we would end up with a highly realistic pencil drawing.
Realistic Drawing Hack – Conclusion
Hopefully, you now see how important it is to be patient with a realistic drawing. It simply takes time to create a convincing drawing. So, if realism is what you are after, you better be patient. But being patient just might be the big difference maker, and the peice that you’ve been missing.
If so, join over 36,000 others that receive our newsletter with new drawing and painting lessons. Plus, check out three of our course videos and ebooks for free.

Gettin’ Sketchy – Season 10
Gettin’ Sketchy: Season 10
Episodes
About Gettin’ Sketchy – Season 10…
Gettin’ Sketchy Live is an original live broadcast. The goal is produce a sketch within 45 minutes while providing art instruction and entertainment. This season is focused on creating drawings and paintings in the style of artists from the past. Drawings and paintings are created using a variety of media. Subjects include still life, portraiture, landscape and more.
Episode 1: Andy Warhol
In this live painting lesson, we create a painting in the style of Pop artist, Andy Warhol. In this case, we’ll create a colorful portrait of the influential artist using Posca Markers on hot press watercolor paper.
Episode 2: Van Gogh
In this live drawing lesson, we create a charcoal drawing in the style of artist, Van Gogh. This is a timed drawing exercise that is broadcast live.
Episode 3: Georgia O’Keeffe
In this live drawing lesson, we create a pastel drawing in the style of artist, Georgia O’Keeffe. This is a timed drawing exercise that is broadcast live and Matt will have 45 minutes to complete the drawing. Georgia O’Keeffe is well known for her large paintings of flowers up close. Keeping with her style, we’ll create a colorful image of a flower with an extreme close up angle.
Episode 4: Giovanni Piranesi
In this live drawing lesson, we create a pen and ink drawing in the style of artist, Giovanni Piranesi. This is a timed drawing exercise that is broadcast live and Ashley will have 45 minutes to complete the drawing. Piranesi is well known for creating architectural etchings with intense line work. In line with his style, we’ll create a pen and ink drawing on white paper.
Episode 5: Janet Fish
In this live drawing lesson, we create a marker and colored pencil drawing in the style of artist, Janet Fish. This is a timed drawing exercise that is broadcast live and Matt will have 45 minutes to complete the drawing. Janet Fish is well known for her realistic paintings of glass, foods, and reflections. We’ll use a combination of alcohol-based markers and colored pencils on marker paper.
Episode 6: Salvador Dalí
In this live drawing lesson, we create a Surrealist drawing in the style of artist, Salvador Dalí. This is a timed drawing exercise that is broadcast live and Ashley will have 45 minutes to complete the drawing. Salvador Dalí was a Spanish artist that created Surrealist paintings that were influenced by the subconscious and dreams. We’ll use colored pencils on gray paper to complete the drawing.
Episode 7: Pablo Picasso
In this live drawing lesson, we create a Cubist portrait in the style of artist, Pablo Picasso. This is a timed drawing exercise that is broadcast live and Matt will have 45 minutes to complete the drawing. Pablo Picasso is most well-known for his Cubist drawings and paintings. We’ll use oil pastels on orange paper to complete the drawing.
Episode 8: Edward Hopper
In this live drawing lesson, we create a Realist drawing in the style of artist, Edward Hopper. This is a timed drawing exercise that is broadcast live and Ashley will have 45 minutes to complete the drawing. Edward Hopper is most well-known for his somber Realist paintings that often featured high contrast and moody lighting. We’ll use oil pastels to complete the drawing.
Episode 9: René Magritte
In this live drawing lesson, we create a Surrealist drawing in the style of artist, René Magritte This is a timed drawing exercise that is broadcast live and Matt will have 45 minutes to complete the drawing. René Magritte is most well-known for his Surrealist paintings that often challenged language and the perception of reality. We’ll use alcohol-based markers and colored pencils on toned Stonehenge paper to complete the drawing.
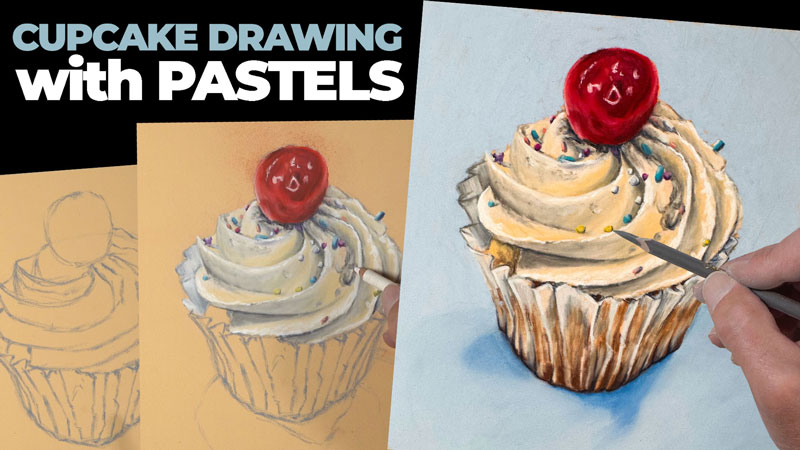
Episode 10: Georges Seurat
In this live drawing lesson, we create a drawing in the style of artist, Georges Seurat. This is a timed drawing exercise that is broadcast live and Ashley will have 45 minutes to complete the drawing. Seurat is most well-known for his Pointilism paintings that when viewed at close range appear as small dots of paint. But when viewed from a distance, the small dots combine to optically mix to create variations of color and value. We’ll use charcoal or conté on white Bee Stipple paper to create the drawing.
Episode 11: Season 10 Review and Critique
In this live drawing critique, we look back on the drawings we created during Season 10 and quickly critique each piece. In Season 10, we created drawings in the style of artists throughout history. We choose our favorite drawings and encourage you to choose your favorites as well. Join the chat and join in the discussion as we look back on what we created.
Resources for this Lesson…
Distributing any content downloaded from this site is strictly prohibited and against the terms and conditions of use.
References
Here’s what you’ll need…
(Disclosure: Links to art materials are affiliate links which means we make a small commission if you purchase at no additional cost to you.)
Episode 1: Andy Warhol
Episode 2: Van Gogh
- White Charcoal Pencils
- Black Charcoal Pencils
- Strathmore Gray Drawing Paper
Episode 3: Georgia O’Keeffe
Episode 4: Giovanni Piranesi
- Technical Drawing Pens
- Strathmore Drawing Paper
Episode 5: Janet Fish
Episode 6: Salvador Dalí
Episode 7: Pablo Picasso
Episode 8: Edward Hopper
Episode 9: René Magritte
Episode 10: Georges Seurat

Gettin’ Sketchy – Season 9
Gettin’ Sketchy: Season 9
Episodes
About Gettin’ Sketchy – Season 9…
Gettin’ Sketchy Live is an original live broadcast. The goal is produce a sketch within 45 minutes while providing art instruction and entertainment. This season focused on creative drawing prompts with a game show theme. Drawings produced include landscape, portraiture, animals, still life, perspective and more.
Episode 1: Wave Drawing
In this live drawing exercise, Matt will have 45 minutes to complete a drawing based off of a creative prompt voted on by YouTube users. The creative prompt is “Don’t Give Me No Lines”, which means that Matt will create a drawing that does not use any lines – only values and colors. This drawing is created with soft pastels on gray Ingres paper.
Episode 2: Stamp Pad Drawing
In this live drawing exercise, Ashley will have 45 minutes to complete a drawing using non-traditional drawing tools. The creative prompt is “Not Your Average Pen”. This drawing is created using a stamp pad and a traditional eraser found at the end of a pencil.
Episode 3: Octopus Drawing
In this live drawing exercise, Matt will have 45 minutes to complete a drawing of an Octopus with Posca Markers that uses only four values or tones. The creative prompt is “Less is More”. This drawing is created using Posca paint markers on gray Strathmore Drawing Paper.
Episode 4: Figure Drawing
In this live drawing exercise, Ashley will have 45 minutes to complete a figure drawing by using a photo reference positioned upside down. The creative prompt is “Upside Down”. This drawing exercise forces the artist to isolate lines, values, and textures and draw them the way they are observed. This drawing is created using graphite drawing pencils on white drawing paper.
Episode 5: Avocado Drawing
In this live drawing exercise, Matt will have 45 minutes to complete a drawing that fools the eye. The purpose of this drawing is to create the illusion that the avocado is actually on the surface. The creative prompt is “My Eyes Don’t Lie”. This drawing exercise challenges the artist to think about the positioning of the subject within the picture plane and materials that can be used to create this illusion. This drawing is created using graphite drawing pencils, PanPastels, pastels, colored pencils, Posca markers and alcohol-based markers on toned sketch paper.
Episode 6: Timed Drawings
In this live drawing exercise, Ashley will have 45 minutes to complete 3 drawings of the same object (in this case, a wrench). The first drawing will be timed to just 1 minute. The second drawing will be timed to 5 minutes. The third drawing will be timed to 30 minutes. The creative prompt is “3 Ways”. This drawing exercise challenges the artist to consider what details to include and which to leave out. These drawings are created with graphite drawing pencils on white drawing paper.
Episode 7: Mash Up Drawing
In this live drawing exercise, Matt will have 45 minutes to complete a drawing that combine two fruits into one cohesive drawing. In this case, a watermelon and an apple are drawn as one drawing. The creative prompt is “Fruit Loop”. This drawing is created with pastels and pastel pencils on PastelMat Paper.
Episode 8: Dice Drawing
In this live drawing exercise, Ashley will have 45 minutes to complete a scratchboard drawing of dice. The creative prompt is “Scratch That Itch”. Scratchboard or scrapeboard is an art-making medium in which ink is removed with a sharp tool, revealing a light value (usually white). In this type of art, the artist must think in reverse, scratching out the highlights, while leaving the darker tones.
Episode 9: Self Portrait Drawing
In this live drawing exercise, Matt will have 45 minutes to complete a self portrait drawing from the future. The creative prompt is “Back to the Future”. In this challenge, the self portrait should depict the subject as older than they currently are. This means that exaggerations are made to the wrinkles, hair, and skin imperfections. This drawing is created using Mars Lumograph Black pencils and white charcoal on gray drawing paper.
Episode 10: Perspective Drawing
In this live drawing exercise, Ashley will have 45 minutes to create a drawing that utilizes one of the forms of linear perspective. Ashley may choose 1 point, 2 point, or 3 point perspective to complete the drawing. The creative prompt is “What’s the Point?”. This drawing is created using graphite pencils and white drawing paper.
Episode 11: Season 9 Review and Critique
In this live drawing critique, we look back on the drawings we created during Season 9 and quickly critique each piece. We choose our favorite drawings and encourage you to choose your favorites as well. Join the chat and join in the discussion as we look back on what we created.
Resources for this Lesson…
Distributing any content downloaded from this site is strictly prohibited and against the terms and conditions of use.
References
Here’s what you’ll need…
(Disclosure: Links to art materials are affiliate links which means we make a small commission if you purchase at no additional cost to you.)
Episode 1: Wave Drawing
Episode 2: Stamp Pad Drawing
Episode 3: Octopus Drawing
Episode 4: Figure Drawing
Episode 5: Avocado Drawing
- Graphite Drawing Pencils
- Toned Sketch Paper
- Prismacolor Colored Pencils
- PanPastels
- Pastels
- Alcohol-Based Markers
- Posca Markers
Episode 6: Timed Drawings
Episode 7: Mash Up Drawing
Episode 8: Dice Drawing
Episode 9: Self Portrait Drawing
Episode 10: Perspective Drawing
Gettin’ Sketchy – Season 8
Gettin’ Sketchy: Season 8
Episodes
About Gettin’ Sketchy – Season 8…
Gettin’ Sketchy Live is an original live broadcast. The goal is produce a sketch within 45 minutes while providing art instruction and entertainment. This season features drawings of landscapes, portraiture, animals, cars and vehicles, and still life. Mediums include gouache, colored pencils, graphite, charcoal, pastels, charcoal and inks.
Episode 1: Fly Drawing
In this live episode, Matt creates a drawing of a fly with pastels and pastel pencils on PastelMat paper within 45 minutes in this timed drawing exercise.
Episode 2: Bear Drawing
In this live episode, learn how to draw a polar bear with pastels in just 45 minutes. This is a timed drawing exercise. Watch, learn, and draw along side.
Episode 3: Poppy Drawing
In this live episode, learn how to draw a poppy flower with pen and ink. Add color with watercolor markers and activate the applications with water and a brush to turn the drawing into a watercolor painting. Learn line and wash techniques and draw alongside as the art is created in real-time. Staedtler pigment liners are used on hot press watercolor paper.
Episode 4: Bird Drawing
In this live episode, learn how to draw a Cockatiel bird with colored pencils. This is a timed drawing drawing exercise that is presented live – in real-time. This drawing is completed in 45 minutes.
Episode 5: Chain Drawing
In this live episode, learn how to draw chains with white charcoal on black paper. Use blending tools to smooth transitions of value. Add the highlights with white charcoal and leave open spaces for the shadows. This is a timed drawing drawing exercise that is presented live – in real-time. This drawing is completed in 45 minutes.
Episode 6: Bee Drawing
In this live episode, learn how to draw a bee with mixed media. Black marker, drawing pens and gouache (opaque watercolor) are used to develop a drawing of a bee in this timed drawing exercise. This drawing is completed on orange paper within 45 minutes.
Episode 7: Plane Drawing
In this live episode, learn how to draw a plane with pen and ink with markers. Gray scale markers and drawing pens are used to develop a drawing of a plane in this timed drawing exercise. This drawing is completed on marker paper within 45 minutes. Pen and ink applications are applied for the contours with toning by the markers.
Episode 8: Café Drawing
In this live episode, learn how to draw a cafe terrace with pen and ink. Pen and ink is applied to drawing paper in this timed drawing exercise and color is added with markers. This drawing is completed in real-time within 45 minutes. Draw along-side and create the sketch with us.
Episode 9: Acorn Drawing
In this live episode, learn how to draw an acorn with white and black charcoal on gray paper. Start loosely and gradually build up value relationships and details. This drawing is completed in real-time within 45 minutes. Draw along-side and create the sketch with us.
Episode 10: Pineapple Drawing
In this live episode, learn how to draw a pineapple with pen and ink and markers. Use line to describe the contours and add color with markers. This drawing is completed in real-time within 45 minutes. Draw along-side and create the sketch with us.
Episode 11: Season 8 Review and Critique
In this live drawing critique, we look back on the drawings we created during Season 8 and quickly critique each piece. We choose our favorite drawings and encourage you to choose your favorites as well. Join the chat and join in the discussion as we look back on what we created.
Resources for this Lesson…
Distributing any content downloaded from this site is strictly prohibited and against the terms and conditions of use.
References
Here’s what you’ll need…
(Disclosure: Links to art materials are affiliate links which means we make a small commission if you purchase at no additional cost to you.)
Episode 1: Fly Drawing
Episode 2: Bear Drawing
- Winsor and Newton Pastels
- Derwent Pastel Pencils
- CarbOthello Pastel Pencils
- Canson Mi-Teintes Paper (Black)
Episode 3: Poppy Drawing
- Staedtler Pigment Liners
- Winsor and Newton Promarker Watercolor Markers
- Canson Hot Press Watercolor Paper
- Grumbacher Goldenedge Watercolor Brushes
Episode 4: Bird Drawing
Episode 5: Chain Drawing
Episode 6: Bee Drawing
Episode 7: Plane Drawing
Episode 8: Café Drawing
Episode 9: Acorn Drawing
Episode 10: Pineapple Drawing
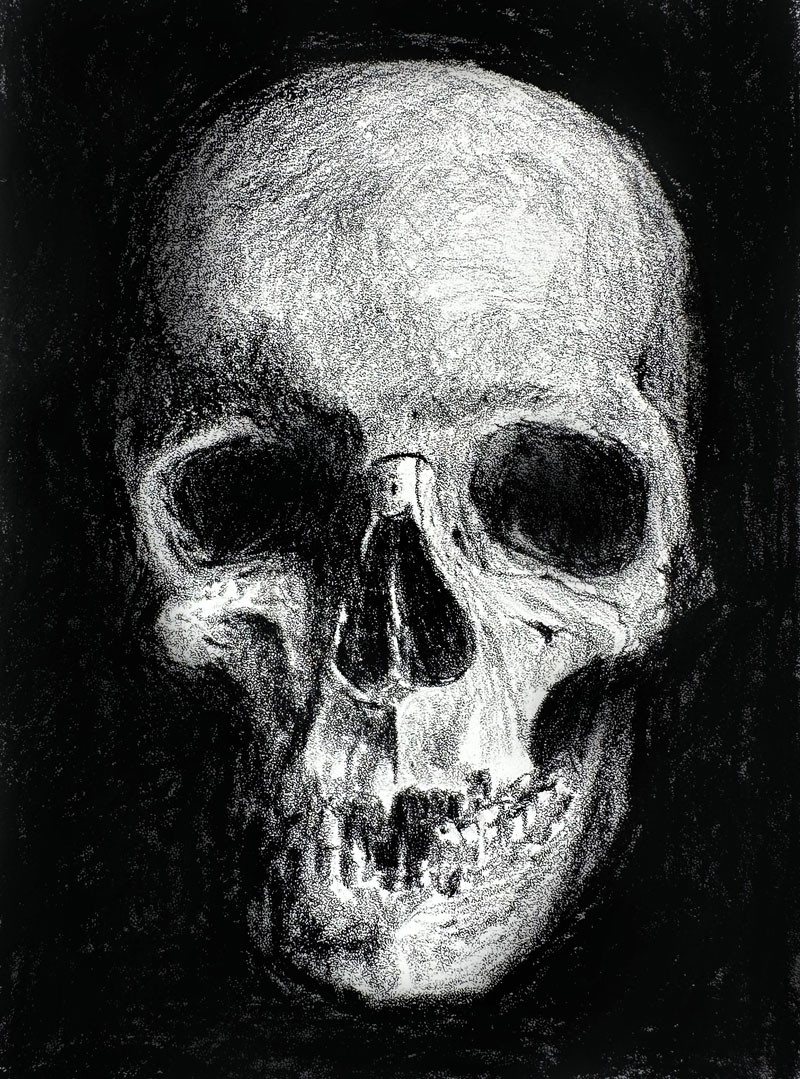
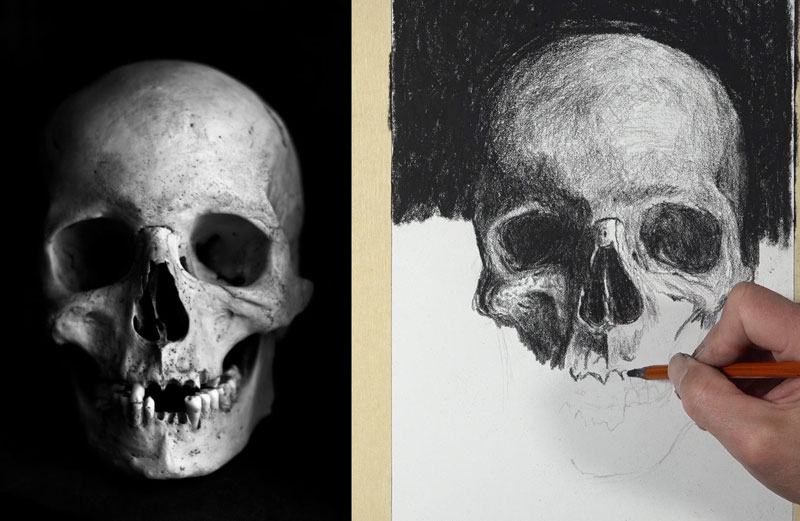
Spooky Skull Sketch
Drawing a Skull with Charcoal
In this lesson, we’ll work on stipple paper by the Bee Paper Company and complete the drawing of a skull with charcoal. We’ll only use compressed charcoal pencils and sticks. This unique paper features a very unique surface that is heavily textured, which will be important in our final drawing.
Here’s a look at the completed drawing…
See also: How to Draw a Glass of Water with Graphite and Charcoal
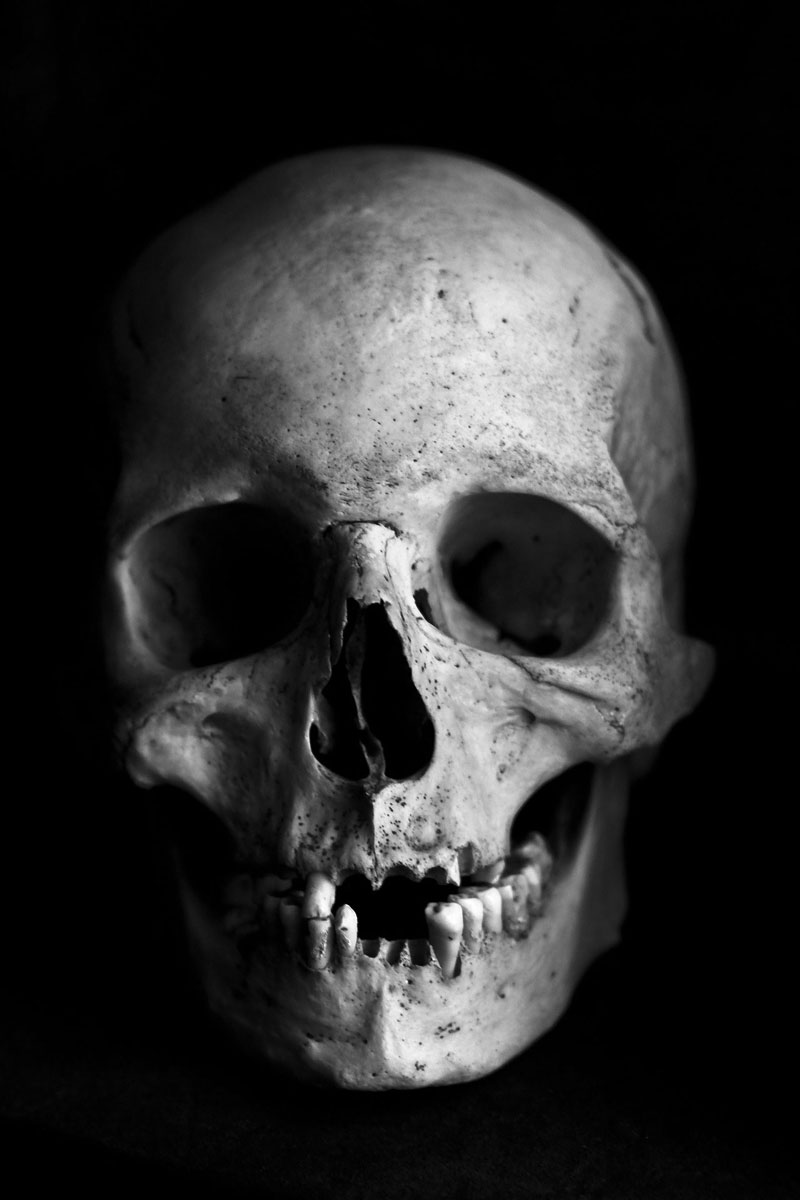
Here’s a look at the photo reference…
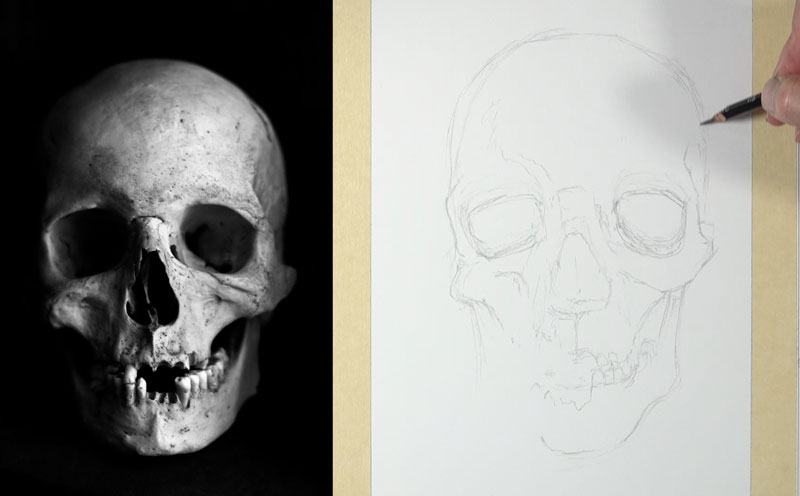
Graphite Pencil Sketch
We’ll begin the drawing with a HB graphite pencil. I want my marks to be visible, but I want them to be light. We begin by finding a location for the top of our skull and the bottom of our skull.
Then we find the areas where we see strong contrast. I draw lines where I see an edge or a difference in value between dark and light locations. Details are purposely left out. While I’m striving for accuracy, I’m also leaving myself open to some discrepancies between the photo reference and the drawing.
Shading with Charcoal
With my graphite sketch in place, I can switch over to a charcoal pencil for shading and texture. There is no blending or smudging, I’m just going to work with the texture of the paper.
I’m paying attention to the areas of highlight or the areas of lightest value. We want to leave these areas open as we’re adding the charcoal. You’ll also notice that I’m starting on the left side of the picture plane to work my way to the right and lower down the picture plane. I’m doing this simply to keep the palm of my hand out of the way of the drawing so I don’t smear any of the graphite that I’ve applied.
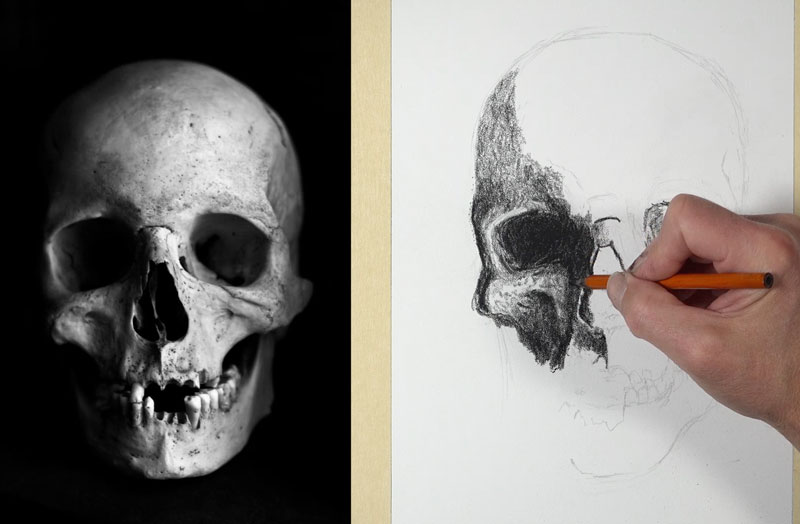
I’m going to go ahead and put a little bit of the dark value behind the back edge of the skull so that I have some contrast there. That will help me better evaluate the values as I add them to the drawing.
See also: Charcoal Drawing of a Skull in 45 Minutes
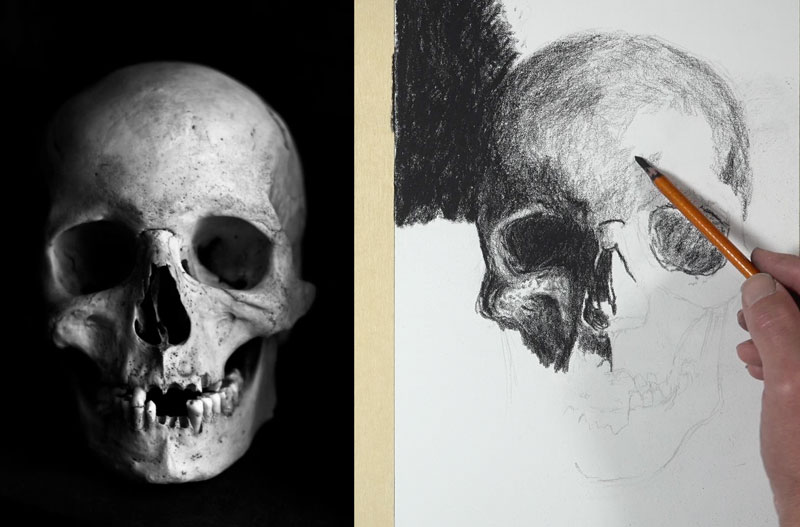
Working Down the Skull
As we continue to work our way down the picture plane, I’m going to add a little bit more of that dark background at the top. Then it’s back to the center part of the skull, working in one of the eye openings. In this eye opening on the right, we can see some subtle shifts of value inside. Since this sketch is loose and quick and since the surface dictates it, we’re not going to include all the details that we see. We just want an impression of the skull. We want a loose sketch, and this paper helps us to achieve that loose look.
Our light source is originating from the right side of the picture plane. This means that all of the parts of the skull that stick out or protrude are going to be lighter on the right side compared to the left side. Even still, we still need to make some of the values on the right side a little bit darker, so instead of leaving them white, we’re going to create areas of gray. We just want to make sure that our value contrast is there so that we preserve the illusion of the light source in the final drawing.
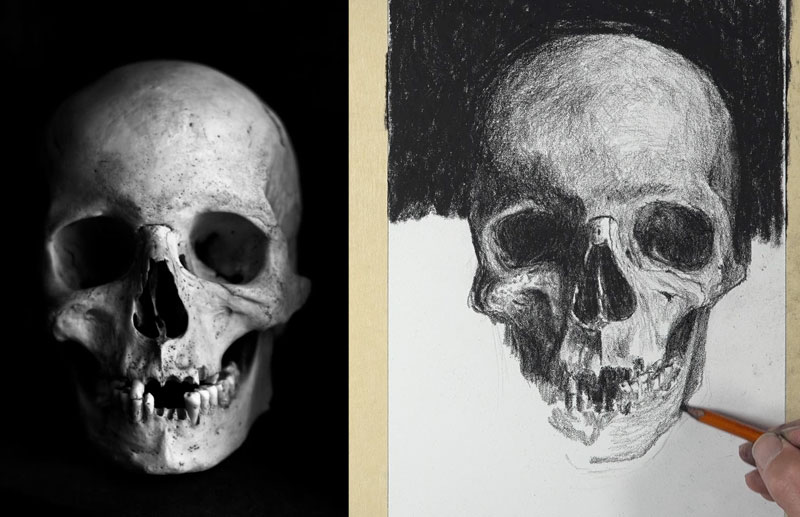
As we work down to the lower part of the skull and in the teeth section, I’m going to give an impression of the teeth, without defining all of the details. Since we only really clearly see the right side of the bottom of the jawbone, I’m only going to include a range of value here. On the left side, we’re going to focus mainly on the shadowed shapes that we see.
Finishing the Skull Drawing
Now we’ll finish the drawing by simply filling in the background with a heavy application of compressed charcoal.

Now our drawing of a skull with charcoal is complete.
Spooky Skull Sketch – Conclusion
A skull is certainly a spooky subject, but it’s also a great subject for practicing drawing. Every skull is slightly different and the light can be dramatically different. This provides a nice challenge. Skulls have been the subject of countless artworks and is one of my favorite things to draw. I hope this lesson helps you draw your own skull.
If so, join over 36,000 others that receive our newsletter with new drawing and painting lessons. Plus, check out three of our course videos and ebooks for free.
Gettin’ Sketchy – Season 7
Gettin’ Sketchy: Season 7
Episodes
About Gettin’ Sketchy – Season 7…
Gettin’ Sketchy Live is an original live broadcast. The goal is produce a sketch within 45 minutes while providing art instruction and entertainment. This season features drawings of landscapes, portraiture, animals, cars and vehicles, and still life. Mediums include gouache, colored pencils, graphite, charcoal, pastels, charcoal and inks.
Episode 1: Jellyfish Drawing
In this episode, we create a mixed-media drawing of a jellyfish on colored Mi-Teintes paper using gouache and pastels.
Episode 2: Pencil Landscape
In this episode, we draw a landscape with graphite pencils on white drawing paper.
Episode 3: Pastel Landscape
In this episode, we draw a landscape of a setting sun overlooking sand dunes with pastels on toned paper.
Episode 4: Car Drawing
In this live episode, we draw a classic car (BMW) with an interesting composition using colored pencils.
Episode 5: Lime Drawing
In this live episode, we draw a a lime slice with colored pencils, markers and gouache on yellow-green paper.
Episode 6: Portrait Drawing
In this live episode, we draw a portrait with colored pencils from a black and white photo reference.
Episode 7: Lightbulb Drawing
In this live episode, we draw a light bulb with markers, white inks, and ink pens on gray toned paper.
Episode 8: Snail Drawing
In this live episode, we draw a snail with pen and ink on white drawing paper.
Episode 9: Motorcycle Drawing
In this live episode, we draw a motorcycle and rider with white charcoal on black drawing paper.
Episode 10: Architecture Drawing
In this live episode, we draw architecture – and architectural landscape with charcoal on white drawing paper.
Episode 11: Season 7 Review and Critique
In this live episode, we look back on the drawings we created during Season 7 and quickly critique each piece. We also choose our favorites and encourage you to choose your favorites as well.
Resources for this Lesson…
Distributing any content downloaded from this site is strictly prohibited and against the terms and conditions of use.
References
Here’s what you’ll need…
(Disclosure: Links to art materials are affiliate links which means we make a small commission if you purchase at no additional cost to you.)
Episode 1: Jellyfish Drawing
Episode 2: Pencil Landscape
Episode 3: Pastel Landscape
Episode 4: Car Drawing
Episode 5: Lime Drawing
Episode 6: Portrait Drawing
Episode 7: Lightbulb Drawing
Episode 8: Snail Drawing
Episode 9: Motorcycle Drawing
Episode 10: Architecture Drawing
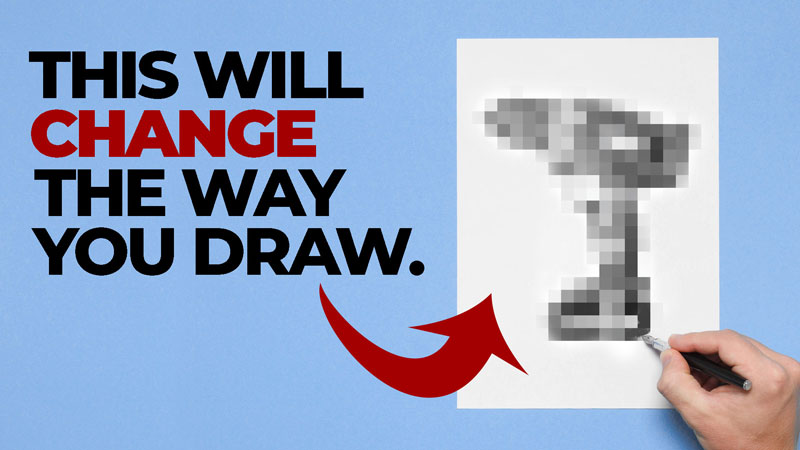
#1 Secret to Drawing
The Most Important Secret to Drawing
Who doesn’t want to be able to draw and do it well? The problem is that most people believe they can’t draw even though they’d love to be able to do it. Well, the good news is that drawing is a skill that anyone can learn and develop. And just like any other skill, drawing requires a bit of knowledge and practice. Now, the practice is up to you, but in this lesson, I’m going to give you one major piece of knowledge that may dramatically affect your drawing ability.
See also: Why You Believe You Can’t Draw and What to do About It
Many people believe that drawing is about making marks, and yes, this is true. You must make marks to make a drawing, but there’s a lot more to it than just making marks. Our drawings are the results of making marks on a surface, but the true essence to drawing is about what happens between your ears.
Michelangelo is quoted as saying, “A man or woman paints with his brains, not with his hands.” But what does this mean?
It means that our brains are actually more involved in the drawing process than our hands.
Drawing From Imagination
Now, let’s see if we can go deeper to understand the quote above. We’ll do a few drawing exercises. For all of our exercises, you’ll need a piece of paper and a pencil.
For our first drawing exercise, simply draw a hammer – just a plain old hammer from your imagination. Don’t look at anything to create this first drawing.
Your hammer might end up looking like this…

Now, this drawing does look like a hammer – right? But, it could be better – much better. So drawing purely from our imagination is not enough.
See also: Improve Your Drawing Skills in 6 Days
Drawing with 100% Observation
Now we’re going to create another drawing, but this time we’re going to have a few restrictions. This time we’ll actually look at a hammer. I’ll use a photo reference and we’ll look at it, but you can not look at your drawing paper.
Yes, you read that right. You can not look at your drawing paper. We’ll only be looking at the reference photo and not the drawing.
Here’s a look at the photo reference…
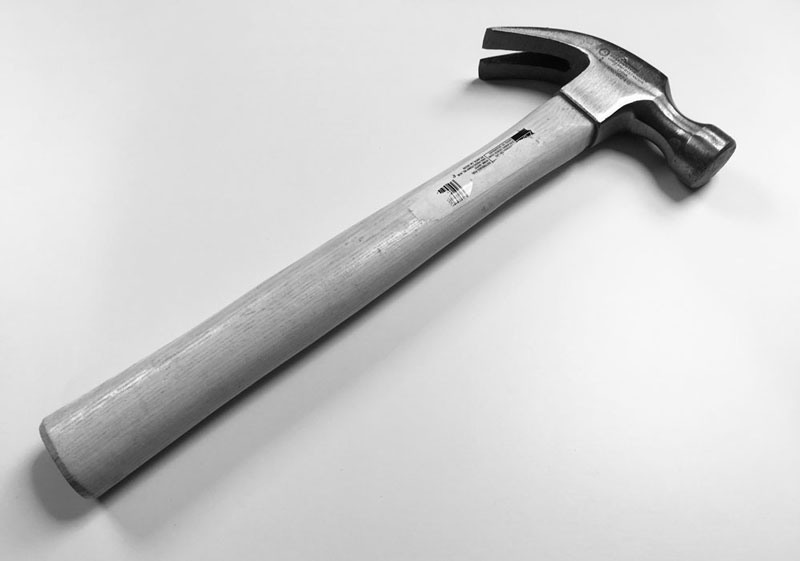
We’ll create this drawing using just one line. This means that once we place the pencil to the drawing surface, we can’t pick it up again. The goal here is to pick a place to start observing on the hammer and try to move your hand with your pencil at the same speed and angle in which your eyes move over the reference. This is called a blind contour line drawing.
Don’t worry about what your drawing will look like. Just concentrate on observing and moving your hand with the pencil.
This is what my drawing looks like (along with the first to compare)…
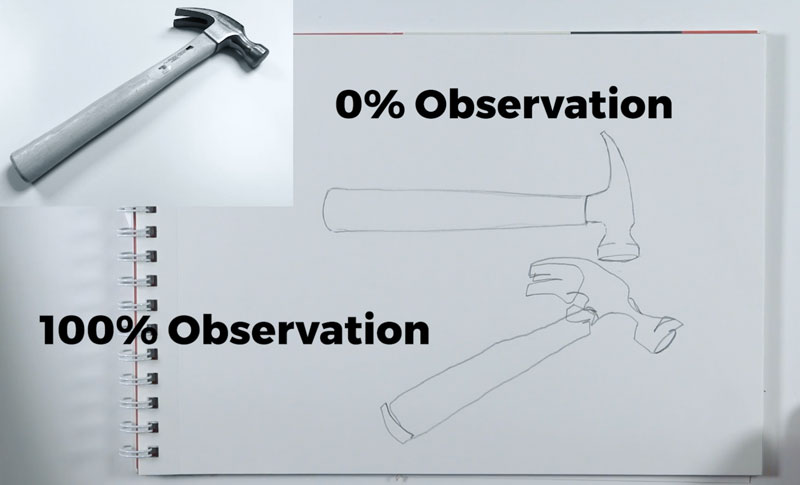
We now have two drawings, one from our imagination without any observation, and one that was created purely with 100% observation. Drawing accurately is somewhere in between these two drawings.
Now here’s the big secret… Drawing is at least 50% observation.
Drawing is about seeing and recording what we see in the form of marks.
Drawing with 50% Observation and 50% Mark-Making
Let’s create one final drawing and we’ll use the same reference photo, but this time we can look at the reference photo and we can look at our drawing paper. We can also pick up our pencil this time too.
Now we’re making comparisons between what we see in the reference and the marks that we’re making on the drawing paper. In fact, it’s a continuous process of going back and forth with our eyes between the photo reference and the drawing paper. All the answers are sitting there waiting for us in the photo reference. All we have to do is see them and place them in the correct location on the drawing paper.
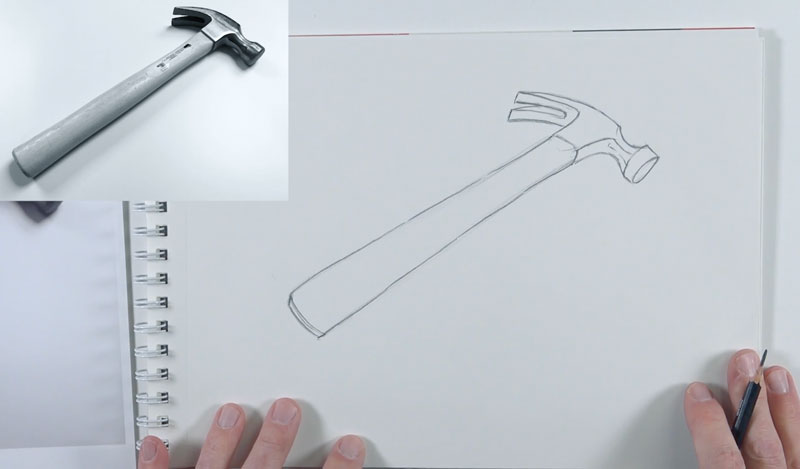
This is the essence of drawing. It is all about observation – well, at least 50%.
#1 Secret to Drawing – Conclusion
The number one secret to drawing is that drawing is at least 50% observation. It’s about what happens between your ears a bit more than just making marks on the surface. When you’re practicing your drawing, you should also be practicing your observation skills because ultimately, drawing is about observation.
If so, join over 36,000 others that receive our newsletter with new drawing and painting lessons. Plus, check out three of our course videos and ebooks for free.