Step by Step Approach to Drawing Anything
In this drawing lesson, I’m going to share with you a simple three step approach to drawing and sketching that improves your accuracy and probably will improve your speed as well.
When most of us first start drawing, we usually start with drawing the outlines, and these are often referred to as contour lines. The problem with this approach is that it is a little bit harder to be accurate with your drawing. You might find a place to start on your drawing, and then when you come back and connect the contour line, sometimes it doesn’t always match up or you have distortion. In this way of drawing we’re starting with the outside part of the subject and working our way to the inside. So we’re working from the outside to the inside. But what if we switched that, reversed it, and instead worked from the inside out?
In this three step process, that’s exactly what we’re going to do. We’ll take a look at two different subjects – one that’s simple and another one that’s complex. We’ll see how this three-step process can be applied. Let’s take a quick look at this three-step process before we go into the examples.
The Simple Process of Drawing
The first step is to break our subject down into simplified shapes. Now this works for simple subjects and also complex subjects, and we’ll see this in just a minute.
See also: Drawing 101 – Simplify for Success
After we’ve broken down our subject into basic shapes, the second step is to draw the contour lines or the outlines. These are the lines that we normally begin with when we create a drawing, but in this case we’re going to start with the simplified shapes then move on to the contour lines.
The third step in the process is to develop the value. Value is the darkness or lightness of a color. It’s one of the seven elements of art, and it’s perhaps one of the most important elements of art. When we develop the value a lot of times people refer to this as shading. We are creating the illusion of form, we’re creating the illusion of a light source, and we’re making our object or subject appear more three-dimensional. So let’s take a look at our first example.
See also: 6 Reasons to Draw on Toned Paper
Example 1 – Drawing a Dolphin
For our first subject, we’ll draw this wonderful dolphin.

Step 1 – Draw the Basic Shapes
Our first step of the process is to break the subject down into basic shapes. We don’t have to worry about drawing a series of controlled shapes. We just want a generalized idea of the shape. I’m drawing loosely and quickly before moving on to the next shape that I see.
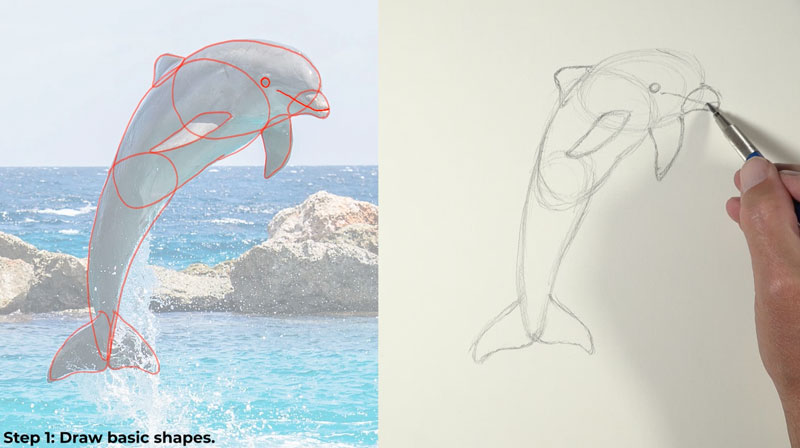
It’s important to note that you may see different shapes in this subject or any other subject that you decide to draw, and that’s completely fine. You just want to find shapes that are simple and easy for you to draw. And for some subjects, it’s going to be very easy to see these shapes. But for others, it might take a few minutes of thinking.
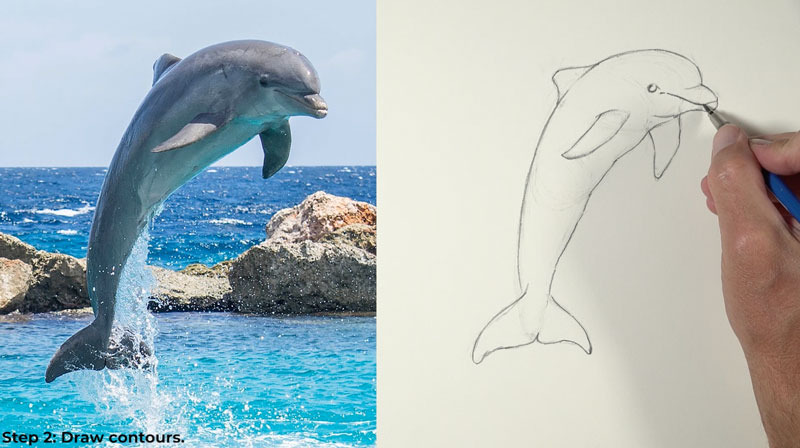
Step 2 – Draw the Contours
Now with a bit more pressure and a lot more refinement, we’ll go ahead and draw the contour lines or the outlines. But since we have a faint version of our dolphin in place, we can draw these contour lines with a bit more conviction, meaning we can be a bit more confident with the marks that we make here and we can concentrate on the quality of the line that we make.
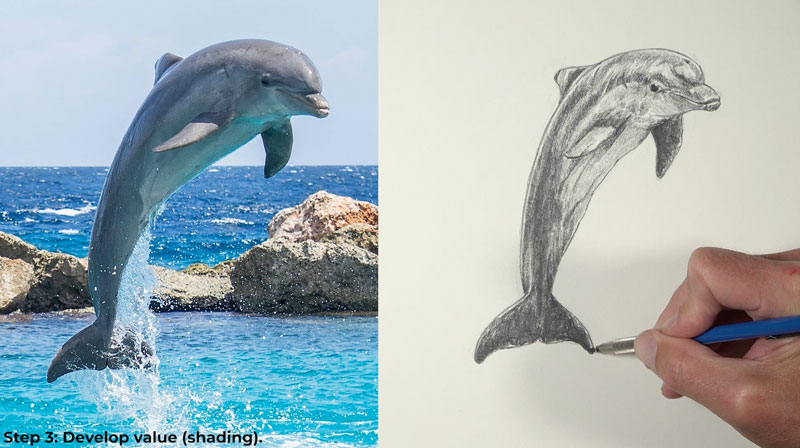
Step 3 – Shade the Drawing
Now it’s time to develop the value. Value, of course, is the darkness or lightness of a color and a lot of times we refer to this as shading. In this case, we’re just adding darker values and we’re leaving lighter areas using the white of the paper to create the tints. And of course, we’re adding graphite in areas to create the shades. Our goal is to create a full range of value. This leads to the illusion of form and texture in our drawing. This is the step that is the most time-consuming part of the process.
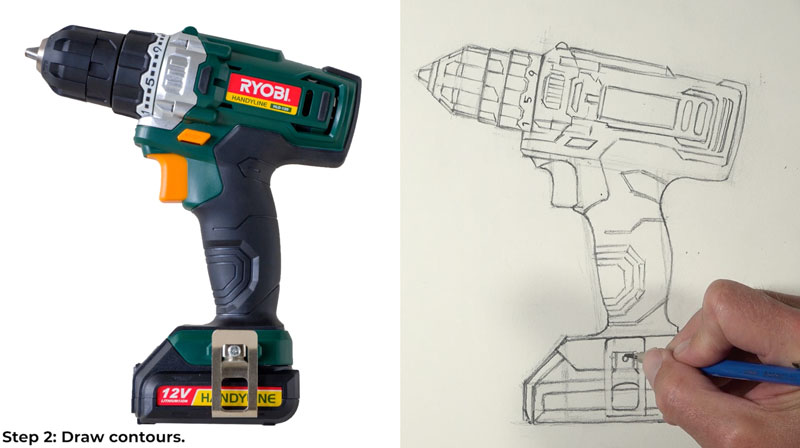
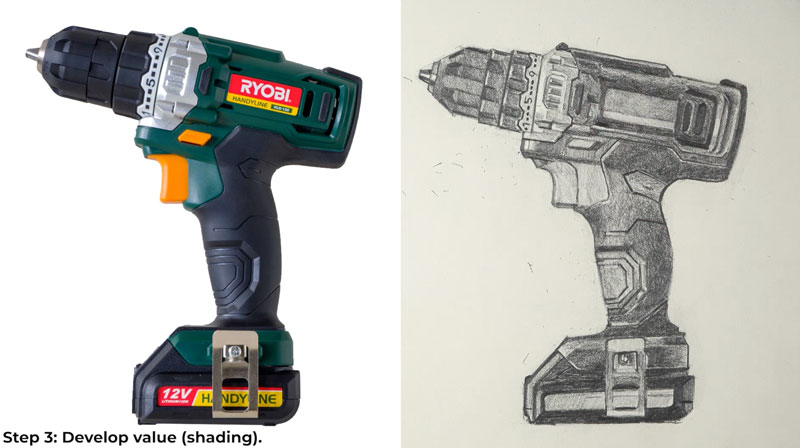
Example 2 – Drawing a Drill
Now we’ve seen how we can apply this simple three-step process to a simple subject. Let’s take a look at applying this process to a more complex subject. This time we’ll draw this very complex drill.

Step 1 – Draw the Basic Shapes
At first glance, this drill might seem overwhelming and overly complex, but we can break this down into simplified shapes. We’ll draw the simplified shapes first, and then worry about the contour lines.
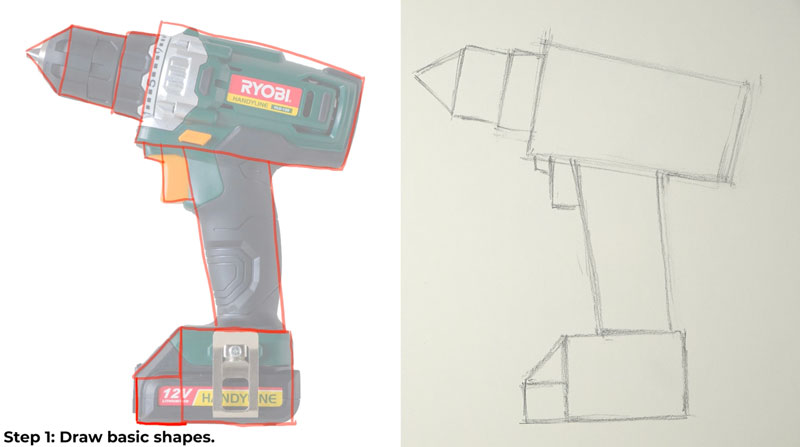
Just like with our first example, I mentioned that you may see different shapes, and that’s completely okay. We’re all going to see things differently. What’s most important is that you just find shapes that you feel are easy for you to draw.
Step 2 – Draw the Contours
Now we can start with the contour lines. This is a complex subject as we’ve already mentioned, but now we have a better idea of where these contour lines need to go. Drawing these contour lines is much easier now that we have a map in place – the map we created with basic shapes. My goal is to be as accurate as possible with these contour lines, but as is the case with any drawing or painting, I’m allowing myself to be a little bit more free with my drawing. If my drawing’s a little bit different from the subject, that’s completely okay with me.
Step 3 – Shade the Drawing
After our contour lines are in place, it’s time to develop the value. Again, this is the most time intensive part of the process. It’s a slow process, but it’s also not that difficult. All we have to do is match the values that we see or match them to the best of our ability in order to create the illusion of form and light on our subject.
3 Step Approach to Drawing Anything – Conclusion
This three step approach is great for creating quick drawings and sketches. It ensures accuracy like we have seen, and it will also improve your speed as well. Now that you know and understand this approach, we’ll find use for it in your own drawings and paintings.
If so, join over 36,000 others that receive our newsletter with new drawing and painting lessons. Plus, check out three of our course videos and ebooks for free.