Why Is Paper White?
Walk into any art supply store and you will find aisles of canvases and sketchbooks, nearly all of which are white. At the end of the sketchbook aisle you’ll probably find a rack single sheets of paper in a variety of grays, browns and muted hues. Ask a store employee and they might advise that these papers are for pastel.
They are partly right. These toned papers have a smooth side and a rougher side. The rougher side is great for pastel. However, all drawing media are appropriate for toned paper drawings. In fact, working with just black and white media on toned paper is a great way to stretch your skills.
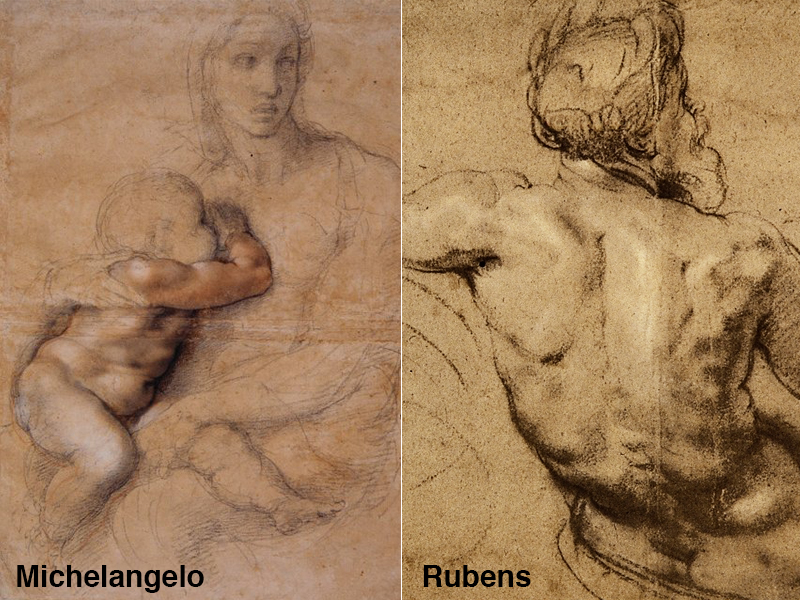
During the Renaissance and the Baroque Period, artists such as Michelangelo and Peter Paul Rubens commonly drew on light brown or light gray paper, not in pastel but in ink, charcoal, conte crayon or any other drawing media.
Below we’ll consider some of the advantages to drawing on a toned surface. We’ll also walk through the steps you might take in creating an artwork on toned paper yourself. Of course, the approach explored here is not definitive. It is just one approach, but it is one that is likely to lead to success.
1. Working on Toned Paper Often Leads to More Realistic Results
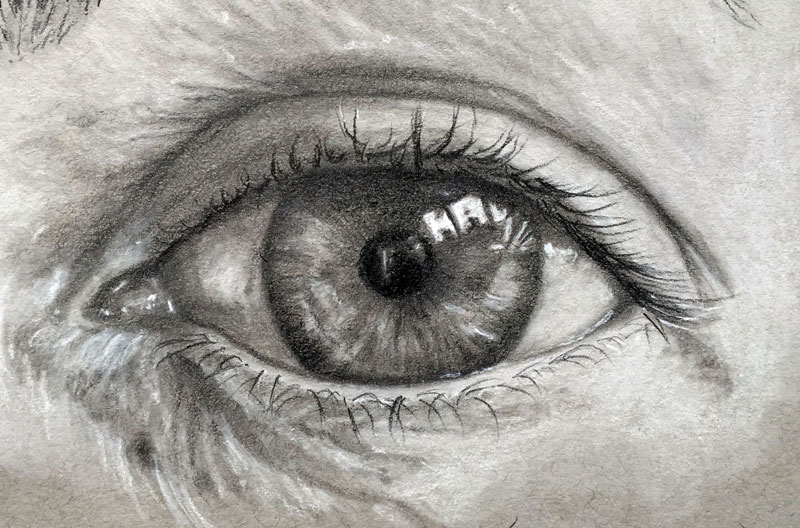
I can still hear my own drawing instructor saying “There is no white in life. There is the sun, and everything else is darker than that.” His point was that our artwork should have little or no white left in it to create the most convincing, realistic depiction.
Therefore, if your paper is darker than white then you avoid, by default, one of the main reasons some drawings don’t seem realistic enough. An otherwise accurate drawing may even seem unfinished to the viewer if too much of the white paper lies bare.
It’s easier to push a drawing darker if you start with toned paper. Then, if you choose add some white highlights, you are doing so with intention and your work will seem more complete.

2. It’s Easier to Hide “Mistakes”
Unless you are Anthony Van Dyck, famous for rarely erasing, you will make mistakes. Mistakes are a part of the process. If, however, your goal is to make a highly refined drawing then you might not wish to see any eraser marks on your paper.
I have good news. Mistakes made in the primary stages of a drawing on toned paper are easier to hide. It’s not magic, it’s contrast. Or rather, a lack of contrast. Your dark marks on white paper stand-out more than those same marks would on gray paper. When you erase those marks from the toned paper, any residual material left on the sheet is likely to melt into the value of the paper and later stages of your drawings.
3. A Toned Surface Increases Your Speed
These days, artists commonly use photographic references. However, for artists working before the advent of photography, quick sketching as an ability was a must. Drawings made without the aid of a photo were a race against the setting sun and the fatigue of weary models. Artists would capture their reference imagery in a sketchbook and then work from those sketches to complete a larger, more involved painting.
Using toned papers allowed these artists to save time. They could shade the darks, use white for highlights and allow the paper to do the rest. Unfortunately, the contemporary habit of drawing from photographs promotes a more sluggish approach. Drawing on toned paper can counterbalance the effect.
“If you can’t paint a man falling from a five story building before he hits the ground, you will never make a monumental painting.”
A quote by Eugene Delacroix, painter of “Liberty Leading the People”, expresses the importance he placed on speed and efficiency, – “If you can’t paint a man falling from a five story building before he hits the ground, you will never make a monumental painting.”
4. Drawing on Toned Paper Enhances Your Painting Skills
Drawing on white paper means that we mostly work in one direction, from light to dark, since our paper starts us off at one extreme of the value scale. When we paint, however, we begin with a range of values/colors on our palettes. We then make light and dark marks all at once, thus working in both directions on the value scale. Drawing on toned paper is a valuable bridge between these two approaches to rendering light and form.
5. Toned Paper Unifies Your Composition
Unity is a guiding principle of art and design. It refers to the overall cohesiveness of an artwork. Drawing on toned paper, particularly a paper of color, practically guarantees a sense of unity in your artwork. The tiny bits of color, spread across your composition, peaking through your marks, creates that unity and can be used to convey an defined mood in your artwork.
6. Encourages a Full Range of Value
Working on toned paper helps to ensure that you create a full range of value and tone in your drawing. A full range of value should be included in nearly every work of art. Value is incredibly important. It describes the light within the scene, the form of the object, and the texture. We should make is as easy as possible to create a full range.
When we start with a white sheet of paper, we begin at one extreme of the value scale. We then have to work to progressively add darker values in order to produce a full range of tone. If we start with a toned surface, somewhere in the middle of the value scale, we only need to push the values slightly lighter and darker. This increases the chances that we will create a full range of value in the finished drawing.
Working on a toned surface also helps us to better understand the contrast of the values that we add. Take a look at an excerpt from a recent question and answer sent in for “The Member’s Minute”. The question is essentially asking why pastel papers are toned…
Create a Drawing on a Toned Surface
Follow the steps below and make your own still-life drawing on a toned surface.
You will need:
- A piece of gray or tan paper
- A pencil (2B or Ebony)
- A white colored pencil or white charcoal pencil
- White tempera, acrylic paint, or gouache
- A few small objects
- A camera and printer
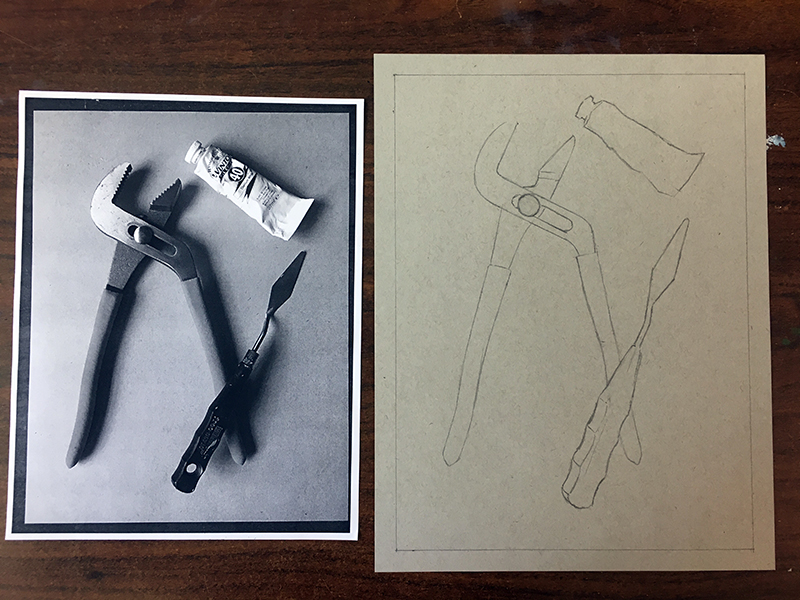
Step One – Gather Your Materials and Lay Out The Objects
Choose a light gray or brown sheet of paper and arrange a small collection of object on it. Take a reference photograph of your objects from directly above without using your a flash. Lay your paper, with objects, next to a window to ensure that the shadows are strong.

Step Two – Create a Contour Line Drawing of the Objects
Make a line drawing of your object. Be sure to consider proportion. Pay special attention to the size and shape of the empty spaces between the objects.
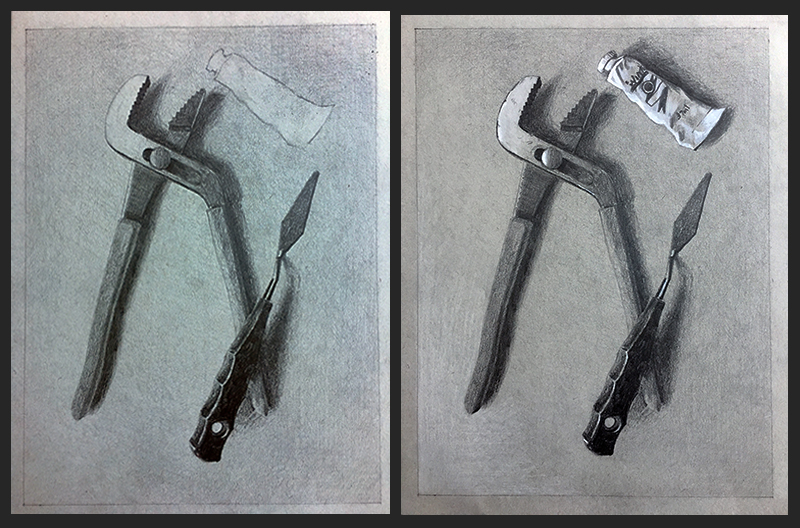
Step Three – Add Tone to the Background
Identify the darkest area of the background and begin shading there, gradually lightening your pressure as you work toward the lightest area of the background. Don’t use any white in the background yet. You may only shade a portion of your page before the natural value of the toned paper matches the reference. That is fine. Late in the process you can use some white to push the background farther.

Step Four – Shade The Darker Values on the Objects
Now shade the objects. Be sure to identify the parts of each object that you believe are the value of the paper and lighter. Erase those areas out if you shaded over them when covering your background and darken the rest of your objects according to the reference photograph.
Avoid using white until you think you are finished with the graphite.
Step Five – Add Lighter Values with White
Now is the time add “pop” to your work with the addition of white media. I like to use the white pencil first. On the grey paper the white pencil is less bright than paint. After applying the white pencil to every area that is lighter than the natural value of the toned paper I’ll then determine if white paint is needed.
If you choose to use paint, use it conservatively. In the example I’ve mostly used white pencil on the pliers and white paint on of the tube.
The only real downside to drawing on toned paper is that you have to carry two pencils instead of one – which is not much of a downside at all.
If so, join over 36,000 others that receive our newsletter with new drawing and painting lessons. Plus, check out three of our course videos and ebooks for free.