Limited work time is not the only challenge to drawing the figure. It is a slippery subject, able to dramatically change its orientation. Since the figure does change its shape, it provides the artist with a unique experience each drawing session.
The audience amplifies the challenge, as we are more critical of the drawn figure more so than any other subject. People are quick to point out displeasing human proportion (both in art and in life). Therefore, one must work extra hard at accurately capturing the figure in a drawing or painting. Beyond hard work, one needs proven methods for doing so.
See also: Gesture Drawing – Drawing the Human Figure Quickly
Proven Methods for Figure Drawing
Keep in mind, there are numerous methods to creating a drawing, not all of which are the focus of this lesson. The approaches described here are meant to be integrated into your process, not replace it. These ideas are time tested.
- Build a drawing on the elements of art and in the order as the elements of art.
- Use negative shapes to your advantage.
- Look at vertical and horizontal alignments of body parts.
Building a Figure Drawing with the Elements of Art
The elements of art are line, shape, form, value, color, space, and texture. These elements are almost always listed in this same, logical order. This particular order is organized from simple to complex with line being the most simple. We will see how the first three elements act as a road map to start a figure drawing.
Drawing the Figure with Line
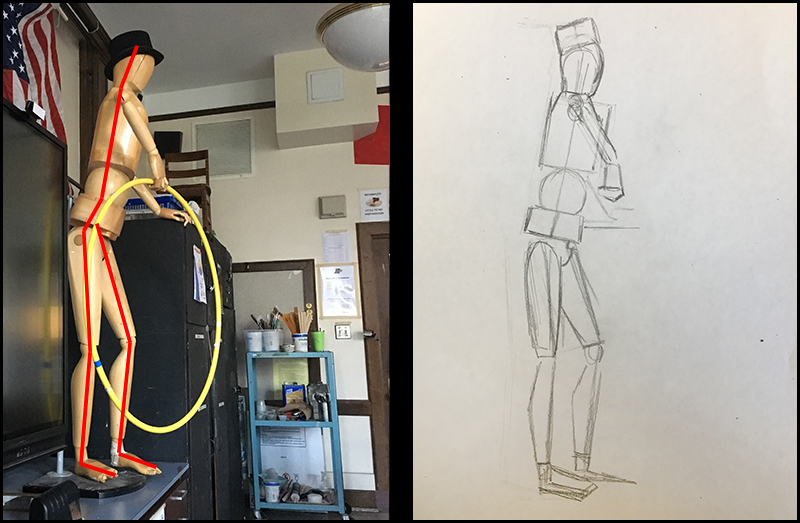
Note – The following drawing was created from life in a classroom environment. The photograph of the drawing manikin is for the reader’s benefit but was not used when making the drawing. For this reason, there may be small discrepancies between drawing and the photograph that was taken after the completion of the drawing.
In the image above, we can see how the first element of art – line, captures the subtle tilt of the figure. Starting a figure drawing from life with only one or two lines is enough to capture the overall gesture of the figure. One should refine this line until it leans and tilts like the subject.
In order to find this angle, you may consider holding your pencil up at the subject. Compare the angle of your pencil with the observed angle of the major parts of the subject’s body.
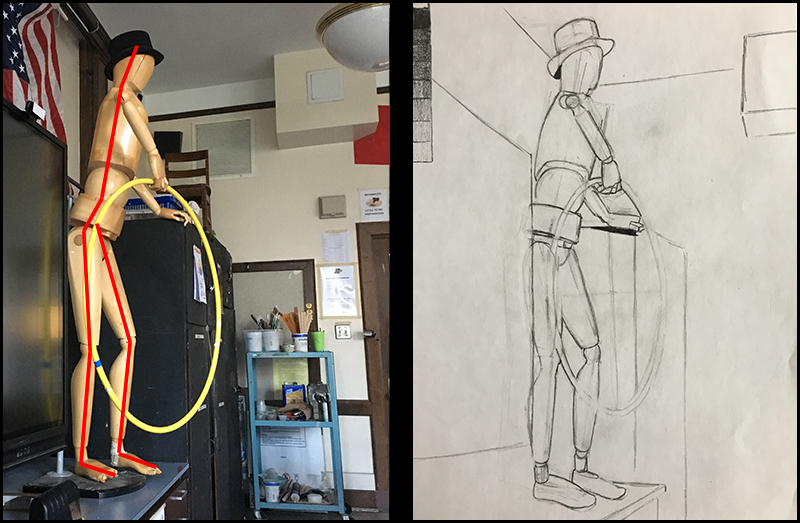
Drawing the Figure with Shape
The second element of art is shape. The second step in a figure drawing is to draw shapes on top of the line from the previous step. The line will keep you from losing the gesture while focusing on the basic shapes. Use these shapes to judge general proportions. This is the time to modify proportion, while there are neither details nor shading.
Notice that these shapes are quite simple. They are pieced together to make more complex shapes. Try to simplify your subject down to the most basic shapes possible.
See also: Drawing Basics – Construction
Drawing the Figure with Form
Form is the third element of art we’ll consider. Only after capturing gesture and proportion using line and shape should the artist refine his/her drawing into a collection of specific forms and subtle contours. At this point, the artist can carefully capture form without fear of having to make major proportional changes.
With a drawing, we are dealing with the illusion of form. This means that we create this illusion by developing the values. Value is another element of art and refers to the darkness or lightness of a color. The positioning and relationships of values inform the viewer of the form (and texture) of the subject as well as the light within the scene. This is the process we commonly refer to as “shading”
See also: Basic Shading Techniques
Using the elements of art to construct a drawing organizes the process. While this is not a step by step formula, it is clearly a process we can use to organize our observation.
However, there is more to consider with figure drawing.
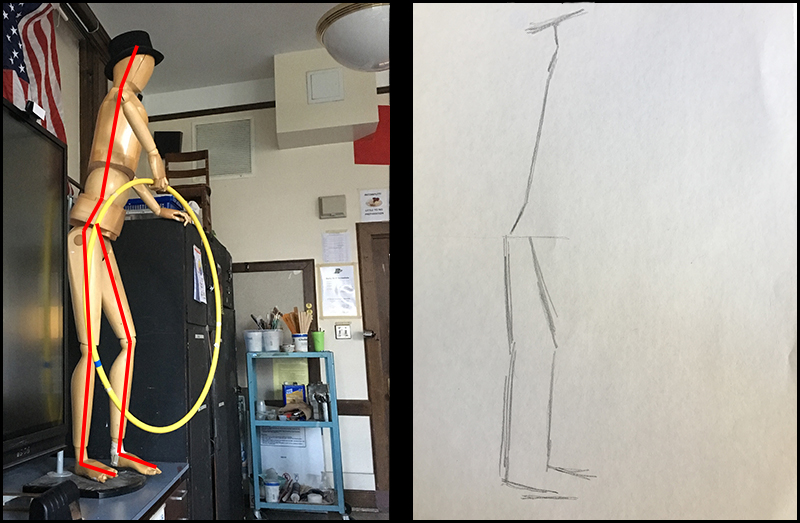
Consider Negative Shapes
The shapes mentioned in the previous section of this article are not the only shapes in this drawing. There are other often overlooked shapes – negative shapes.
Negative shapes are shapes created by the areas around the subject and its environment. Negative shapes are the empty shapes between things. Look at the images below. Some of the important negative shapes in the scene are highlighted in yellow.
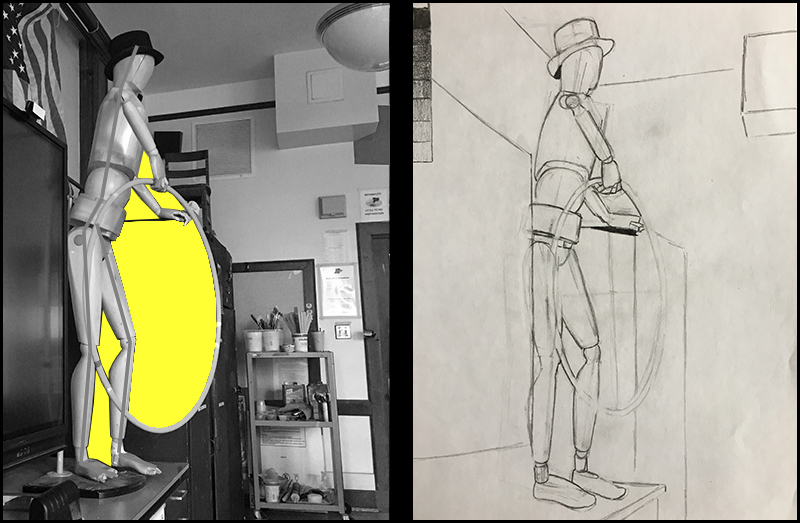
Negative shapes help the artist to capture the relationship of different parts of the figure. Look at the small quadrilateral shape between the hand, body and hoop. If that negatives shape is drawn similarly, then the relationship of those three individual parts is accurate. Negative shapes help us to capture the oneness of complex composition.
By considering both positive and negative shapes, we have a better chance of accuracy in our drawing.
See also: Positive and Negative Space
Negative shapes are not our only option when it comes to capturing the relationship of individual elements in a composition. While negative shapes capture the relationship of adjacent parts, alignment lines capture the relationship of disconnected parts.
Using Alignment Lines in Figure Drawing
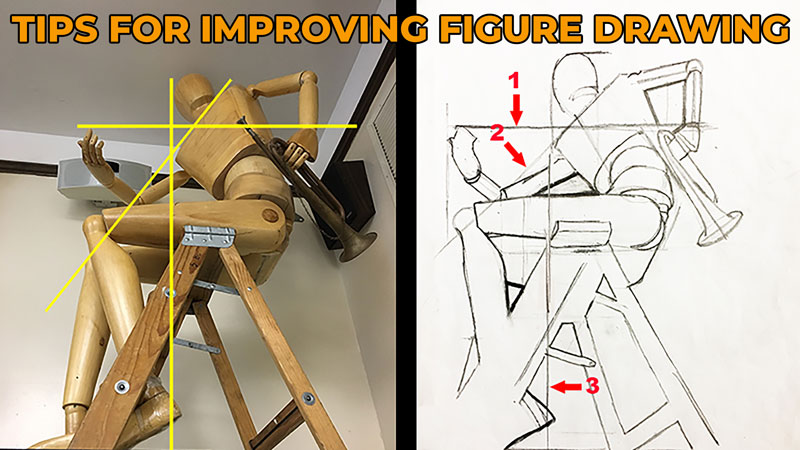
In the image below, lines have been superimposed over a complex pose. These lines are vertical, horizontal, and diagonal.
Most of us are better at imagining vertical and horizontal lines compared to diagonals. Think about it – using only the imagination, most or all people can more easily draw a vertical line than a line that slopes at 31 degrees to the right.
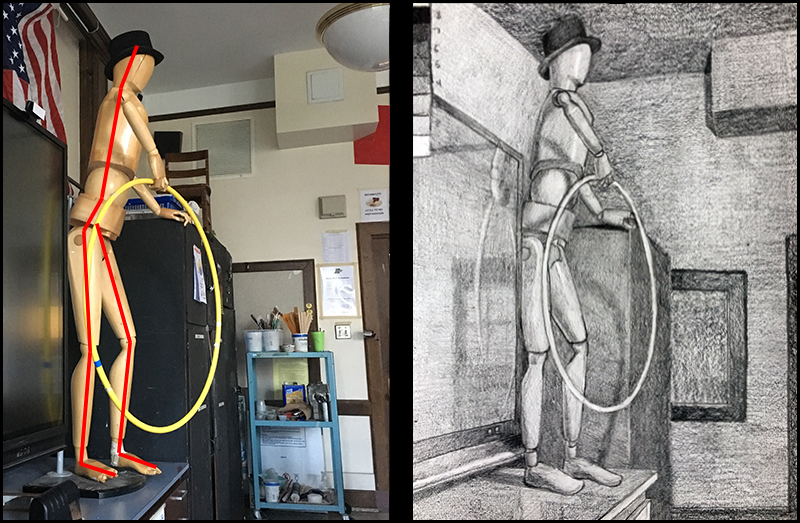
Now let’s look at our manikin reference and compare it to a line drawing of the same subject.
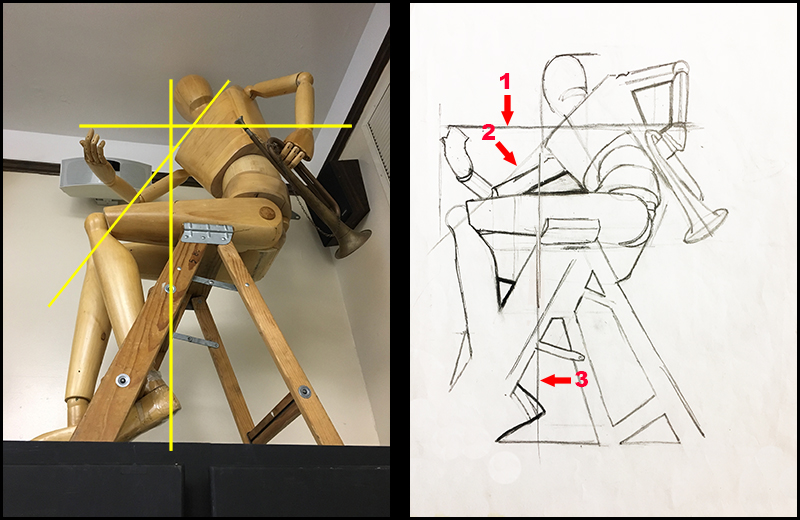
Look at the line marked “1”. It reveals the tip of the hand on our left is horizontally in alignment with the wrist of the hand on our right. This is important information. Now look at line “3”. It shows that the head and the heel are vertically aligned with one another.
So, the head has a special relationship to the heel. The fingertips on one hand have a special relationship with the wrist of the other hand. These special relationships act as checkpoints when creating a drawing.
Of course the artist is not restricted from using imaginary lines that are not vertically or horizontally oriented. The artist can, using his/her imagination, stretch out the figure’s actual contours. Look again at the image above. See how the shoulder line (marked “2”) is drawn all the way to the manikin’s knee. This line will help the artist check the knee’s placement for accuracy.
Let’s Wrap It Up
Although the focus of this lesson is drawing the figure from life, these same techniques will improve the efficiency of drawing any subject – even from a photograph. Using the elements of art, negative shapes, and alignment lines to draw the figure are not exclusive steps but should all be considered simultaneously.
Incorporate these techniques into your own process to improve the accuracy and speed of your drawing.
If so, join over 36,000 others that receive our newsletter with new drawing and painting lessons. Plus, check out three of our course videos and ebooks for free.