On top of this, these charming creatures make good companions for people and other animals.
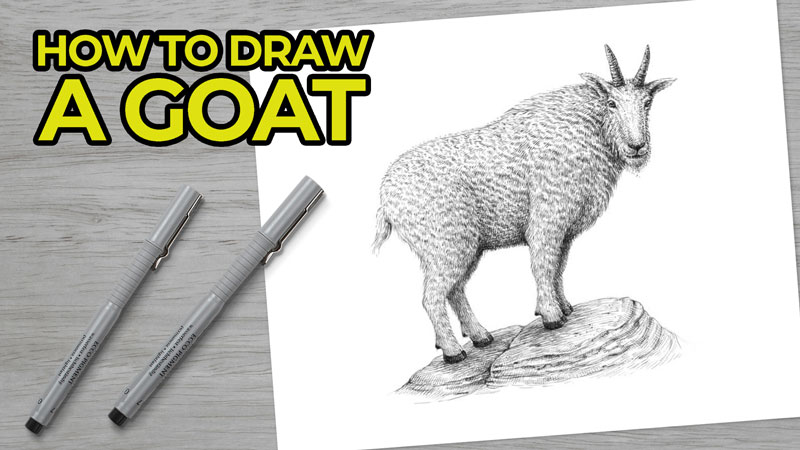
Today’s drawing lesson is dedicated to goats. More precisely, we’ll be drawing a mountain goat. It is also known as the Rocky Mountain goat.
Technically, mountain goats are not in the same genus as true goats. They belong to the Bovidae family, just as their mentioned relatives. Most likely, mountain goats share a common ancestor with true goats and sheep.
Within the Bovidae family, mountain goats are associated with antelopes, gazelles, and cattle.
Anatomically, the appearance of true goats and mountain goats is quite similar. Both demonstrate woolly coats, cloven hooves, and the signature curved horns.
The more significant distinction between these two groups is habitat. Mountain goats live in alpine and subalpine environments. They mainly reside among the mountain peaks of North America.
The high elevation protects theses animals from predators. Mountain goats are capable climbers. They are adapted to the insecure footholds of cliffs that are covered with ice and snow.
I hope that this introduction was interesting enough to make you excited and inspired to draw a goat. Let’s begin our drawing session! We’ll learn some other facts along the way.
Art Supplies For Drawing a Goat with Pen and Ink
We’ll start with a graphite pencil underdrawing, so keep an ordinary HB pencil and an eraser at hand.
I’ll be drawing on an A4 sheet of paper with a smooth surface.
For the inking part, I’ll be using two ink liners. Their sizes are 0.05 and 0.1. A combination of a dip pens and liquid black ink is also an option.
Drawing a Goat with a Graphite Pencil
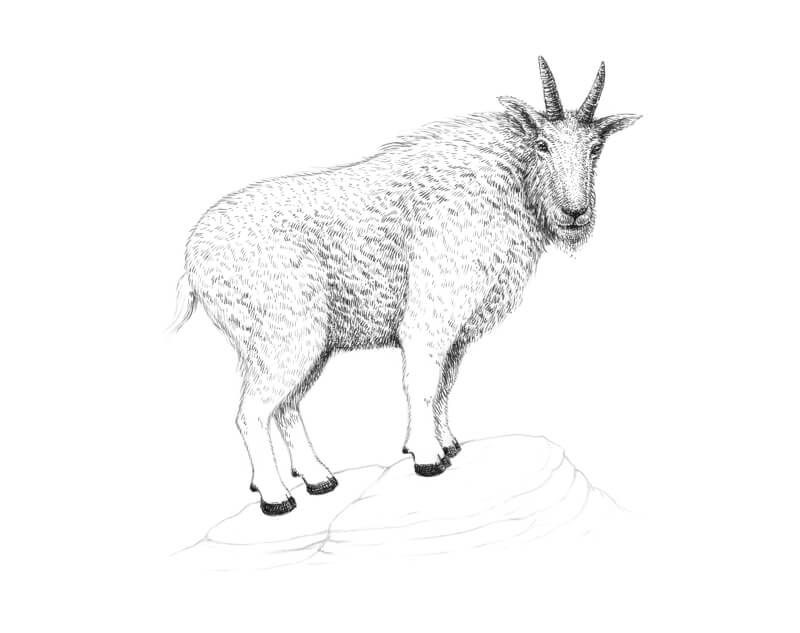
I’ve chosen a pose with a slight inclination. This pose will make our artwork more dynamic and eye-catching. The goat will be standing on a rock and looking at the viewer.
Our first task is to create a stylized framework of the animal’s body. I start with simplified shapes that mark the position of the goat’s elongated head, horns, and ears. Mountain goats have thinner, lighter skulls than true goats. Also, their horns grow shorter, slenderer, and pointier than those of true goats.
It’s interesting to know that, unlike true goats, mountain goats do not butt heads. Instead, they stab each other with their horns – ouch.
At this stage of the process, the marks can be rough and sketchy.
I add a long core line that indicates the direction of the animal’s body.
The body is marked with a long elongated shape. Mountain goats have two types of fur, so their woolly coats are thick and shaggy. This feature is quite beneficial, as these animals live in a cold environment. Our shape also includes some space for the fur.
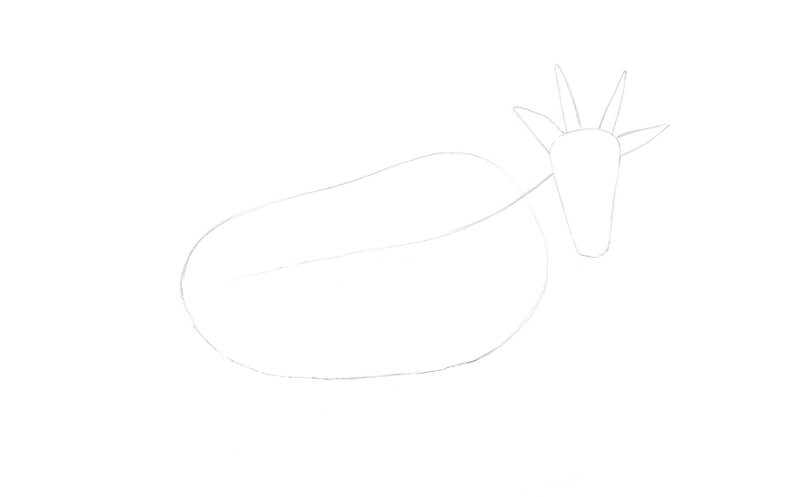
I mark the eyes, nose, and mouth, using subsidiary lines. There is a significant distance between the eyes’ level and the nose. Keep in mind that one side of the head will be less visible due to foreshortening.
See also: Drawing Basics – Construction
I create a simplified shape of the neck by joining the head and the body with two lines. Then I mark the short tail.
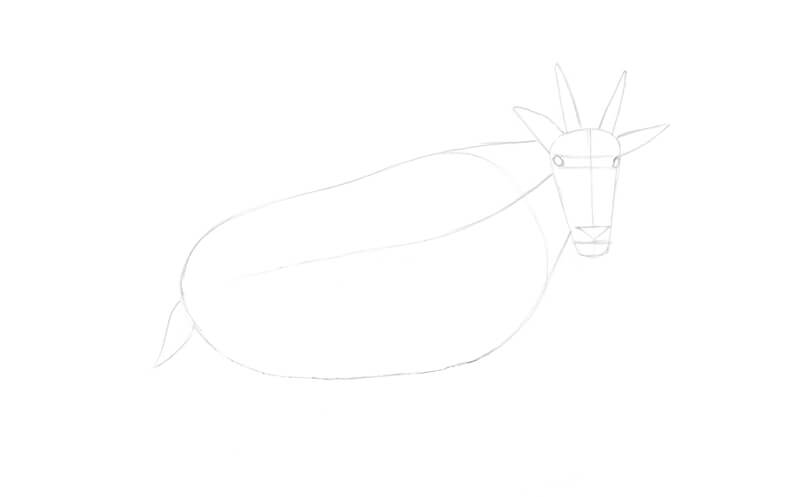
Let’s add a framework for the limbs. I mark the joints with circles.
For the forelimbs, the joints include the shoulder, elbow, and knee. (From top to bottom.) The joints of the back legs are the hip, stifle, and hock.
The shapes at the lower ends of the legs mark the hooves.
I add two inclined lines under the goat’s feet. They outline the direction of the underlying surface, so the pose becomes steadier.

I draw the contours of the limbs.
The areas near the joints are thicker, more prominent. Some parts, like hock or elbow, show an angular curve.

I refine the head and add the pupils and the ear openings. I also widen the area of the muzzle, but it’s still quite slender.
By the way, horizontal pupils enable panoramic vision, allowing the animals to notice danger as soon as possible. Such a shape supports an enhanced image quality of the objects that are directly ahead of the animal. Horizontal pupils also allow for more light to enter the eyes.
See also: How to Draw Animal Eyes with Pen and Ink
We no longer need the subsidiary lines, so I erase them.
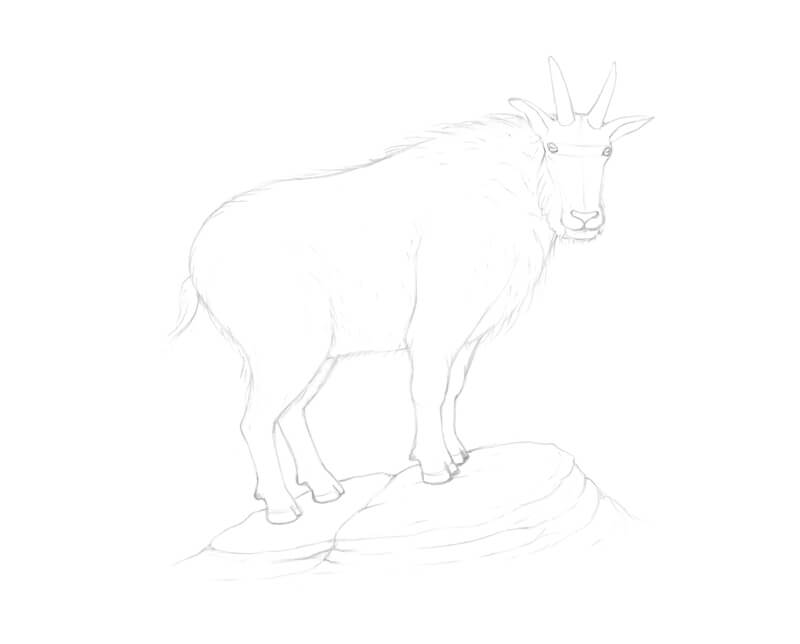
After refinement, the contours have become smoother and more polished. I add the strands of long fur that are framing the lower sides of the head. They are more visible at the side that is closer to the viewer.

I refine the contours of the body and legs. The long, shaggy fur affects the appearance of the silhouette, so I remove the initial continuous line and replace it with a set of marks that imitate hairs.
I change the hooves, too. There are two toes on the front side of each hoof. They can spread out to improve balance.
I also add the dewclaws. They can be found on the back of the goat’s feet and help to prevent slipping.

As a finishing touch, I add the contours of rocks under the feet of our animal.
The underdrawing is complete!
Drawing a Goat with Ink Liners
Mountain goats have beautiful fur coats of white or cream color. No doubt that this light coloration provides excellent camouflage among the snow!
As we’re going to use black ink to complete the drawing, working gradually should be our core principle. It’s always possible to add more lines, but removing the excessive marks can be extremely difficult.
See also: How to Fix Mistakes in a Pen and Ink Drawing
There are folds of fur in the neck area and also near the upper parts of the legs. With 0.05 ink liner, I mark the darker, deeper areas in the goat’s coat.
I work with groups of short lines. There may be some variation in direction, curvature, and length. In general, the marks follow the contours of the goat’s body.
The upper part of the body gets more light from the natural environment. In that area, much of the paper may be left untouched.
Also, I start creating the main contour of the animal’s body. Long lines imitate the flow of hairs.
In the image below, you’ll find samples of the fur texture and the enlarged contour.

With 0.1 liner, I draw the eyes. Then I darken the nose, mouth, and ear openings.
I draw the contours of the horns with an interrupted line and mark the texture of the yearly growth rings. Fur overlaps the foundations of the horns, so avoid any harsh outlines there.
With short marks, I start creating the texture of the head’s coat. In some areas, the lines resemble dots. (The image below, point a.)
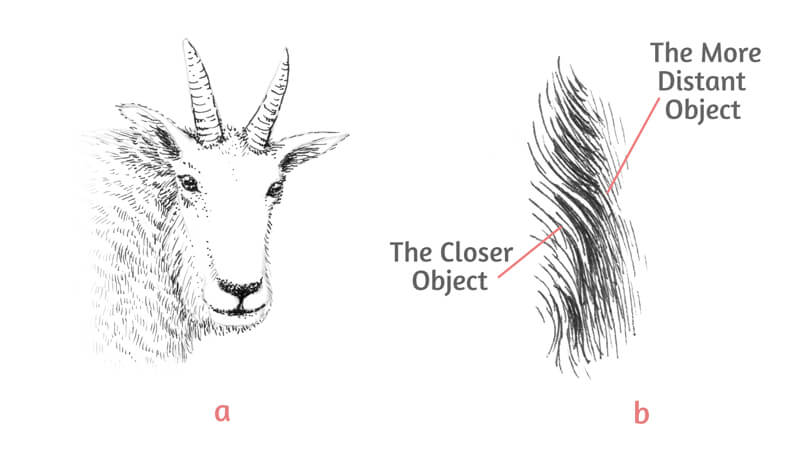
Now let me explain the concept behind the other illustration (point b) in the image above.
Although the fur’s local color is light, it may look much darker in the shadowed areas.
Besides that, sometimes we deal with two objects that have a light local color. Let’s imagine that the first object is closer to the viewer and the second one is more distant. (Like, in our case, the closer and the farther leg of our mountain goat.) We should increase the contrast to make a distinction between the objects.
Here’s a tip that helps to set the planes visually. It also allows conveying the feel of the fur texture.
The lines used for the closer object should imitate the texture – in our example, the hairs. When working on the farther objects, place ink marks in the gaps between the hair-like marks of the closer object’s contour. The lines that cover the farther object should be more unified.
We’ll use this technique when working on the goat’s legs. The folds in its coat require a similar approach.
I continue adding groups of short hatches with 0.1 liner. I work on the body. The deeper areas of folds in the coat (neck and belly) get an accent.
I create soft shadows that separate:
- the head and neck
- the belly and the upper legs
I darken the legs that are farther from the viewer. I make sure that the hairy contour of the legs closer to the viewer remain readable. We don’t have to be perfectly precise with our marks or draw every single hair or strand. The goal is to create the illusion of fluffy fur wrapping up the limbs.
I also accent the hooves, covering them with layers of cross-hatching. Horizontally-oriented lines are slightly curved. They repeat the contours of the hooves.

With a 0.05 liner, I add more lines to the head. The muzzle becomes slightly darker. This shift conveys the transition between the planes – it is assumed that this area receives less sunlight.
The sides of the nose become covered with short hatches while the marks follow the direction of the fur. The central part of the nose is worthy of the most delicate lines. They are very short, resembling dots.
I make the beard slightly longer.
I darken some areas of the fur on the head. This change is minor. The subtle contrast creates a hint at irregularity that is typical for natural textures.
I add layers of contour hatching to the horns, giving them more volume. One side of each horn is slightly lighter.
With a 0.05 ink liner, I work on the legs in a similar manner. New marks support the existing ones and contribute to the overall look of the texture.
Be patient, as drawing fur often requires a lot of time and effort.
I add some long lines to the lowest area of the belly to accent the form and emphasize its direction. These marks also strengthen the core shadow.
There are deep folds of the fur in the bottom part of the goat’s body. We remember that although the coat is light in value, it may look significantly darker in a shadowed area. I make sure that even the lighter, more prominent parts of the folds, are not too bright. They shouldn’t distract the viewer’s attention.

The hatches that I add to the lower parts of the legs are plain and unified. The fur is shorter there, and the contours reflect this change. You may need to add some contour hatching to the areas near the hooves to give the limbs more volume.

It’s time to complete the fur on the goat’s back and rump. These sections are lighter, so I’m going to leave much of the paper’s surface untouched.
With a 0.05 liner, I add more short lines to the mentioned areas. In the image below, you’ll find a close-up sample of this texture.
I add some short lines along the contour of the goat’s back. They create the illusion of light coming through the hairs.
The components of the head (eyes, nose, and horns) and the hooves are my reference points in terms of value and contrast. They should be dark enough to emphasize the lightness of the fur.
At the end of this stage, we should get a nice, soft gradient from the lighter top of the animal’s body to its darker bottom. Squint your eyes softly and look at your artwork. Do you like the resulting value transition? This simple trick will help you to determine whether you need to add more ink marks.

With a 0.05 liner, I add long, mostly parallel, lines to the stones. The marks repeat the direction of the planes. The darker areas of the relief get an additional layer of hatches.
I use fewer lines in the bottom part of the drawing. This trick creates the impression of a transition of value.

With a 0.05 liner, I work on the details of the rock texture. The goal is to give some interest and credibility to the environment, leaving the goat as a focal point. Be careful not to overdo this element. A few cracks and hollows will be enough.
I darken the area right under the animal, strengthening the cast shadow.
I evaluate the artwork once again. It is complete!

How to Draw a Goat with Pen and Ink – Conclusion
Congratulations! We’ve created a beautiful drawing of an interesting mountain goat. I hope that you’ve enjoyed our creative journey – and also learned a couple of useful things!
I wish you much inspiration for your future art projects and pen and ink drawings. Have fun and enjoy your work!
If so, join over 36,000 others that receive our newsletter with new drawing and painting lessons. Plus, check out three of our course videos and ebooks for free.