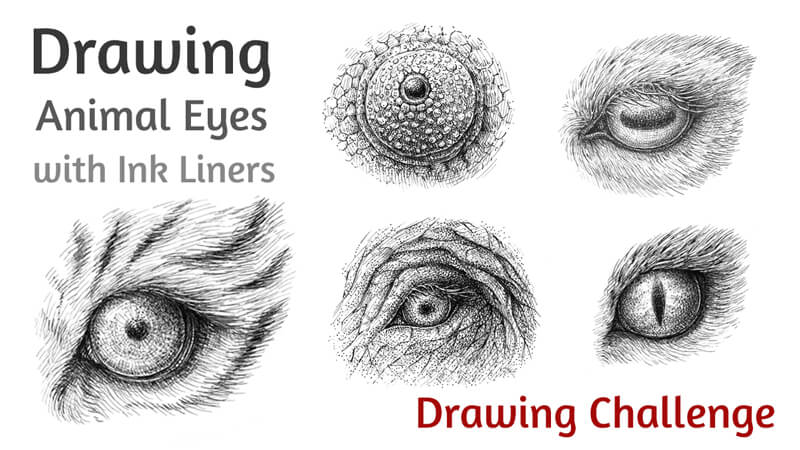
The Challenge – Animal Eyes with Ink
In this pen and ink lesson, we’ll take a look at drawing several different animal eyes. Each set of eyes is extremely different from the rest making this a wonderful drawing challenge.
You’re probably familiar with at least several art challenges out there that people have devised. Some of them are large-scale and social. They may be conducted in a particular month, prompting people all over the world to draw and share their creations.
This kind of activity usually requires a commitment to complete some sort of work over a specific period, often with some level of regularity. Art challenges encourage us to focus our attention on a particular topic or medium. But an art or drawing challenge can be individual endeavor as well – centered around specific medium or subject – or better yet – a specific subject AND medium.
Anyone can create a plan for an individual art challenge. Here are several questions to ask yourself when planning your own art challenge…
- What’s your goal or desired outcome of this challenge?
- What are you going to draw – what’s the subject?
- What art medium is optimal for your challenge?
- How many drawings should be in the complete series?
I’ve decided to create my own little art challenge, exploring the subject of animal eyes with pen and ink. These drawings are just a starting point since there is so much diversity out there pertaining to this subject.
We’ll draw five examples of eyes together. If this subject inspires you, feel free to continue the series and make it your own art challenge as well.
Drawing Materials
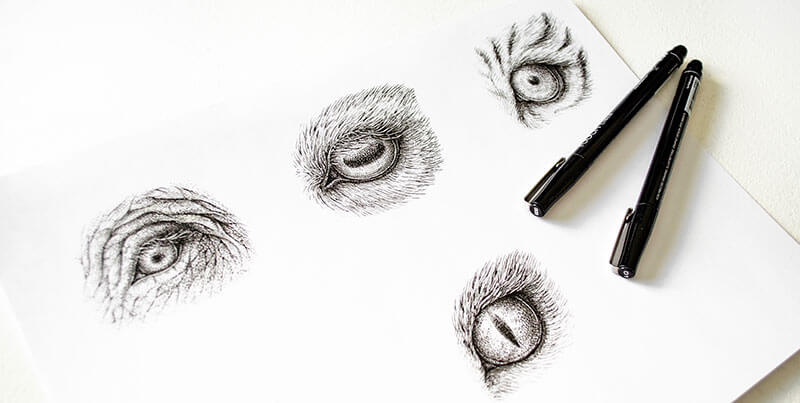
I’ll be using an HB pencil and an eraser to create underdrawings. A 0.05 and 0.1 ink liners are used to complete the drawings and develop the texture and value. Each drawing is small, only about 6×7 cm, so all five of them can easily fit onto a single sheet of drawing paper. But keep in mind – the larger your drawing, the more details you can add to it.
What Can We Observe?
Let’s take a quick look at several aspects to consider when drawing animal eyes.
1. Notice the position of an eye. Compare the size of the eye with the size of the head.
When it comes to drawing a small part of a complex object, it’s easy to lose sight of the bigger picture. The eyes are located on the head of an animal, and the specifics of the anatomy of the head greatly influences the appearance of the eye.
The eye sockets of some animals are quite large in comparison with the size of the skull. Usually, this is true for creatures that are active at night. Larger eyes have evolved to allow the animal to see better at night.
Eyes that face forward on a skull suggest that the animal is a predator. Such eyes allow for better judging of depth, which helps to track and pursue prey.
If eyes are located on the side of the head, it may be the sign of a prey animal. This kind of placement allows for greater peripheral or side vision. This helps the animal see predators approaching from the side or from behind.
2. Observe the shape of the pupil.
The shape of the pupil is closely related to the animal’s size and whether it is a predator or prey. There are three most common shapes of pupils:
- Vertical
- Horizontal
- Round
Of course, there are exceptions and not all animal eyes will fall into one category. For example, the pupils of a Cuttlefish resemble the letter “W” and dolphins have pupils shaped like crescents.
Animals with vertical pupils are most likely ambush predators. Such pupils allow for accurately judging the distance to the prey.
However, this rule is true only if the animal is short, so its eyes aren’t too high off the ground. A clear example of this principle is the difference between house cats and their lager relatives. Small cats have vertical slits, but the pupils of tigers or lions are round.
Round pupils usually can be found in taller hunters that actively chase down their prey.
Prey animals are very likely to have horizontal pupils. This kind of shape provides an animal with a panoramic view, so they can scan in all directions for danger.
3. Note the features of the eyelids, eyelashes, and other details.
There’s clearly more to drawing the eye than the eye itself. We must also consider the areas that surround the eye including the eyelids, skin and/or fur. The eyelids, in particular, can be quite varied.
For example, camels have three eyelids. These complex eyelids help to protect their eyes from sand. Their eyelashes can measure up to 10 cm long!
A Process for Drawing an Animal Eye
We’ll first need to gather reference photos or a tame animal to draw from life. Remember, drawing is at least 50% observation, so we’ll need something to observe!
No two eyes are exactly the same. For this reason, it’s impossible to develop one process that will work for every eye that you encounter. However, there are a few general steps that will help you as you go through the process of observing and drawing.
If we try to determine any specific steps, the sequence may look like this:
- Start with a rough shape of the eye.
- Add the approximate contours of the eyelids.
- Refine the eyelids and add the pupil.
- Add the significant details, such as the eyelashes.

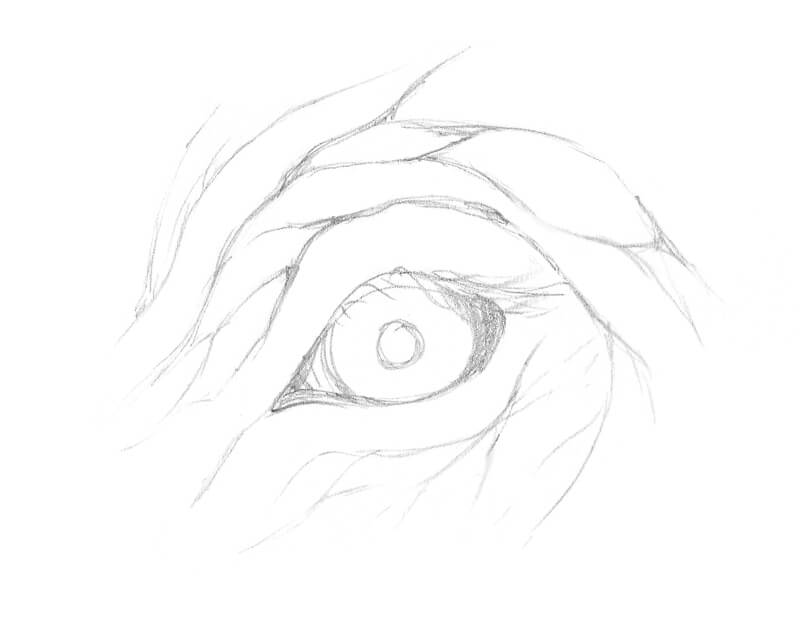
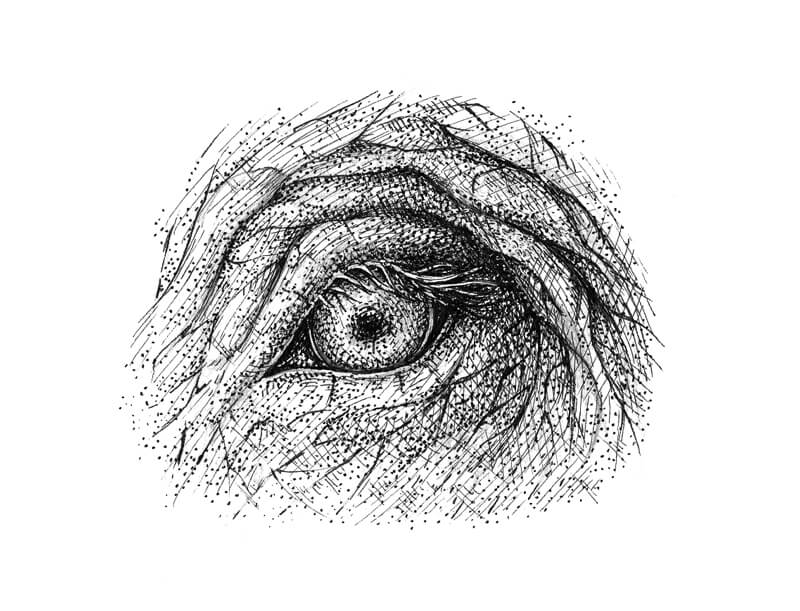
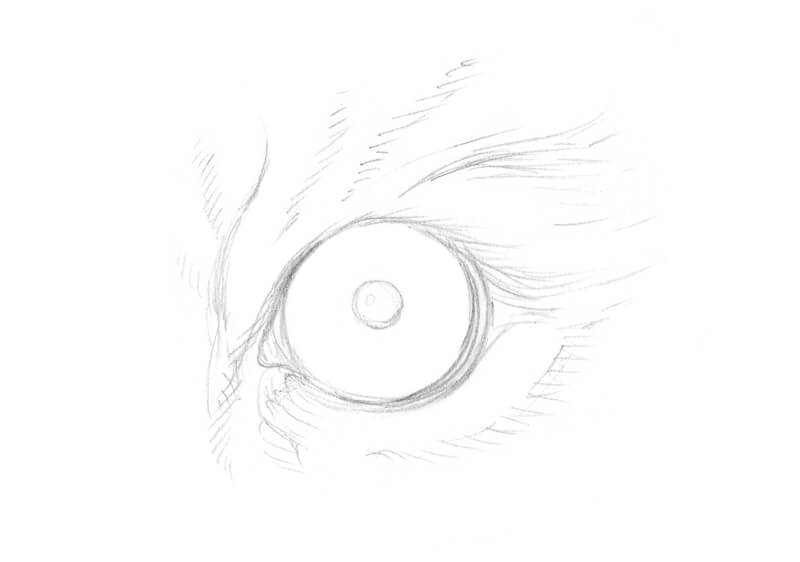
Elephant Eye with Pen and Ink
Let’s get to it and draw a few animal’s eyes. We’ll start with the eye of the elephant.
I start sketching with a graphite pencil. I outline the main contours of an elongated eye, the eyelids, and some wrinkles around it. I darken the corners of the eye and also add long eyelashes to the upper eyelid.
Eyes of an elephant are small in comparison with the size of the head. These animals have limited peripheral vision due to the position and size of the head. Elephants have poor eyesight and can only see for short distances of up to 20 meters.
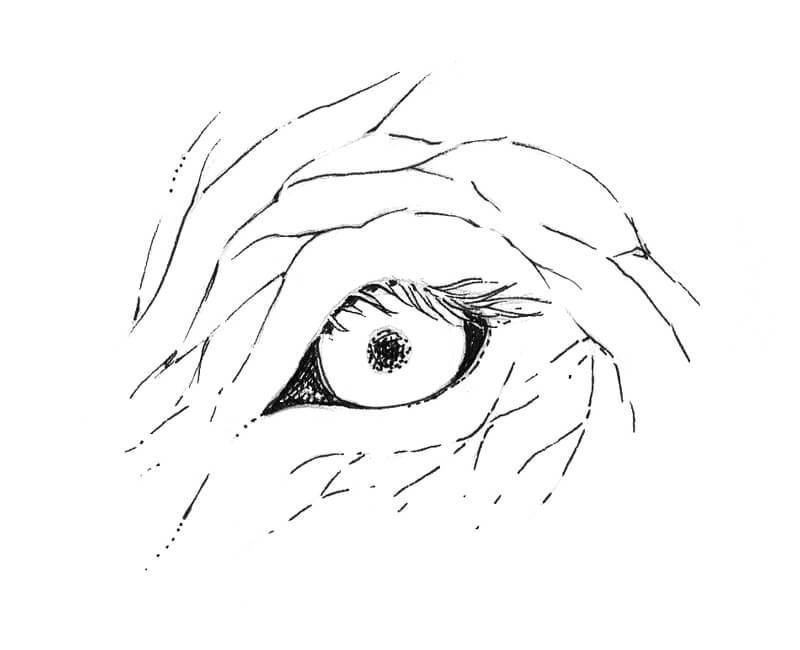
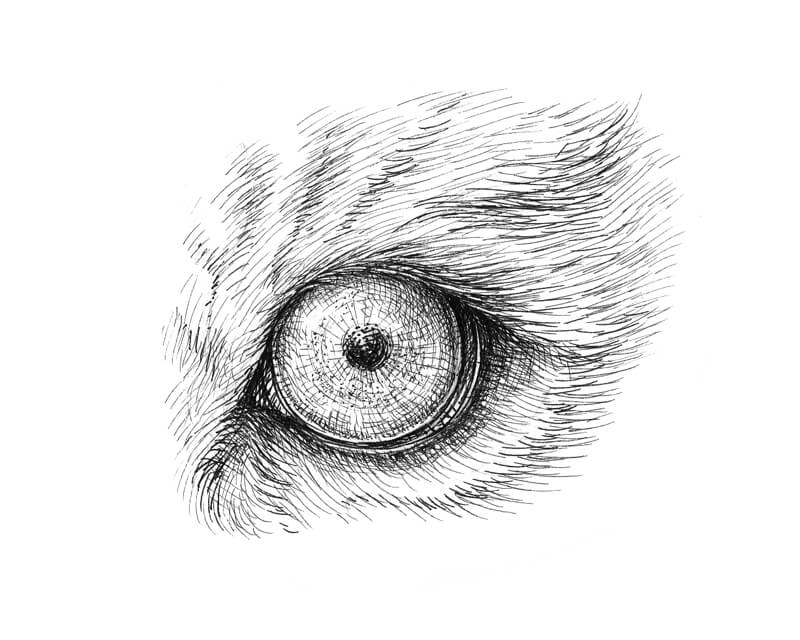
With 0.1 ink liner, I outline the contours of the eye and then mark the wrinkles and the eyelashes.
I darken the pupil and the corners of the eye. The edges of elephant’s pupil seem blurry and are not hard-edged, so I add dots to soften the edges.
See also: Pen and Ink Drawing Techniques
With a 0.05 liner, I add hatching to accent the relief of the skin. Some wrinkles near the eye are quite deep so the value here is dark.
I give more volume to the iris by applying fine, rounded hatches. Notice how the eyelashes cast a subtle shadow on the iris. Don’t overdo the eye at this step and be sure to leave some space for the highlight.
I also add some dots to the area around the eye using a 0.1 liner. Stippling on top of hatched layers helps us to create the illusion of the texture of the skin.
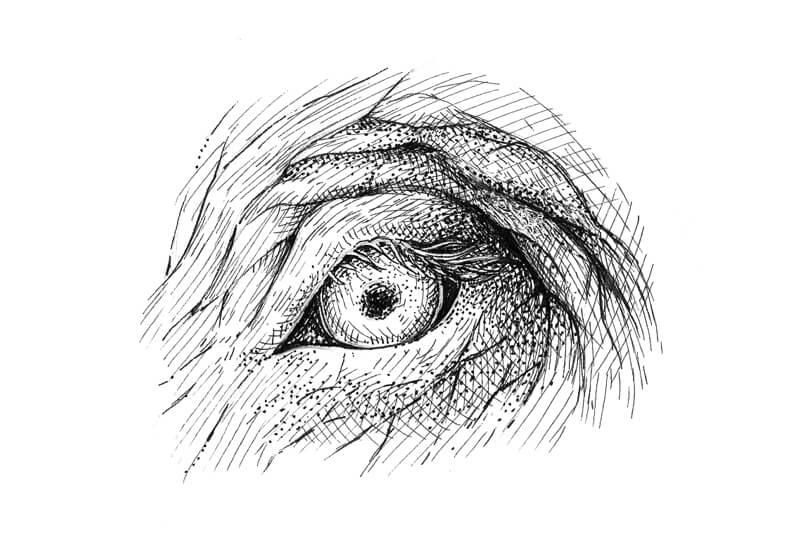
I add more hatching using the 0.05 liner. I keep the pressure light while drawing to get the finest lines possible. Thin ink hatching can create beautiful, smooth transitions of value – even resembling graphite shading from a distance.
I also add more dots with a 0.1 liner. I work on the texture of the skin and deepen the shadows. Then, I draw smaller wrinkles and extend the sketch by adding a larger area of skin.
If you accidentally “lose” the eyelashes, it’s possible to recover them with a white gel pen. You can also add some white dots to the skin to make the texture more interesting. However, using a gel pen is completely optional and can take away from the purity that comes from just using black ink.
See also: How to Draw an Elephant with Colored Pencils
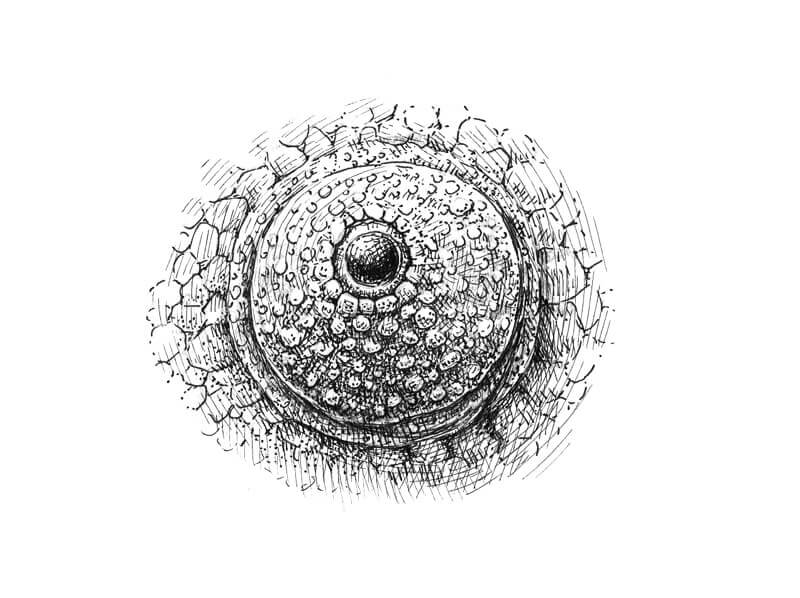
The Eye of a Chameleon
A chameleon can move each eye independently of the other. This feature allows the animal to look in two different directions simultaneously with a full 360-degree view. Just like a camera lens with zoom, a chameleon can focus its eyes and enlarge the object in which they are looking.
The eye protrudes and the eyelids are joined to protect the eye. There is just a small opening for the pupil to peer through.
The eyelid is covered with small elements and there are folds of skin around the eye. I add some scales to create a hint of the head’s texture.
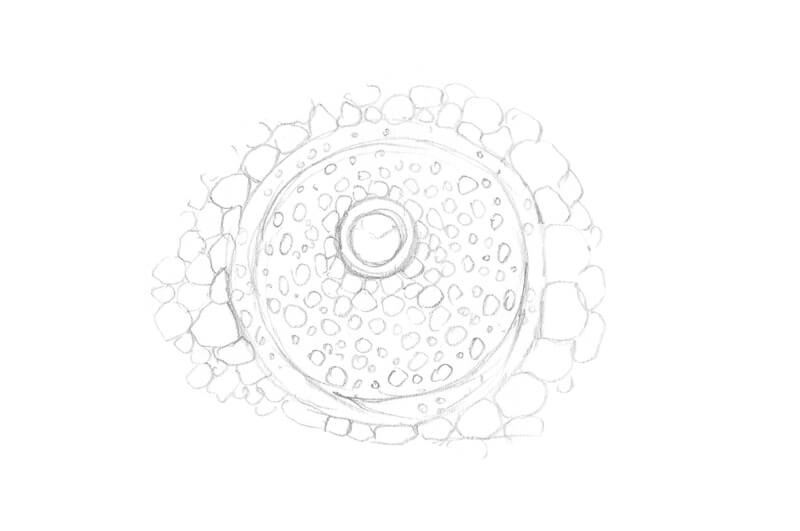
With a 0.1 ink liner, I outline the main contours and mark the smaller elements. Note that the contour of the eye’s opening is not perfectly smooth or round.
I darken the lower part of the pupil, leaving some space for the highlight. I also mark the shadows in the folds of the skin with additional lines.

With a 0.05 liner, I add layers of fine hatching to give the drawing more volume.
We’ll assume that the light is coming from above. The lower part of the eyelid (the area under the pupil) should be in shadow. The small protruding elements are lighter than the eyelid itself, but they need some short hatches too.
I also create a shadow inside the eye’s opening and add more ink marks to the pupil, reducing the brightness and size of the highlight.
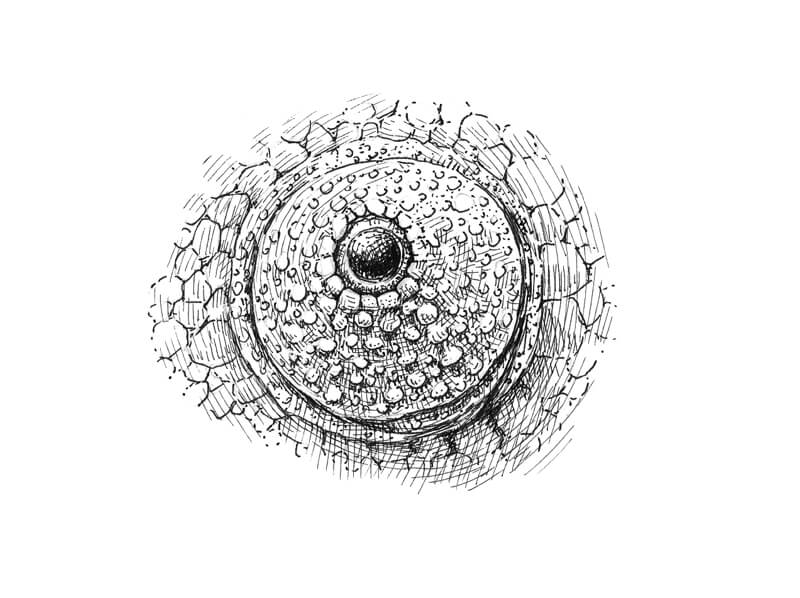
I increase the contrast by adding another layer of cross hatching, using the 0.05 liner. The shadows become more intense. It’s also important to mute some areas that are too light – for example, the folds of skin.
I add dots with a 0.1 liner to communicate the unique texture of the chameleon’s skin. Stippling also helps to create smoother transitions of value.
Drawing The Eye of a Goat
The pupils of a goat resemble horizontal rectangles. Remember what we learned about this kind of pupil? They give animals a wide field of vision, helping them to scan the horizon for predators.
I draw the eye and hairs surrounding it with a graphite pencil. The eyelids are quite thick and the eyelashes are long.
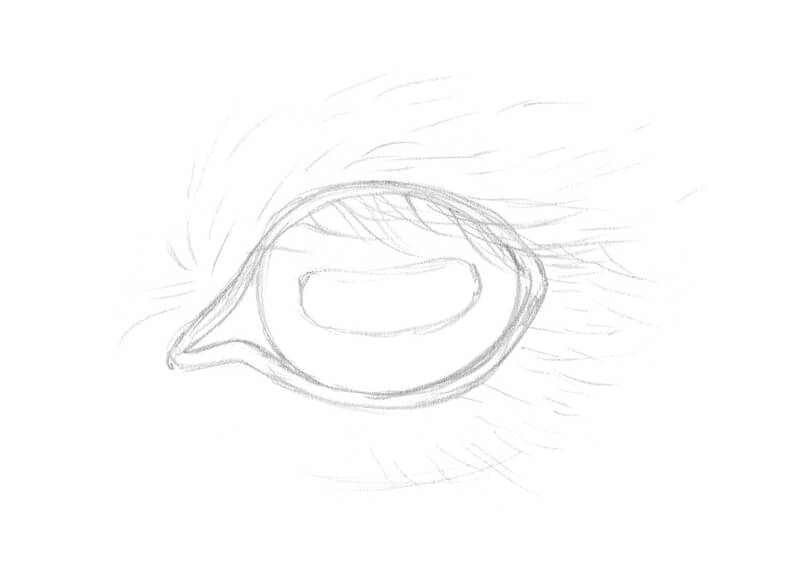
With a 0.1 liner, I apply cross hatching to the pupil and the inner corner of the eye. Don’t forget about preserving the highlight.
I mark the direction of the hair growth with long organic lines and outline the eyelashes.

With a 0.05 liner, I add more hatches to create the illusion of the texture of fur. I create a subtle shadow in the hairs below the eye.

I also darken the eyelids and the iris. The rounded lines repeat the object’s contours leading to the impression of form. The eyelashes are light, so the area right below them remains almost untouched.
The pupil needs some more fine hatches too.
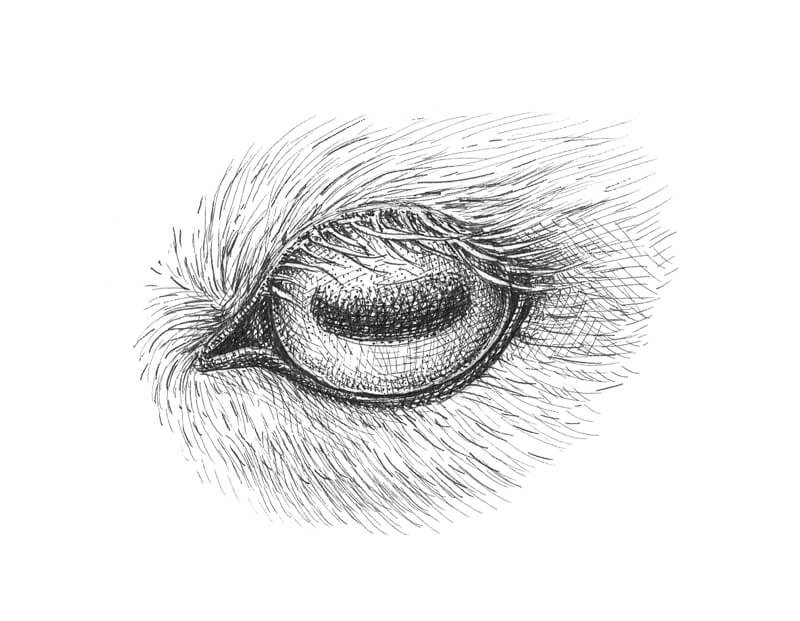
With a 0.1 liner, I increase the contrast in the drawing. The eyelashes and the hairs near the eyelids become more visible and stand out with additional contrast.
I expand the area of fur with additional lines, using both 0.1 and 0.05 ink liners.
Drawing a Cat’s Eye
Cats are excellent examples of predators with forward-facing eyes. Their pupils look like vertical slits. This kind of pupil helps the animal to estimate the distance to its prey. Their peripheral vision is ideal for hunting since cats’ eyes have almost 285 degrees of sight!
Cats also have a third eyelid, also known as the nictitating membrane. This retractable membrane is located in the inner corner of each eye, closest to the nose. Usually, we don’t see a cat’s third eyelid because it’s hidden inside the corner of the eye.
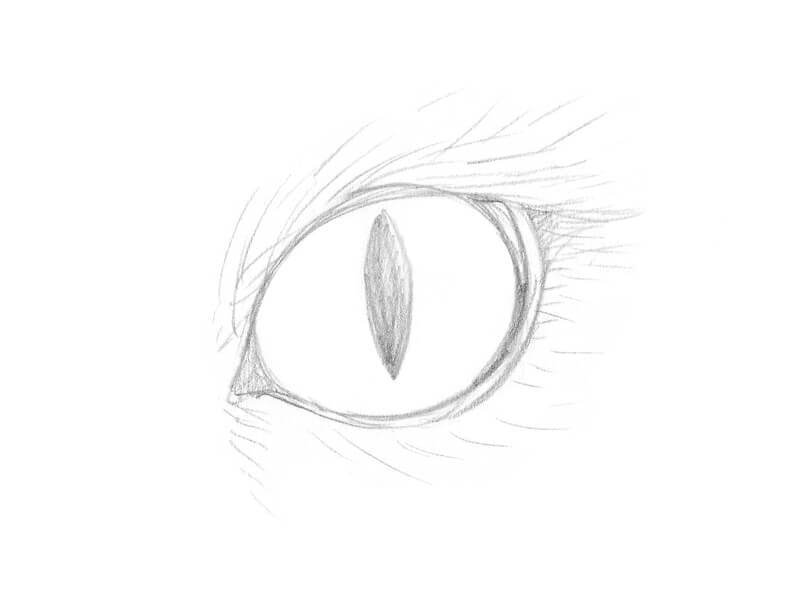
With a 0.1 liner, I darken the eyelids and the pupil, especially at the bottom.
Then I mark the direction of hairs that are growing around the eye.
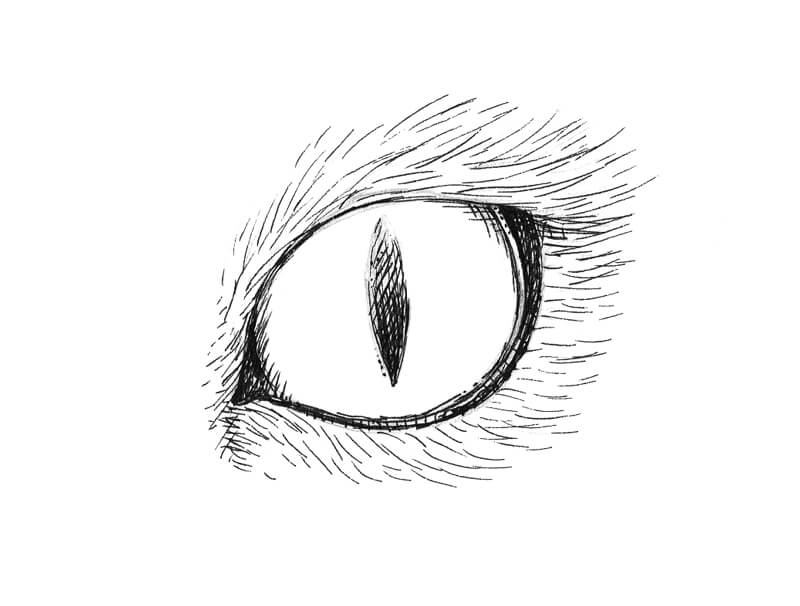
I add more hair-like lines, using a 0.05 ink liner. They help to create the illusion of fur. I also work on the eyelids to soften the transition from skin to hair.
Groups of rounded hatches are pulled from the periphery of the iris to its center. This is done to make the eye more three-dimensional. Apply as many layers of hatching as you need to get the desired result. I add some dots and random lines to vary the texture of the iris.
I add more dots to the iris, using a 0.1 liner. The upper area near the pupil remains lighter in tone to suggest a highlight.
I also darken the gaps in the fur to give the texture a more realistic look. The area near the eyelids is made darker too. This increases the contrast and creates a stronger accent on the eye.
See also: How to Draw Cat Eyes with Colored Pencils
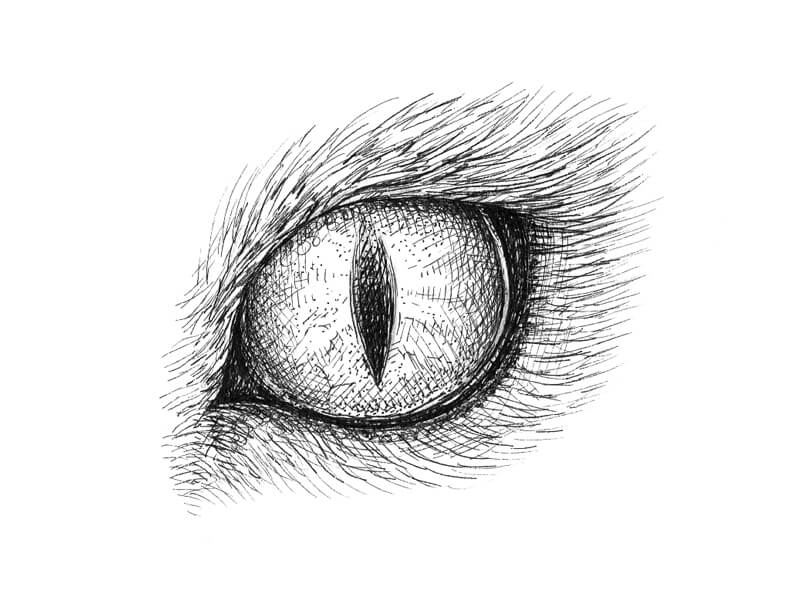
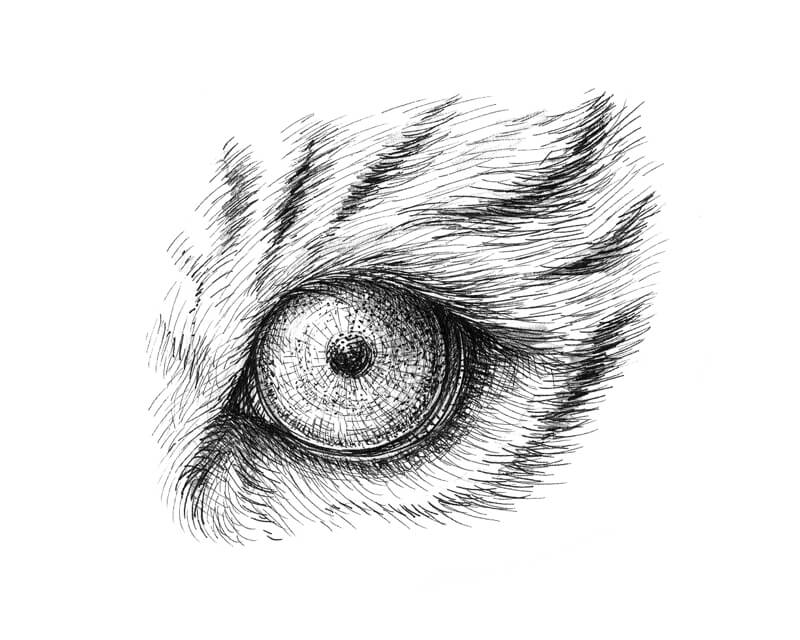
Drawing a Tiger’s Eye
While domestic cats have vertical slits, their larger, taller relatives – tigers – have round pupils.
To begin the drawing, I outline the tiger’s round eye with a graphite pencil, then mark the darker stripes of fur around the eye.
With a 0.1 liner, I darken the eyelids and the pupil. In the pupil, short hatches transform into dots near the shape’s edges.
Then I add some long lines to the areas of black stripes. The marks mimic the direction of hair growth. I vary the direction and character of lines to make the texture more realistic.

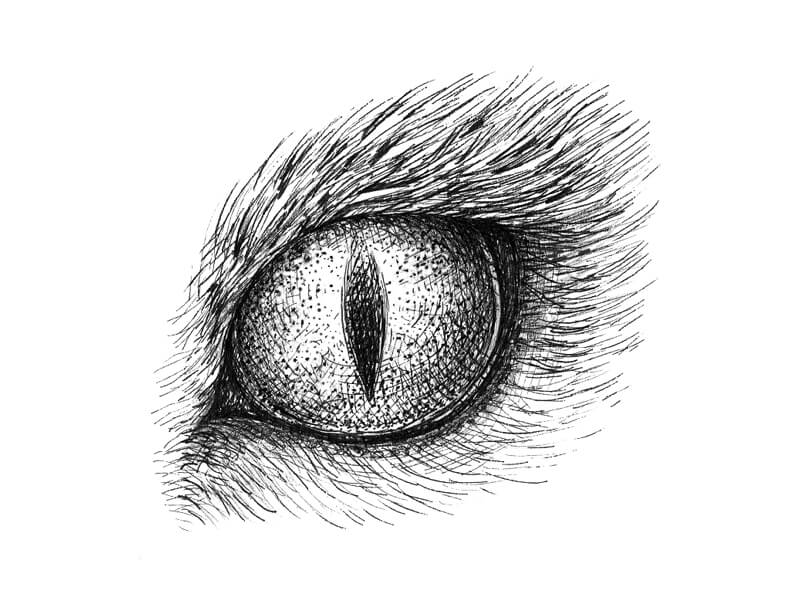
With a 0.05 liner, I work on the iris, adding groups of round hatches that repeat the form of the object. I also add some dots to the iris to create a pattern.
Remember that an eye is not a circle – it’s a sphere that has some volume.
The eyes of a tiger are bright, so it’s important to get the right balance of lighter and darker areas without overdoing the sketch. Don’t forget to leave a highlight.
I apply long hatches to create the illusion of white or lighter fur around the eye.
With a 0.1 liner, I accent the darker stripes on the fur.
Then I strengthen the shadow that the hairs cast on the eye.
See also: How to Draw Tiger’s Eyes with Colored Pencils
Drawing Animal Eyes with Pen and Ink – Conclusion
Congratulations – we’ve created five ink drawings of animal eyes! I hope that you’ve enjoyed every step of our artistic journey and inspired you.
As you can see, there are some similarities in the way that we can approach drawing different animal eyes. The steps are very similar – only the shapes, directional marks, and value change.
If so, join over 36,000 others that receive our newsletter with new drawing and painting lessons. Plus, check out three of our course videos and ebooks for free.