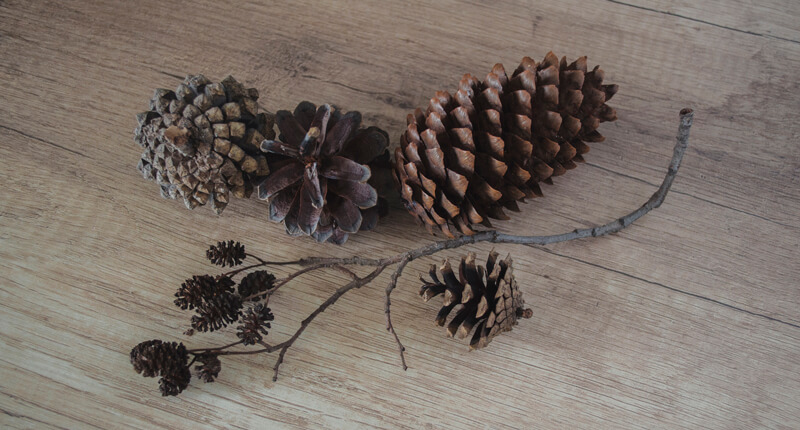
Nature has so many curiosities, and cones are one of them. We see various cones on a walk in a forest or park and in holiday wreaths and floral decorations. In this pen and ink drawing lesson, we take a look at drawing several pine cones with ink.
In other words, pine cones become a habitual part of our life. Chances are that we don’t even pay much attention to these small jewels of nature. But does it mean that cones are just something simple or ordinary?
In the recent past, we worked on an interesting project called “Ink Herbarium”. Today we’ll explore a similar idea, but at a different angle. The subject of our inked collection will be pine cones of different sizes and shapes.
Cones are a wonderful candidate for a project. Why? They can be found even in winter, when all the beautiful leaves, flowers and other numerous wonders of the natural world are temporarily not available.
I consider this drawing as a set of sketches that we create to study nature. That’s why I’m going to use cones from my collection. Some of the exemplars were brought from another country!
I recommend that you gather some physical pine cones before starting the project. We’ll talk about the reasons for that in the next chapter.
To introduce some challenge to this project, I’ll be using one ink liner (number 0.2) to draw the whole artwork. This tool doesn’t allow much variation of the line width, in contrast to nib pens.
However, we can achieve a slight variation by changing the level of pressure on the liner. The lighter the pressure is and the faster we draw, the thinner our lines will be.
Also, using a tool that creates lines of medium width by default will add a sketchier, more spontaneous feel to the artwork.
So, please use any kind of inking tool you have or prefer. Maybe you’ll even choose graphite or colored pencils for this idea!
How to Understand the Structure of a Cone
A Wonderful Responsiveness to Humidity
It’s useful to know that scales of seed-bearing cones move in response to changes in relative humidity. The scales gape open when it is dry. But when it’s damp, they close up.
To a certain extent, you can use this mechanism to adjust the appearance of your cones so they fit your vision. One of the methods to ‘close’ a cone is to put it into a container that is filled with water.
Two Basic Shapes of Cones
We usually use the term “pine cone” to describe any cone we come across, but that’s not technically correct. Evergreens come in many types: for example, fir, pine, hemlock, cedar or spruce. They are called conifers and bear cones.
Basically, cones are found in two common shapes – we’ll talk about them in a moment. It’s necessary to mention, this classification is just something that I invented to simplify the explanations and the further process of drawing.
Of course, the world of cones is much more complex than just two categories of shapes.
For example, each evergreen has two distinct cone types – female and male. They usually differ in size and appearance, too! If you are interested in this topic, please take your time to explore it. Additional knowledge will only enhance your project, making it more credible.
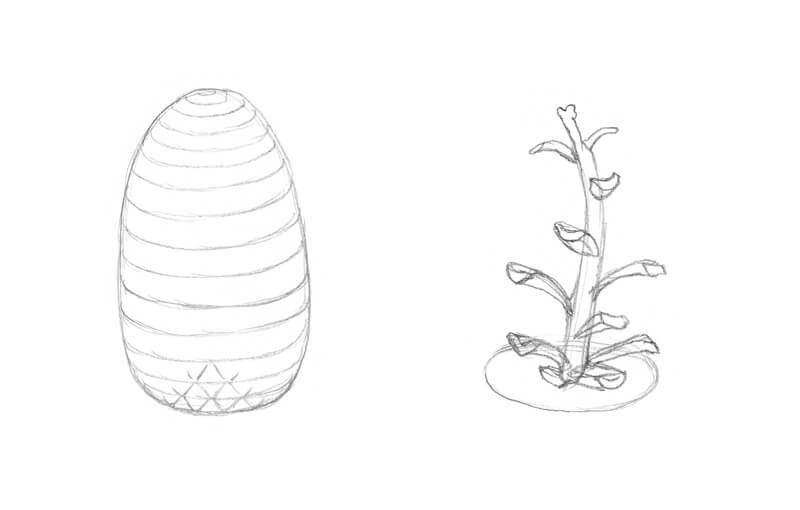
The first type of shape is an egg-like cone (like fir tree cones). It looks rather solid and massive. The top tips of scales can move away from the general shape of the core, creating an uneven silhouette, but the main egg-like mass is still visually dominating. Such cones usually have a predictable, symmetrically organized rhythm of scales.
Another type is more complex – it features extended scales arranged around a core. In this case, scales go aside from the core quite noticeably. Scales have a rhythm too, but it isn’t as strict and obvious as with the first model. Pine tree cones are an example of this second type.
Chances are that you’ll come across a cone that has features of both types, too. Nature is versatile!
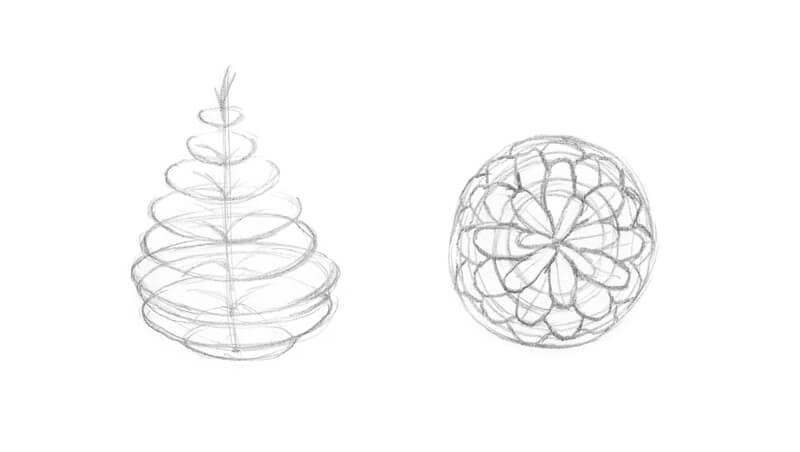
In the image below, you’ll find a scheme that represents the first step that you can undertake to analyze and draw a cone of any of those types. However, your drawing doesn’t have to resemble any scheme – please feel free to develop your own approach.
Analyzing Your Cone
The best way to analyze a cone is to get a real one and observe it at different angles.
How does it look in from a side view or from above? Can you see the rows of scales on top of each other? As a general principle, look for the guidelines (like separate scales that attract your attention more than others) and rhythm in the pattern. This will help to develop your observational skills.
Also, it’s useful to study the separate scales – especially those bending aside of the “stem” quite noticeably. How do they look if we change the angle of view? Is there anything special about the shape of their tip?
Compare the scales at the center of the cone and at its periphery. How do the location and the shape of the cone itself affect the appearance of the individual scales?
Pay attention to the density and height of the scales’ rows. How do they change from top to the bottom? If we observe a cone from above, we’ll see how the scales fill in the shape of the cone. It’s possible to draw a scheme with imaginary lines that mark each row of scales.
Just keep in mind that cones may be slightly – or significantly – asymmetrical. Especially the cones of the “pine type”. Sometimes an exaggerated inclination or distortion of the cone’s core adds natural charm and expressiveness to the artwork.
A cone may seem to be a simple object, but when it comes to drawing, its complexity uncovers itself. Take the time you need. It will pay off.
Qualitative photos used as a reference can be helpful. But, they may lack important nuances that allow us to understand the structure and volume of the object. By the way, any step-by-step instructions on how to draw a generic cone may lead to a similar point of confusion – the goal is to study, not to repeat a scheme that somebody has made.
That’s why having real nature at hand is quite useful, if not crucial. You can deviate from that object’s shape which is completely normal.
Working on the Composition
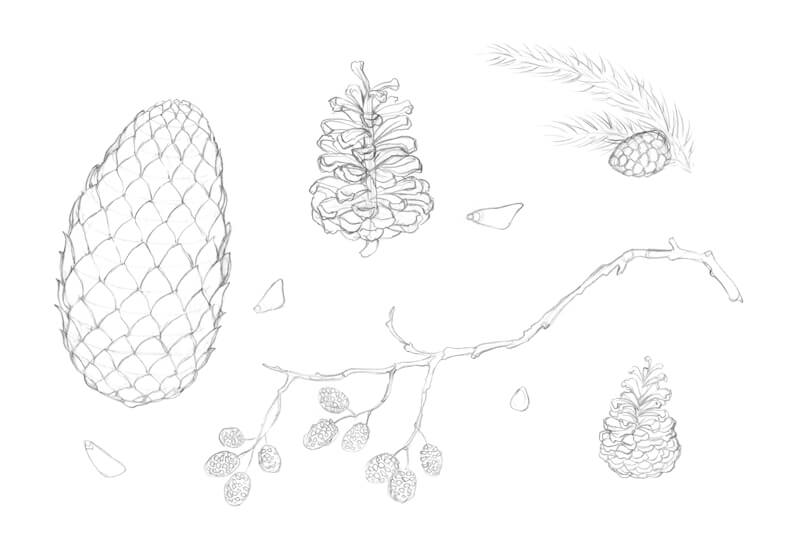
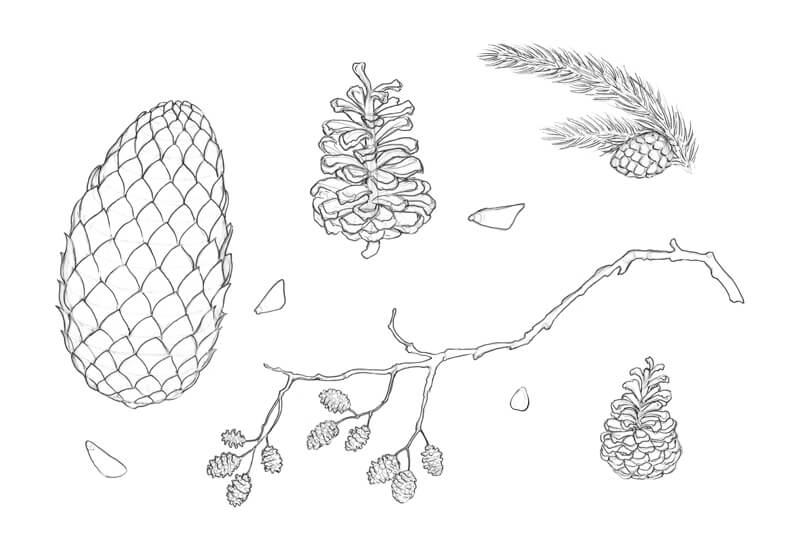
I’m going to draw several kinds of cones of different shapes and sizes, emphasizing the priority of cones with additional elements – like fir twigs and small cone seeds. A combination of smaller and larger elements will make the composition more balanced.
I plan to gather my sketches inside one sheet of paper, so this collection will look like an art poster. That’s why a harmonious composition is absolutely desired here.
See also: Composition in Art
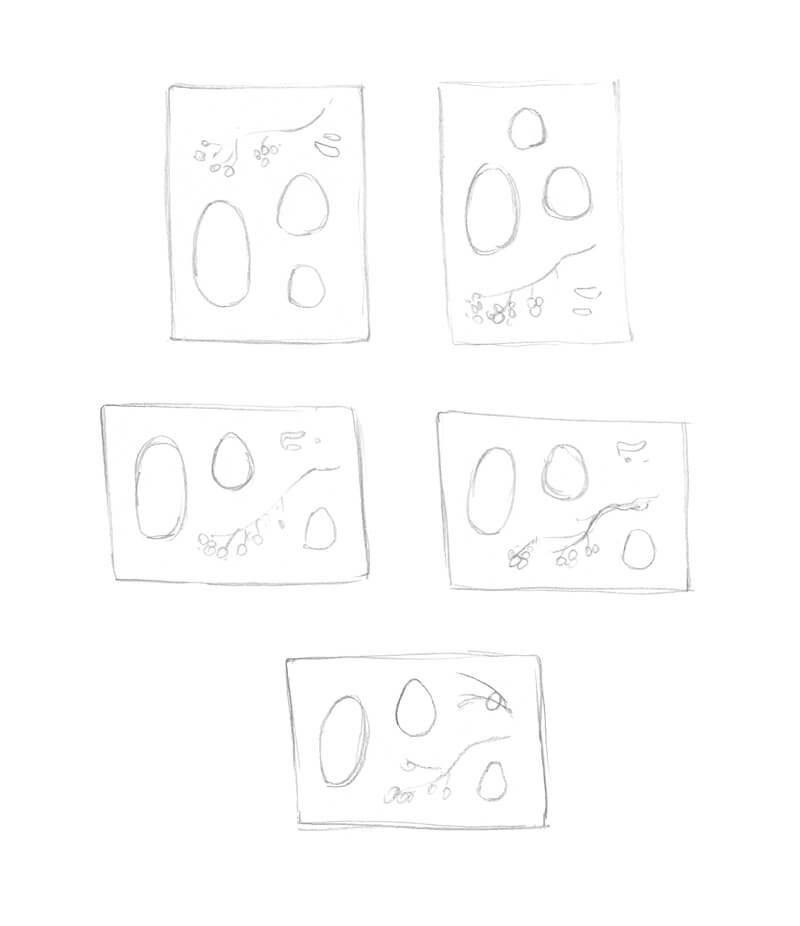
I create several miniature sketches, playing with various possibilities.
The depicted elements may be stylized. The only thing that is important is your understanding of what is going on the final surface. For example, the meaning behind that relatively large shape on the left side of my sketches may seem dubious, but I know – it is a symbol for a big fir cone.
Creating the Graphite Pencil Underdrawing
In my experience, having a preparatory drawing that serves as a structure for ink lines is invaluably helpful. It allows being more confident and, at the same time, relaxed while inking.
So I sketch our objects, adding as many details as I feel necessary to start applying ink. It’s important to reflect your observations in the underdrawing and be deliberate.
For example, I don’t just repeat the pattern of scales on the biggest cone. The top scales are smaller, featuring a minor change in the rhythm.
Also, a couple of cones in my drawing may seem very similar – the only difference is their size. In reality, the discrepancy between their shapes and their tips suggest that these cones belong to different trees. However, we already know that conifers are relatives.
Drawing the Cones with Ink
I outline the main contours of the cones and their scales, paying particular attention to the silhouette of each object.
As I work with only one ink liner, it’s necessary to vary the pressure on the tool. When I draw with a lighter pressure and at a higher speed, the lines become just a bit thinner. That’s exactly what we need!
The cones of an alder tree are the smallest in our drawing. They present so many compact scale-like shapes! I avoid making their contours too complex as this may overload the drawing right away.
To allocate the shadows, we need to determine where the light source is. In the case with relatively small objects, a common model is an illuminance from above. As we have several sketches gathered together, the model of light and shadow should be the same or similar for all your sketches.
With groups of hatches, I accent the darker areas of the cones, focusing on the individual scales. Keep in mind the general shape of the cone. The bottom rows of scales usually present darker values, owing to the cone’s core shadow or numerous drop shadows from the upper elements.
See also: How to Shade a Drawing
Also, practice shows that darkening the area near the pine cone’s core helps to move forward the tips of the front scales visually.
Hatching can be a powerful tool – if the characteristics and direction of lines conform to the shape of the object, you’ll easily create an illusion of volume. That’s why I use contour hatching to make the cones more three-dimensional.
To learn more about the common hatching techniques used in ink drawings, check out this course: The Pen and Ink Experience
Also, the direction of hatches accents various planes (sides) of an object – for example, the upper plane of the pine cone scale, its width, and the side plane. Sometimes it’s helpful to see everything you draw in a simplified manner.
The alder tree cones require a different approach. To darken the gaps between the rows of scales, I use a spontaneous scribble line.
Feel free to erase the graphite lines as you go. At the time, I prefer to keep them – grey marks create interesting tonal nuances here.
I increase the contrast in my drawing. The fir cone, which has a solid, massive shape, needs a more pronounced core shadow, so I apply a couple of hatching layers to the sides and the bottom part. The pressure on the liner is minimal because the lines should be as thin and unobtrusive as possible.
Also, I darken the areas between the scales to separate the rows visually.
I pay special attention to the contours – they should blend into the sides of the cones smoothly.
There is an advantage in working on several sketches at once. For example, such an approach increases the chances to notice new nuances as you go, because you see your drawing with fresh eyes each time. Also, you can digress from one object and have a beneficial moment of rest while working on another part of the artwork.
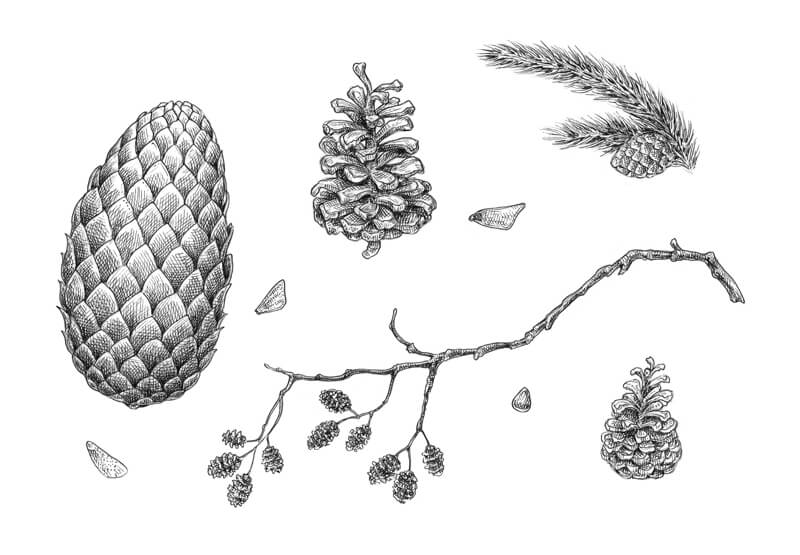
I add dots here and there, especially to the tips of the scales, to reveal a beautiful organic texture. Also, dots help me to soften the transition between darker and lighter values on the scales. Some areas seem too light, even highlighted, so I mute them with the deliberate use of dots.
As a final touch, I make sure that the fir tree needles, which are relatively dark in real life, have enough ink marks. The individual needles remain lighter than their neighbors. They stand out because of the contrast.
Drawing Pine Cones with Pen and Ink – Conclusion
Congratulations – we’ve completed this special project! I hope that you found cones truly fascinating and made another step in developing your artistic skills. The great news is that now you can apply this knowledge to the new projects.
Thanks for being with me on this journey. I wish you much inspiration and luck!
If so, join over 36,000 others that receive our newsletter with new drawing and painting lessons. Plus, check out three of our course videos and ebooks for free.