Why is this topic worth our attention? An ink drawing is basically a collection of straight and/or curved lines. A line operates as a building block – a small, yet important element. Used together, lines can communicate a subject so that we understand it as a three-dimensional object.
But line does more than this. Lines help to define edges and planes. They can be used to convey texture and indicate form. A line can also suggest where the light source is. When hatching and cross hatching is used, lines play an important role in developing value.
See also: The Elements of Art – “Line”
Practical Applications of Line
Let’s practice using line with a few drawing exercises.
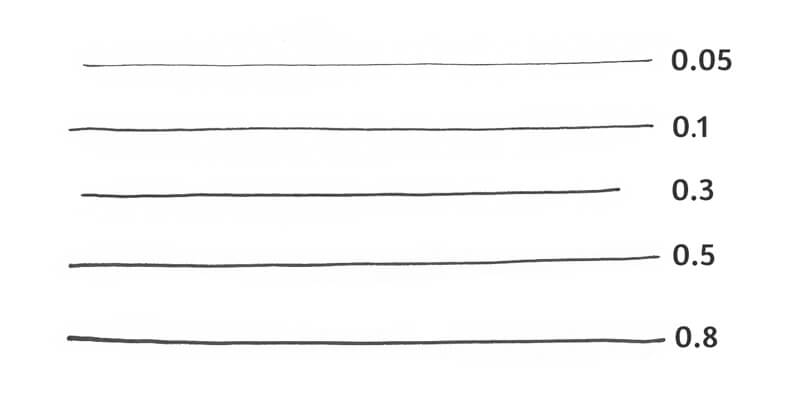
For this first project, I’ll be using three ink liners. Their numbers are 0.05, 0.1, and 0.3. We’ll also need an HB graphite pencil and an eraser for sketching.
I consider this project an exercise. We won’t be creating full-fledged artworks. That’s why I’m going to use some thin paper of A4 size with similar characteristics to that of printer paper.
The goal of my demonstrations is to show you examples of the analysis process. They are also an invitation! Choose an object that you like and draw it, keeping in mind the line hierarchy principle that we’ll discuss momentarily.
Line Quality
Line quality, also known as line weight, is a visual characteristic. It refers to the thickness or thinness of a line within a drawing. By varying the line quality, you can accent certain parts or elements of the image. You can also create depth and the illusion of volume by changing the width of your lines.
See also: Line Weight (Quality) and Cross Contour Lines
In other words, the interplay of line weights allows organizing different components of your drawing into a cohesive hierarchy. Various elements (edges, forms, textures, and so on) are presented according to some level of priority or importance. This helps the viewer to read the image.
Let’s consider four levels:
- Edges and primary shapes – Here we tackle the main contours (the ones that create silhouettes) and the larger forms in our drawing. These lines are usually the thickest.
- Focal points and elements or areas of high importance. These areas usually represent some significant features of the main object or point to the key visual idea. They tell a story, so we should do our best to attract the viewer’s attention to these areas.
- Secondary objects and shapes. Here we deal with the lines that help to define the form and relief. At this stage, we’re deconstructing the complex parts into smaller, simpler ones.
In some cases, this “level” can be merged with the previous one, so we have only three levels in our line hierarchy. For example, this may be the case for sketches of a single object.
- Lines that suggest texture, plus all the accent lines. At this level, we’re rather decorating the drawing than working on its volume or depth.
You can think of these levels as layers or stages of drawing. The second step happens only after the first one is complete. Alternatively, you can jump from one level to another and back. Just keep in mind the general scheme of hierarchy.
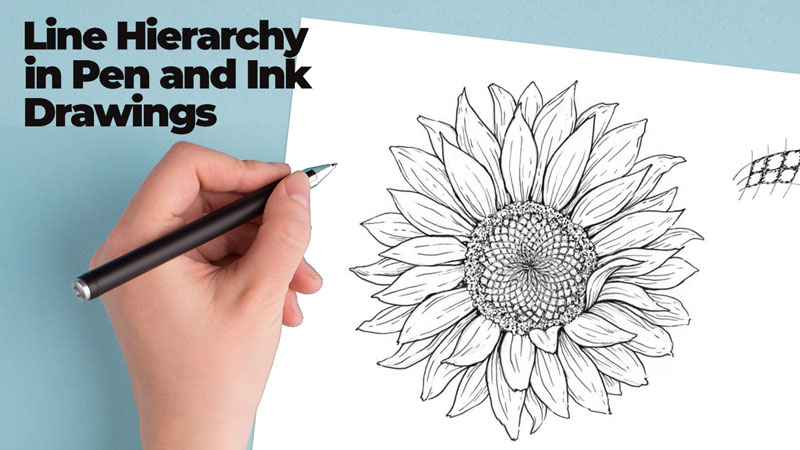
The Hierarchy of Ink Liners
Ink liners (pens) are a good fit for our project. They produce lines of a predictable consistent width.
Each liner has a number on its body. The larger the number, the wider the line. You can achieve some variation by pressing heavier or lighter, but the difference won’t be very significant.
Some tools, such as nibs and brush pens, allow for greater line weight variation. They can be used to create bold, expressive contour lines that generally fall into the first level in our classification.
For example, here are a few brush pen strokes.
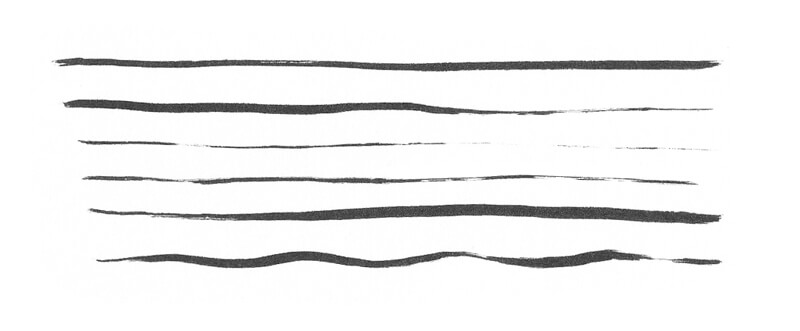
However, a line that was drawn with an ink liner still can be broadened. You can achieve the desired effect by adding new marks near the existing line and merging them.
In the image below, both sets of lines were created with the same tool.
The choice of liners is a matter of personal preference. Also, drawings of a larger size may require much wider contour lines.
Here is the scheme that I use most often for my drawings:
- I use my 0.3 pen for drawing the main contours.
- I use 2 and/or 0.1 are for focal points and secondary elements.
- I use 0.05 for details and texture.
Note that line weight is relative – it’s a matter of comparison and rhythm. But there is logic behind the sequence of line widths.
We’re making one line subtly thicker or thinner than its neighbor, depending on the level. The 0.3 line is slightly bolder than the 0.1 line. In turn, the 0.1 line is slightly thicker than the 0.05 line.
The difference between 0.3 and 0.05 lines becomes quite noticeable. However, as long as there are 0.1 lines as a middle link, our artwork stays balanced.
When it comes to drawing lines, no matter what tool is used, some beginners feel overwhelmed. It may seem scary to let your hand draw freely and spontaneously. If this is you, take some sheets of cheap paper and draw as many flowing lines as you need to become more confident.
See also: 10 Exercises for Confident Lines and Accurate Hatching
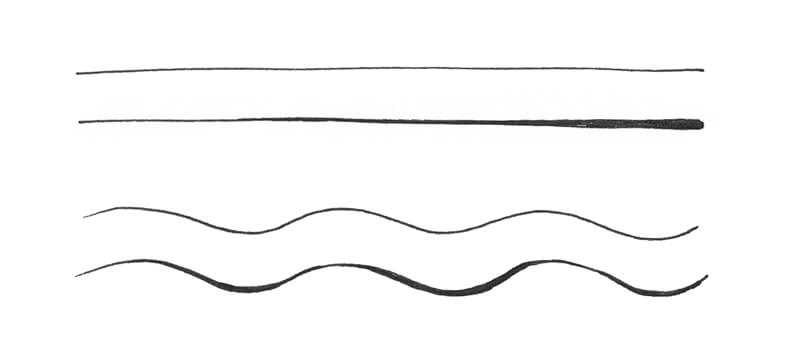
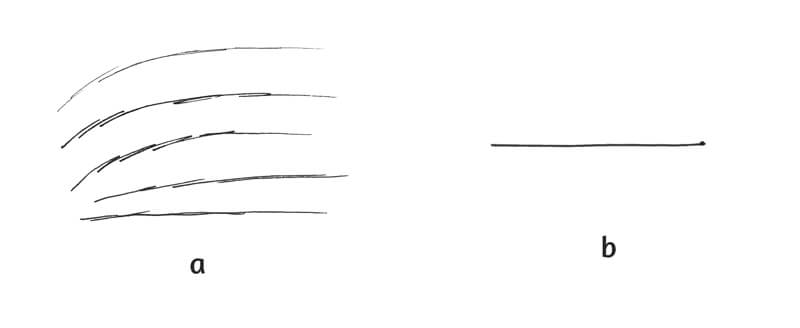
Avoid making shaky, uncertain lines that consist of numerous back and forth movements. (See the example a in the image below.) This style of mark-making is not a mistake, since there are situations when it makes sense to use looser marks.
Also keep in mind that if you leave the tip of your pen on the paper for too long, it may create an unpleasant blob at the end of the line. (See the example b in the image below.)
Tips for Your Contour Line Drawing
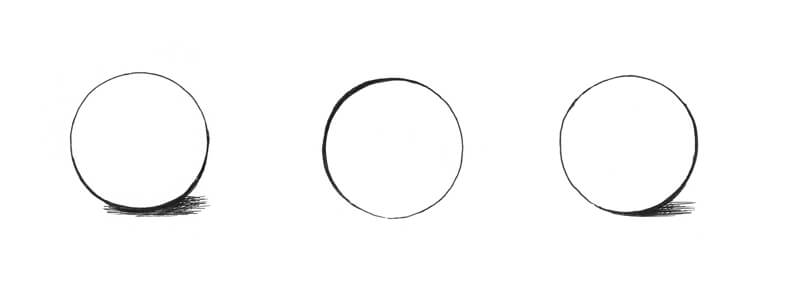
When you’re drawing a light-colored object, using a thinner liner to create an outline. Make the contour thinner to accent the area where the light hits the object.
Compare the stylized spheres in the image below. There is no hatching to give them more volume, but they don’t look completely flat because of the varied contour line. The line is thinner in the lighter area. It becomes wider in the area of shadow.
Each contour line gives us valuable information about the position of the light source.
Let’s observe the interaction between the contour line and texture. Compare the models in the image below.
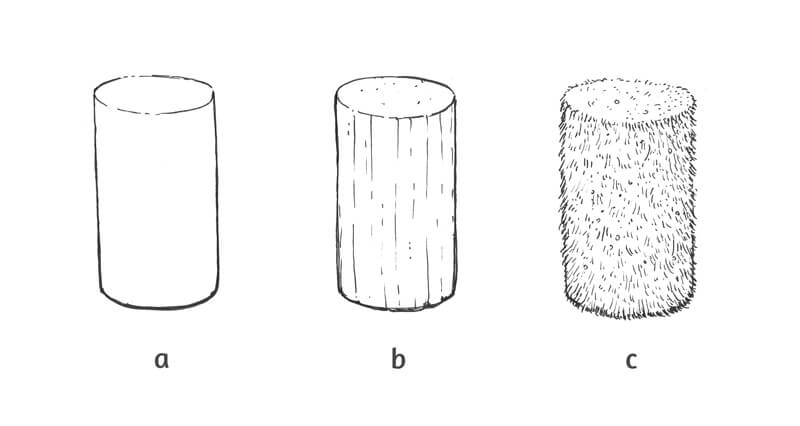
The cylinder a is drawn with 0.1 liner. The contour is broadened in the lower part of the figure to make it look as if it is in shadow. The line in the upper part is thinner because this area is lighter in value. This cylinder doesn’t have any additional details of texture or relief- just a contour.
The main contour line accents the texture as well. It’s uniform and direct, which suggests that the surface is relatively smooth with little relief.
Cylinder c doesn’t have a uniform contour line. Its edges are presented as a set of short hair-like lines that were drawn with 0.3 liner. The strokes are placed closer together in the bottom part of the figure to make it feel as if the light is less intense.
The inner area of the cylinder is filled with short 0.1 lines that imitate the texture of fur or grass.
As you can see, not every case requires that you use three or more tools of different widths to keep the line hierarchy. We’ve applied lines of two weights, and the main contours are a bit thicker than the secondary elements. This subtle difference creates an impression of orderliness and believability.
Styles of Contour Lines
Choose the style of a contour line wisely. A line can convey mood and movement and also suggest the features of the object. Let’s examine a few examples…
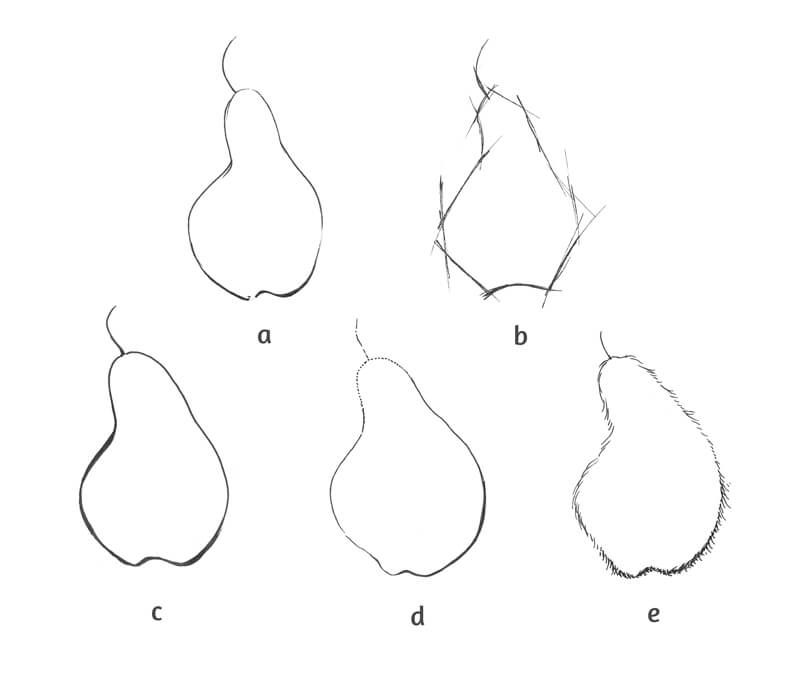
Sample a presents a flowing, spontaneous, relaxed line. This sketch has an artistic feel.
Sample b looks rough and sketchy, as if someone was making technical measurements to construct the silhouette.
Example c looks polished. We don’t see any gaps in the line. Other “happy accidents” are missing as well. The bottom area of the contour is widened.
In the case with sample d, the difference in line quality is rather subtle. In the upper part, the line breaks into smaller pieces to indicate the area of light.
Example e is truly extravagant. Its contour is presented as a set of short lines, which creates the illusion of an odd hairy texture. In the lower part of the figure, we see an increased density of ink strokes. This conforms to the principle of hierarchy that we already know.
The Practical Application of the Line Hierarchy Principle
Now, let’s put what we’ve learned in practice…
Drawing a Flower
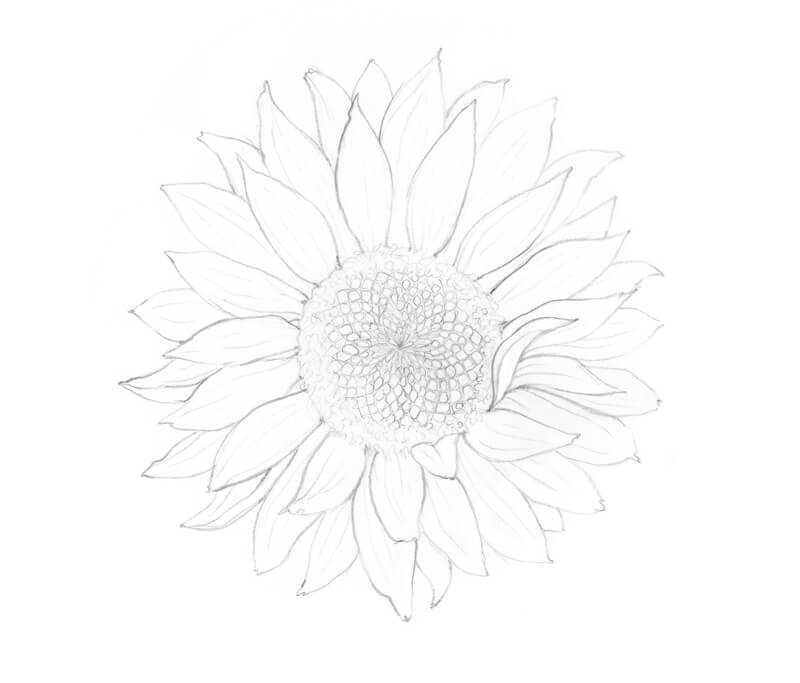
We’ll have an organic object as a subject matter for our first artwork.
This form of flora resembles a sunflower. It has two rows of petals and a round core with seeds.
I sketch the object with a graphite pencil. As you can see, some lines are heavier than others already at this stage.
The pattern in the central part of the sunflower may be difficult to draw. Below is a simplified scheme. It may help you to understand the general principle.
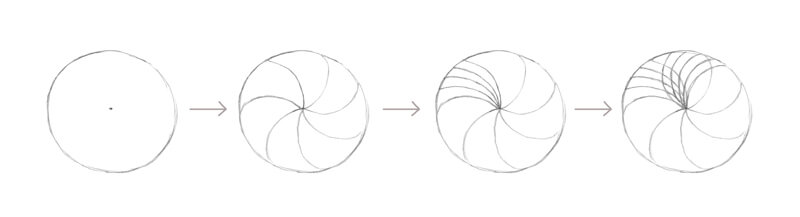
- Mark the center of the flower’s core.
- Draw several curved lines that go from the central point to the periphery of the circle.
- Draw more lines inside one or all segments.
- Add another set of curved lines that follow the opposite direction. The overlapping lines will create intersections. Place the sunflower’s seeds into these diamond-shaped “windows”.
Now let’s start inking.
With a 0.3 liner, I outline some contours of the petals focusing on the elements that are closer to the viewer. They should attract attention, so it’s important to make them stand out. If needed, we can broaden the contour in some areas, such as near the flower’s center.
The petals’ tips are partially left untouched. The same is true for the petals from the back row. I’m going to give them a thinner outline. This trick will create a beautiful variation of line quality.
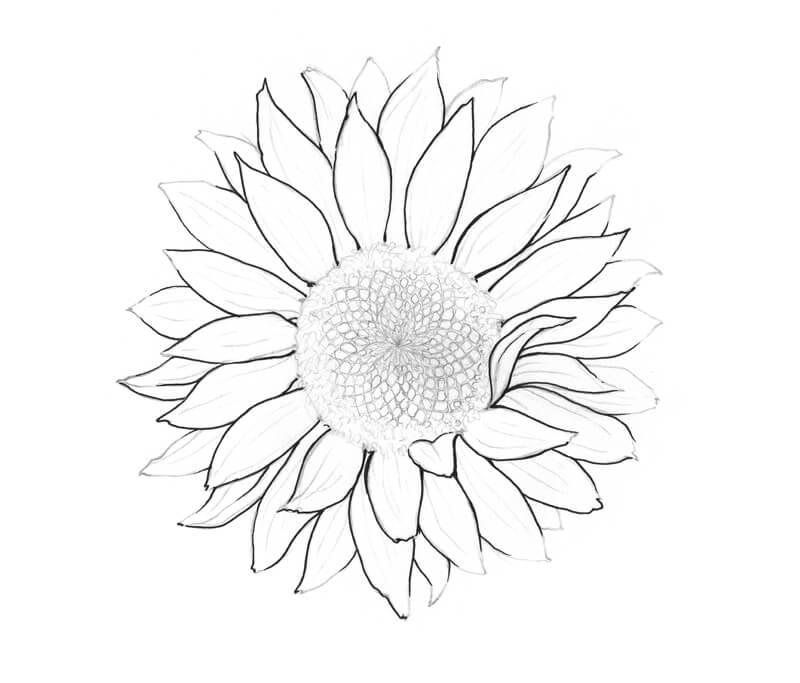
I add thinner lines, using a 0.1 pen. I complete the contour of the petals, so now we have a solid silhouette. I add some delicate lines that repeat the direction of each element. These lines reveal the relief of soft wrinkles, giving hints of the petals’ texture.
I mark the edge of the flower’s core. The peripheral part of the core demonstrates a peculiar fluffy texture – I mark it with some spontaneous scribbly lines. You’ll find a sample in the image below.
The seeds in the central area are very small, almost indiscernible. I add some short lines to the core’s center to make this area stand out. It will be the focal point.
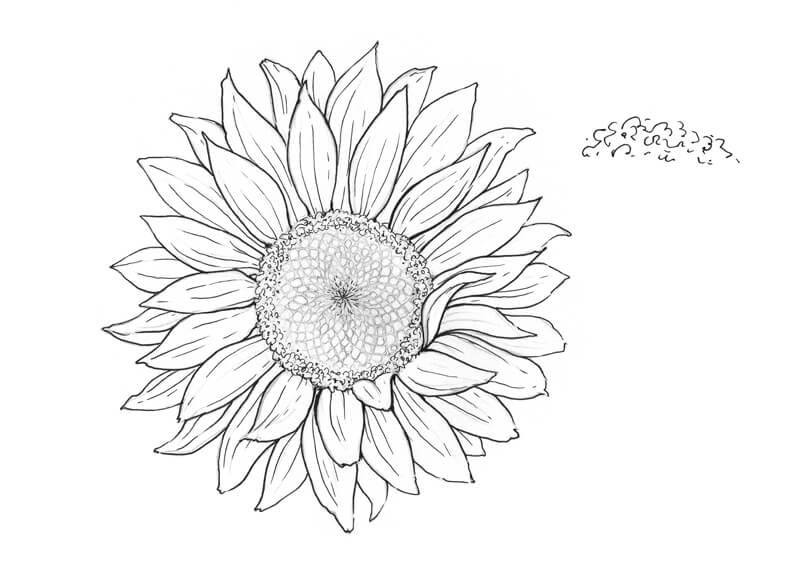
With a 0.05 liner, I darken the area that surrounds the seeds in the flower’s core. I divide the rows with thin lines. Then I increase the contrast with additional scribbly lines. The seeds remain untouched.
I also add some fine textural lines to the core’s periphery and the petals.
Now, this sketch looks crisp and fresh. We could add some ink hatching to elaborate on the volume and texture of the petals. The core shadows could be intensified. However, bearing in mind that the petals of a sunflower are light, I prefer to leave this line art exercise just as it is. Less is more!
Drawing an Ax
We’ve now dealt with an organic object. The flower featured soft, curved, delicate lines. Now we’re going to draw a man-made object.
With a graphite pencil, I’ve created a sketch of an ax. To make it a bit more interesting, I’ve added a piece of wood. These two contrasting subjects will allow us to play with different textures.
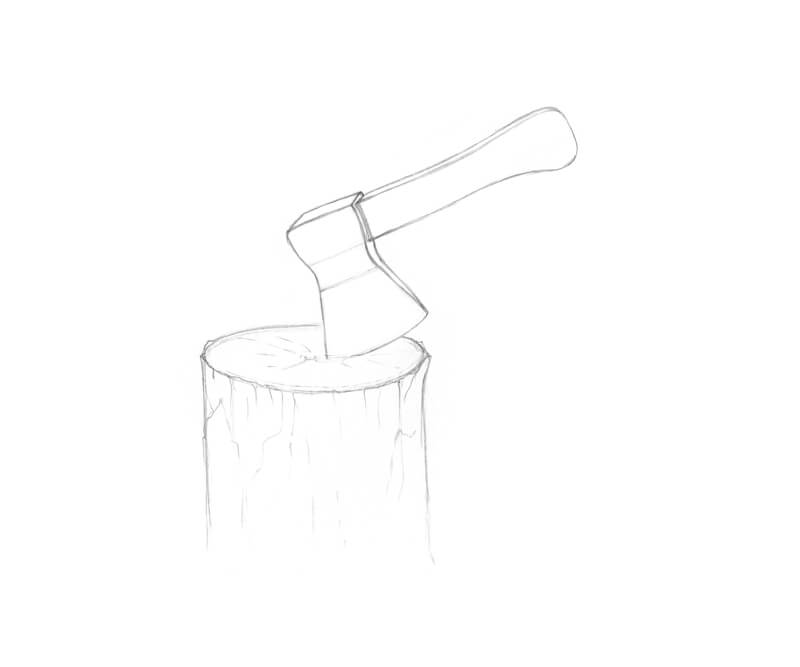
With a 0.3 liner, I outline the thickest contours. An ax is an artificial object. Its contours require a steady, confident hand with precision.
If drawing accurate lines is intimidating for you, try adjusting your breathing patterns. Some people find it helpful to hold their breath for a moment while drawing. Others say that drawing on the exhale allows producing perfect marks.
The tree is another story – here the contour line can accent various bumps, hollows, and other details of relief. Your marks can be organic.
I leave the upper part of the ax’s contour untouched. The handle is made of wood, and I’d like to accent its lightness. Therefore, I’ll work on its upper contour with a thinner liner.
I’ve accented the trunk’s cut (the upper flat plane) with a broad line, making it stand out.
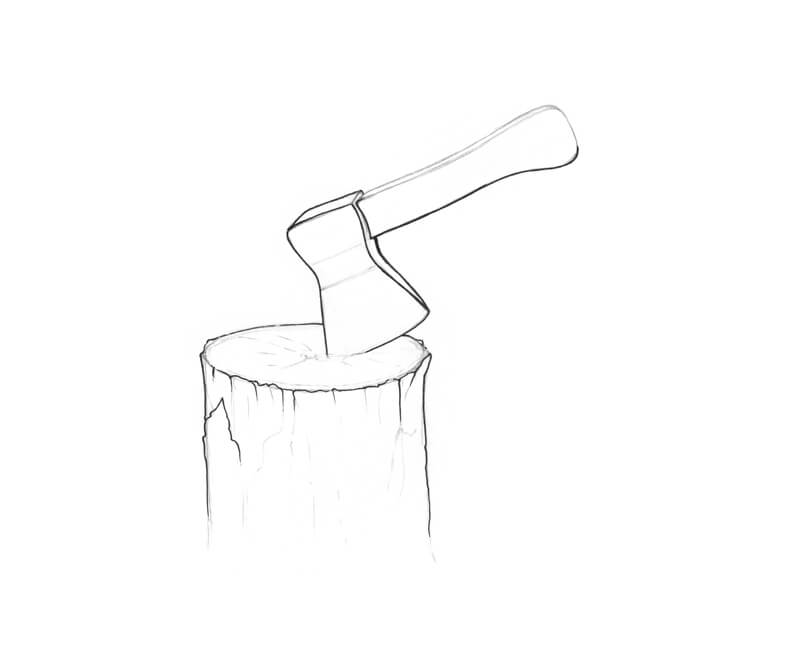
With a 0.1 liner, I complete the outlines, forming the silhouettes. The bottom part of the trunk becomes somewhat blurred or blended. This effect is achieved by leaving some gaps in the lines.
I add more ink marks that create the illusion of texture and relief. Vary the pressure on the tool to create subtle line weight variation. This trick may help even if you use only a couple of liners.
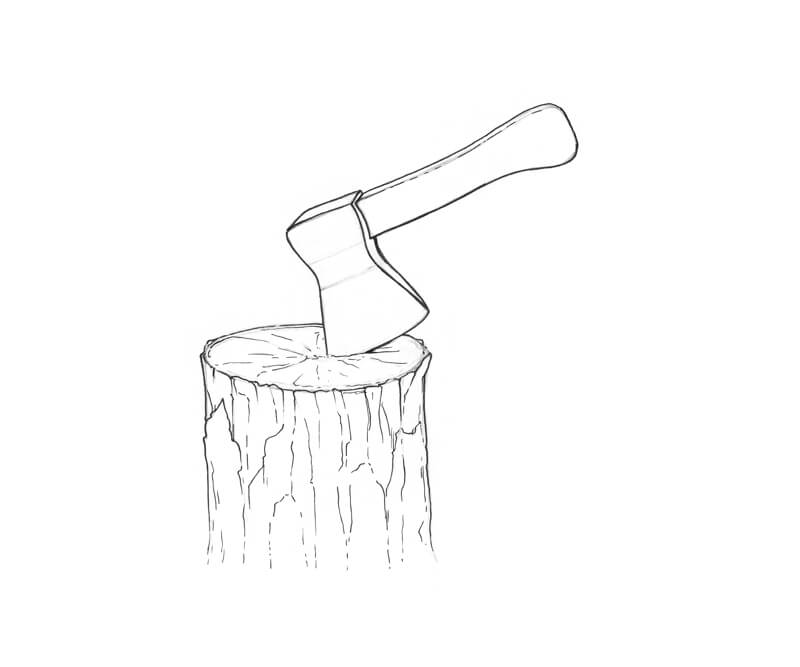
With a 0.05 liner, I add some parallel lines to the ax, accenting the smoothness of metal. The lines conform to the planes.
Although we carefully evaluate the use of every line in this project, I decided to include some elements of cross-hatching to give the ax and the trunk more volume.
I add a pattern of wood grain texture to the handle.
With several lines, I create a cast shadow under the ax. The trunk’s top surface gets fewer ink marks to communicate light hitting this area.
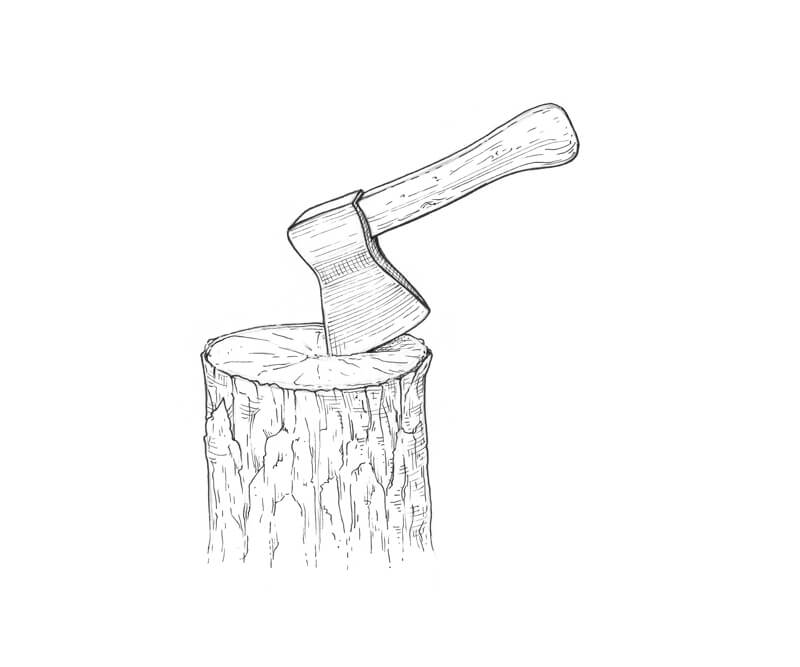
Conclusion
We’ve completed the project! Thank you for being with me on this journey.
I hope that you’ve enjoyed exploring the topic of line hierarchy and learned some useful tips. I wish you much joy and inspiration for your future artworks!
If so, join over 36,000 others that receive our newsletter with new drawing and painting lessons. Plus, check out three of our course videos and ebooks for free.