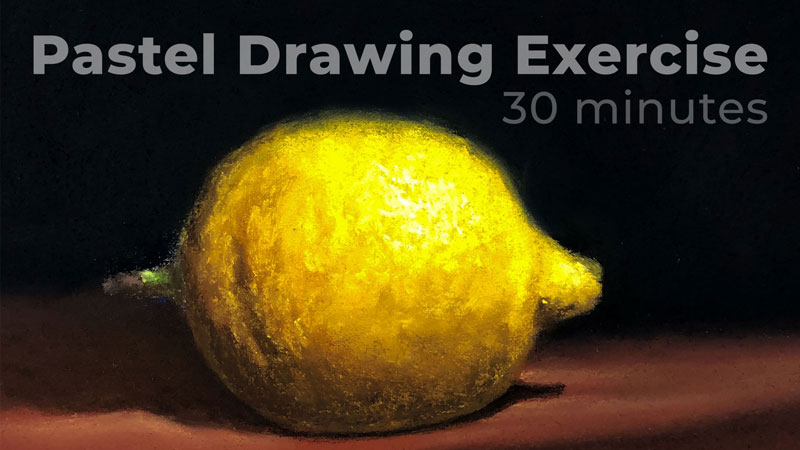
Gettin Sketchy – Drawing a Bell Pepper with Pastels – Season 2 Episode 5
This episode aired live on YouTube on September 16, 2020.
In this timed drawing exercise, we take a look using soft pastels on PastelMat paper to create a drawing of a bell pepper. This sketch is limited to just 45 minutes from start to finish. Due to the nature of soft pastels, I was able to complete the drawing just under the allotted time constraint.
Blocking Colors and Value
The medium that you work with often determines the approach that you take to complete the art. The process of drawing with pastels is very similar to the process of painting with an opaque medium like oils or acrylics. Since pastels can be layered and colors can be covered completely, we can be more liberal in our initial applications. Colors can be blocked in quickly and then refined through additional layers throughout the process.
Blending can be also be used to create smooth transitions of tone and color if so desired. With pastels, it’s perfectly acceptable to use your finger for a quick transition or smudge. However, it should be noted that the paper used for this drawing is PastelMat paper which has a shallow, but strong, tooth. This texture helps to hold the pastel material in place when it is applied, limiting the amount of pastel dust but also the ease of blending.

The Pastel Stick is a Brush
After a rough sketch is completed with a darker pastel pencil, the process of blocking in colors begins. We start with the local observed colors (reds) and then begin pushing the range of value. By layering light and dark tones over our base applications, we can slowly begin creating the illusion of form.
A pastel stick is wide and bulky, especially compared to precise tip of a pencil. It’s best to think of the pastel stick as a brush instead of the tip of a pencil. Typically, a pastel stick is held between the forefinger and the thumb and applications are made using a similar stroke as one would make with a paint brush. Instead of thinking in terms of line, think in terms of shapes of color and value. If you successfully position and match the tone and color, then your resulting drawing will closely resemble your subject.
Here’s a look at the completed drawing…

Materials for this Pastel Drawing
Just like with any drawing or painting medium, there is a broad spectrum of quality when it comes to soft pastels and pastel surfaces. The quality of the medium and surface that you choose to work with does make a difference in your potential success. In this exercise, premium materials are used. Rembrandt soft pastels are used on PastelMat paper. (The following links are affiliate links which means I make a small commission if you purchase at no additional expense to you.)
There are less expensive alternatives to the materials used in this lesson, but keep in mind that your results will also be different. However, if you’re just starting out and you’re not quite ready to invest in more expensive materials, the following materials are a great place to start…
If you’re interesting in continuing with pastels, here are a few good places to start…
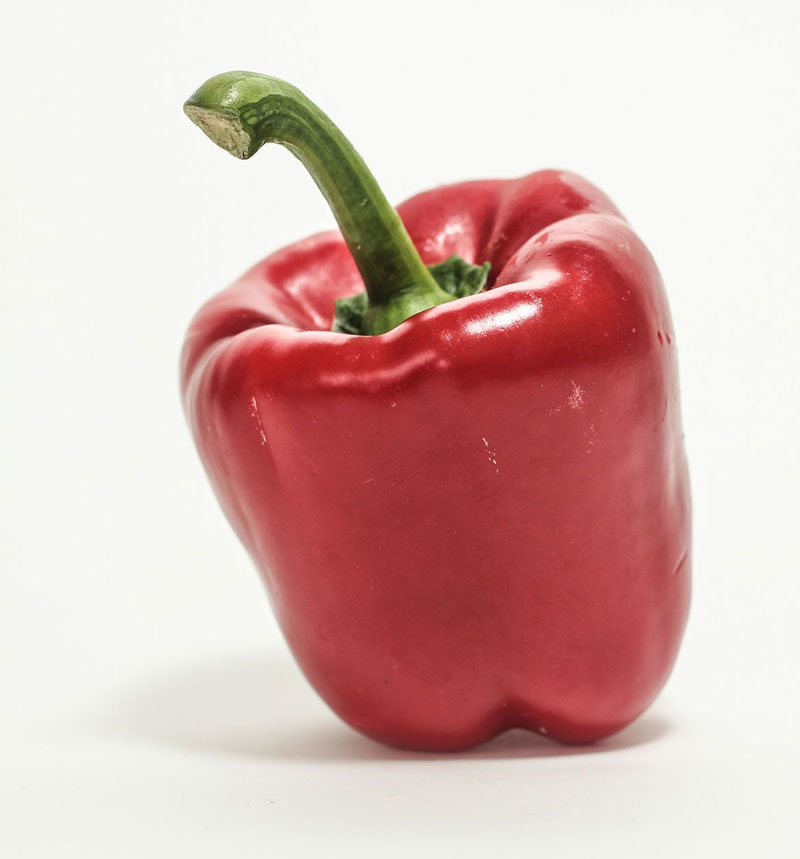
Photo Reference
The reference photo for this exercise comes from Pixabay.com. Here’s a look at the photo reference…
Practice Sketching as Much as You Can
We all know that “practice makes perfect”. For some of us, finding the time to practice is the hard part. We may have the desire to sketch and improve our skills, but finding a little space in a busy schedule can be a challenge. This is where a timed drawing can be your best friend. By setting a defined time frame, you have a better chance of making it work in your schedule. If you don’t finish your drawing in the allotted time, it’s no big deal – at least you got a little practice in. Plus, you can always return to the drawing later and finish it.
So, schedule a little time for yourself, set the timer and get to it. Every drawing that you create is a small step closer to your goal.
If so, join over 36,000 others that receive our newsletter with new drawing and painting lessons. Plus, check out three of our course videos and ebooks for free.