
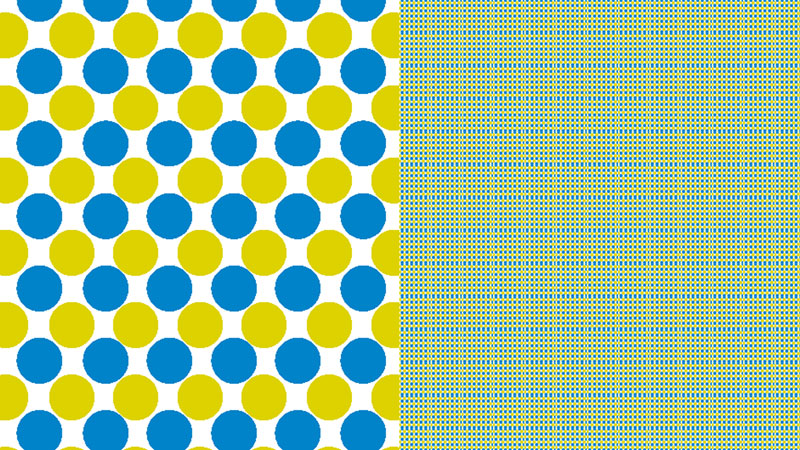
Part of the issue with the ever growing number of color wheels out there is that there are varied ideas when it comes to color theory in general.
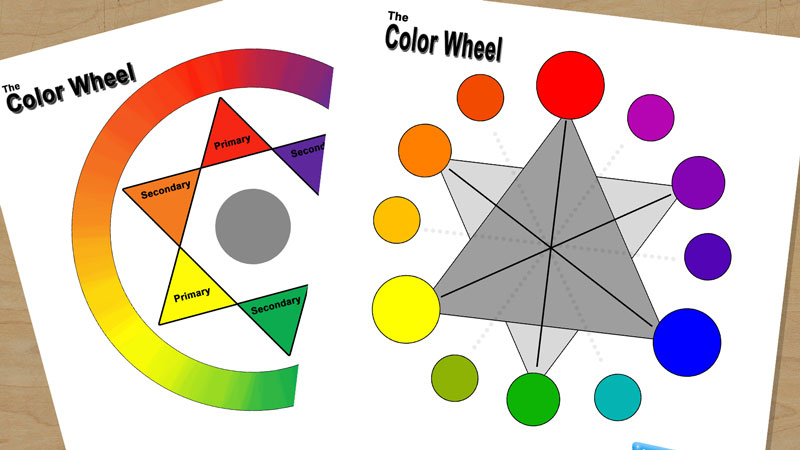
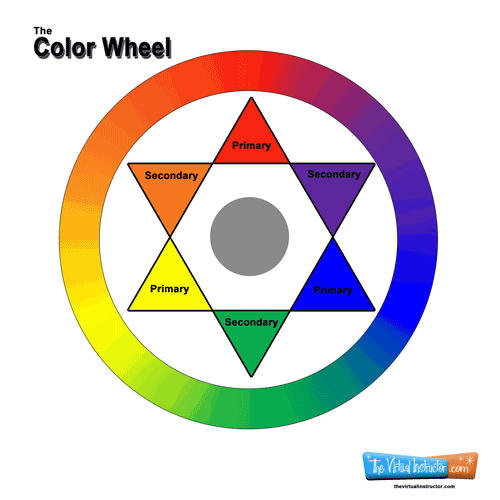
Most of us agree that there are 3 Primary colors: blue, red and yellow – and 3 secondary colors: orange, green, and purple.
Most of us can also agree that the complementary colors exist as opposites on the color wheel. This means that orange is the complement of blue; purple is the complement of yellow; and green is the complement of red.
There are Different Color Wheel Charts!
I came across a site the other day that took color theory to another level. Honestly, it made me wonder if I really knew anything about color at all. You can visit this page and read for yourself.
The argument here is that the color wheels that we have been using for years are wrong. The author of the site argues that red, blue, and yellow are not the true primaries. He states that the true primaries consist of cyan, magenta, and yellow. (I have seen color theory taught this way.)
The arguments presented are fairly convincing. However, using this color wheel would force the complement of blue (ultramarine) to be yellow.
I have a hard time swallowing that one.
It does however show cobalt blue to complement orange. I guess that helps. It’s worth mentioning this theory because the color wheels charts that I’m sharing today are in the traditional vein.
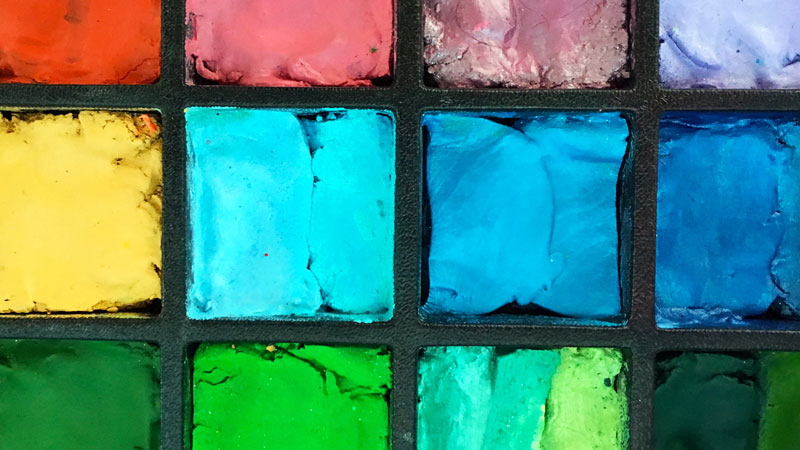
(You are free to download any of the color wheel charts below…click on the image-then right click and “save as”)
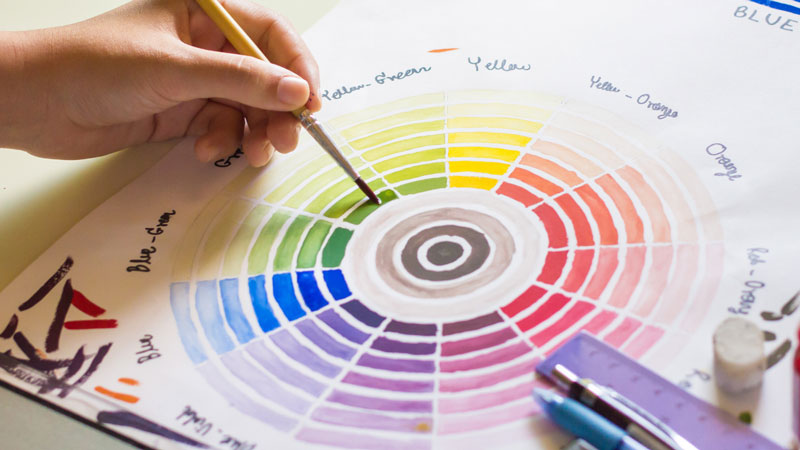
Anyhow, I decided that I would create a series of color wheel charts that teachers, students, artists – can use that may fulfill a specific need, either to teach basic color mixing, complements, and so on.
The first color wheel chart I created is intended for teaching basic color mixing. It includes a gradation of hue around the color wheel with labeled primary and secondary colors.

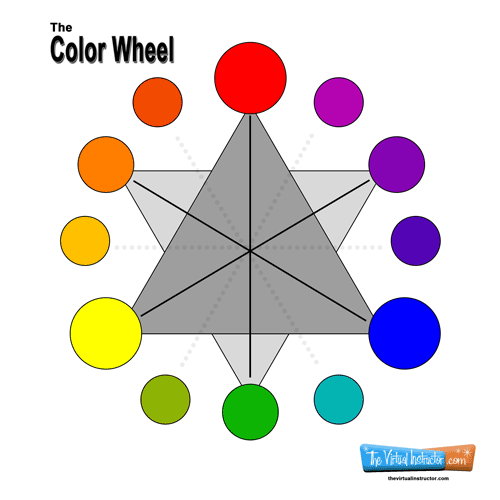
The second color wheel chart that I created is intended to help students recognize complementary colors on the color wheel

I plan on adding new color wheel charts in future posts according to specific usage. Hopefully, some of you will find them useful and helpful to you.
I also want to share with you some color theory worksheets that I use to teach color theory to my beginner classes. Students mix paints and paint directly on the sheets. To download these sheets, click on the thumbnail-right click on the image and click “save as”


If you are looking for an interactive experience when it comes to the color wheel, try The Interactive Color Wheel.
If so, join over 36,000 others that receive our newsletter with new drawing and painting lessons. Plus, check out three of our course videos and ebooks for free.


Cymatics – The Art of Sound
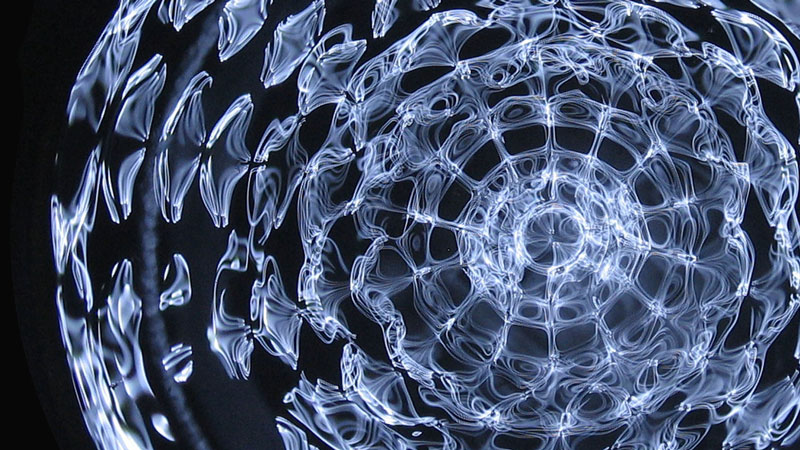
His experiments concluded that sound frequencies are not in a state of chaos, but instead a highly structured and organized schema. This phenomenon was first observed by Robert Hooke who noticed that sound frequencies can be translated into visual representations.
Cymatics is somewhere between science and art. The imagery produced from the creation of a Cymatics rig can be stunning but the science behind it is equally intriguing.
I built a Cymatics rig in my classroom and shared the experience with my students. I was able to capture some cool images.


I took the process one step further and discovered that if you add corn starch to the water at the right consistency to create a Non-Newtonian fluid, you can create a sculptural creature that morphs with the frequencies.
You have to play with the mixture until it flows like a liquid, yet feels like a solid to the touch. You also will have to play with the frequency to find the right place for your monster to appear.
Here are some more resources to help you get started…
Cymatics.org
Create Your Own Cymatics Rig
Jimmy O’Neal – Cymatics Artist
If so, join over 36,000 others that receive our newsletter with new drawing and painting lessons. Plus, check out three of our course videos and ebooks for free.

Different Types of Erasers
(I’d probably argue with myself on that opening sentence.) Part of drawing is subtracting. (That’s probably more accurate.) Erasers are an inevitable part of the process of subtraction in drawing. I’m not going to discuss the many ways that erasers can be used to actually create the drawing in this article. Instead, I want to give you a run down of the different types of erasers and what they are generally used for.

A Rubber Eraser
A rubber eraser is the most common type of eraser out there. It can be found at the end of every #2 pencil. Rubber erasers are generally colored pink, although I have seen them available in all different types of colors. The Pink Pearl brand eraser is a standard for most artists.
It comes as a wedge shape and is colored pink. Rubber erasers are best suited for erasing pencil (graphite) on paper. It works by shedding itself as it lifts the pigment from the surface. Rubber erasers will not tear the paper unless they are used over-aggressively. Rubber erasers are also quite economical averaging from $.25 to $.50 a wedge.
Gum Erasers
Gum erasers are sometimes called art gum erasers. These erasers are also made of rubber, but are a softer version than rubber erasers. Gum erasers are very soft and tend to crumble as they erase.
If the integrity of the paper is a concern, then a gum eraser may be your best bet because they will not tear the paper even with aggressive rubbing. Gum erasers are best for erasing graphite on paper.
These erasers are usually brown in color and some are even semi-transparent. One negative aspect of gum erasers is that they don’t last very long. Because they crumble so easily, the life of the gum eraser is a short one. Gum erasers range in price from $.50 to $.75.
Kneaded Erasers
Kneaded erasers are very soft, pliable erasers that be formed and sculpted. They are a unique breed of eraser because of this feature. They work by lifting the pigment off of the surface. Because of this, kneaded erasers will not harm the surface. Because they are easy to form, kneaded erasers are particularly popular with artists.
Kneaded erasers become dirty as they erase but can be pulled and manipulated to clean them. They can even be washed. The standard color for kneaded erasers is gray, although I have seen them in all sorts of colors. Kneaded erasers are mostly used for graphite and charcoal. Kneaded erasers are best suited for charcoal.
These erasers are a bit more expensive than rubber erasers averaging in price from $1.00 to $2.50.
Vinyl or Plastic Erasers
Vinyl erasers are made of soft vinyl and are sometimes called plastic erasers. These erasers are the toughest of the bunch. If not used properly, they can easily tear paper. Vinyl erasers can erase almost anything including ink. Vinyl erasers are usually white and come in a variety of shapes.
Many draftsmen prefer vinyl erasers because of their ability to erase cleanly and completely. Vinyl erasers are fairly expensive, ranging in price from $2.00 – $5.00 depending on the brand.
Eraser Pencils or “Erasils”
Although the material used to create erasils is vinyl, I still think it necessary to mention them. Erasils are just erasers in a pencil form. They can sharpened just like a pencil for super precise erasing.
Because the eraser material is vinyl, they can damage the paper if not used gently. Erasils are becoming increasingly hard to find, but with a little search on the internet, you’re sure to find a place where they can be ordered.
If so, join over 36,000 others that receive our newsletter with new drawing and painting lessons. Plus, check out three of our course videos and ebooks for free.
The Stages of Artistic Development

In 1947, Dr. Viktor Lowenfeld published “Creative and Mental Growth”, which quickly became THE textbook for art educators. Lowenfeld argues that are six clearly defined stages of artistic development and that these stages can be witnessed in the artworks of children. According to Lowenfeld, the six stages of artistic development are:
Stage 1 – Scribble Stage (1 – 3 years old)
Children at this age are engaged in the physical activity of drawing. There is no connection made between the marks and representation during most of the scribble stage. However, towards the end of this stage children may begin to give marks names. This stage is mostly about the enjoyment of purely making marks.

Stage 2 – Preschematic Stage (3 – 4 years old)
Children at this stage of artistic development are beginning to see connections between the shapes that they draw and the physical world around them. Circles and lines may be described as people or objects that are physically present in the child’s life. It is in this stage that a child first makes the connection to communicating through their drawings.

Stage 3 – The Schematic Stage (5 – 6 years old)
Children at this stage have clearly assigned shapes to objects that they are attempting to communicate. They often have developed a schema for creating drawings. There is a defined order in the development of the drawing.
Drawings at this stage have a clear separation between the sky and the ground. Often the sky is a strip of blue at the top of the paper, while the ground is a strip of green at the bottom.
Objects are often placed on the ground instead of floating in space. Objects of importance are often drawn larger than objects of lesser importance.

Stage 4 – The Dawning Realism (7 – 9 years old)
At this stage in artistic development, children are beginning to become more critical of their own work. It has become evident that a structured order to drawing objects is no longer sufficient. While a schema is still used to create drawings, it is more complex than the schema used in earlier stages. Overlapping can be seen and a sense of spatial relationships is more evident.

Stage 5 – The Pseudo-Naturalistic Stage (10 – 13 years old)
The use of value and light is now apparent in drawings. Children at this stage of artistic development are very critical of their own success. Success is determined by the level of realism achieved in the drawing. Frustration is a common occurrence. It is exceptionally important to encourage students at this stage.

Stage 6 – The Decision Stage (13 – 16 years old)
Children at this stage will decide to continue drawing or view it as an activity without merit. Because of the level of self criticism inherent at this stage, many children, (now young adults) view drawing as a skill that do they do not possess.
Others, however, decide to continue working on their drawing skills and continue to develop. I think that it is important to encourage students to continue drawing despite their level of skill. Any skill level can be attained with practice. This stage of artistic development is perhaps the most critical to the development of an artist.

UPDATE: I recently added a new video podcast on this subject. Here’s a link to the video – The Stages of Artistic Development
If so, join over 36,000 others that receive our newsletter with new drawing and painting lessons. Plus, check out three of our course videos and ebooks for free.

Some Interesting Facts about Color
Facts About Color
Color is a powerful tool. Many good artists and designers recognize its power and use it to manipulate to their benefit. Recently, I have been researching color in general and have uncovered some interesting facts about color. Use this information wisely, as it will allow you the ability to subtly manipulate your audience.
Color Can Affect You Physically
Did you know that the color in a drawing, painting, or object can effect the way you feel about it? In fact, simply the color of an object can affect your mood and feeling.
There is actually research that suggests that the light of colors can affect the center of emotions found in the hypothalamus. This region of the brain, in turn affects the pituitary gland, which controls the endocrine system.
The endocrine system, in turn controls the thyroid and sex glands, which control hormone levels. Hormone levels control mood and emotion. It may be a long trip, but color does physically affect our body through our mood and emotion.
Color Can Affect You Psychologically (Although it’s Hard to Prove)
I think that all of us can agree that color does affect our psyche. It is quite hard to prove this however, if you are the scientific type.
Despite this, there have been several attempts over the years to prove the connection between color and psychology. Neuropsychologist, Kurt Goldstein experimented with the affects of color on one’s psyche in the 1930’s.
These experiments yielded some interesting results on how color affects us. For example, the experiments showed that objects seen in red light appear bigger or heavier. In contrast, objects that were viewed in the opposite color, green, appeared smaller and lighter.
Here are a few more ways color is thought to have had an impact on psychology…
Fact 1 – A factory in the United States changed the color of the bathrooms to an unpleasant green and saw production increase by 8%.
Fact 2 – Customers of a coffee house constantly complained about the cool temperature in the room. At that time, the walls were painted a light blue. After changing the color to orange, there were no more complaints.
Fact 3 – The color yellow can cause nausea, so it is avoided in airplanes.
Fact 4 – Black boxes seemed heavier to workmen than green boxes filled with the same material.
Fact 5 – Red can make you hungry, while the opposite color, green, suppresses it.
Fact 6 – The color red can also increase your muscle reaction, make you want to gamble more, and raise your blood pressure. Blue has the opposite effect.
Fact 7 – Blue street lighting resulted in lower crime rates in Glascow in 2000.
Fact 8 – Blue conveys trust and reliability.
Fact 9 – Green is believed to increase concentration.
I came across these interesting facts about color in my research and I thought that I’d pass them on. While color does have an impact on our psychology, we bring our own experiences to the table making color psychology an imperfect, but fun science.
If so, join over 36,000 others that receive our newsletter with new drawing and painting lessons. Plus, check out three of our course videos and ebooks for free.
Top 10 Most Influential Visual Artists of All Time
Sure, some of the greatest artists of all time appear on this list, but this list is about influence. What kind of an influence has this particular artist had on other artists, on the development of art movements in history, and on visual art as a whole. Some on this list may surprise you, while others will not. Just keep in mind that this list is only my humble opinion.
The Most Influential Visual Artists
10. Rene Magritte (1898 – 1967) Rene Magritte has influenced numerous painters and musicians and even helped to influence the movement of Pop Art. He is a Belgian born Surrealist painter whose work aimed to challenge the visual perception experienced by the viewer.
One example of Magritte’s aim to challenge the viewer can be seen in the painting entitled “The Treachery of Images”. In this painting, a representational painting of a pipe is displayed above the phrase “This is not a pipe”. Of course it’s not a pipe, it’s a painting of a pipe. Some of the artists that Magritte has influenced include Andy Warhol, John Baldessari, and Jasper Johns.
9. Paul Cezanne (1839 – 1906) Paul Cezanne has been labeled as the “Father of Modern Art”. How’s that for influence? Cezanne was a French Post-Impressionist painter that fit the transition from Impressionism to Cubism. Cezanne was interested in breaking objects down into basic forms and shapes and was particularly interested in how we perceive objects.
We see with two eyes, so essentially we see two separate images. Cezanne wanted to include this in his paintings. The likes of Picasso and Matisse site Cezanne as a direct influence on their painting styles.
8. Marcel Duchamp (1887 – 1968) Marcel Duchamp is a rather controversial pick in this list. However, it is my opinion that he was one of the most influential artists. Remember that this list is about influence only, not a judgment on the artworks themselves.
Although Marcel Duchamp’s body of artwork is not very large, the artwork he produced served as a catalyst for the avante-garde. His “ready-mades” produced much controversy but did force the art world to look deeper into what makes an artist an artist and specifically what makes art, art. He is credited as influencing the Surrealists, and his attitudes toward the “Art Establishment” of the time latter influenced the Pop Art movement.
7. Vincent Van Gogh (1853 – 1890) You cannot talk about the most influential artists of all time without mentioning Vincent Van Gogh. Van Gogh did not decide to become an artist until the end of his short life. But in that short time, he created over 800 paintings.
His grasp of color relationships and unique brush work has distinguished him as one of the most profound artists of all time. Van Gogh’s influence continues today. His work inspires Modern Impressionists around the world and because he is probably the most well-known artist from history, his works and legacy are introduced to young artists daily.
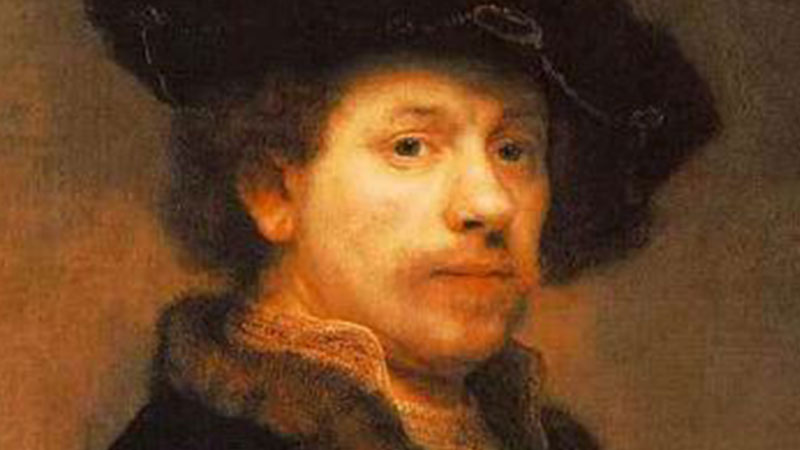
6. Rembrandt van Rijn (1606 – 1669) This Dutch painter and printmaker is credited as being the “first artist to create for art’s sake”. Ironically, he is also perhaps the most prolific Biblical painter from history. He is well known for his vast collections of work and his notable portraits.
Many of which were self portraits. Rembrandt has had a vast influence on a variety of Genre. Many portrait artists will site Rembrandt as an influence on their composition and brushstroke work. Rembrandt influenced many painters of the Romantic period, and Georges Seurat has noted Rembrandt as a notable influence on his work.
5. Claude Monet (1840 – 1926) Monet is recognized as the founder of Impressionism with his painting entitled “Impression-Sunrise”. Impressionism places an emphasis on loose brushstrokes and the optical perceptions of color. The Impressionist movement, which included artists such as Renoir, Manet, and Seurat , went on to influence the likes of Van Gogh and many abstract artists there after.
4. Leonardo Da Vinci (1452 – 1519) No list of influential artists would be complete without mention of Leonardo Da Vinci. Da Vinci was a man of “many hats”, but is perhaps best known for creating the most famous painting of all, The “Mona Lisa”.
It could be argued that Leonardo Da Vinci could be one of the most influential people of all time. Besides his contemporaries, Da Vinci has influenced countless painters and artists throughout history.
3. Titian (1480 – 1576) Titian is one of the most important Italian artists to ever have lived. Most of his paintings featured scenes of the religious, but were painted with a dramatic attention to detail. Countless artists have been influenced by Titian, the most notable of the list being El Greco.
2. Michelangelo (1475 – 1564) Michelangelo, a true artist-(sculptor and painter) has influenced both painters and sculptors throughout history. Michelangelo is best known for his “David” and the famed Sistine Chapel frescos. His works has influenced many, most notable his Renaissance contemporaries and Artists such as Raphael.
1. Pablo Picasso (1881 – 1973) The most influential artist of all time is Pablo Picasso. Picasso, the co-founder of Cubism, has transformed the world of art.
A prodigy of artistic skill, Picasso changed the way artists approach a canvas. Cubism opened the door to the world of Abstraction and a new way of seeing. Picasso is credited to influencing artists such as Salvador Dali and Paul Klee, among countless others.
Remember that this list is my opinion only. I’m sure that I have left others off of the list that many may find worthy.
If so, join over 36,000 others that receive our newsletter with new drawing and painting lessons. Plus, check out three of our course videos and ebooks for free.
How to Teach Movement to Art Students
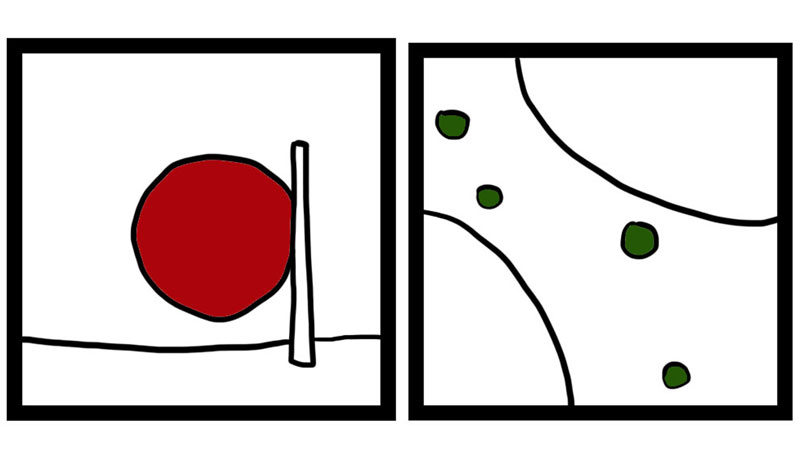
The elements of art deal with the basic components of art-making, while the principles of art deal with the way that the elements of art are arranged in a work of art. One of the principles of art that is usually not debated is movement.
There is more than one type of movement found in artworks. The first type of movement found in artworks is the obvious, physical movement. This is the feeling of action found in a work of art. This can be conveyed in a number of ways. The most direct way to show movement is to draw or paint lines coming from the object that is moving. For example, this type of movement can be seen in the image below…

Communicating movement in this manner may be effective but it is definitely not aesthetic. It is also quite “cartoony” as well.
A group of artists called the “Futurists” attempted to show movement in their artworks in a similar, but more aesthetic fashion. They are termed the “Futurists” because their interest in future technologies. Because the Futurist movement took place in the early 1900’s the technologies that they were interested in may seem quite antiquated by our modern standards.
One technology that they were especially interested in included moving pictures. Thus, movement became a centerpiece of the style.
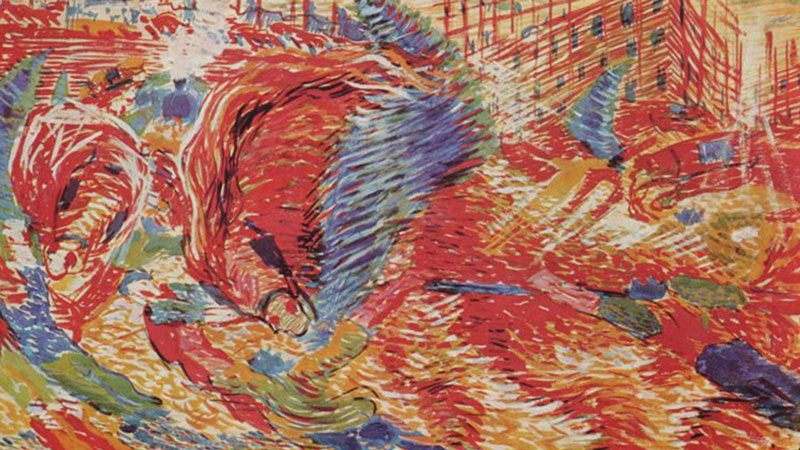
By using multiple brushstrokes and repetitive marks, they hoped to create a feeling of action into their paintings. Although the movement was short-lived, the artwork does provide some methodologies into creating movement in artworks.
Take a look at the image below by Umberto Boccioni, entitled The City Grows, 1910…

Notice how the repetitive lines can create the illusion of movement.
Another way to communicate movement in an artwork is to juxtapose the subject(s) in manner that cannot be replicated by a static pose. In other words, to have the subject portrayed in somewhat of a “freeze frame”. This type of movement may take the form of the subject being in the air, or at an angle.
Setting up the composition so that the subject creates a diagonal line through the picture plane can create a sense of movement as well. This type of movement is illustrated in this painting by Edgar Degas, entitled, Balletprobe, 1873.

In this case, we know that the dancers cannot hold poses for very long. We know that they are in a state of motion, which creates the illusion of physical movement in the artwork.
The third type of movement found in artworks deals with the way a viewer’s eye moves through the work of art. This movement is dictated by the placement of objects inside of the picture plane. Placement of the objects will lead and guide a viewer’s eye. Dynamic compositions are aesthetically more successful than static compositions. So, determining the best placement for subjects within your composition is very important. This aspect of movement can best be illustrated by the following video…
When I am teaching movement to introduction level art students, I introduce them to the various ways of creating movement in art. I show them lots of examples, and we discuss as a class how the artist intended to convey movement.
I then challenge them to create movement in a series of thumbnail drawings, usually 5. These small, quick drawings do not have to be representational. They may be purely non-objective. The goal is to create movement in a variety of ways. I ask them to number their compositions.
On separate piece of paper, I ask them to note in written form how they attempted to show movement in the numbered composition. Students then trade thumbnails (just the drawings). Without talking, I ask them to write how they think their classmate attempted to show movement in each of the compositions.
Each response coordinating with the numbered composition. At the end of the exercise, students trade back their compositions and discuss their comments with each other.
This exercise not only helps students to understand movement in artworks, but also helps them to learn how to evaluate artwork, and hopefully, think more deeply about the artwork that they are created themselves.
If time permits, students can then decide to create finished work from one of their thumbnail drawings.
If so, join over 36,000 others that receive our newsletter with new drawing and painting lessons. Plus, check out three of our course videos and ebooks for free.
Industrial Design-The Art of Objects
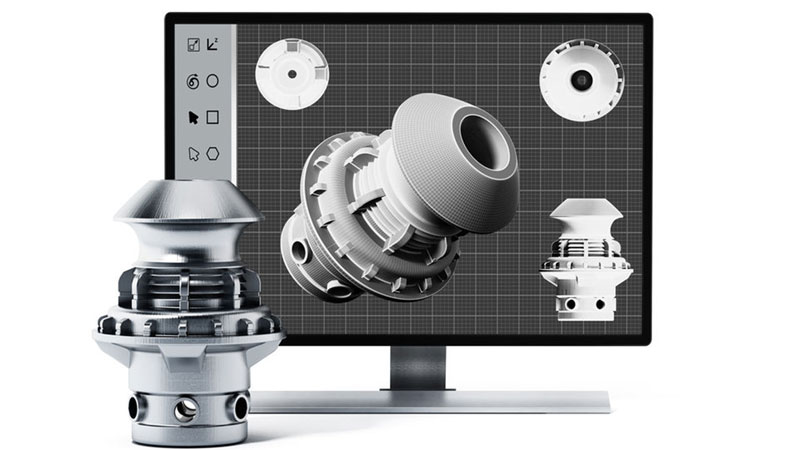
Industrial Design is the design of objects. It ranges from the simplest tools to automobiles, from tape dispensers to computers and so on. It is a field that is always in demand and is always looking for talented designers to fill the ever growing need for good, solid design.
Why is it so overlooked?
Well, this may be simply answered by the fact that Industrial Design is everywhere. Think about all of the objects that you interact with on a daily basis. Do you ever stop to think about the design process behind its creation. The answer is probably not.
But the designer of those objects has labored over how it will be used by you. They have spent hours, days, perhaps months considering how you will use their design. They have crafted their design to be as perfect as possible.
Unfortunately, there are quite a number of products that are imperfect. So what makes good design? While this could be argued, there are a few characteristics that good designs share.
Functionality
Quality Industrial Design requires that the product be functional. I know that this sounds pretty obvious, but think of all of the products that are sold that just simply lack functionality.
The product must work. It can look as pretty as it wants, but if a product doesn’t work then it is worthless.
Functionality should be goal number one to the Industrial Designer. In fact many designers look to find ways to make existing products more functional. I know that I can think of several products in my life that could use some tweaking in the way of functionality.
Simplicity
The best ideas are often the most simple ones. How many times have you said, “I wish I thought of that”?
If your like me, then you said that phrase too many times to count.
The fact is we are acknowledging that those ideas were so simple that anyone really could come up with them. The best ideas really are the simple ones.
The same is true when it comes to Industrial Design. The best products are often the most streamlined. The best products are often the simple ones. Want an example? How about the Post-it note. So simple yet so functional.
Aesthetic Appeal (Beauty)
The aesthetic appeal of an object is often the reason we buy it. In fact, some products are driven by the aesthetic appeal alone. This is unfortunate because it leads to product development that is lacking in the other areas. It is only when all three (functionality, simplicity, and aesthetic appeal) are combined in harmony that quality Industrial Design results.
Aesthetic appeal is important, but only when functionality and simplicity exist as well.
For a look deeper into the fascinating world of Industrial Design, I suggest you watch the documentary “Objectified”. It is a pretty thorough look at the world of contemporary industrial design. It also takes a look at a few well known companies and how they approach creating quality design. It is well worth a look. If you have Netflix, you can stream it instantly.
One more note on Industrial Design. Many people just can’t define design. Often times, it is confused with style.
Design and style are clearly different things. I cam across this video on YouTube. It is old. It was produced in the later 1970s, but I do feel that it explains Industrial Design well. It also has a segment in it that clarifies the difference between style and design. (Plus I’ve always loved that style of animation – it’s pretty groovy.)
So where does industrial design fit into your life? Do you give it notice? Do you appreciate quality design? What products do you feel exhibit quality design?
If so, join over 36,000 others that receive our newsletter with new drawing and painting lessons. Plus, check out three of our course videos and ebooks for free.
