Some animals, such as fish and reptiles, can’t be imagined without scales. These small rigid plates provide protection and coloration. In certain cases, they also aid in locomotion.
These creatures boast beautiful scaly mosaics on their bodies. Butterflies and moths have membranous wings that are covered with delicate scales. Pangolin, also known as the scaly anteater, is a mammal with large scales protecting its body. Even birds have scales on their toes!
As we can see, this type of covering is widespread in the natural world. If animals appear in your art quite often, it may be useful to learn more about this texture.
Some artists find it difficult to draw scales, and for good reason. Simply observing all those small elements can be overwhelming!
From a scientific standpoint, scales present an impressive variety in shape and structure. There are specific types of scales that belong to animals of a particular class.
This tutorial is a summary of valuable information on the topic of drawing scales. We’ll focus on the practical aspects that you can apply to your art. It doesn’t matter what art medium you choose to use.
In the first part of the lesson, we’ll observe the most common types of scales. We’ll also learn a few methods to analyze this texture. I’ll show you a couple of ways to draw scales in rows. Achieving a realistic result may be easier than it seems!
The second part of the tutorial is purely practical. We’ll create two samples of texture using colored pencils. The scales we’ll draw are those of a lizard and a snake.
Reptilian scales are the focus of this lesson, but you’ll also find some advice that is useful for other types of scales. It applies to drawing fish scales and, in general, any scales that you can imagine.
The Shapes and Structure of Animal Scales
We’ll first take a look at the basic shapes and structures that we can observe with animal scales. Understanding what we’re seeing will help us when it’s time to draw.
See also: Drawing Construction – Drawing with Shapes
Mind Tricks
What animal appears in your mind when you think of scales? Most likely, your first association will be a fish. Usually, we imagine the pattern of fish scales as a set of close-fitting semicircles.

This simplified model is true for the scales of cycloid type. Such scales resemble small disks that overlap each other.
See also: How to Draw a Fish with Pen and Ink and Add Color Digitally
This abstract example invites a couple of interesting conclusions…
- The human mind has a great ability to simplify complex forms and patterns. Artists develop this skill to a high level, as it helps to create credible illusions on paper or canvas. We easily recognize real objects in stylized drawings. Adding details from memory or imagination also comes naturally.
- Our mind has storage of visual images and ready-made associations. We often choose the first option that shows up and content ourselves with it. This method definitely helps us to save energy!
However, the most obvious option usually isn’t the only (or the correct) one. Further research and brainstorming may bring some surprising results!
The process of exploration broadens our horizons. It provides additional options and data, which often leads to a more credible result. Sometimes we don’t learn new things but rather refresh our existing knowledge.
In this case, research suggests that fish scales exist in a variety of forms.
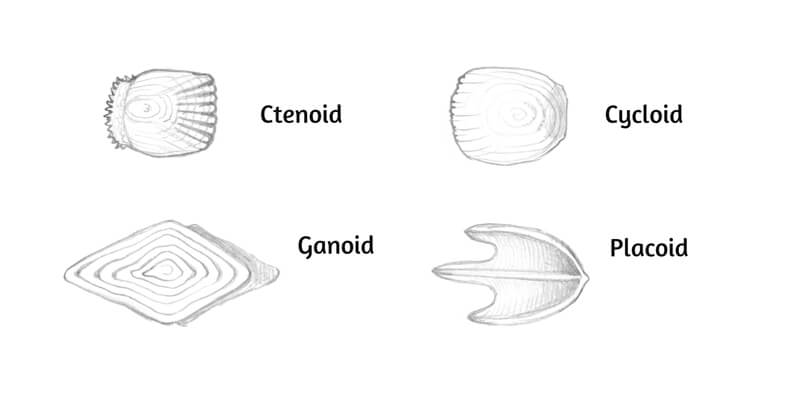
Ctenoid scales are similar to cycloid ones in shape, but their outer edges are toothed. (Cycloid scales have smooth outer edges.) Trout, herring, and carp scales belong to the cycloid type. Perch, bass, and sunfish present the ctenoid shape.
Ganoid scales are diamond-shaped. They can be found on gars and sturgeons.
Placoid scales are plate-like and have a small outgrowth. This type of scale belongs to sharks.
Reptilian scales present a similar variability. We’ll talk about them in greater detail in the next section.
Variety of Scales in Nature
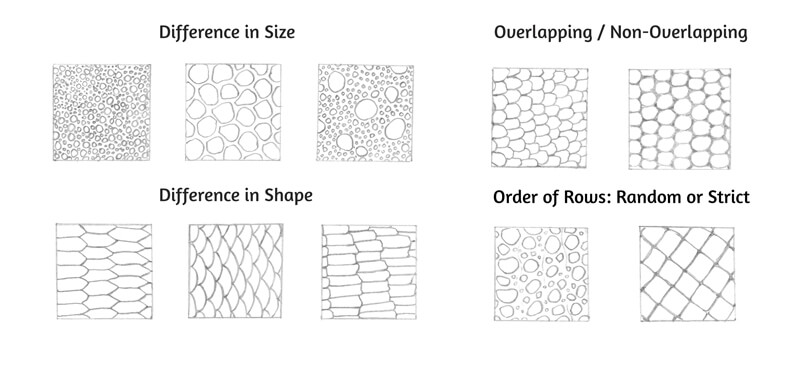
Scales can be divided into several categories, depending on their visual appearance. My classification is derived from observation and is not rigorously scientific. This system is a practical attempt to categorize the abundance of natural textures.
By the way, observing a variety of references and then creating your classification may be a great exercise.
The scales’ size (and its consistency) is among the most important variables. The location of these elements also affects their size. Most often, bigger scales are found on the head, feet, and tail. Smaller ones cover the areas around the joints for flexibility.
Before you start drawing a sample of a texture, it may be useful to recognize what part of the animal’s body you are attempting to depict. Are those big, diverse scales from the chameleon’s neck or extra broad scales from the snake’s belly? It’s up to you to decide on the subject.
The shape characteristics vary, too. Here are some extremes:
- Round – angular
- Even – irregular
- Long – short
The arrangement of scales can be orderly/symmetrical or irregular.
General skin relief is another important variable. Rows of scales can overlap each other, creating prominences that create highlights and shadows.
In the image below, you’ll find a visual presentation of this classification.
Relief and Height
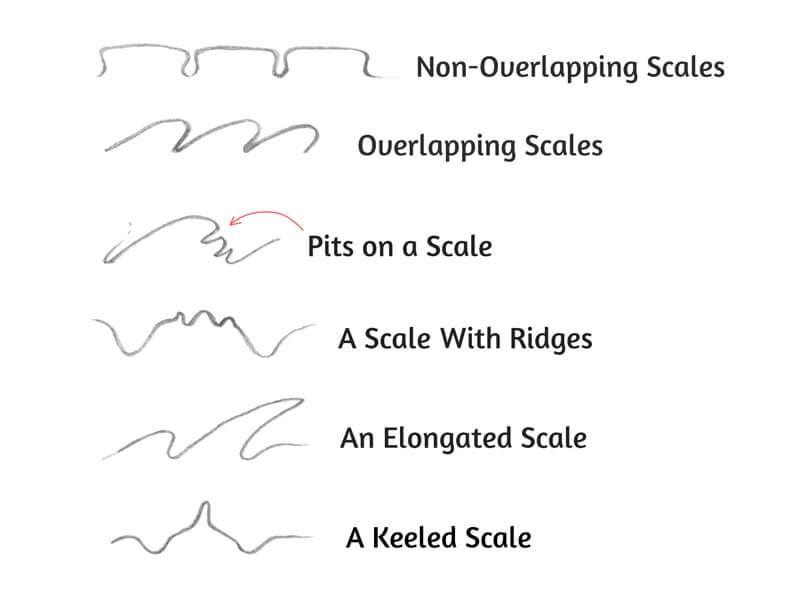
An individual scale also has a height. Some examples are relatively flat. In this case, the scale’s surface is smooth, making the element resemble a disk or a plate.
Scales may be granular. These elements appear bumpy.
Another variation is keeled scales. They have a center ridge.
All these types can be found in reptilians. Sometimes, scales have pits and other fine structures too.
In the image below, you’ll find schematic drawings of scales in a cut view. They present different kinds of relief depending on the height and form.
The Rhythm of Scales
Careful analysis is key to drawing scales and here’s a conceptual example of such an assessment.
The first step is to observe the size and shape of the elements, as we’ve done in the previous chapter.
Now, digress from the scales and look at the negative space that serves as a background. Is there any component that appears to dominate? What has attracted your attention – the elements or the area surrounding them?
Observe the gaps between the scales. Do they form an intricate pattern? Try to notice the unique rhythm of this texture.
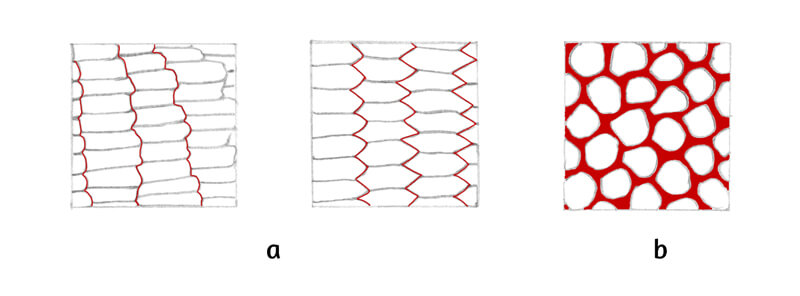
The image below illustrates this concept. The red lines follow the borders between the close-fitting scales (a), showing the pattern’s variability and movement. The horizontal borders have a monotonous character.
The example b demonstrates the negative space between the elements.
How to Draw Scales on a Form
After you’ve found the rhythm of the texture, imitating it with lines on paper becomes easier. Using subsidiary lines is one of the ways to create a framework. Such lines are especially helpful when you’re adding scales to a three-dimensional form like a cylinder or a sphere.
To practice drawing rows of scales, I recommend the following exercises…
The First Exercise
This method works great for non-overlapping scales.
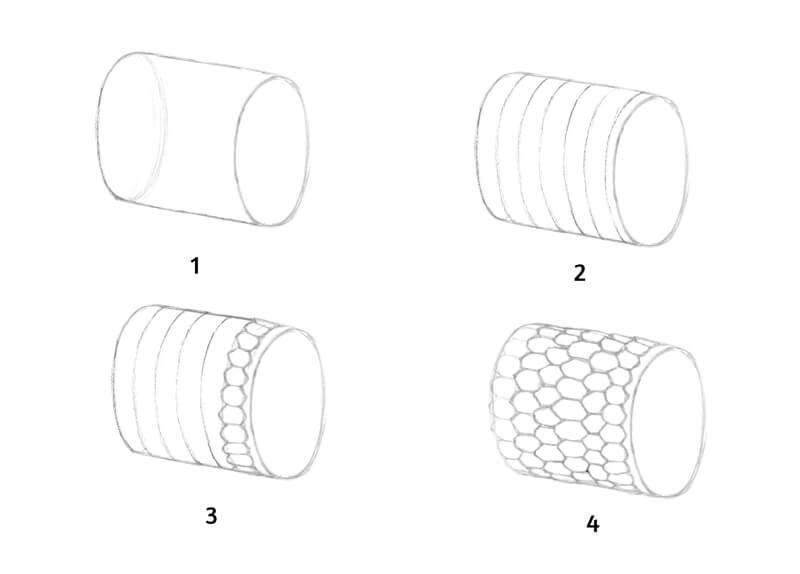
- Start with a form. Mine resembles a cylinder. It doesn’t have to be perfect. This form serves just as a basis. I imagine that it is a fragment of an animal’s body that I should cover with scales.
- Add the lines that approximately follow the contours of the form.
- Then it’s time to add the first row of the scales. In this case, scales have a shape of an irregular hexagon. The elements won’t overlap each other. Note that the elements conform to the contours of the cylinder. In its central area, the scales are fully visible, but they become reduced at the sides of the form.
- Add the next rows, one by one. Each new scale is placed between the prominent angular edges of the existing elements. You can vary the width of each row, making your texture more organized or irregular.
The Second Exercise
The following method may help you to arrange wide overlapping elements (like scales of the cycloid type.) In this case, we’ll need two sets of subsidiary lines.
- Start with your initial form.
- Add two sets of diagonal lines. The guides follow the form. There is a moderate twist near the sides of the cylinder. The intersections create diamond-shaped boxes.
- Fill the resulting shapes with semicircles – the scales. I start with the row that is closest to the viewer.
Note that the character of scales affects the outer contours of the form! In the image, they are marked with red color. The contours become slightly irregular.

The Values – How the Main Form Affects Single Scales
Scale texture is a combination of small elements, where each element is affected by the light source. If a covering has elongated ridges, bumps, and other prominent components, this principle becomes especially important.
In such a case, each element will have areas of light, shadow, and midtone – just as normal objects. Also, overlapping scales cast shadows on their neighbors. If we draw a texture in detail, we should give the prominent elements the relevant illusion of volume with the help of values.
The texture conforms to the main form of the object and repeats its contours.
In other words, scales are found on the skin of an animal, and skin wraps around the body. The body is the main form. It is affected by the light, its direction and character. There will be areas of highlight, light, midtone, core shadow, and reflected light.
When you’re drawing scales on an animal, it’s necessary to consider the values and their location on the main form. They determine the average tone of the texture in any given area. In the image below, you’ll find an illustration of this concept.
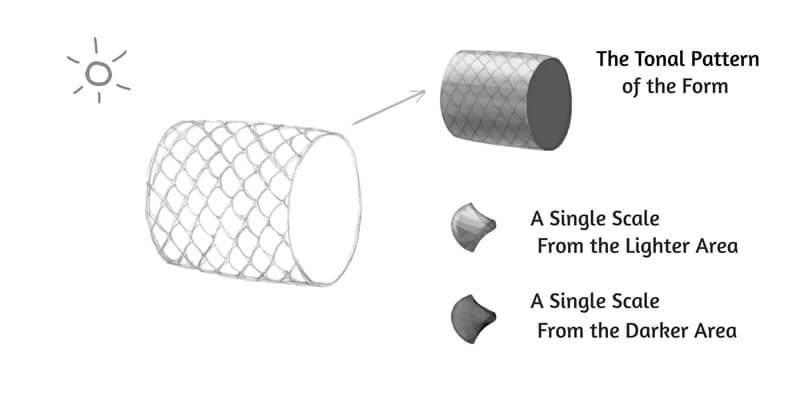
Here we have a cylinder with scales on its surface. The light comes from the upper-left corner of the scene. It is soft, so we won’t see any harsh, chopped shadows between the scales – even if the texture is observed close-up.
The light affects both the main cylindrical form and the individual scales. In general, the upper-left areas of the elements will be lighter, as they have more chances to catch the light.
The values of the main form affect the texture. An enlarged scale from the cylinder’s brightly lit area will look quite different from a scale on a shadowed part of the form.
So in a nutshell, always pay attention to the main form and its values. Don’t get carried away with all those fascinating details of texture found on the scales!
A Note on Coloring Scales
As we know, scales provide coloration. In certain cases, the pattern can be quite complex.
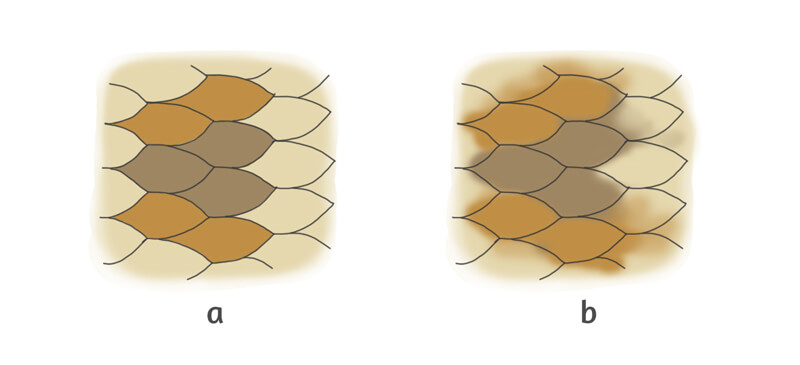
Sometimes the change of color happens as if within the scales. The borders are crisp and readable, so the pattern resembles a page from a coloring book. (See illustration a in the image below.)
The transition between the colors can be blurred. In this case, the colors go beyond the borders of the scales. (Illustration b.)
How to Draw Lizard and Snake Scales
Now let’s put the concepts we’ve covered to practice and draw a couple of animal scales.
We’ll need a graphite pencil to create an outline. I recommend an H or HB. Alternatively, you can use a gray pencil from your set of colored pencils.
Keep an eraser at hand to remove any unnecessary lines and excessive graphite.
A ruler will help you to create straight, even borders for your texture swatches.
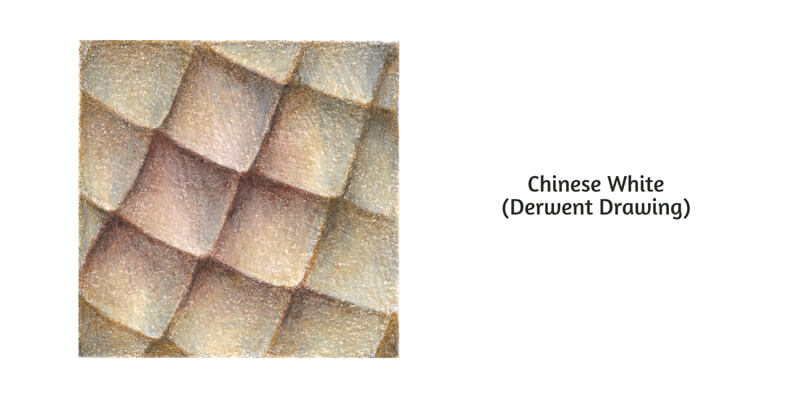
Below you’ll find my list of colored pencils. The vast majority of them are from the Faber-Castell Polychromos set. The only exception is Chinese White – it belongs to the Derwent Drawing range.
See also: Comparing Colored Pencils
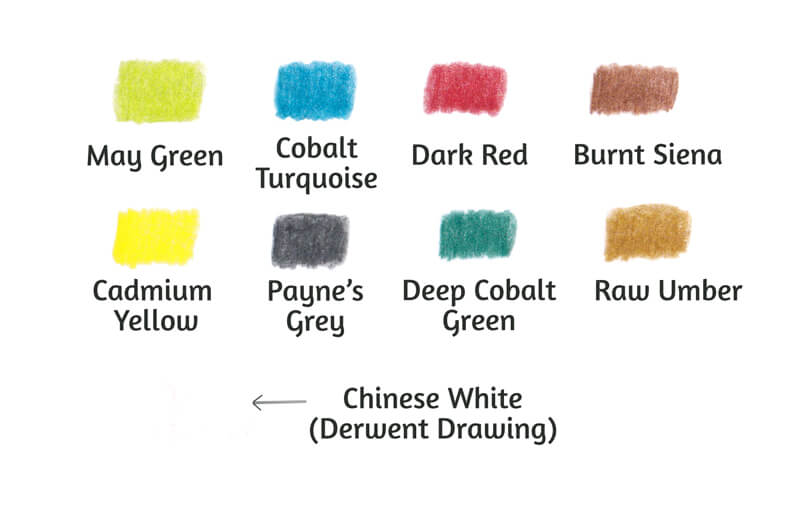
A pencil sharpener is another must-have tool for our project. A sharp pencil is required to create such detailed work.
I’ll be drawing on 200 gsm paper of A5 size. This format is enough for both drawings, as the size of each texture sample is 6.5 × 6.5 cm (2.6 × 2.6 inches.) The paper has a subtle texture.
Drawing Lizard Scales
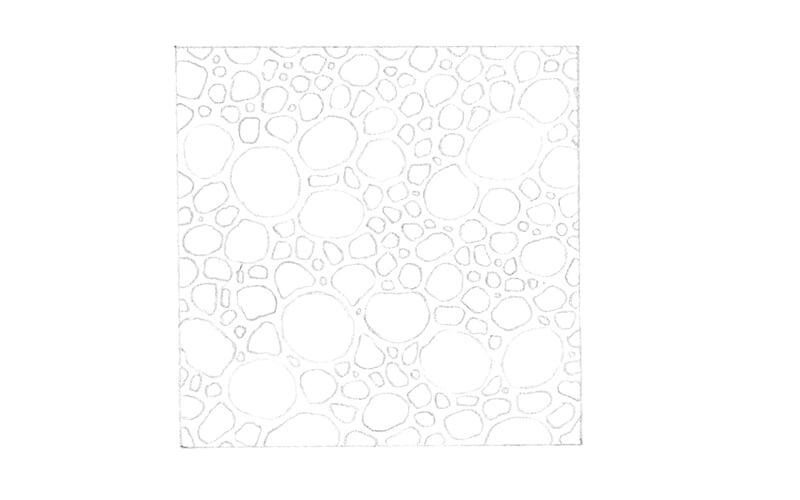
With a graphite pencil and a ruler, I create a square to indicate the borders of the swatch. Then I fill its inner space with rounded shapes – the scales.
It’s possible to divide the scales into three groups, depending on their size. I prefer drawing the larger elements first. The scales of medium and smaller sizes will be arranged within the remaining space.
In my sketch, larger elements have smoother, more rounded contours. The smaller scales are slightly angular.
With colored pencils, achieving sharpness on fine details may become a challenge. That’s why I avoid adding tiny, dot-like elements. Even the smallest scales are large enough and are accessible for a sharp pencil tip.
It’s time to create a colored base for our texture swatch. Before we proceed to colored pencils, it might be a good idea to lift excessive graphite with an eraser. (A kneaded eraser is the best option.)
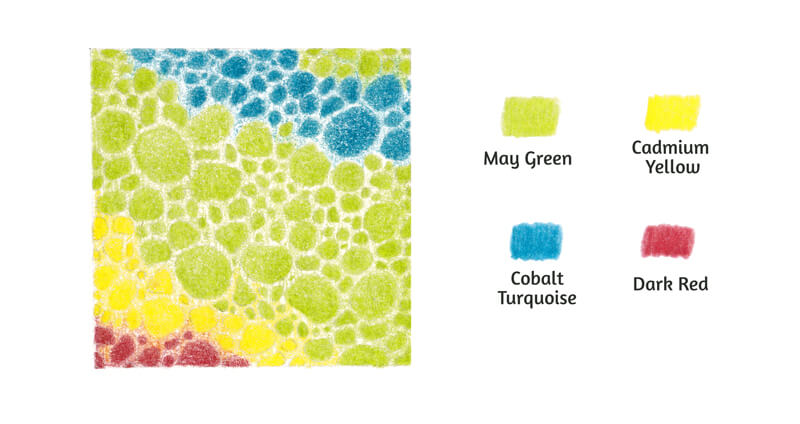
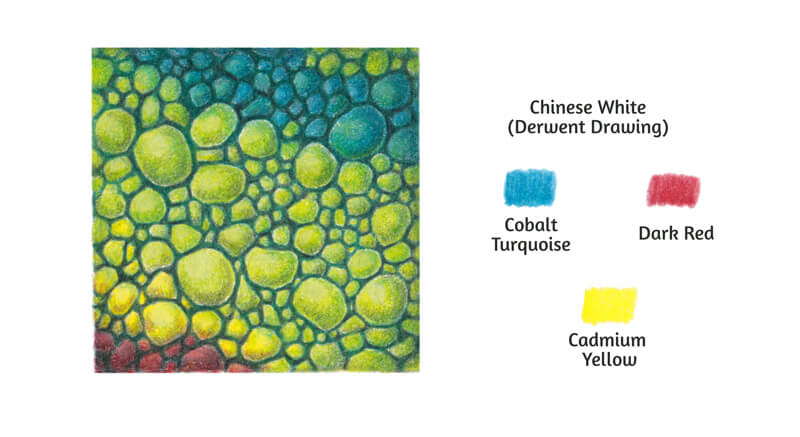
I use May Green at light pressure to cover the central area of the square. The pencil moves in small circles. I add another layer to the scales, applying increased pressure. A small area in the upper right corner also gets this vibrant green color.
Then I vary the coloring of the lizard skin, adding other hues. The neighboring areas become covered with Cadmium Yellow, Dark Red, and Cobalt Turquoise accordingly.
The layers may overlap to create interesting nuances.
Let’s assume that light is coming somewhere from the upper-left side. It is soft and diffused.
The larger scales are quite prominent. Their tonal pattern conforms to the direction of light. The scales’ upper-left areas will be brighter, and their lower-right sides will be slightly shadowed. I make sure that the darker areas of the larger elements get a solid covering.
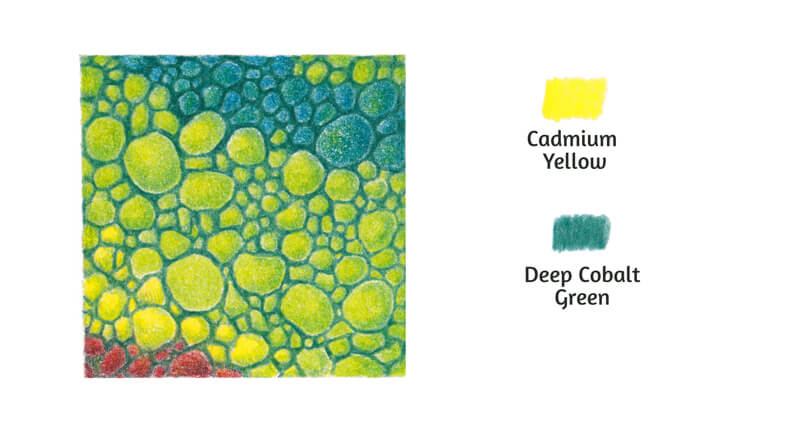
I add Cadmium Yellow to the lighter areas of the larger scales. This is relevant for the green, red, and blue elements. The inclusion of this warm hue will accent a shift in color temperature.
I add Deep Cobalt Green at light pressure to the shadowed parts of the prominent scales. Then I cover the whole area between the elements. The pencil tip is sharp.
I increase the contrast with Payne’s Grey, adding it to the darker areas of the swatch. I cover the space between the scales. The perimeter of the swatch also becomes slightly darker.
It’s possible to apply this shade to the scales’ core shadows. In this case, the pressure should be very light. Such shades can darken and desaturate bright colors in no time.
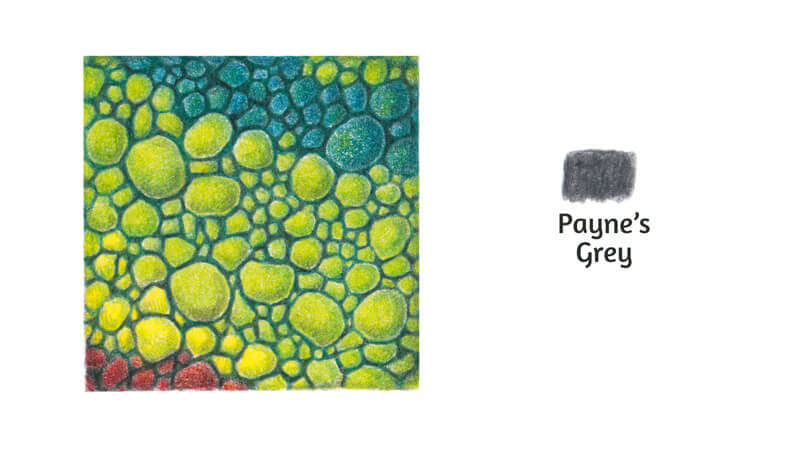
I burnish the scales with Chinese White, removing the graininess of pencil strokes on the slightly textured paper. I focus mostly on the lightest parts of the elements, as the white pencil also lightens the underlying colors.
I add some Cobalt Turquoise to the periphery of the swatch to give it a more unified look.
I also create an exchange of subtle color nuances, using Dark Red, Cadmium Yellow, and Cobalt Turquoise. This technique is similar to adding reflections to shiny objects of contrasting bright colors.
For example, I add some Dark Red to the yellow scales that are close to the red ones. Cobalt Turquoise is applied to the green elements, and Cadmium Yellow – to green and red ones. This simple trick also helps to unite the swatch visually.
Drawing Snake Scales
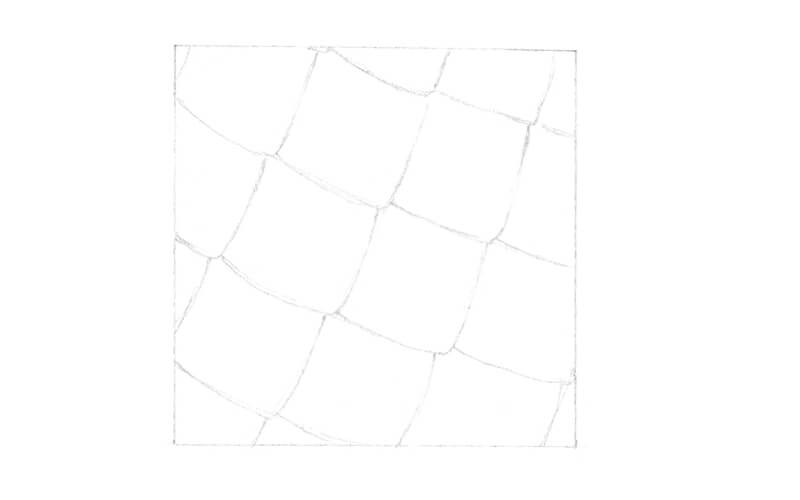
I start with a graphite pencil underdrawing. The scales are quite large and are approximately the same size.
Some crossing subsidiary lines may help you to recreate the rhythm of this texture. Draw two sets of parallel lines that are going in both directions. Then, place the scales into the resulting rhombic shapes.
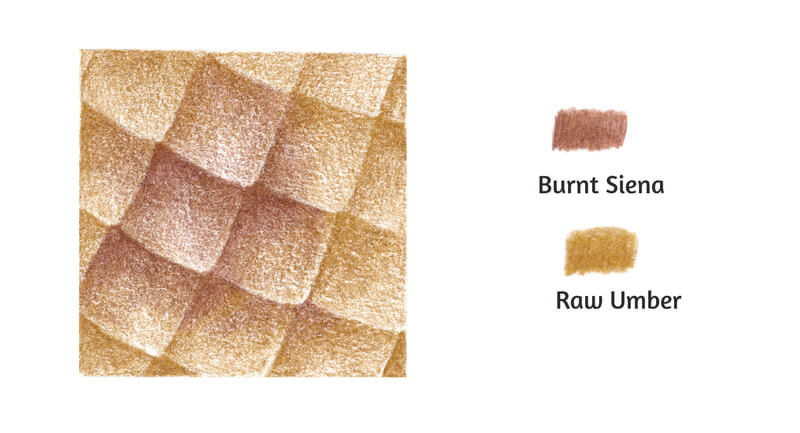
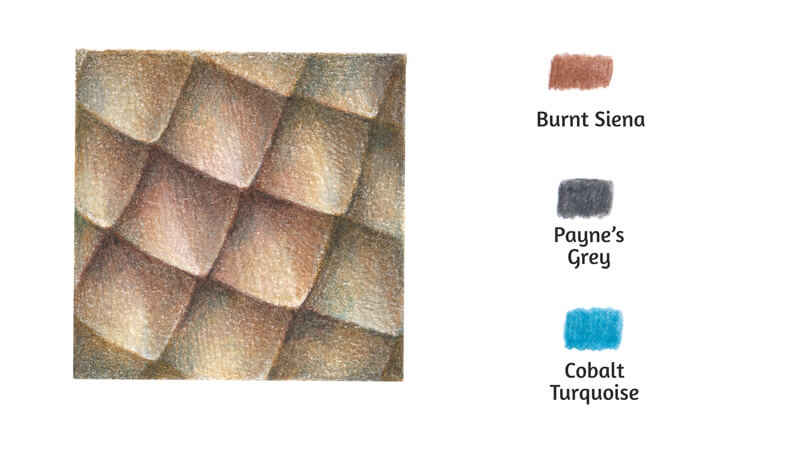
I cover the central scales with Burnt Siena. The lines are soft. The majority of them have a vertical back-and-forth direction. The strokes conform to the contours of each scale.
The color pattern is slightly blurred. It goes beyond the borders of the individual scales.
I add Raw Umber to the remaining space of the swatch.
Let’s agree that soft light is coming from the upper-left corner, just as it was in the previous example. The left sides of the scales, closer to the lower tip, will be slightly brighter. I apply an additional layer of pigment to the shadows between the scales.
The lower prominent ends of the scales remain lighter. This contrast strengthens the recognizable rhythm of the texture.
With Payne’s Grey, I increase the contrast. The shadows between the scales become darker.
The outer part of the swatch gets a subtle dark gray covering, too. This trick imitates a vignette photo effect.
I carefully touch the right sides of the scales, accenting the transition of values. The pressure is very light.
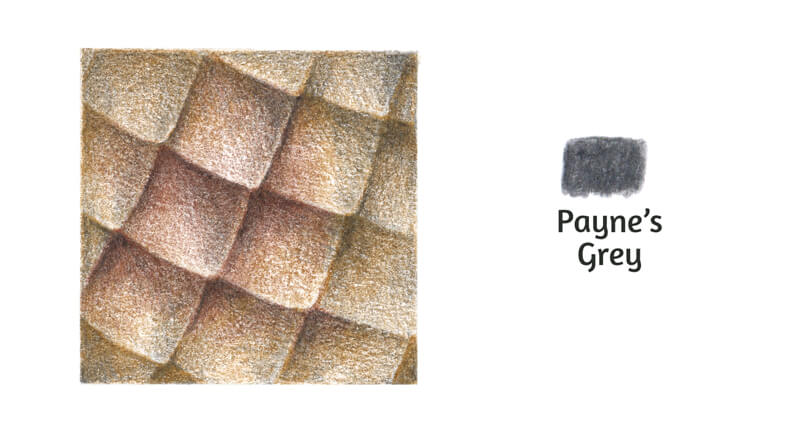
The strokes look grainy. I burnish the colored pencil layers with Chinese White.
Now the covering is smooth and polished, but the colors look slightly faded. We’ll restore the vividness and contrast in the next step.
I apply Burnt Siena as a thin layer to liven up the richness of browns.
With Payne’s Grey, I deepen the shadows and accent the details.
As a finishing touch, I apply Cobalt Turquoise near the inner borders of the swatch. I also add it to the shadowed areas between the scales. In small amounts, this hue often makes the drawing more realistic.
The swatch is complete!
A Couple of Words on Drawing Scales as a Texture in a Finished Artwork
In our practical part of this lesson, we were depicting scales as a flat, abstract, close-up fragment of texture.
Such exercises allow us to focus on the external structure. We explore the connection between the relief and values – and also notice color nuances. We don’t have to think about the main form’s values and their visual impact on the texture.
But what if the task changes? Let’s imagine that now the goal is to depict a three-dimensional object instead of its fragment. In this case, we can’t – and shouldn’t – draw all the details of texture.
When we’re portraying a scaly subject in full view, we aim to convey its perceived qualities in a stylized manner. Simplifying a texture means that we abandon the unnecessary visual information. We should keep only the larger, more significant elements and give just a hint at the less important details.
Rhythm helps a texture stay recognizable in any form. If we look at scales from a distance, we’ll notice how the gaps between the elements form a pattern.
In some cases, this pattern may seem irregular, but it still exists and can be imitated. In other examples, scales are arranged in a strict, symmetrical order.
To determine the key features, squint your eyes and look at your photo reference or subject of texture (make sure that your eyes are relaxed and don’t strain them). This trick helps to evaluate any subject.
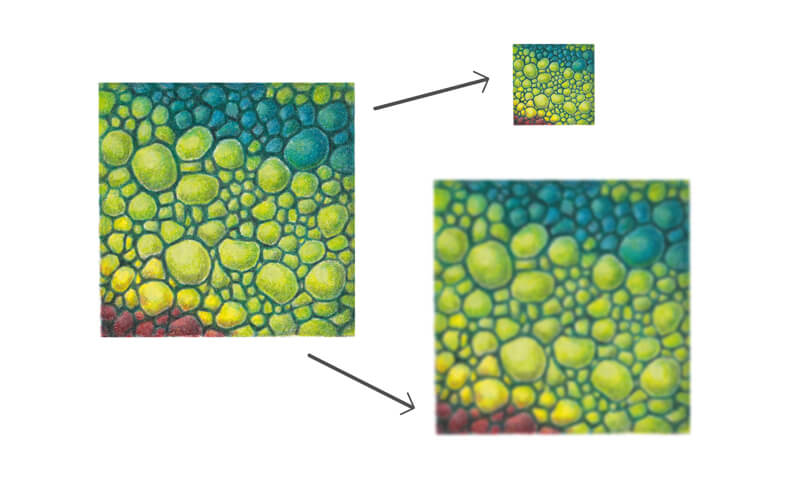
In the image below, you’ll find an illustration of this concept.
The upper image demonstrates a smaller, distant version of our lizard scales’ texture swatch. The lower image is blurred in a digital program to convey an effect of a squinted look.
The larger elements become more prominent visually. Also, we can notice a hint at an irregular rhythm.
Drawing Animal Scales – Conclusion
Congratulations – we’ve completed our journey into the world of scales! I hope that this lesson was interesting and informative. Hopefully you see that drawing scales isn’t as complex or difficult as it may seem. It simply requires a bit of analysis and informed mark-making.
I wish you much inspiration for your future creative projects!
If so, join over 36,000 others that receive our newsletter with new drawing and painting lessons. Plus, check out three of our course videos and ebooks for free.