This lesson highlights simple, yet effective, mark-making and blending techniques that you can use in your colored pencil work. We’ll also talk about the important variables such as pressure, pencil angle, and point sharpness. We’ll explore how these aspects affect the result. I’m excited to share plenty of helpful tips with you!
Some of the techniques, like layering or burnishing, are fundamental. It’s no wonder that you can find them in almost any article on drawing with colored pencils. Other options, such as embossing or creating a white underlayer, are less well-known.
See also: Colored Pencil Techniques
A broad range of techniques and mark-making styles provides more options to choose from. Theoretical knowledge can be multiplied by experience, giving you additional ways to achieve the desired effect. Greater creative freedom comes as a bonus!
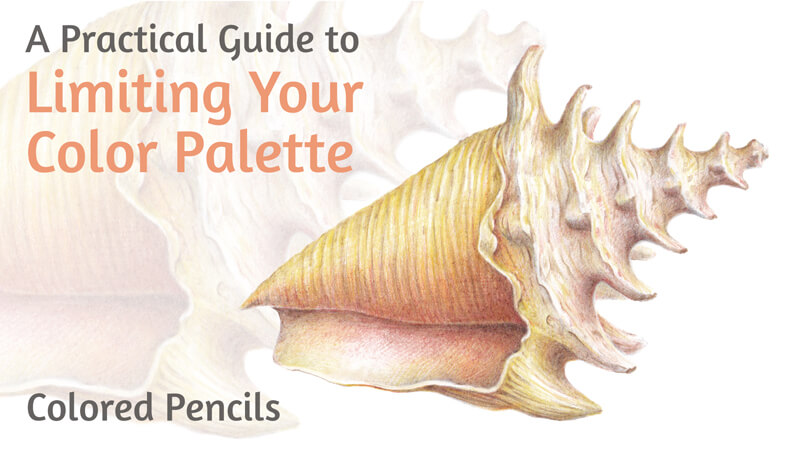
First, we’ll have an introduction that precedes a step-by-step drawing project. Our subject matter will be a juicy mandarin. In the practical part, we’ll apply our knowledge to create a convincing illusion of volume and nearly tangible textures.
Colored Pencil Supplies Used in this Lesson
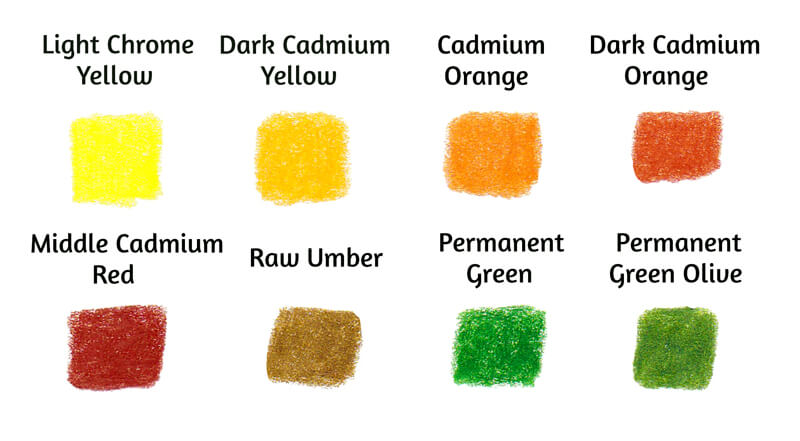
This project is focused on colored pencils. Please use any pencils that you like or have. Mine are oil-based Faber-Castell Polychromos. (You’ll find the swatches in the image below.)
See also: Wax-Based vs. Oil-Based Colored Pencils
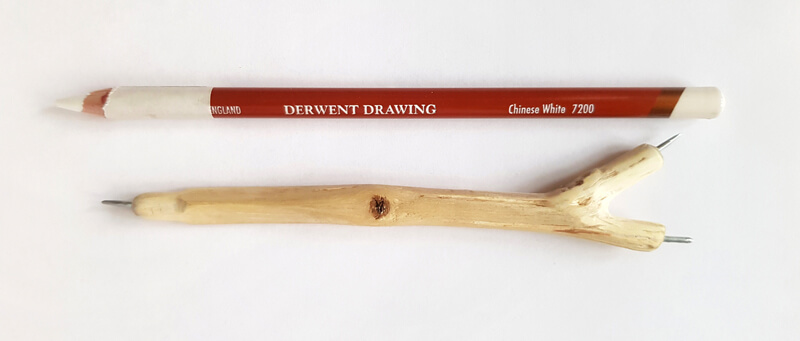
We’ll also need a white pencil. My choice fell on Chinese White from the Derwent Drawing set because creates a dense, solid covering at one go.
See also: Comparing Colored Pencils
As we’ll discuss embossing, it’s helpful to have a tool that allows indenting of the paper. There are various ready-made embossing tools available on the market. Mine is handcrafted – it is made of a wire and a piece of wood.
If you don’t have an embossing tool, feel free to use anything that imitates it. A pen with an empty refill or a thin needle may be a nice substitute.
I’ll be drawing on an A4 sheet of ordinary drawing paper. Its surface isn’t completely smooth and there is a subtle texture. This moderate tooth will help the pigment found in colored pencils stick to the paper.
Choose your paper wisely – it affects the result as much as your drawing skills or the quality of your colored pencils. For example, rough paper makes it more difficult to add details and create an even, smooth covering, but allows for more layers.
See also: All About Drawing Papers and Surfaces
We’ll start with an underdrawing, so keep an ordinary HB graphite pencil and an eraser at hand.
Colored Pencil Techniques: Theory
Before we dive into the creative process, let’s refresh our knowledge on drawing with colored pencils. The character of marks and layer quality are among the aspects that determine the result, but let’s dig even deeper.
Pressure
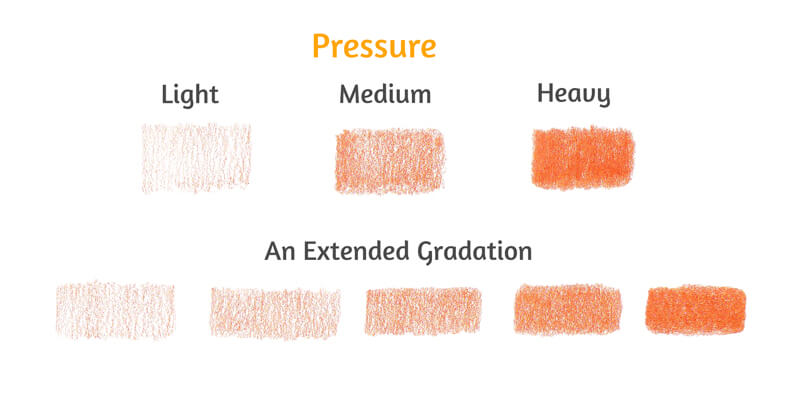
One of the important variables is pressure. It refers to the effort that we apply to the paper with our pencil. Pressure affects the value and intensity of the color.
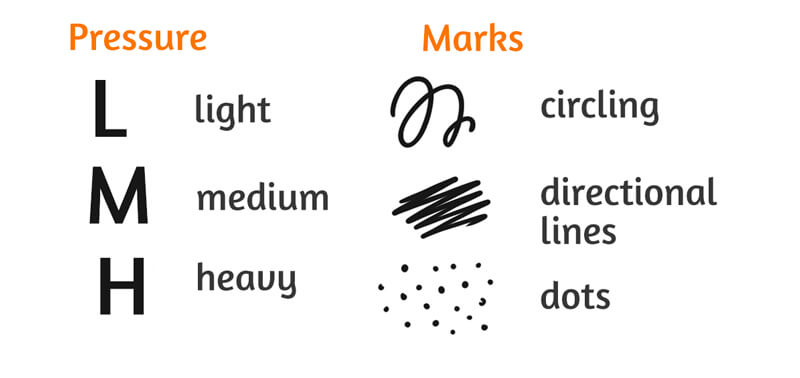
It’s possible to mark out three basic levels of pressure: light, medium, and heavy. However, if you try pressing harder or lighter while drawing, you’ll discover that there are many more transitional levels. The pressure scale may be easily expanded to five or more steps.
It is commonly agreed that the best option is to start lightly. This principle is valid for the few first layers of color. If you press too hard right from the start, it may cause damage to the paper. As a result, the surface won’t be able to accept more applications.
With each subsequent layer of color, you’ll need to apply more pressure to make the pigment stick to the paper. Therefore, you’ll naturally change the level of pressure from light to medium or above medium.
Layering
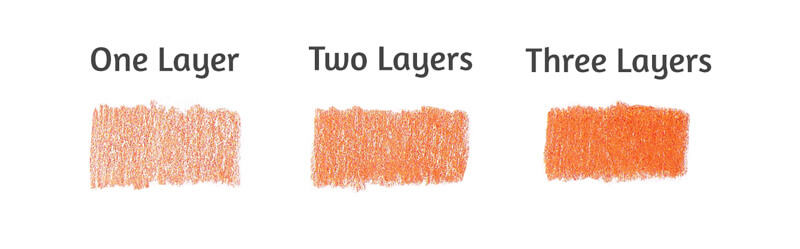
Applying heavy pressure isn’t the only option to get a dense, solid covering. (In the image below, you’ll find the proof.) All three samples were drawn with medium pressure, but the quantity of layers differs.
The more new strokes you add on top of the existing ones, the fewer specks of untouched paper you’ll see. Therefore, if you wonder why your artwork looks grainy, it may be a sign to apply more pigment.
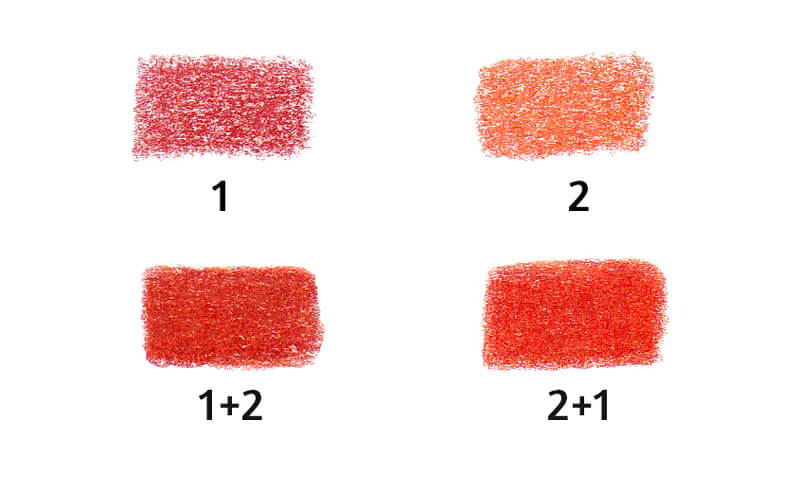
You can layer different colors to create interesting effects. Colored pencil applications are somewhat translucent, so layering allows for blending and mixing.
Even if you don’t have a large set of pencils, you can mix the color you need just by layering. The order in which you apply the colors does matter however.
In the image below, you’ll find two results of layering. In both cases, there are two layers drawn at heavy pressure, but the sequence of color application is different. Based on the experience, the underlying color is dominant.
Pencil Angle While Drawing
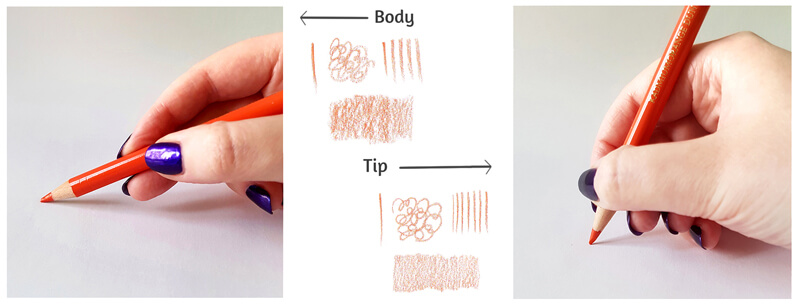
The way you hold the pencil matters too. If the pencil is positioned at an acute angle to the paper, the marks will be made with its core’s body.
This style of drawing makes the texture of the paper more evident – it will show through the pencil applications. The core’s body has a large coloring area, so the marks will be quite broad.
If your pencil touches the paper only with its tip and the angle is closer to 90°, you’ll get finer marks. As a result, the covering will be smoother with softer transitions – even if your pencil isn’t perfectly sharp, as in my example.
See also: 5 Grips for Holding a Pencil for Drawing
The Sharpness of the Pencil
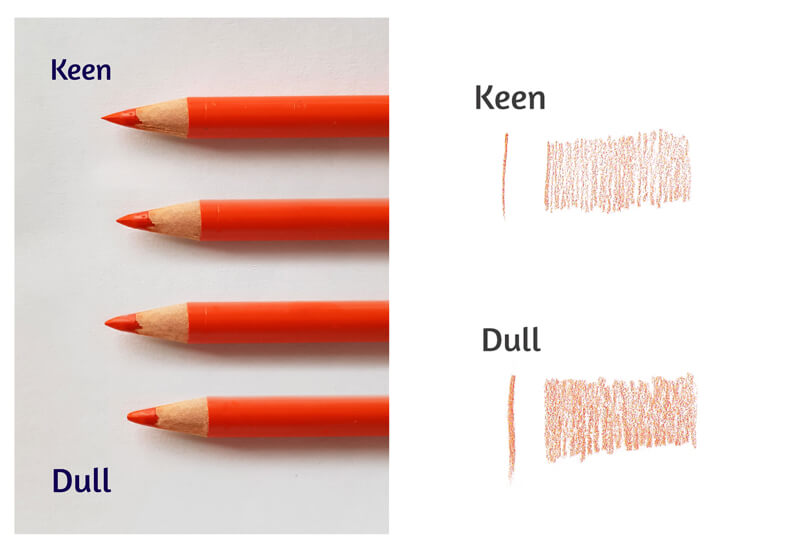
It is obvious that a pencil with a keen point produces thin lines. Therefore, if your goal is to create fine details, don’t forget to sharpen your pencils! Combine a sharp point with light pressure and a proper hand position, and you’ll get lines as thin as hair.
At the beginning stages of drawing, having a keen point may be an advantage too. A sharp pencil can overlay the tooth of the paper in a more efficient, qualitative way than a dull one. However, it may require a bit more time to cover a large area than a blunt core.
Also if your pencil is dull, most likely you’ll be pushing harder and harder to cover all those small spots of paper showing through. This can be quite harmful to the tooth of your paper.
In the image below, you’ll find an improvised gradation from a needle-like pencil tip to a relatively dull point.
I’d say that every artist should find their preferred and comfortable levels of sharpness. For example, I’ve concluded that 80-90% sharpness is acceptable in the majority of cases. It’s good to keep a piece of sandpaper at hand. It allows sharpening a pencil in a mild way when it feels necessary.
Colored Pencil Mark-Making
Colored pencils can produce a variety of marks. Organizing them into a cohesive system may be a challenging task.
If you read a dozen articles on this topic, you won’t find two classifications that look completely the same. Usually, they have just several terms in common. It’s also not unusual to find a mark-making technique named or described in a different way. If some drawing method doesn’t have an official title, it gets an invented one – artists often come up with their own names.
I find it easier to divide the mark-making techniques into three categories: directional lines, circling, and creative marks.
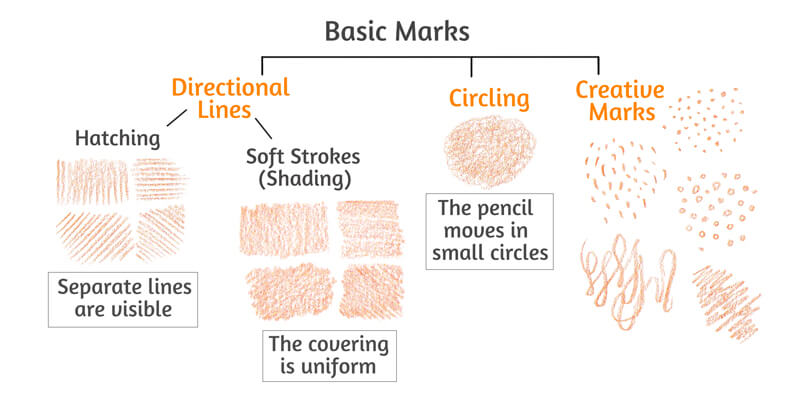
As the name suggests, directional lines flow in the same direction. It may be vertical, horizontal, or diagonal. The similarity creates consistency.
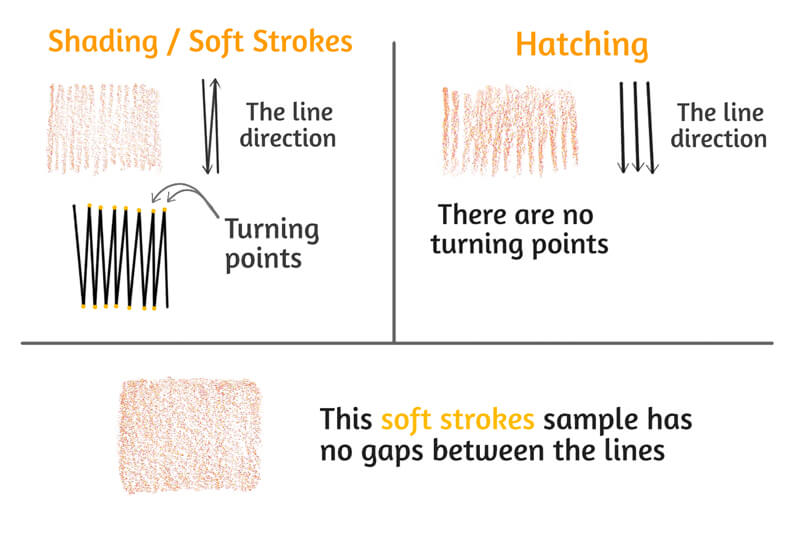
It’s possible to mark out two groups within this category: hatching and, what I call them, shading or soft strokes. From a visual standpoint, these groups may be considered as extreme examples of the same technique.
Hatching is a series of marks. Usually, they have the same direction and character. Hatches may be straight or curved. Each line is clearly visible. To create hatching, the pencil should be lifted from the paper after each mark and then placed down again to create a new one.
Applied on top of each other, layers of hatching create cross-hatching. Each layer usually has a specific direction. Combined, they demonstrate a net-like effect.
Hatching may give your artwork a sketchier, more stylized look.
Shading is a bit different because the pencil moves back and forth without leaving the surface of the paper. There are turning points where the pencil changes direction. This kind of movement allows creating a smoother, more unified look. The covering has a soft transition between the lines.
Multilayer shading, where each subsequent layer has a different line direction, usually has an extra smooth look.
If the marks are placed close together and there are no gaps between them, shading will be perfectly seamless. Drawing with a sharp pencil tip increases this effect.
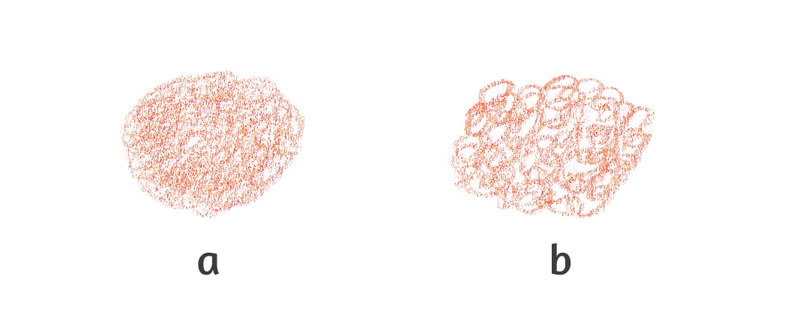
The second category is circling. This technique involves drawing small circles that overlap each other, usually at light pressure. The movement resembles continuous scribbling, but the marks are tight and uniform. To create a smooth covering, make sure that only your fingers are moving, and not your wrist.
Circling makes it easy to produce an even base with a gradual transition between colors and value. Working with a sharp pencil at light pressure strengthens this effect.
Larger gaps between the marks and increased pressure will give your sample a more stylized, textured look. The image below illustrates the difference in space between the circles that form the sample.
The third category is creative marks. In my vision, it includes stippling, random scribbles and zigzag lines, various patterns, and other marks of all kinds. The sky is the limit.
So if your goal is to create a texture or some special effects, feel free to draw in any manner that seems appropriate.
Colored Pencil Techniques: Practice
Now that we’ve had a look at a few of the basics, let’s dive into a practical application and create a drawing using these techniques.
Sketching the Mandarin
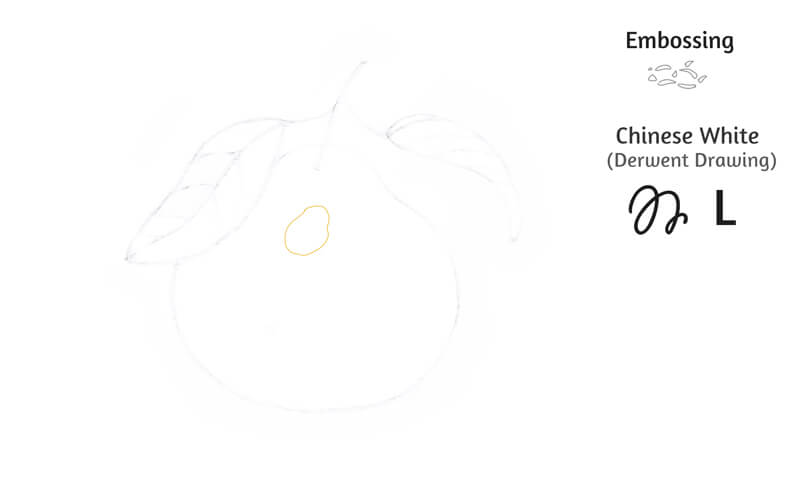
I start with an underdrawing with a graphite pencil.
My fruit has an unusual form – the upper part is slightly elongated. I also add a couple of leaves. They present a nice difference in terms of texture. The surface of a mandarin is rough and bumpy, and the leaves are smooth.
I highly recommend creating a quick value sketch before proceeding to colored pencil applications. Is the object lit from above or does the light come somewhere from the side? A preliminary sketch allows marking the lights and darks beforehand, so you can focus on the techniques, colors, and textures later on.

Softening the graphite marks with a kneaded eraser may be a good idea. Excess graphite can contaminate the colored pencil applications.
To make the following instructions more visual, I’ve developed notation keys. Each symbol has a meaning. Some indicate the level of pressure that I apply to a pencil. Others signify the mark-making techniques. You’ll find the legend in the image below.
Please note that the directional lines technique will be presented mostly as continuous, uniform shading, not hatching. The accent here is on the directional, parallel manner of the lines.
Embossing and Creating a White Underlayer
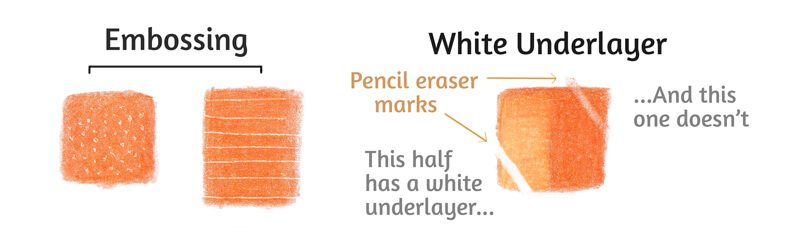
Some artworks require that a specific area should be left untouched. It may be a highlight zone or just tiny details like hairs or veins. One of the ways to preserve the original appearance is embossing. This technique may also be applied to an area that is already covered with pigment.
Embossing means pressing onto the paper with a pointed tool, creating indentations. It is quite difficult to access the indented areas with a pencil tip, so they will stay untouched.
The embossed marks can be of any length. It’s even possible to imitate stippling.
Another way to save the lightness of a zone is to cover it with white before applying any other colors. In this case, soft, creamy pencils work better than dry, chalky ones.
Another advantage of a white underlayer is that you can remove the upper layers of pigment with an eraser and restore the whiteness. In the image below, you’ll find an illustration of this effect.
To make the left part of the sample, I applied Chinese White first, then added Dark Cadmium Orange. The right half was created by applying Dark Cadmium Orange directly on the paper. Then it was the pencil eraser’s turn – I erased two lines on both sides of the swatch. As you can see, the white underlayer made it possible to fully restore white.
I’m going to create a highlight in our fruit’s upper part, using both embossing and a white underlayer.
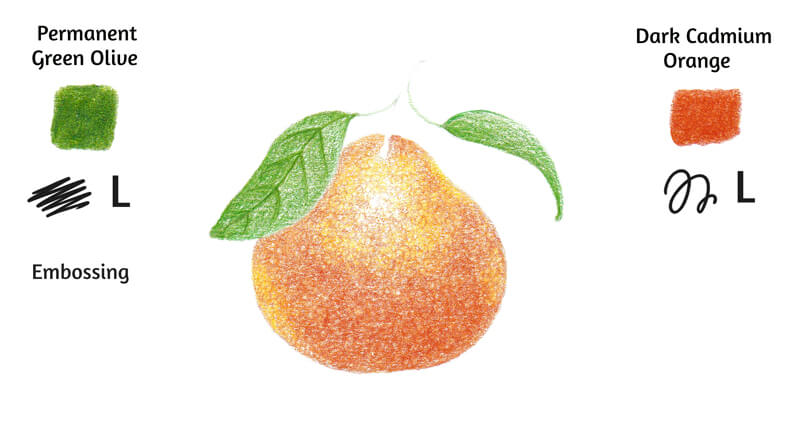
Let’s start with the embossing tool. I work with short curved marks, pressing hard enough to create hollows. The indentations imitate the texture of a mandarin. In the image below, you’ll find a stylized scheme of my marks.
It is very hard to notice the area where I applied the embossing tool, so I marked it with orange color.
Then I add some Chinese White to the highlight zone, partially on top of the indentations. As the symbols show, I work using the circling technique at light pressure.
A white underlayer will create a pleasant variation in color and texture later on. The embossed marks will stay white as the paper and the white pencil strokes will affect the color of the subsequent layers.
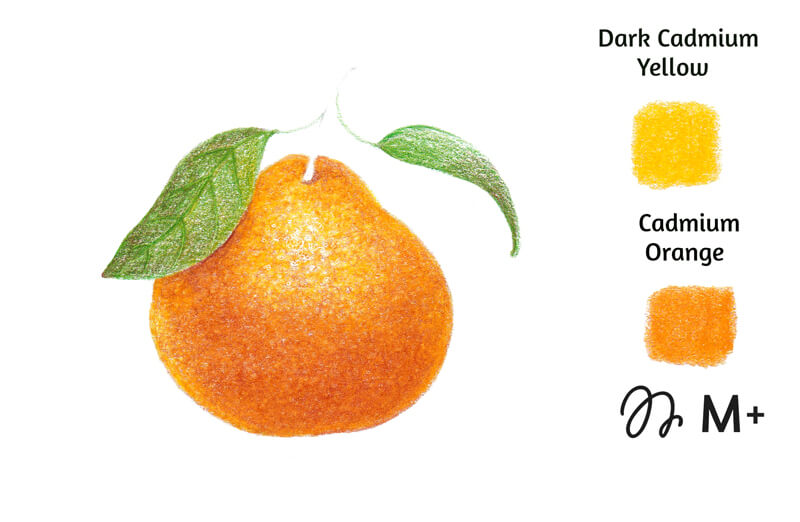
Creating the First Layer of Color
I apply Light Chrome Yellow to the area around the highlight. I also add this hue to the sides of the mandarin.
The remaining shape is covered with an even layer of Cadmium Orange. These two colors may overlap each other to form a seamless coating.
The goal is to create an illusion of the rough, uneven texture of our fruit, so I’ve chosen the circling technique. I keep the pressure light. The paper’s surface shouldn’t be worn out too quickly.
I also cover the leaf with Permanent Green, working in a shading manner. The marks repeat the direction of the leaf. The character and softness of marks will help to create an illusion of a smooth texture.

Layering
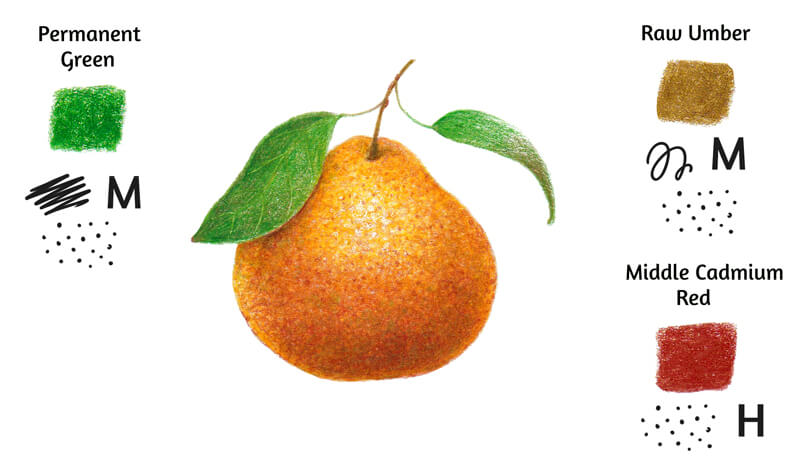
With Dark Cadmium Orange, I increase the density of the colored covering. The specks of white paper are gradually disappearing. The pressure is still light. The bottom part of the mandarin gets an additional layer of strokes. As you can see, the circling technique creates a textured effect.
I add Permanent Green Olive to the leaves, applying more pigment to the darker areas. The manner of drawing is still soft and directional.
I draw the veins of the leaves. At this step, feel free to increase the pressure slightly. After the veins become visible, I emboss them. These details will stay crisp, no matter how many layers of color will be added in the next steps.
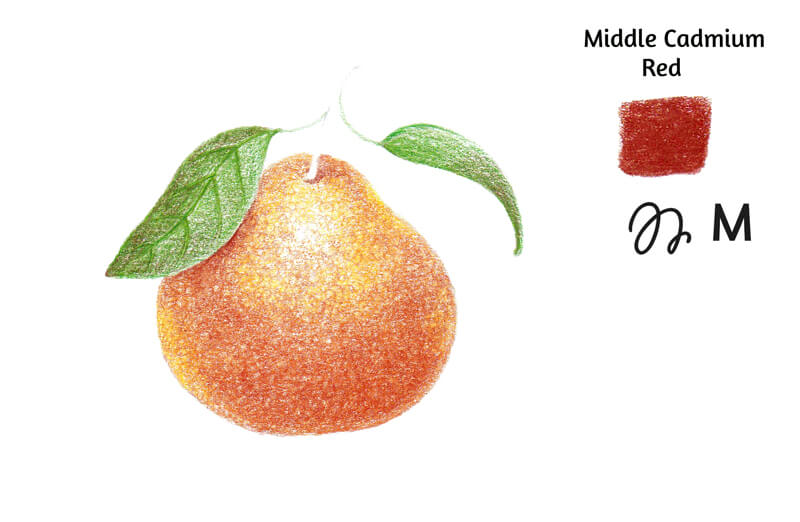
I add Middle Cadmium Red to the fruit’s core shadow, giving our mandarin more volume. I also apply it to the areas under the leaf and near the stem. This red accents the shift of color temperature, making the artwork look more realistic.
Now I have to increase the pressure because there are several layers of pigment already on the paper. However, the change is minor.
I also add Middle Cadmium Red to the darker areas of the leaves. Applied on top of each other, contrasting colors create a deep, muted, and realistic shade.

Burnishing – The First Phase
With Dark Cadmium Yellow and Cadmium Orange, I increase the density of color even more. It’s time to smooth the existing applications and get rid of unnecessary white spots. It’s also a good idea to reduce the highlight zone.
Now the pressure is from medium to above medium. We already have a decent amount of pigment on the paper and we can transfer the pigment locally, from one area to another, with a pencil tip.
It’s possible to say that we no longer layer the applications – we’ve started burnishing our artwork.
Burnishing is technically a blending method, but it is different from simply layering the colors. Burnishing means creating a solid area of pigment where no paper texture is showing through. With this method, you can add a polished feel to your artwork, so it resembles a painting.
This effect is achieved by applying a pencil, usually of a light color, on top of the existing layers at heavy pressure. Technically, you can use a pencil of some bright or dark color to perform burnishing too.
Other popular tools can create a polished effect – for example, a colorless blender or various paint thinners.
See also: How to Blend Colored Pencils
To burnish an area, both directional lines (in a continuous, shading manner) and circling are wonderful options. The pencil may be slightly dull. When heavy pressure is applied, it’s easier to break a fragile fine point.
It is generally recommended to consider burnishing as the top layer that you add to your artwork. This advice is legitimate, considering that burnishing involves an increased level of pressure. It may be that your drawing surface won’t be able to accept another layer of pigment later on.
However, each case is unique. It’s possible to perform two or three rounds of burnishing without damaging the paper. Try to feel your materials and experiment.
Additional Work on the Values and Textures
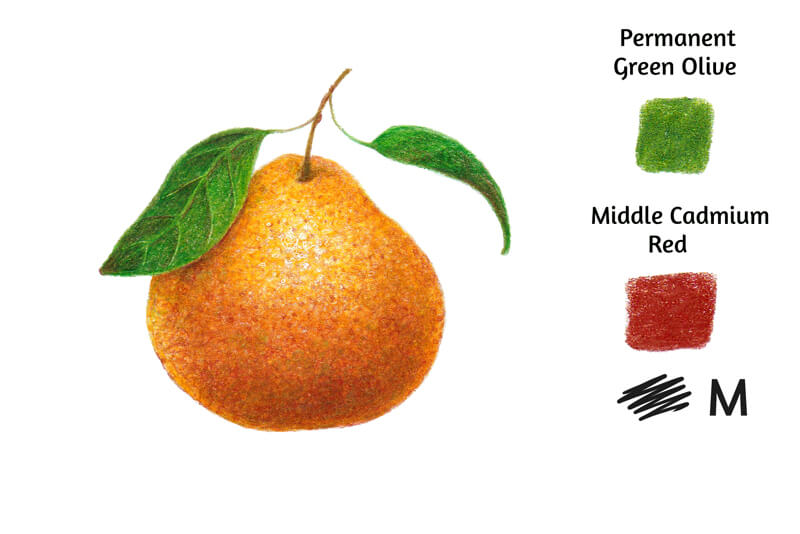
The fruit still looks a bit flat. With Raw Umber, I deepen the core shadow in the lower part of the mandarin. I work in the circling technique at medium pressure. Apply as many layers as you need to get a nice solid core shadow.
It’s also possible to leave some dots here and there to convey the texture.
With Middle Cadmium Red, I add dots and small circles to reveal the roughness of the fruit’s surface. The pressure varies from above medium to heavy. Keep your pencil point sharp enough when working on details!
I cover the leaves with Permanent Green, using directional lines. I add some green dots to the lower part of the mandarin to achieve the interesting effect of mixing contrasting colors.
With Permanent Green Olive, I work on the areas between the leaves’ veins. The strokes still repeat the direction of a leaf. I keep them smooth and soft.
I also add this shade to the cast shadow on the peel, under the leaf. This subtle addition not only indicates the proximity of a green object, but also deepens the shadow.
Then I apply Middle Cadmium Red on top of the leaves’ darker areas. The color becomes richer and more complex.
The Final Burnishing
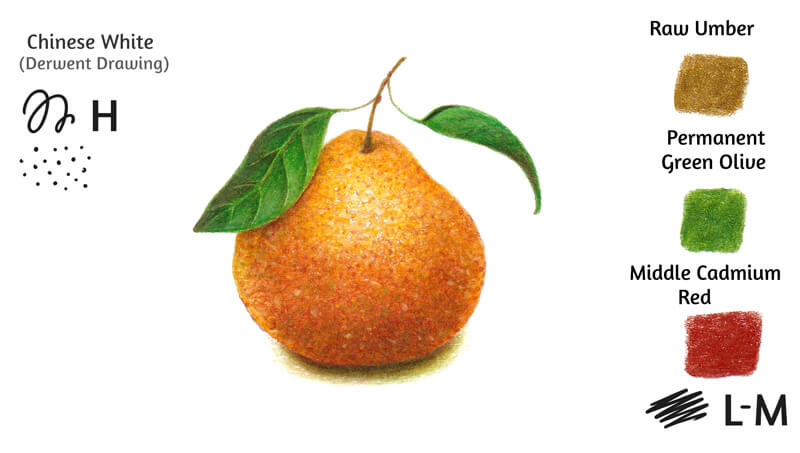
The artwork is almost complete. With Chinese White, I burnish the upper part of the mandarin and its leaves. I focus on the areas with the unwanted specks of white paper. However, the visibility of the tooth adds to the textured effect, so it may be a good idea to leave some areas.
In the lower part of the drawing, I apply the white pencil only in a stippling manner. Dots and short strokes help to convey the texture.
As a final step, I create a cast shadow under the fruit. I start with Raw Umber, then apply Permanent Green Olive. Middle Cadmium Red acts as the top layer. I keep the pressure from light (at the shadow’s outer edge) to medium (right under the object.) Repeat this sequence or add any color that you find suitable.
A Practical Guide to Colored Pencils – Conclusion
Congratulations – we’ve created a beautiful artwork! I hope that you enjoyed every step of this practical guide.
I wish you lots of creative fun with your future colored pencil drawings!
If so, join over 36,000 others that receive our newsletter with new drawing and painting lessons. Plus, check out three of our course videos and ebooks for free.