Gettin Sketchy – How to Draw a VW Beetle – Season 3 Episode 2
This episode aired live on YouTube on January 27, 2021.
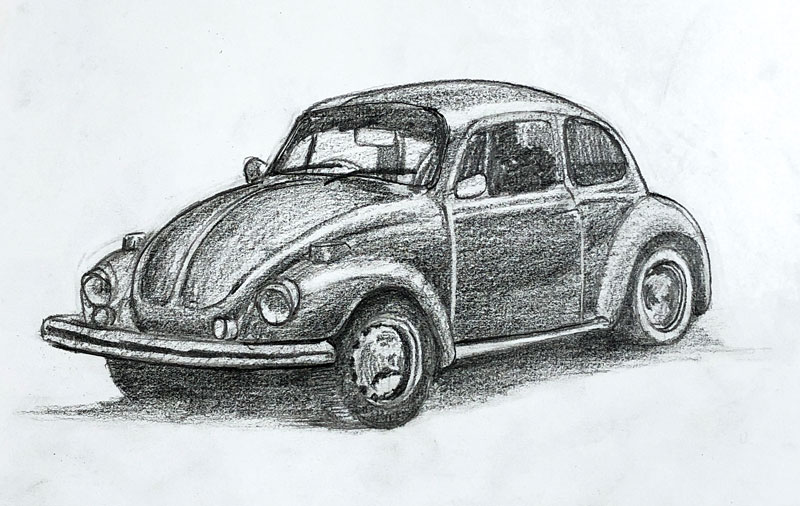
Think drawing cars is difficult? Well, any man-made object with curves and details isn’t a “walk in the park”. Ironically, if we loosen up with our initial marks and focus on relationships of lines and shapes, a complex object (like a VW Beetle) is quite a bit more manageable to draw. In this timed drawing exercise, Ashley demonstrates this concept as he completes a drawing of the classic car in just 45 minutes with graphite pencil.
Here’s a look at the completed image…
Mapping the Drawing with Shapes and Lines
Every drawing that we create is a series of decisions. Where should we place this mark? What should this shape be? How does this section relate to the one beside it?
Our drawing develops as we make these decisions, which are followed by the actual marks. The decisions that we make early in the drawing process are often the most critical.
This doesn’t mean that these early marks must be remarkably accurate. This is because many of the decisions we make are based on relationships and comparisons. Many times, we can’t make an informed decision on a specific mark without having a mark in place. With two marks or three or so on, we have more information for comparisons and as a result – our drawing becomes more and more accurate.
In the beginning stages of this drawing, marks are made quickly and loosely.
Ashley starts with a line to define the bottom edge of the car. This initial line establishes the approximate length and angle of the Beetle. From there, the angle of the front of the car is established, but only after comparing its length and slant to the first line. Then a line is drawn, parallel to the first, for the height of the door. This is followed by an additional parallel line for the height of the car.
These four simple lines become the foundation for the drawing that follows.
See also: Drawing Basics – Construction
Without the first line, the three that follow cannot be added with accuracy. So the drawing builds from here. Each line that is added – each shape that is drawn – becomes a measurement and comparison tool. Adjustments are made and the drawing slowly develops with a remarkable level of accuracy.
So as you can see, we need to be focused on getting information on the drawing surface that will help us make comparisons as quickly as possible. This may come in the form of basic shapes, loose lines, or more controlled lines like the ones Ashley drew as the drawing begins.
See also: Improve Your Drawing Skills in 6 Days
Once these initial lines are in place, the focus turns to drawing the body of the VW Beetle. We all know, and can clearly see, that a VW Beetle is a curvy car. But Ashley doesn’t jump straight to drawing curves. Instead, he continues with straight lines to define the outer boundaries of the vehicle. Why is this?
By drawing straight lines, Ashley is able to find the outer edges without being distracted by drawing challenging curves. These curved lines can be drawn once the basic shape of the car is defined. This leads to an even greater level of accuracy in the drawing. Angles are always important in accuracy.
Shading the Drawing
Most of the time was spent finding and drawing the basic shape and contours of the VW. The values were quickly added at the end of the timed session. Although the values were developed with quick shading, the car still reads rather well. This is mostly because a full range of value with a consistent light source is developed.
See Also: The Basics of Shading with a Pencil
The directional strokes that Ashley uses to add the shading also helps to communicate the form of the car. Each plane of the car affects the direction of the stroke of the pencil. This concept is often referred to as cross contour lines. Understanding cross contour lines helps the artist make decisions in regards to the direction of pencil and pen strokes as well as brushstrokes.
See Also: Cross Contour Lines
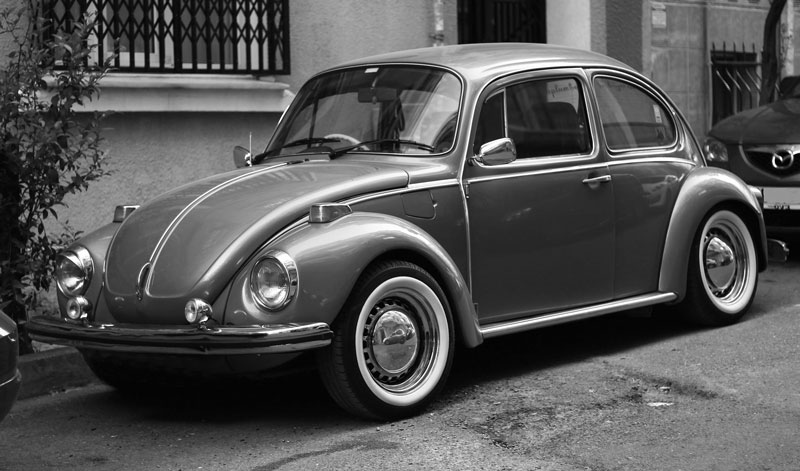
Photo Reference
This drawing was created by observing a photo reference. This photo is from Pixabay.com. However, it was edited to make it more suitable for drawing. The image was originally in color, but the color was removed to leave it in gray scale. This makes it easier to see the values. It was also flipped horizontally, making it easier to “read” from left to right.
Here’s a look at the photo reference…

Materials Used to Create the Drawing
This drawing was created using very basic drawing materials. A few graphite pencils (HB, 3B, and 8B) and standard 80 lb. drawing paper was used. A simple, pink rubber eraser was used for corrections.
See also: All About Drawing Papers
Timed Drawing of a VW Beetle – Conclusion
Although this drawing was created in a loose, sketchy manner and in just 45 minutes – there’s lots to learn here. Drawing is not just about making marks. It’s about making informed decisions that build upon prior decisions. These decisions begin with observation and end with marks. And part of being accurate with a drawing is the willingness to make marks that may not be “right” so that you can compare and alter in order to “find” accuracy.
If so, join over 36,000 others that receive our newsletter with new drawing and painting lessons. Plus, check out three of our course videos and ebooks for free.