A phoenix is usually associated with the sun, fire, time, and long life. Some legends say that this creature may live for several hundred years before rebirth. A variety of cultures have stories of this fantastic bird.
Water-Soluble Graphite Supplies
For our project, I’ll be using three water-soluble graphite pencils from Daler Rowney Artists’ Sketching series. In the dry state, they behave just as ordinary graphite pencils, allowing you to hatch, layer, or blend the strokes.
See also: Graphite Drawing Techniques
Other than that, applications of water-soluble graphite pencils can be activated with water. This feature is quite unusual for pencils that represent a scale of gray tones. However, it’s possible to find water-soluble graphite pencils by other brands.
See also: How to Draw with Water-Soluble Graphite
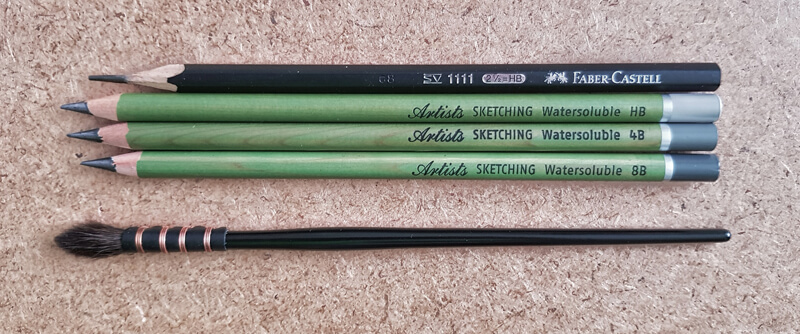
I’ll be using an ordinary non-water-soluble HB graphite pencil and an eraser to create sketches and the underdrawing for the final drawing. The initial lines should be water-resistant. This ensures that they’ll remain visible at every step of the process.
The size of the original artwork is A3. I’ll be drawing on a sheet of thick watercolor paper (140 lb) with a rough texture. Of course, the choice of the surface is personal, but you should consider paper that is water absorbent.
See also: All about Drawing Papers and Surfaces
We’ll need a container for water and a brush. Any soft watercolor brush that feels comfortable will be fine. Alternatively, you can use an aqua brush – a special tool with a reservoir for water.
See also: All About Artist Paint Brushes – Hair Types, Shapes, Marks, and Parts
Drawing an Imaginary Creature
There are various approaches to designing creatures that can’t be found in real life. I usually start with an idea and associations.
Obviously, a phoenix is a bird, but we know little about its appearance. Some sources describe it as having a crest of feathers on its head, or endowed with a halo, which emphasizes its connection with the sun.
There is no clear information about the creature’s coloration. We just know that the phoenix was generally believed to be colorful and vibrant.
I think that this lack of guidelines is a good thing. It leaves much room for us to fill in the gaps and use our imagination.
The prototype will have a contour that is characteristic of other birds. Said simply, it should have two wings, two feet, a head, a neck, and a body – with feathers of different types covering the creature.
You can give your phoenix any features that seem appropriate. At this step, it may be useful to research various species of existing birds. Ask yourself what features and details may fit the appearance of this fantastic creature.
For example, your phoenix may have a head that resembles the one of an eagle or a falcon. This will emphasize the majestic, even imperious air that is inherent to predatory birds.
Alternatively, the appearance of your phoenix may be close to a pheasant, a peacock, a rooster or even an ostrich. Why not? It’s possible to combine the features of different birds together. Everything comes down to the vision that you have in mind.
The Behavior of Water-Soluble Graphite Pencils
If you don’t have any experience with water-soluble graphite pencils (or at least pencils of the particular brand), it may be beneficial to try them beforehand.
In the image below, you’ll find three samples made with HB, 4B, and 8B water-soluble pencils. Each sample can be divided into three parts. In the image, these sections are ordered from left to right – their borders are marked with a red line.
- The first section is “dry” – no water was added.
- In the second section, a moderate amount of water was applied on top of the strokes using a brush.
- The third section was made by pulling the graphite with a wet brush over blank paper to the right.
Let’s compare the samples.
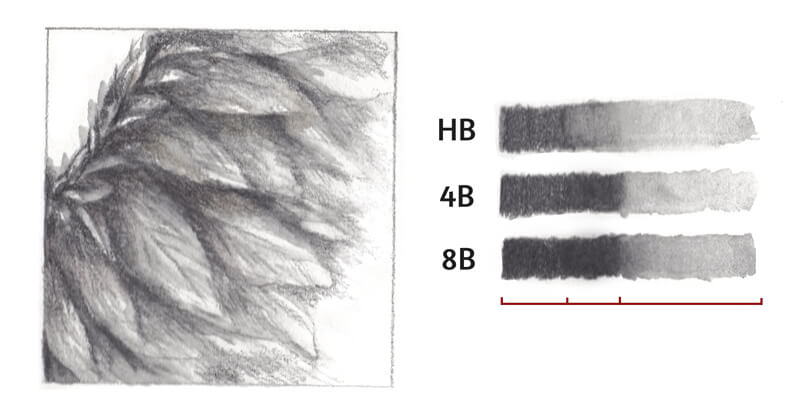
“Dry” parts of the samples look relatively close in value, which is unusual for graphite pencils – at least the common non-water-soluble ones. Usually, applications of an HB pencil are much lighter than that of a 4B or an 8B pencil.
Marks made with the HB water-soluble pencil become lighter after activation (after we’ve applied water). Other samples demonstrate an opposite variation – they become darker after activation.
And lastly, marks made with each pencil can be washed out, forming a semi-transparent “trail”. It’s possible to control the result by varying the amount of water on your brush.
With these pencils, you can lift graphite from one area and transfer it to another part of the drawing with a wet brush. It’s similar to working with watercolor pencils, but without colors.
Sketching a wing’s fragment may be a nice way to prepare for our drawing. (You can find my sketch in the image above.)
If you choose to do this exercise, don’t go deep into details – draw some abstract wing feathers. First, use your pencils like an ordinary pencil. Then, add water and see what happens. Observe how the pencils behave in both dry and wet states.
Sketching and the Underdrawing
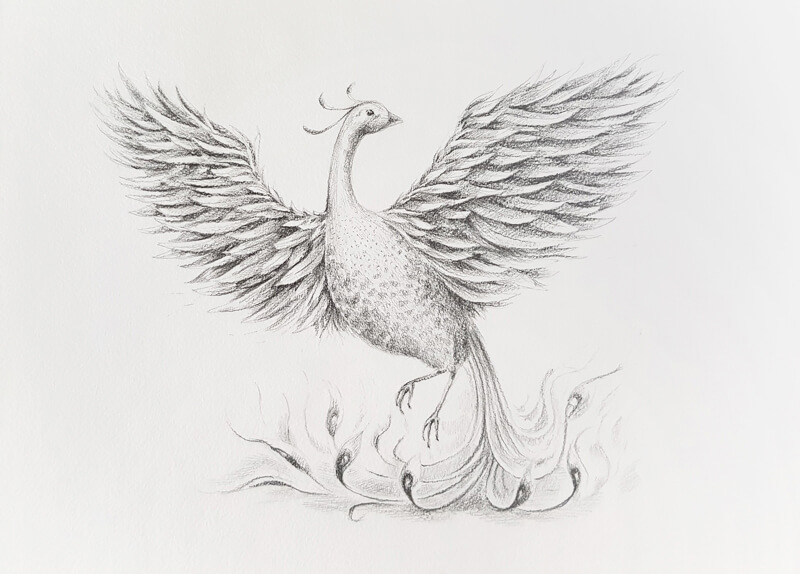
As soon as you have a general vision of how your phoenix will look, it’s time to begin on the final drawing.
I recommend sketching a miniature first. Its purpose is to design a pose and decide on the composition. You’ll find my mini sketch in the image below, on the left side.
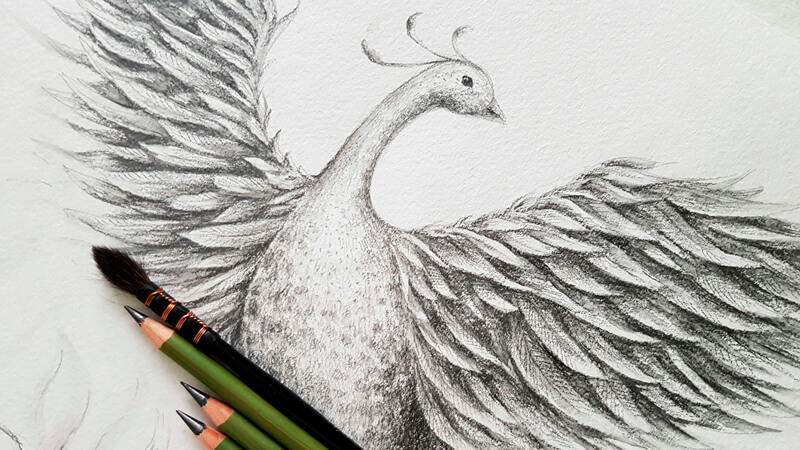
My creature will resemble a goose with its relatively small head and a long neck.
I’ve decided to give it some features that are characteristic of peacocks, including long tail feathers with interesting endings and a crest (feathery head adornments).
The tail feathers and feet will be arranged in a way to create an interesting effect, as if the phoenix is dancing in fire.
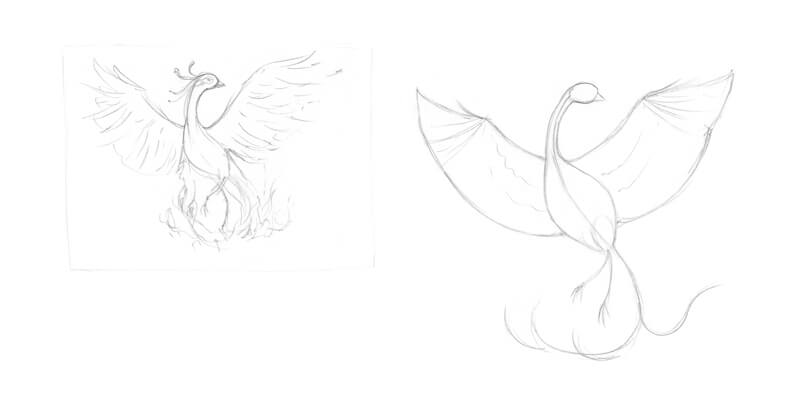
The drawing on the right side is a simplified scheme of the phoenix’s body, presented as a set of shapes and guidelines. In particular, a line that goes from the head shape to the bottom part of the body suggests the direction of the pose. It also conveys a sense of movement.
Feel free to use this scheme for your drawing or create a unique one.
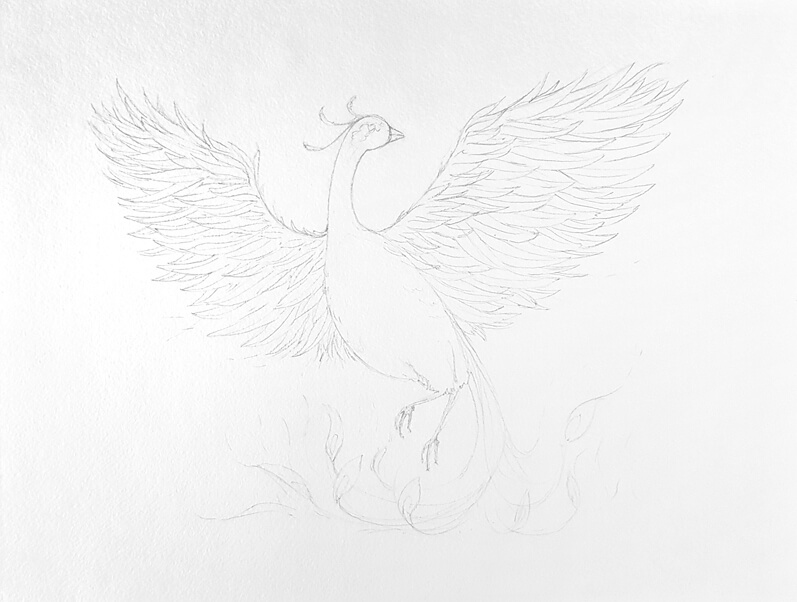
Now it’s time to create an underdrawing on the final sruface.
As the paper size is relatively large, it may take some time and effort to place the main shapes. I recommend marking out the masses first. Add the details only after you’ve set the figure in general terms and everything feels “right”.
At this step, make sure that the overall composition is harmonious. Pay attention to the negative space on the sides of the creature. It shouldn’t be too much here or there.
See also: Positive and Negative Space
The same is true for the wings. Add individual feathers only after the wings’ general shapes are in place.
To simplify the process of drawing feathers, divide the wing’s space into rows or levels. In my case, feathers that are closer to the wing’s upper edge are shorter. The feathers in the lower rows are very long. Also, they are much wider than their upper neighbors.
To create the illusion of slight foreshortening, I make the left wing slightly smaller than the right one.
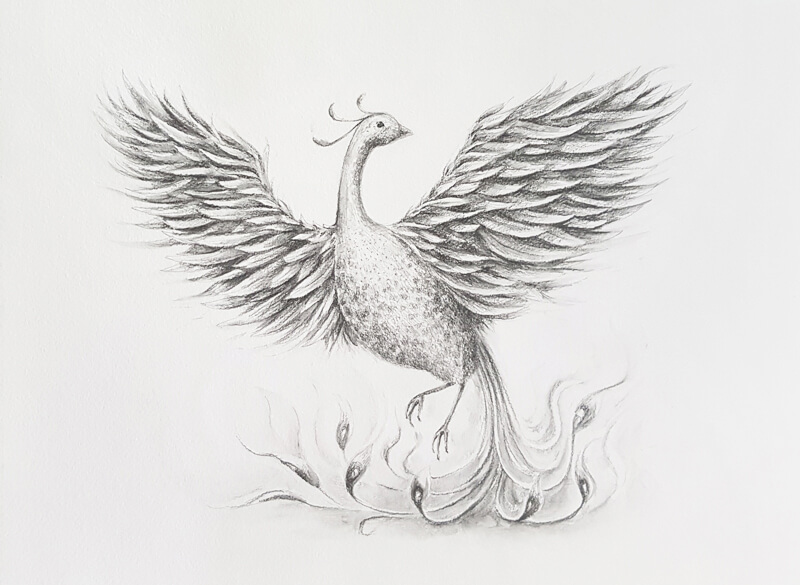
Drawing a Phoenix with Water-Soluble Graphite Pencils
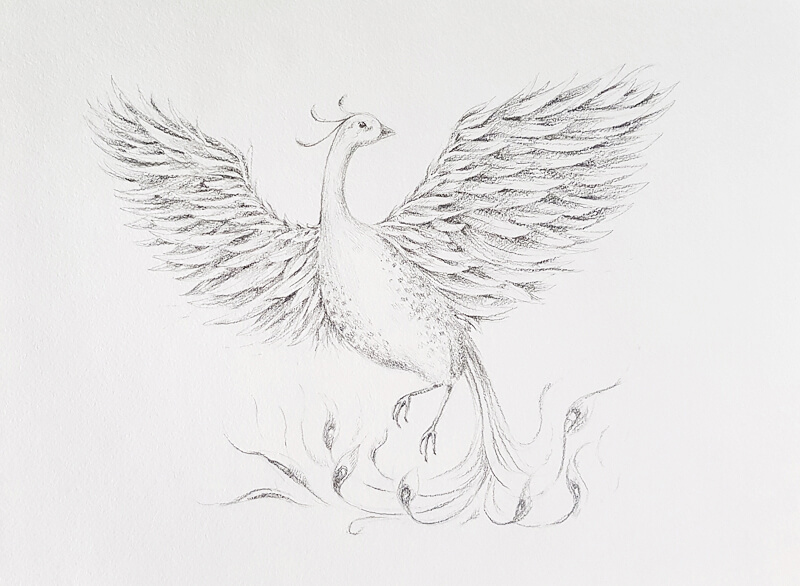
With a 4B pencil, I mark the darker areas. They include the lower part of the body and the gaps between the wing feathers. Vary the level of pressure and quantity of layers to achieve the desired result.
I lightly add a subtle spotty pattern to the sides of the phoenix’s body and near its eye. This pattern of the plumage is typical of pheasants. We can add any details to our imaginary creature!
I also mark the eye, leaving a small highlight.
As the strokes are applied onto a textured paper, they look quite rough and grainy. At this step, no water is added on top of graphite marks.
With the HB pencil, I add more strokes to suggest a wider variety of values. This variation will be more evident after we apply water. There should be enough graphite on the surface. Otherwise, we won’t be able to create beautiful washes in the next step.
I emphasize the tail feathers to make them stand out, then add some light shading nearby. The pencil barely touches the paper. I’m going to transform these marks into washes, too. They’ll be resemble stylized flames after we add water.
I dip my brush into the water and start creating washes. The darker the area, the less water I apply to it, working only with the tip of the brush. This careful approach ensures that I’ll get an accurate result.
I add more water to the lower part of the artwork, where the stylized flames are. Now the belly of the brush is involved, not just its tip.
Graphite applications may become significantly darker right after activation. This is especially true for the stokes made with a very soft pencil. However, they fade slightly after drying.
I gently touch the strokes with a brush, softening the transition between lighter and darker values. The texture becomes less rough, too.
Using a wet brush opens up some interesting options. For example, it’s possible to create small semi-transparent dots and lines. With this approach, you can easily add small details of texture.
I mute the lightest areas by covering them with graphite already on the wet brush. I also make soft “trail” marks that go from the outer tips of the wing feathers to the sides. They accentuate movement, making the scene more dynamic.
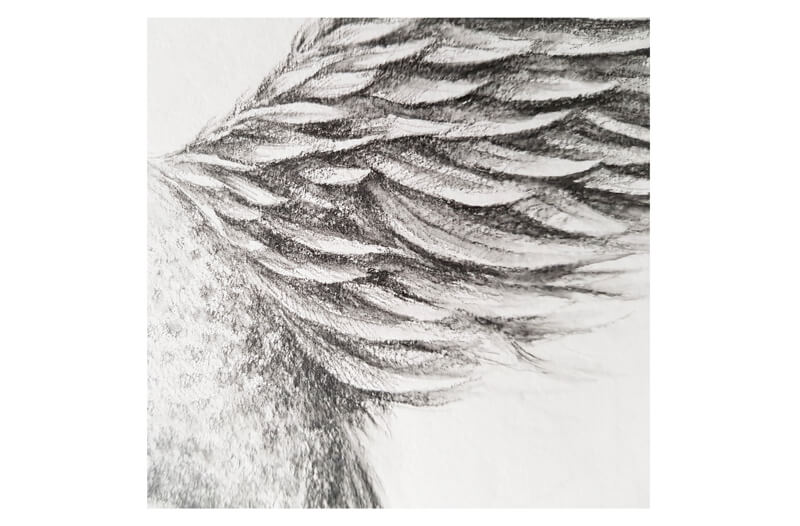
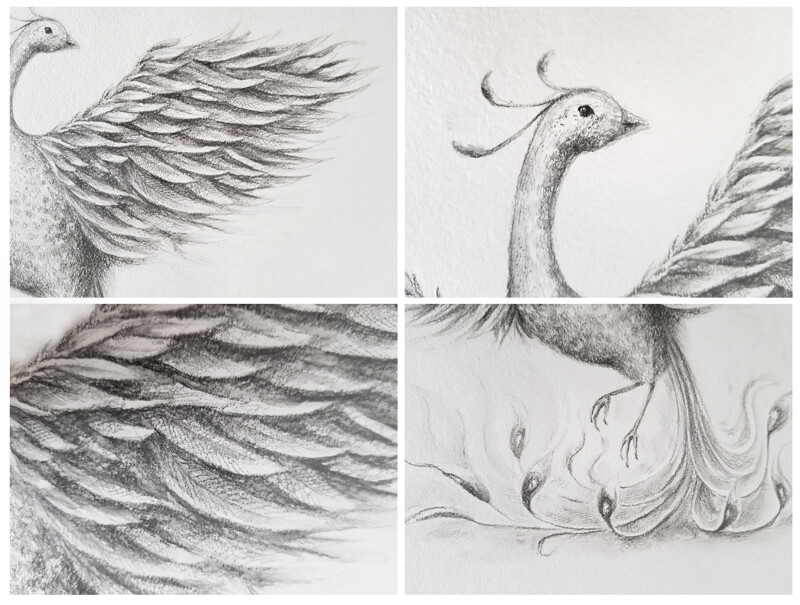
Here is a fragment of the wing. Look at the interplay of rough and washed textures. Isn’t it fascinating?
I recommend waiting until the drawing completely dries before adding any new lines.
With a sharp 8B pencil, I work on the final details, applying thin parallel hatches in groups.
I pay close attention to the wing feathers and to the lower area of the artwork, where the flames are. I touch the eye once again.
I give more depth to the darkest parts, intensifying them. Graphite marks may become lighter after washing, so the drawing loses contrast. That’s why it may be necessary to evaluate the artwork and restore the darker areas and details.
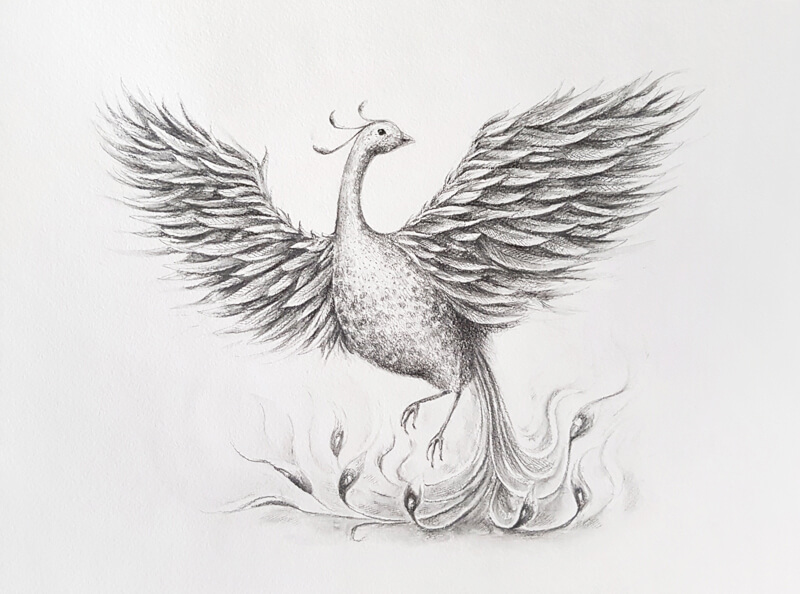
Here are some close-up fragments of the finished artwork:

Phoenix with Water-Soluble Graphite – Conclusion
Congratulations – the artwork is complete!
I hope that you’ve enjoyed working with water-soluble graphite pencils. They are an amazing tool! This art material is so versatile and fun to draw with. It allows creating painterly effects within a controlled graphic approach.
I wish you much inspiration for your future projects!
If so, join over 36,000 others that receive our newsletter with new drawing and painting lessons. Plus, check out three of our course videos and ebooks for free.