Gettin’ Sketchy – How to Draw a Person Playing A Guitar – Season 3 Episode 6
This episode aired live on YouTube on February 24, 2021.
Gettin’ Sketchy is a live drawing exercise, broadcast on YouTube. In each episode, a sketchy drawing is attempted within a 45 minute time period. Depending on the medium used and the chosen subject, some drawings are more refined and “finished” compared to others.
In this episode, Ashley attempts to draw an image of a person playing the guitar with graphite pencil. This particular subject presents several different challenges.
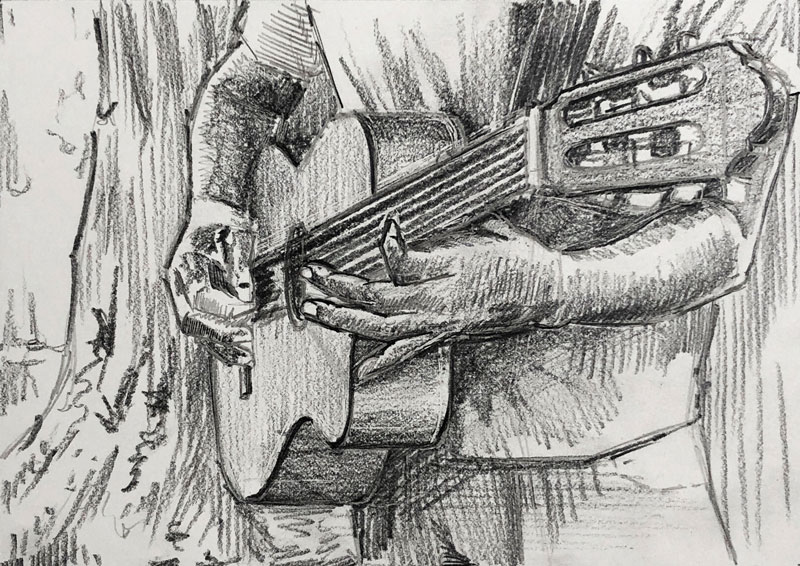
Here’s a look at the completed image…
The Drawing Challenges Faced in This Subject
There are several attributes about this subject that make it a particularly challenging subject, but as Ashley demonstrates, these challenges can be overcome.
The first challenge is the foreshortening. Foreshortening occurs when an object is viewed at an angle in which it comes towards or away from the viewer. Because of the manner in which we see things, the object is distorted. This distortion can be difficult to capture in a drawing.
In this case, the guitar protrudes towards the viewer which makes the end of the guitar appear considerably larger than the bottom. If this distortion isn’t captured in the drawing, then the accuracy of the drawing suffers and the results will look unrealistic.
See also: Foreshortening – Drawing the Figure in Perspective
Like most subjects we encounter when developing a drawing, the answer to this challenge is careful observation and comparisons.
The second challenge are the hands and the figure. The human figure is a difficult subject due to its complexity. The figure can be contorted into an infinite number of positions. This makes formulaic drawing especially difficult. As an added complexity, each figure is different as we all have different body shapes.
Here again, the answer to this challenge is careful observation.
Making Comparisons to Map Out the Drawing
Now that we’ve established that careful observation is so important to our success, you may be wondering how to observe. Observation is often recommended by drawing instructors, but how to observe is often overlooked.
There are many different ways to observe and each artist may approach subjects differently or use any combination of methods.
Construction
Perhaps the simplest method of observation is sometimes called “construction”. Construction is basically the process of simplifying complex subjects into basic shapes or forms. These basic shapes are pieced together to form more complex shapes.
The basics of construction are covered in the following lessons. Some of these lessons require membership…
- Drawing Basics – Construction
- 25 Days to Better Drawings: Drawing with Shapes (Membership Required)
- The Secrets to Drawing – Shape (Membership Required)
- Drawing Bootcamp (Membership Required)
By using construction, we can conquer complex subjects by simplifying them into easy to draw shapes.
Measuring and Mapping
A second technique for observation is called “measuring and mapping”. This technique requires the artist to use a measuring tool like a pencil, pen, or brush to compare lengths and angles on the subject and use this information to make marks on the drawing surface.
When this method is used, the measuring tool is held up at a consistent distance from the subject. This can be accomplished with a photo reference or a live subject. By sliding your thumb up and down on the measuring tool, relative measurements can be taken and applied to the drawing.
This technique is covered in greater detail in the following lesson…
- 25 Days to Better Drawings: Sighting, Measuring, and Mapping (Membership Required)
Consider Negative Space
A third technique for observation centers on the principle of positive and negative space (or shapes). Positive space generally refers to the space occupied within pictorial space that describes the subject or other elements. Negative space is the space that surrounds and frames the positive space. Positive space and negative space work together to communicate the subject.
Most of us focus on just the positive space when we create a drawing. For example, we may just observe the shapes of the guitar, body, hands, etc. in this subject. However, if we also consider the shapes made by the negative spaces in between the positive space we have more information. For example, in this subject, we may focus on and draw the space between the neck of the guitar and the forearm in order to frame the edges of each subject.
Sometimes, the negative spaces are easier to draw compared to the positive ones. This means that we may observe and draw the negative spaces in order to define the positive spaces.
The basics of positive and negative space are covered in the following lessons. Some of these lessons require membership…
- Positive and Negative Space
- 25 Days to Better Drawings: Positive and Negative Space (Membership Required)
Shading the Drawing
As we you may have noticed, the bulk of the 45 minutes for this sketch was devoted to careful observation and making comparisons. Very little time was spent developing the value (or shading). However, within this short period of time, the shading was added. Shading can be done very quickly (as we see here) or it can be a very slow and tedious process.
When values are developed quickly, the result is a looser sketch. When shading is developed with a slower approach, the result is more realistic and polished. Both approaches are perfectly acceptable and depend on the look desired (or the amount of time you have).
See Also: The Basics of Shading with a Pencil
No matter which approach you use, the range of value or tone is more important than the speed in which it is developed. We see the world in a full range of value. This means that we see the darkest darks, the lightest lights, and a broad range of values in between. Therefore, it’s important to include as many of these values as we can in our drawings. For example, a carefully rendered and accurate drawing that lacks the darkest darks will look unfinished and less realistic.
Photo Reference
A slightly edited photo reference was used to create this sketch. This photo is from Pixabay.com. The original image was cropped slightly and the color was removed.
Here’s a look at the photo reference…


Timed Drawing of a Person Playing the Guitar – Conclusion
This drawing was created quickly and definitely falls within the the category of a “sketch”. However, the techniques and approaches used by Ashley demonstrate many of the foundations of observation which are essential to accurate drawings. Practice is important in refining any skill and drawing is no different. Even though this drawing was created in just 45 minutes, the principles used in more developed, refined drawings are the same. By creating sketches like this one, we improve our drawing skills and by challenging ourselves with difficult subjects, our skills grow faster
If so, join over 36,000 others that receive our newsletter with new drawing and painting lessons. Plus, check out three of our course videos and ebooks for free.