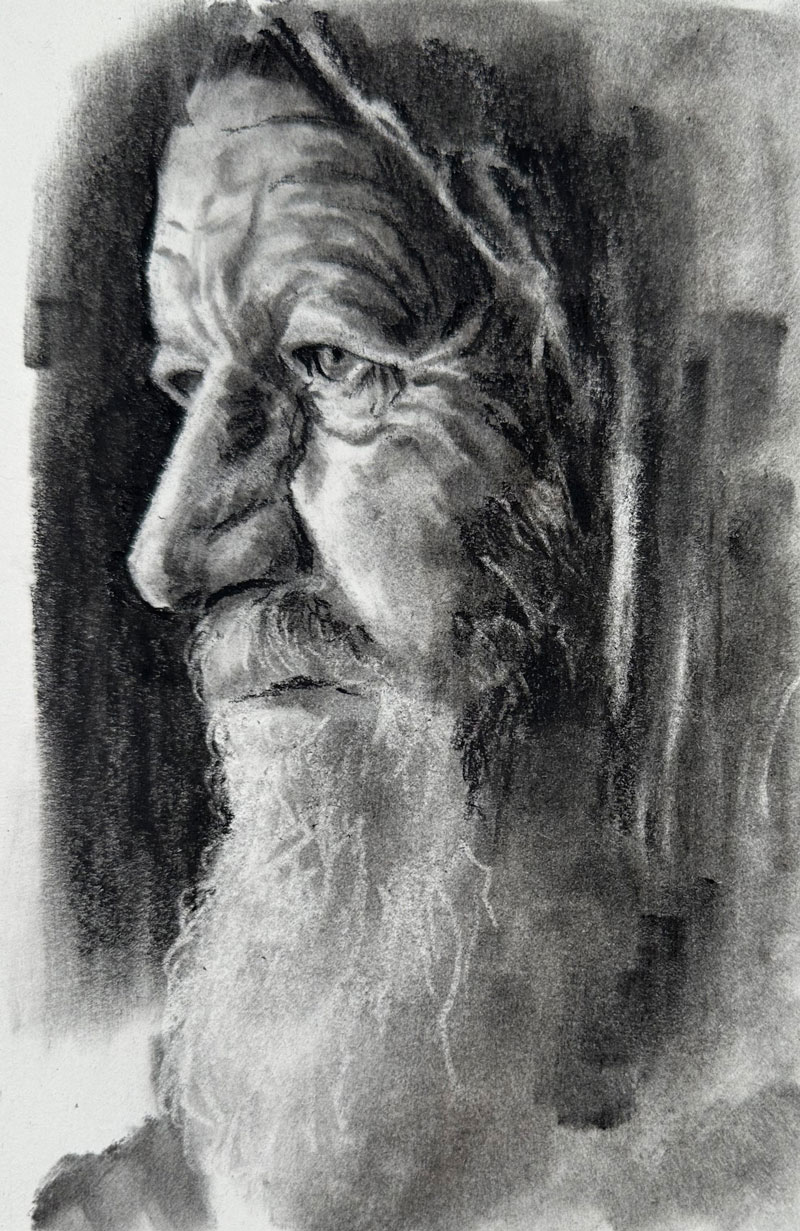
Portrait Drawing with Charcoal
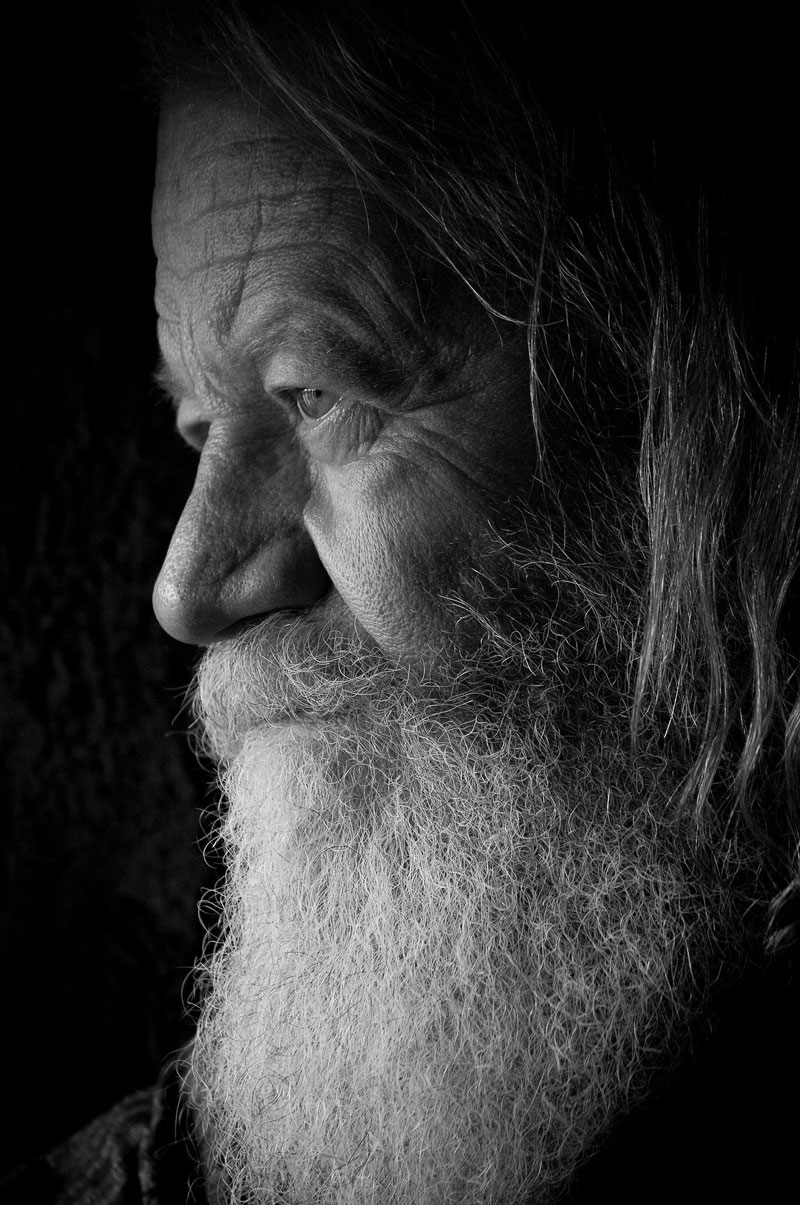
In this charcoal drawing lesson, we’ll draw a portrait of an old man with charcoal in about an hour. Here’s a look at the finished drawing…
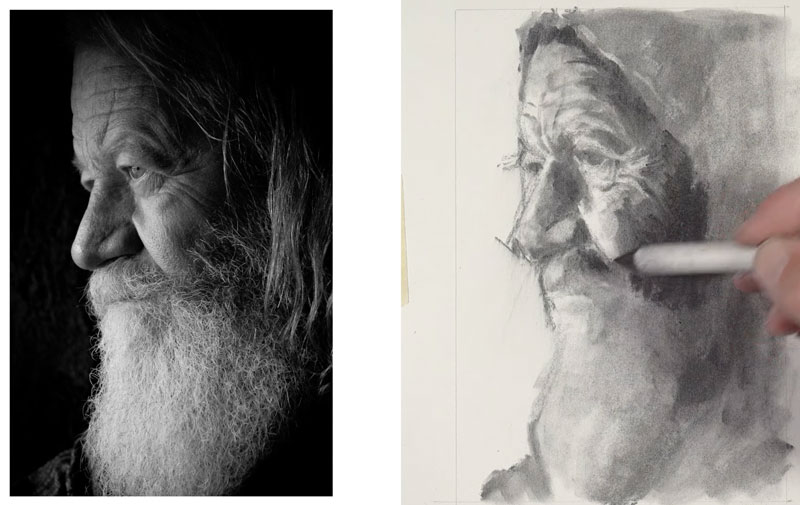
We’ll use a photo reference to complete the drawing. Here’s a look at the photo reference…
Charcoal Materials for Portrait Drawing
We’ll use a variety of forms of charcoal to complete the portrait drawing. We’ll use vine charcoal for our initial applications and compressed charcoal for the finishing applications. We’ll use a blending stump to smooth applications. Erasers are used to define the highlights. We’ll use both a kneaded eraser and a vinyl eraser for more precise erasing. The drawing is completed on white drawing paper.
Sketching the Contours of the Face and Head
I’ll start with vine charcoal, using a very skinny stick. We’ll start by drawing a line for the forehead. Using that line, I’m going to try to figure out where the brow line is located. I’m also going to draw a diagonal line for the edge of the eye before moving on to drawing a few lines for the hairline. Using these lines, I can figure out the location and shape of the nose. I’m putting down a bit of information that I can see and then using that information on my drawing paper to make comparisons to determine where I need to make the next mark.
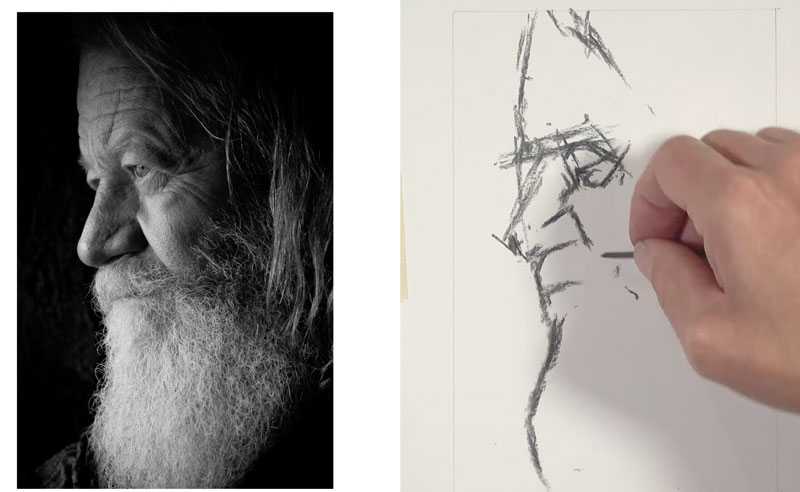
Next, I’ll block out a location for the eye. The chin is not visible here because we have a big white furry beard, but I’ll go ahead and draw a contour line for where the edge of the beard is located. You might notice that I’m not using any drawing formulas, like the Loomis Method, for example. I found that the Loomis Method does make all the heads appear very similar. The Loomis Method is great for drawing heads and faces from imagination, but since we’re working from observation, I’m going to stick with pure observational drawing.
Adding Shadows to the Face with Charcoal
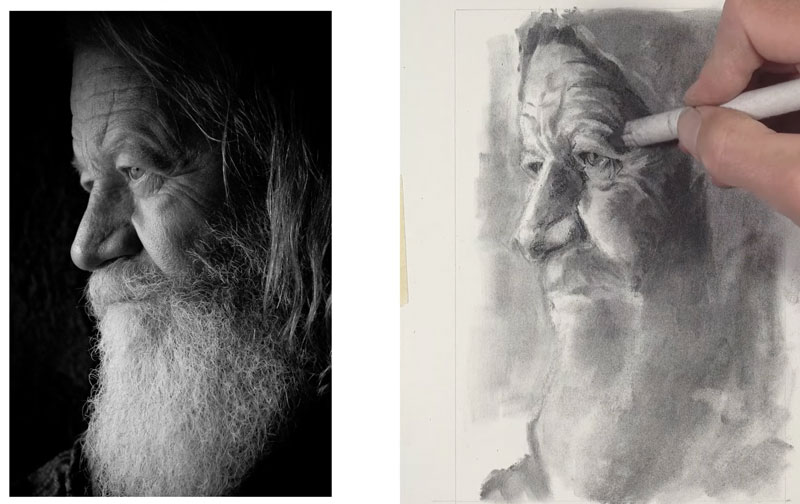
Next, I’ll switch over to a much larger piece of vine charcoal. Using this larger piece of charcoal, I’ll start filling in some of the darker values. Most of the shadowed side of the face is on the right side, so we can go ahead and be liberal with these applications.
Using a blending stump somewhat like a paint brush, I’ll start moving the charcoal around, thinking about the planes of the face. You want to think about all the tools that you use as a mark-making tool and this includes the blending stump. We’ll go ahead and go into the white of the beard knowing that at the later stages of the drawing, we will erase out some of the lighter values.
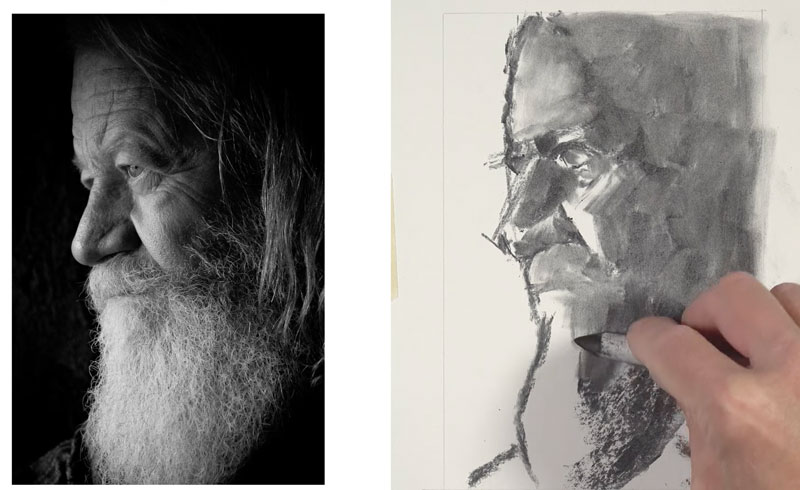
We’re starting to have a better understanding of the form of the head simply because we have some values in place. Value is the darkness or lightness of a color. You can think of a value range as a scale of different grays going from dark to light.
Using a kneaded eraser, I’ll start lifting up some of the soft vine charcoal. At this point, I’m concentrating on the lighter values and the highlights.
Drawing Wrinkles in the Face
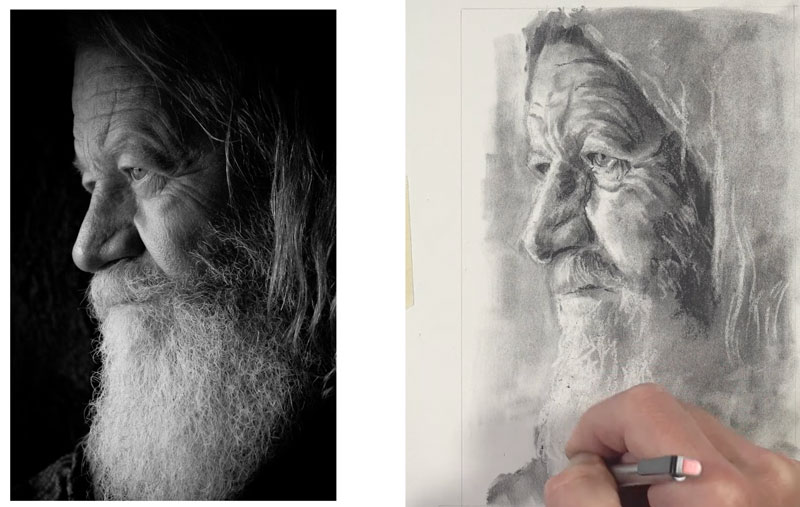
We’ll erase out some indications of some wrinkles and details using both the kneaded eraser and the vinyl eraser. We are essentially creating highlights. The contrast between the highlights and shadows leads to the illusion of the wrinkles. We see wrinkles by seeing both the lights and the darks.
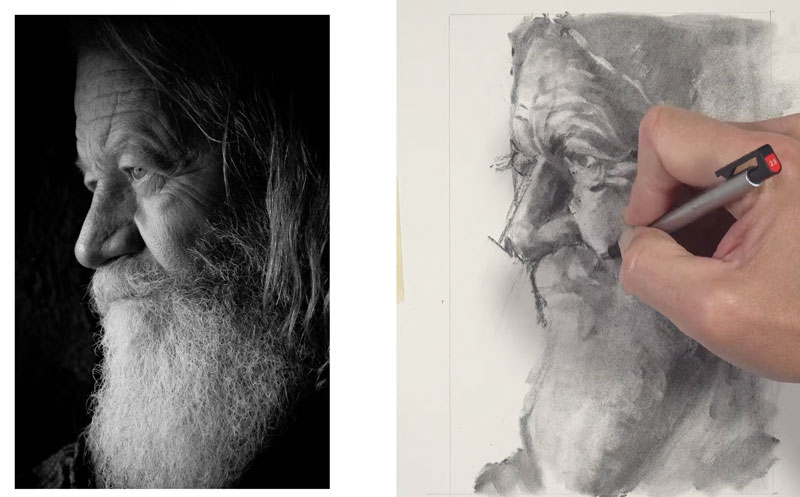
We’ll start pushing the values by adding more vine charcoal. We’ll continue to work back and forth with the charcoal and the eraser to begin pulling out the details.
One thing to keep in mind when you’re working with charcoal is that we start with a looser indication of the subject and then gradually refine the drawing as we go through the process. This is completely different than using a medium like pen and ink or colored pencils where we start with precision and end with precision in most cases.
While compressed charcoal is less forgiving, it can still be blended much like the vine charcoal. We’ll continue adding compressed charcoal, blending it, and then erasing to create highlights. Slowly, our details emerge.
Drawing the Hair
Next, I’ll use the vinyl eraser to erase out some strands of hair. We’ll do so on the mustache and the beard as well as we continue to work down. It’s important to note here that I’m not trying to replicate every single strand of hair that I see. I’m just giving an impression of some of the stray hairs over the top of the medium to dark values. This will give the impression of a furry beard, as we see in the reference, without having to spell everything out for the viewer.
Completing the Portrait Drawing with Charcoal
At this point, we’re ready to increase the contrast along the edge of the face. Using the compressed charcoal pencil, we’ll go ahead and refine the edge.
I’m thinking about the contrast of value that happens around the edge of the face. This will allow me to refine the edge of the nose and the other facial features as they bump up against that dark tone. We’ll use the side of the charcoal pencil to cover a broader area. We’ll also do the same in the darkest areas of the hair on the right side of the picture plane.
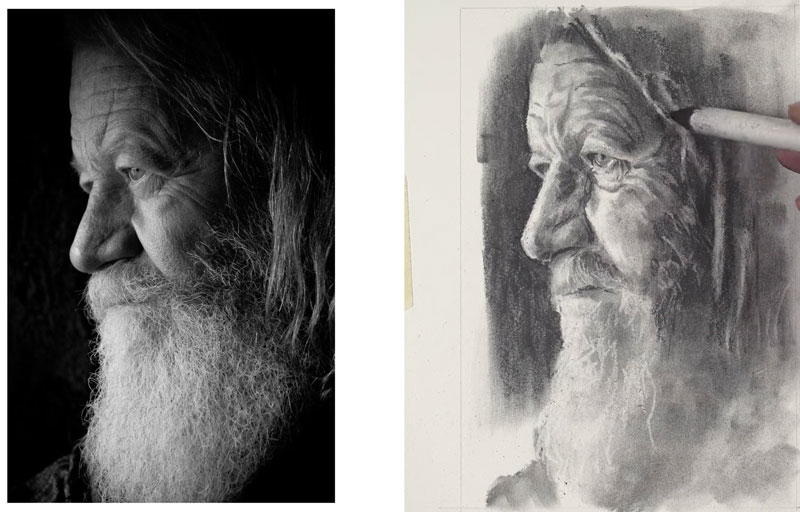
Then, we’ll erase out a few stray hairs over the top of the darker tones. We’ll add a few more details to the eye with compressed charcoal to complete the drawing.
Now our charcoal portrait drawing is complete. Here’s a look at the completed drawing…
Charcoal Portrait Drawing of an Old Man – Conclusion
Charcoal is one of the most forgiving mediums for drawing, despite its reputation for being messy. It’s important to focus on shapes of value and try to replicate these shapes in your drawing. Details emerge from the drawings as it develops. Stay loose and patient and slowly your portrait drawing will develop into a refined image.
If so, join over 36,000 others that receive our newsletter with new drawing and painting lessons. Plus, check out three of our course videos and ebooks for free.