
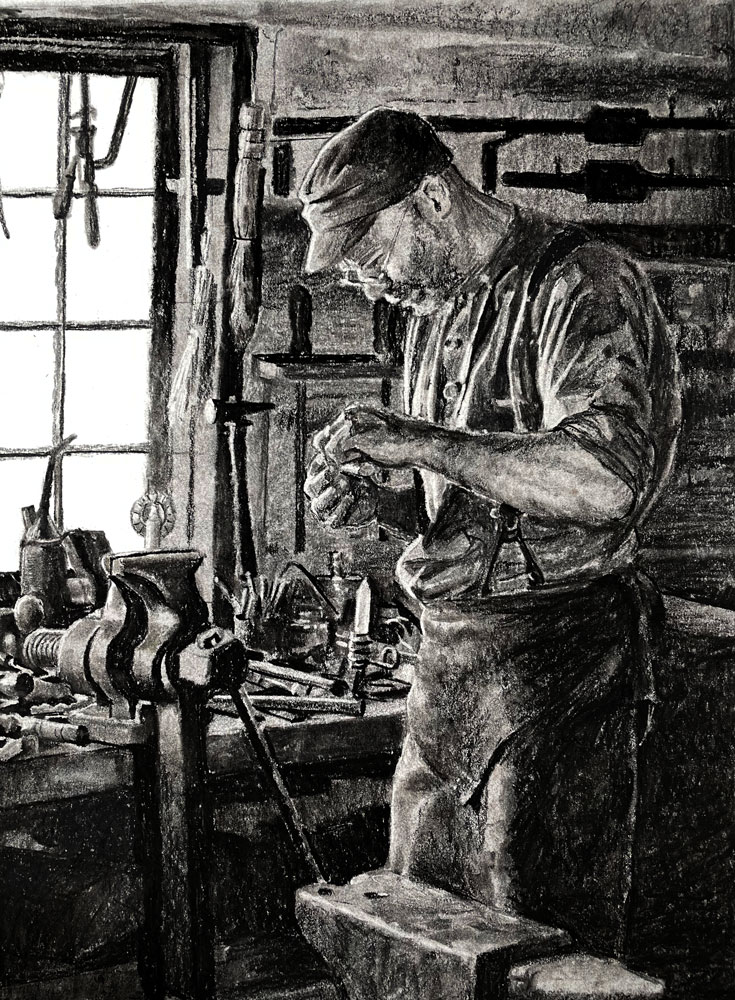
Figure Drawing with Charcoal

Lessons
About This Lesson Series...
The Figure Drawing with Charcoal class is a focused and practical lesson designed to develop your skills in capturing the human form using charcoal. This class emphasizes observation, proportion, gesture, and value, helping artists create dynamic and expressive figure drawings. Through step-by-step demonstrations, you’ll learn how to work with charcoal to convey depth, movement, and structure effectively.
Understanding Gesture and Movement
The lesson begins with an exploration of gesture drawing, which captures the energy and flow of the figure. You’ll learn techniques to quickly establish the pose, direction, and balance of the body. This stage emphasizes looseness and rhythm, ensuring that the drawing conveys life and movement rather than appearing stiff or static.
Establishing Proportion and Anatomy
Next, the class focuses on building accurate proportions and understanding basic anatomy. You’ll learn how to measure and compare parts of the body to maintain correct scale and balance. The instructor demonstrates how to simplify complex anatomical forms into basic shapes, allowing you to structure the figure confidently before adding details.
Working with Charcoal for Value
Charcoal is a versatile medium for creating strong contrasts and subtle transitions. This lesson shows how to use different types of charcoal—vine, compressed, and pencils—to build layers of value. You’ll learn how to create highlights, midtones, and deep shadows, giving your figure drawing depth and a three-dimensional quality.
Rendering Form and Depth
A major focus of the class is rendering the figure’s form realistically. You’ll discover techniques for shading curves and planes of the body, emphasizing volume and structure. By observing light and shadow carefully, you’ll learn how to define muscles, contours, and posture while maintaining a natural, expressive look.
Refining Details and Finishing Touches
As the drawing progresses, attention shifts to refining details such as hands, facial features, and subtle anatomical nuances. The class teaches how to balance precision with expressive marks, ensuring that the figure remains dynamic and alive. Final touches involve enhancing contrast, softening edges, and unifying the composition for a polished, finished drawing.
A Comprehensive Figure Drawing Experience
By the end of the Figure Drawing with Charcoal class, you will have completed a full figure drawing while gaining essential skills in gesture, proportion, value, and shading. This lesson equips you with techniques that can be applied to a wide range of subjects and media, making it an excellent resource for artists seeking to improve their understanding of the human form and their overall drawing abilities.
Specific Lessons
Lesson 1 (1:04:06)
In lesson one, we tone the paper and begin the contour line drawing using the aid of a grid.
Lesson 2 (1:14:15)
In lesson two, we begin work on some of the details of the drawing including the face.
Lesson 3 (1:09:48)
In lesson three, we develop the folds of the shirt.
Lesson 4 (1:04:43)
In lesson four, we work on clarifying some of the objects on the table.
Lesson 5 (1:08:15)
In lesson five, we develop the details found on the objects on the table.
Lesson 6 (1:10:35)
In lesson six, we complete the drawing.
Resources for this Lesson...
Distributing any content downloaded from this site is strictly prohibited and against the terms and conditions of use.
References
Here's what you'll need...
- Vine Charcoal
- Compressed Charcoal (Pencil)
- Blending Stumps
- Erasers
- White Drawing Paper
(Disclosure: Links to art materials are affiliate links which means we make a small commission if you purchase at no additional cost to you.)

Expert teacher and visual artist. Ashley is encouraging and makes creating art easy to understand.
When we first started this drawing, I was terrified because of how complex the image is. What I’m finding is that it is teaching me to work on one small area at a time, although I do still bounce around some. It is also teaching me to REALLY observe small details. Thank you, Ashley, for choosing this image.
I was convinced at first that I simply couldn’t do the subject matter justice. I said to myself that I’d just watch the process, but I am now obsessed with this drawing and charcoal. I have also done all the posted lessons of the new charcoal course. Thank you Matt for including the tree landscape. I can’t stop looking at my finished drawing. It feels as if I could walk into it.
All this is to say, these courses and the teaching provided have truly and finally, at the age of 71, awakened my artist. I cannot thank you enough.
Brenda
I recently purchased some charcoal paper and I’m excited to get caught up on this series for next week. Also, thank you Ashley for warning me in a getting sketchy taping that charcoal paper is thinner than I would have expected. If you hadn’t said it, I would have absolutely been disappointed.
I’m learning so much and always improving in my art. I’m very grateful to be a member.
Just been working in charcoal on another course and it drove me a bit mad as I would draw one area and then accidentally smear away some of my work while working on another area.
This face coming out of this drawing is awesome Ashley! Very good and talented work!
Southeast Florida and other areas got hit real bad. My prayers are with them. I live in Southwest Florida and we got feeder bands and strong winds, but we got really lucky.
What happened to Video #3?
Hi Deborah,
Thanks for letting me know the error. I have fixed it and Video #3 is where it needs to be. 🙂
Thank you! ❤️😎
Really enjoyed this one and learned so much. At first I wasn’t excited for the subject matter but once we got going, I realized my mistake – this was perfect for charcoal. So much contrast and the detail does come thru! Can’t gush enough about these live lessons and everything else on this site. THANK YOU!!!!
Awesome June! Thanks for your comments!
I saw this lesson and really liked the subject. Reminded me of my dad in the garage. However, I thought there was no way I could do it myself. Then I did the lesson of the “Ostrich” with charcoal (which I also loved) and started thinking that maybe I could tackle it. I’ve just finished it and couldn’t be happier with my results. Ashley you are a great instructor and listening to you two friends is so enjoyable as I am drawing. Matt and Ashley keep up the great work!
If I use one of the reference photos and make a picture of it (let´s say with soft pastels or acrylics) can I post it on social media? (my piece, not the photo)
HOW DO YOU CLEAN YOUR BLENDER STICK?
Hi,
Could you please provide the details of paper used. Brand and type of paper.
Thanks
Charcoal has always been my favorite and pencil. This is just an amazing drawing. I love it!