Gettin Sketchy – How to Create a Monotype – Season 2 Episode 8
This episode aired live on YouTube on October 7, 2020.
In this timed drawing exercise, we take a look at creating a monoprint of a coffee mug on standard white drawing paper. This interesting printmaking process is relatively quick and fun and the resulting appearance is unique.
Creating a Monotype
It should be noted that the terms “monoprint” and “monotype” are often used interchangeably, however they are technically different. A monoprint can refer to one print made with any printmaking process, while a monotype is specific to the process we are discussing here. Ashley and I use the term monoprint, but technically, monotype would be more accurate.
As the name suggests, monoprinting (also called monotyping) is a printmaking process that results in one print. Sometimes you can get a second “ghost” print, but mostly this process results in only one usable image.
This means that this printmaking process differs from the others where we typically expect to get several prints. Generally speaking, printmaking is an art-making process that utilizes an altered support to transfer ink (or other pigmented medium) to paper or fabric. With other printmaking processes, several prints are usually produced where each one is considered an “original”. But monoprinting is special since only one print is produced.
Monotyping also differs from other forms of printmaking since it does not fall into the categories of relief printmaking, intaglio, screenprinting or lithography.
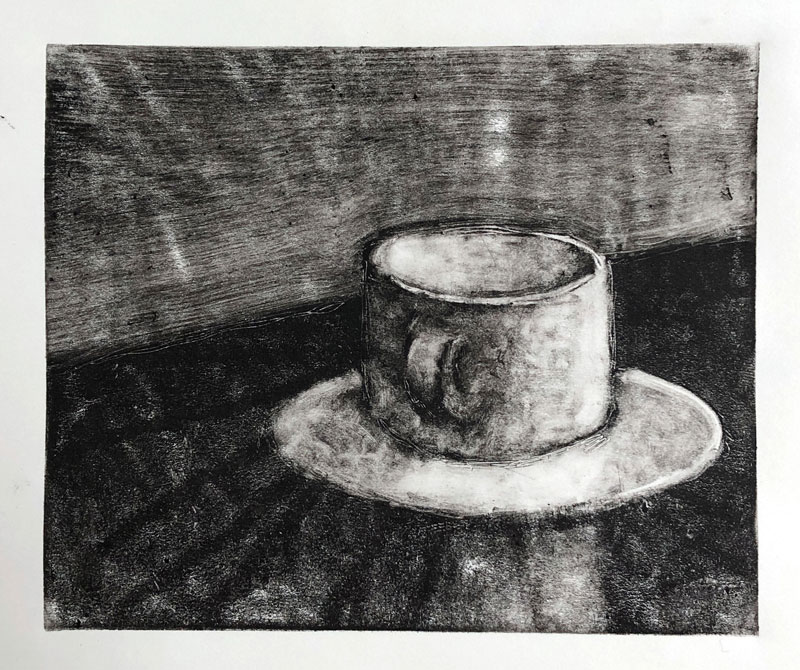
Here’s a look at the completed print…
Thinking in Reverse
Most of us become accustomed to adding dark media to a light surface when we first learn to draw. For example, we often start with a pencil and make marks on a white sheet of paper. This trains our mind to look for dark tones on our subjects and add them to the drawing surface.
With monotyping, the process is reversed. Since we start with a solid application of ink and remove the ink to create the image, we must consider the tints (or lighter values) as we develop the image.
The resulting print is also in reverse. We must consider this, especially if text is included in the scene.
The Process of Creating a Print
A few surfaces can be used as the matrix for a monotype. This could be a zinc or copper plate, but acrylic surfaces or a pane of glass is a bit more accessible.
Oil-based ink is spread on this surface and then gradually removed using a cloth, cotton swab, toothpick, or any other tool. Oil-based ink must be used so that it doesn’t dry before the ink can be removed. This process will not work with water-based ink.
With a transparent surface, like an acrylic or glass pane, a sheet of white paper can be placed underneath so that you can better evaluate the image as the ink is removed.
Ink is removed in the areas of lighter tone. Gradually, an image develops.
Once you are happy with the image produced on the pane of glass, a sheet of paper can be placed over the inked pane. Pressure is then applied to the back of the paper to transfer the ink to the paper. A wooden spoon or a baren can be used to apply pressure.
Once adequate pressure has been applied to the surface, the print can be gently pulled away.
In our demonstration, Ashley used regular white drawing paper, however printmaking papers that are 100% cotton may produce better results.
Photo Reference
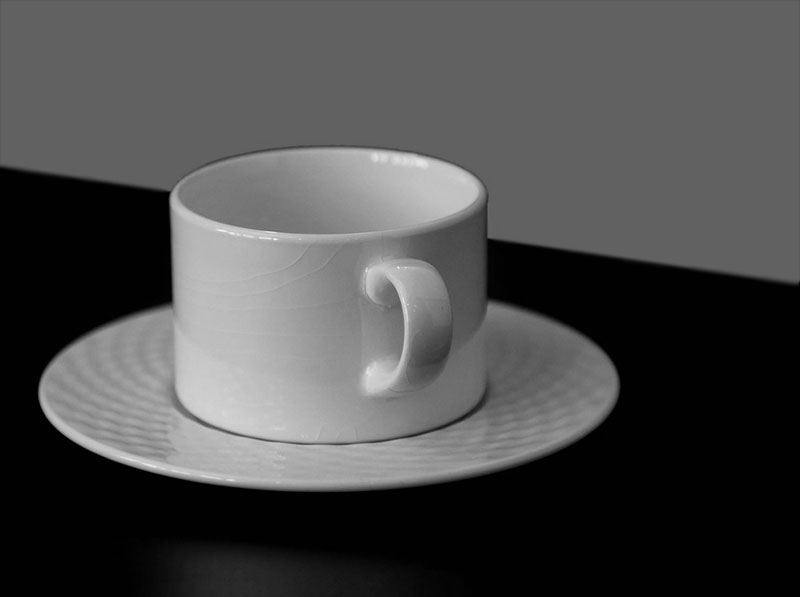
The reference photo for this exercise comes from Pixabay.com. This reference was heavily edited for simplicity and much of the background information along with the color was removed. Notice how the photo reference is in reverse when compared to the final image. Here’s a look at the photo reference…

Supplies for Monotypes
One of the advantages of creating a monotype is that it doesn’t require a full printmaking studio to create one. With other printmaking processes, like intaglio, a printing press is preferred. But with monotyping, one is not required. In fact, minimal tools and materials are required to be successful. In our demonstration, Ashley uses very basic tools.
Here’s what you’ll need to create a monotype of your own…(Some of the following links are affiliate links which means we make a small commission if you purchase at no additional cost to you.)
- A plate to apply the ink. This can be an acrylic or glass pane.
- Oil-based printmaking ink
- A brayer (to apply the ink).
- Tools to remove the ink. This can be anything that makes marks (pencils, pens, a cloth or paper towel, golf tee, etc.)
- Paper to print on. Regular drawing paper will work, but you may find greater success with printmaking paper that is 100% cotton (commonly called “rag” paper.)
- A wooden or metal spoon, or a baren.
While the process of creating a monotype is clearly a printmaking process, this fun exercise can also influence your drawing and painting skills. Working in a new or different medium that is outside of what you’re accustomed to forces you to think about image making in a new way. This carries over to the processes that you are familiar with, making you a more well-rounded artist. An additional benefit is how quickly these images can be created. These prints can be created in a short period of time and produces imagery that is unique with a full range of value.
If so, join over 36,000 others that receive our newsletter with new drawing and painting lessons. Plus, check out three of our course videos and ebooks for free.