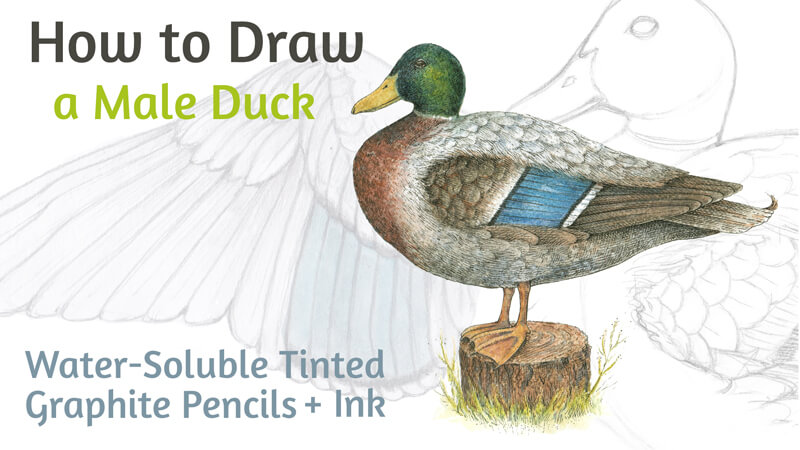
Technically, there is no such thing as some general or average duck. Numerous species of them exist! In this tutorial, we’ll create a stylized drawing of a male mallard duck. It’s interesting to know that mallard ducks are the ancestors of almost all other varieties of domestic ducks.
A Couple of Words About Mallard Ducks
This species of duck features a significant difference in appearance, depending on whether the bird is male or female. The male mallard duck is also called a drake.
The plumage of a mallard drake changes during the breeding season. The head acquires a glossy iridescent green color with a white collar. The breast becomes chocolate brown with a subtle inclusion of purple. The wings are gray and brown, and the belly is pale gray.
After the breeding season, the plumage of male ducks becomes similar to the one of females. They wear it for about a month as their new feathers grow. During that time, they are flightless and more vulnerable to predators. In this period, drakes prefer to stay in isolated areas or flock together for protection.
The coloring of female mallard ducks doesn’t change much during the year. Their plumage is duller, relatively uniform in colors, and mottled. The colors vary from beige or pale orange to dark brown.
Both male and female mallards have distinct iridescent blue speculum feathers edged with white.
The main body structure of both male and female mallard ducks is similar, but males tend to be larger. Also, drakes have bigger heads and thicker necks. You can draw a female duck, relying on the following instructions, just remember about the difference in plumage coloring.
Art Supplies for Drawing the Duck
This is a mixed media artwork. Each art tool presents a unique set of features, so we can combine different supplies to our – and our artwork’s – advantage.
I’ll be drawing on watercolor paper with a rough surface. I also recommend that you keep a couple of sheets of ordinary printer paper at hand.
We’ll need a graphite pencil and an eraser. They are necessary to create sketches and an underdrawing for the finished artwork. I recommend using an H or HB drawing pencil.
A black 0.1 ink liner will help us to create crisp outlines and details of texture.
In the image below, you’ll find water-soluble tinted graphite pencils. The unique feature of this medium is the pleasant, enchanting naturalness of colors. They are deep and yet slightly subdued.
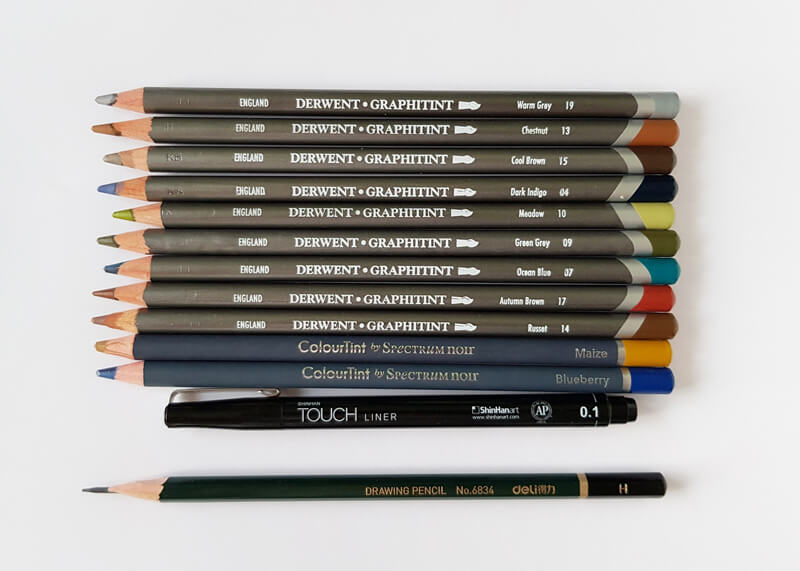
The majority of these pencils are Graphitint by Derwent, which probably is the most well-known brand of tinted graphite pencils.
Two additional colors are from ColourTint by Spectrum Noir. I’ll use Blueberry to add color to the speculum and Maize for the beak and feet. Their pigments are closer to the color scheme of a real mallard drake. The color range of Graphitint pencils is beautiful, no doubt about it. But, in my view, yellows and oranges are somewhat under-represented.
Here’s a list of the materials that we’ll use…(The following links are affiliate links which means we make a small commission if you purchase at no additional cost to you.)
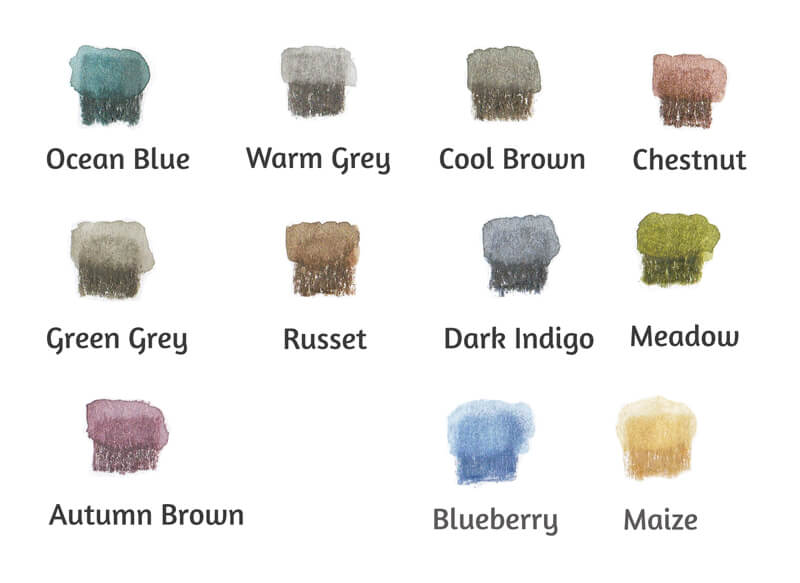
In the image below, you’ll find swatches of the chosen pencils. I’ve applied water to the top areas of the swatches to activate the pigment. The colors have become more vibrant there. After activation, water-soluble graphite behaves similarly to watercolor or ink wash.
The lower areas of each swatch demonstrate the strokes in a dry state.
If you don’t have water-soluble graphite pencils or your set lacks some colors, no problem. Use watercolor or watercolor pencils instead!
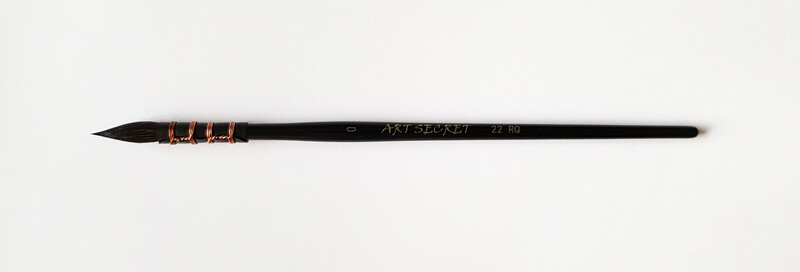
We’ll also need a brush to apply water and a water container. I’ll be using a generic soft round brush.
See also: All About Artist Paint Brushes – Hair Types, Shapes, Marks, and Parts
When you choose the size of your brush, base the decision on your preferences. Keep in mind that graphite strokes require enough water to be activated, and they dry quite fast. That’s why I recommend avoiding tiny brushes.
Drawing the Duck with Graphite Pencil
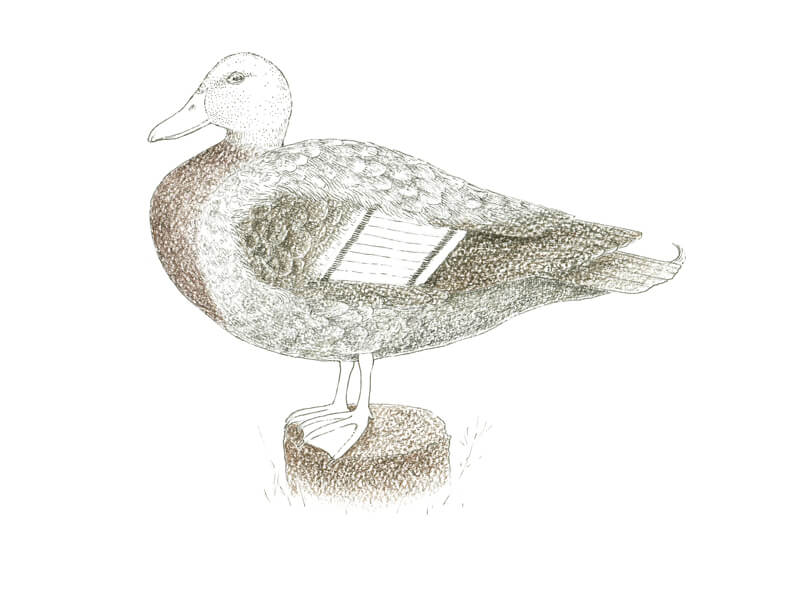
My suggestion is to put the watercolor paper and water-soluble pencils aside for a moment. Now we’re going to examine the duck’s anatomy. Some erasing and reworking is inevitable ao it may be harmful for the delicate surface of watercolor paper. Let’s create a preparatory sketch on a sheet of sketch paper.
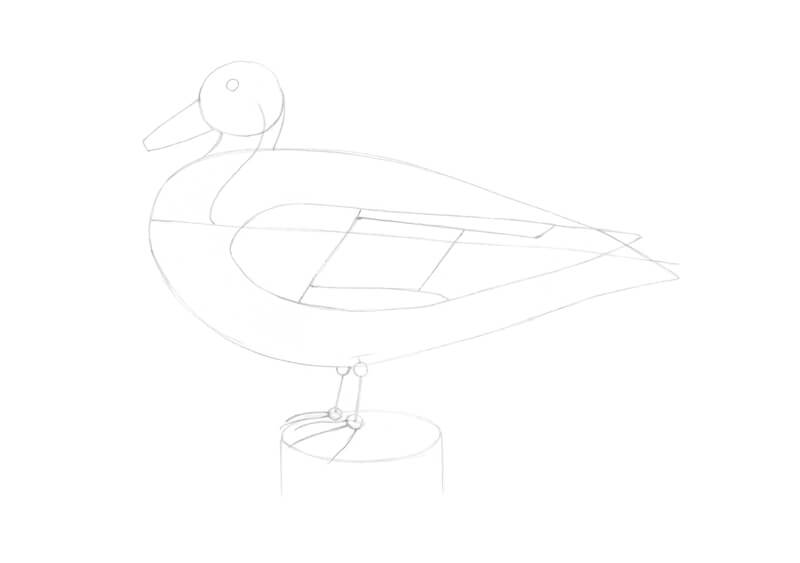
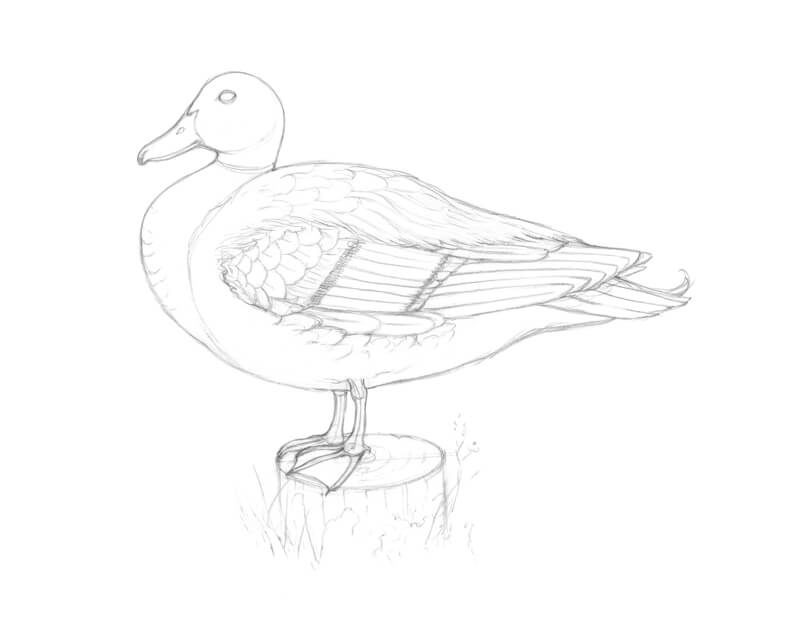
First, I outline a rough shape of the duck’s head. I add a long line that marks the direction of the body. It’s the body’s improvised axis. I connect the head and body with a curved core line of the neck.
In this ruffled up pose, the head is drawn closer to the body, which makes the breast come forward slightly.
The body is elongated. As a stylized shape, it resembles a drop that is lying on its side. Be sure to leave some space for the duck’s feet!
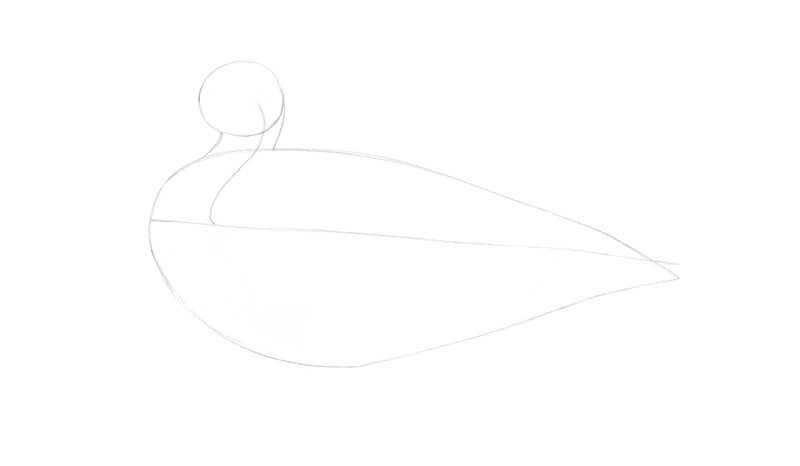
I mark the eye and the rough shape of the beak. The length of the beak is slightly smaller than the width of the head.
I outline the visible part of the folded wing. We’ll consider the wing’s structure in a moment.
Then I add the short feet. They are almost aligned with the middle of the body. I mark the joints with circles. There are three front toes and a small back one.
To complete the composition, I add the framework of a tree stump under the bird’s feet.
The Anatomy of a Bird’s Wing
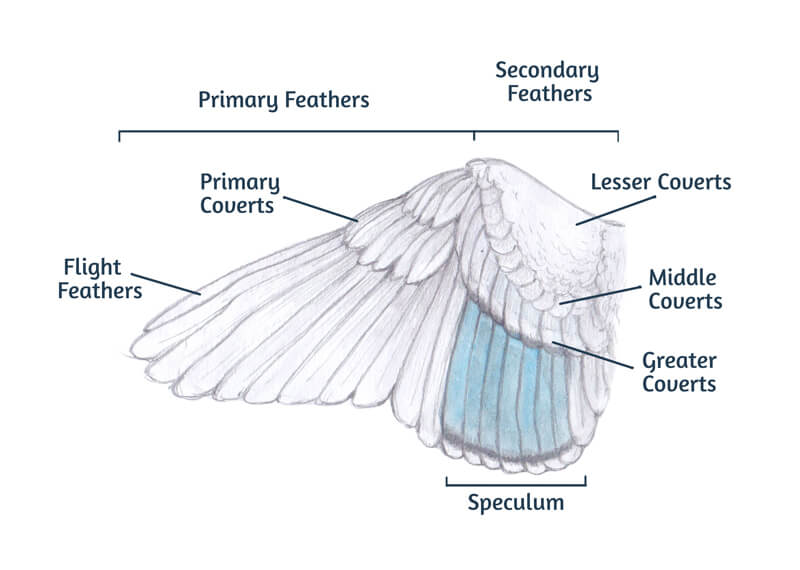
Now let’s examine the simplified anatomy of the duck’s wing. It’s easier to distinguish between different parts and sets of feathers when the wing is spread.
By the way, ducks have to flap their wings about ten times per second to keep their relatively large bodies in the air. These birds are capable of reaching great heights and flying just as high as airplanes. And they have waterproof feathers! Even when a duck dives underwater, the layer of feathers right next to the skin will stay dry. Isn’t that incredible?
Ducks’ wings are long, pointed in shape, and small in size. (The image below illustrates the following explanations.)
Primary feathers are the outer feathers that are furthest from the body. The primary feathers spread out to allow air passage during the flight. If they have been cut off, like in the case with domestic birds, the duck will stay grounded.
Secondary feathers are the inner wing feathers. They force air up from the wings, providing lift. Secondaries create the speculum – a beautiful insertion of bright color. It can be iridescent green, blue, purple, or white, depending on the duck species.
Wing coverts can be found in the wing’s upper part. They keep the bases of primary and secondary feathers covered on both sides of the wing. Their function is to create a smooth surface for optimal airflow.
When the wing is folded, feathers are folding, too. Below is a simplified illustration that may help you to identify different groups of feathers. This scheme is based on the wing’s position in our artwork.
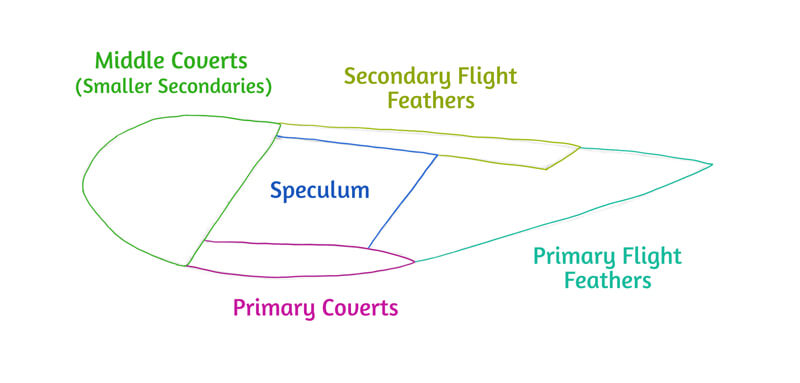
Note that the appearance or ratio of the visible segments may change. It depends on the pose and other factors. Ducks lift or compress their plumage in various ways to dive underwater, regulate body heat, and express emotions.
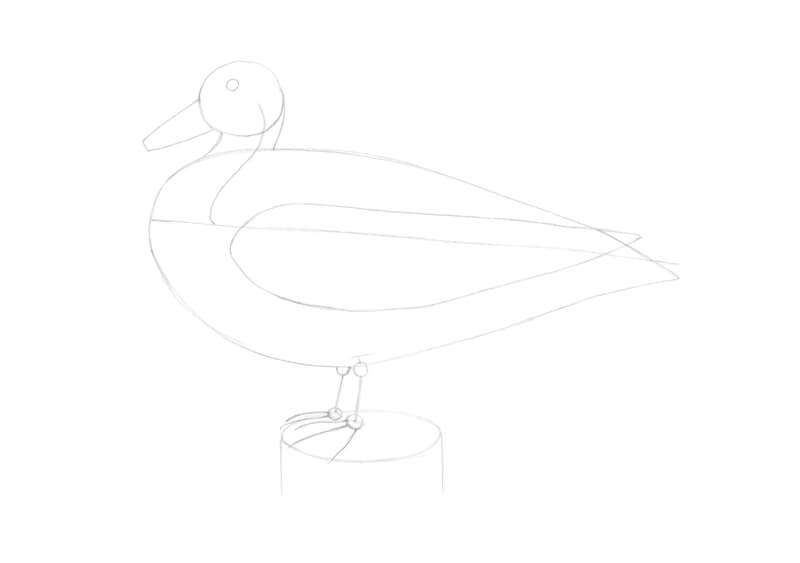
With the scheme in mind, I add the segments to the wings. Note that speculum is located approximately above the duck’s feet.
I refine the head of our drake. The line of the forehead becomes sharper. I add the nostril and a so-called nail at the tip of the beak. The beak is slightly extending beyond the line of the bird’s breast.
By the way, ducks’ beaks are highly sensitive – they have many touch receptors, similar to those in human fingertips.
Feel free to erase the unnecessary lines as you go.
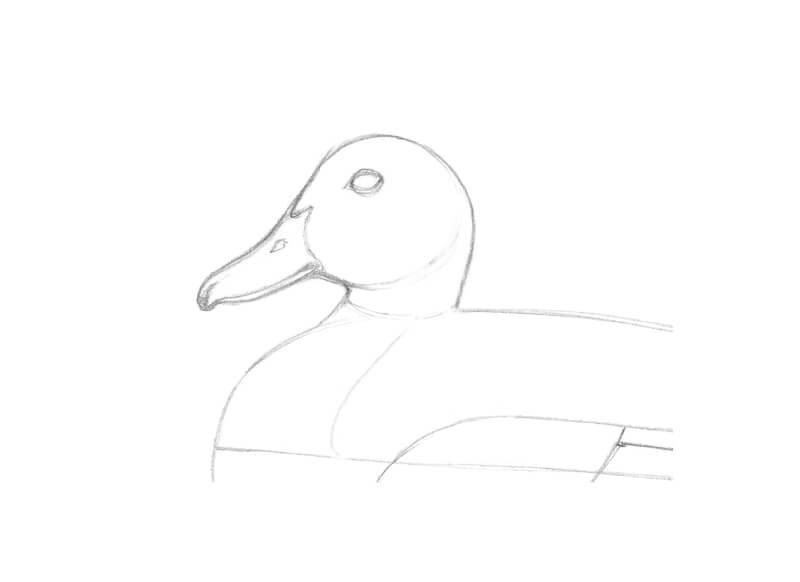
I refine the contour of the breast, making it steeper. Then I mark the location of the white collar in the duck’s feathering.
I add the rows of scapular feathers in the upper part of the bird’s body. They slightly cover the wing’s top edge.
Then I draw the short and round middle coverts, longer primary coverts, and speculum. I also add a hint at secondary flight feathers in the upper part of the wing, under the scapular feathers.
The lower part of the wing is partially covered by the body feathers.
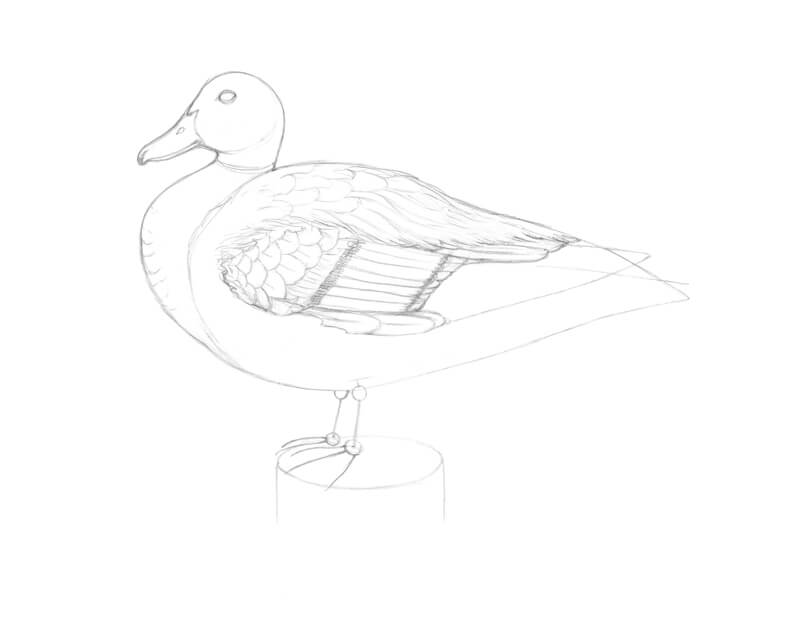
I complete the wing by adding the long primary flight feathers. Then I draw the tail feathers. They act as a rudder, helping the bird to stabilize and control flight.
There are peculiar twisting feathers at the end of the body – these are so-called drake feathers or curls. As the name suggests, this feature is inherent to male ducks.
I also adjust the lower contour of the body.
I refine the feet of the drake, adding the outer contours. The feet are webbed for paddling in the water. There are claws at the ends of the toes.
By the way, ducks’ feet have no nerves or blood vessels. So ducks don’t feel the cold with their feet!
I also add some features of bark texture to the stump and several grass blades around it. The sketch is complete!
How to Draw a Duck with an Ink and Tinted Graphite Pencils
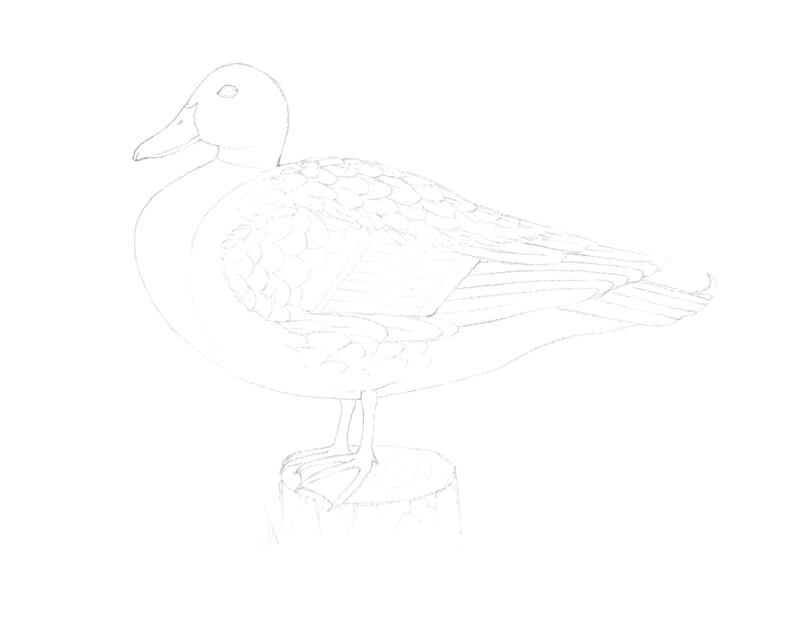
Now I put the watercolor paper on top of my sketch and place them together on the window pane. I trace the main contours and the most important details. (Using a light table or carbon paper is also an option.) I recommend keeping the initial sketch at hand in the process, so you can refer to it.
If some pencil lines look too heavy, lift the excess graphite with a kneaded eraser.
Important: the process I’m showing you isn’t the only option to create a mixed media work with these materials. As an alternative, you can start with tinted graphite pencils, then wash the strokes, and apply ink as the last step.
Either way, if you’re going to add water, always do a prior water-resistance test. Draw several lines with your ink pen, let the ink dry completely, and try to wash the lines with a wet brush. If they don’t bleed, this pen is suitable for the task.
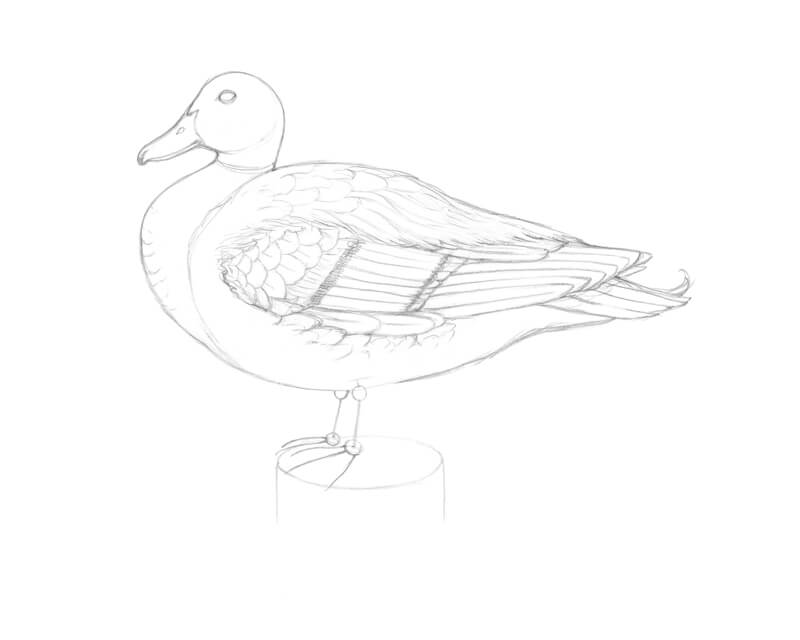
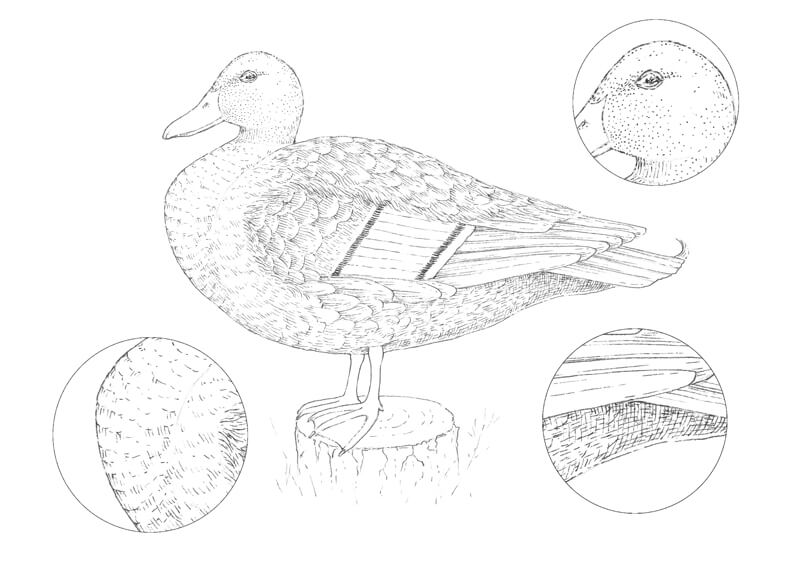
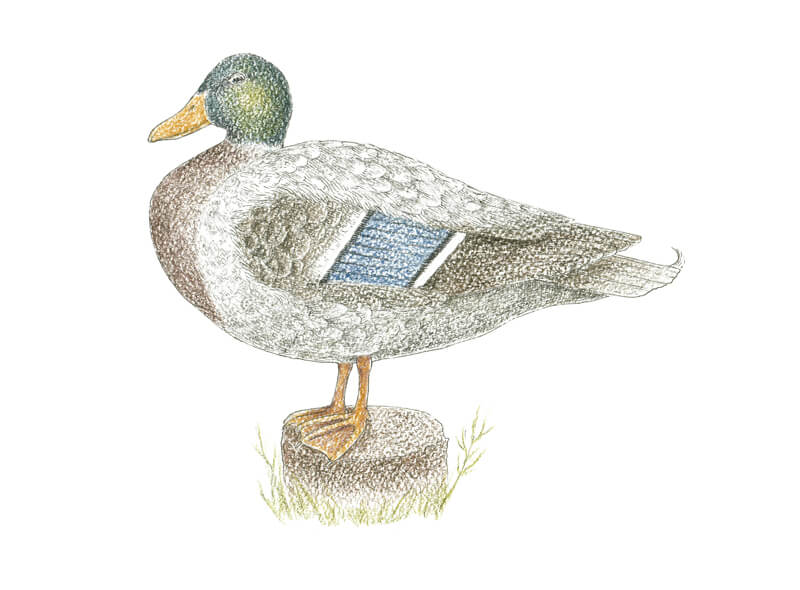
With 0.1 ink liner, I draw the outer contours, allowing some interruptions in the line.
I use mostly dots and groups of short hatches to create an illusion of texture. The direction of marks conforms to the direction of feathers. I create soft shadows between the feathers.
The black areas in the speculum are the darkest parts in the drawing so far.
There is a soft shadow under the tail so I apply cross-hatching to deepen it. In the image below, you’ll find several samples of texture in close-up.
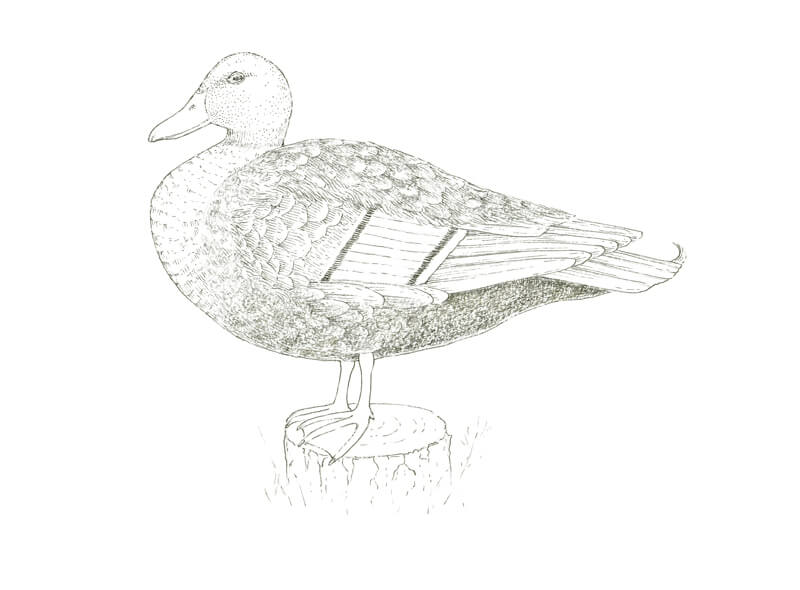
At this stage, the drawing shouldn’t be perceived as either three-dimensional or complete. If we place too many black lines right now, the artwork will look overworked. So let’s create just a subtle ink base and proceed to the tinted graphite applications.
I apply Warm Grey to the upper part of the duck’s body, and Green Grey to the underside. The difference between these two grays is subtle, especially in the dry state.
However, after we add water, the delicate green hue found in Green Grey will become more evident. I use it to create an impression that a green-colored reflected light affects the bird’s lower side – as if there is grass under the drake.
My pencil is slightly dull. The lines repeat the direction of the drake’s body. The pressure is relatively light as we should avoid indenting the surface of the paper. With heavy marks, it becomes much harder to wash out the pigment completely.
I apply additional layers of pigment to the darker areas. Some feathers in the upper part of the body are left untouched.
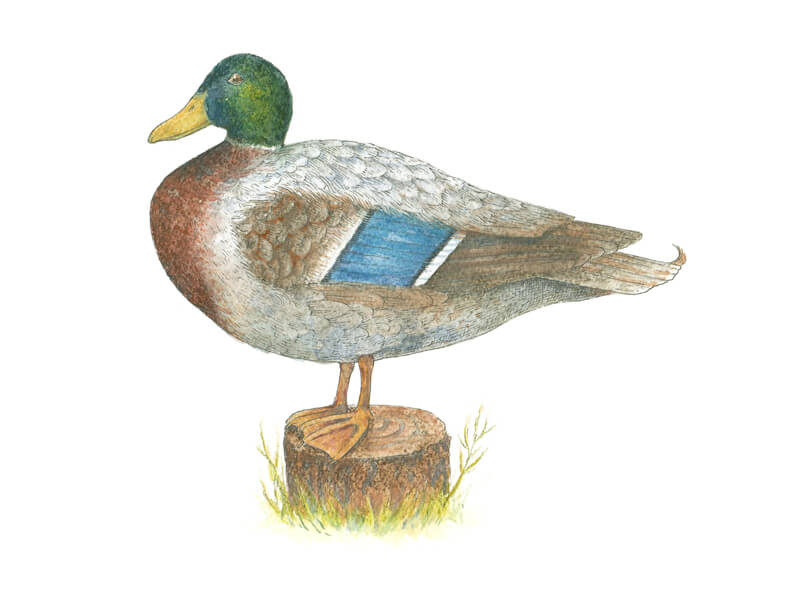
I add Chestnut to the drake’s breast. There are subtle shadows in the lower part of this area and under the bird’s head. They require an additional layer of color.
With Russet, I cover the stump. Its vertical sides get less light (assuming that the scene is lit from above), so I make this plane darker.
I cover the wing plumage with Cool Brown. As you can see, the paper’s texture affects the result – the strokes look grainy at this point.
I add Blueberry to the speculum. Then I work on the head. I apply Dark Indigo closer to the edges. Ocean Blue covers the whole area of the head. Meadow is added to the central zone, under the bird’s eye and beyond.
I create a thick covering of colors there. The more pigment you have on the paper, the more intense the colors will be after applying water.
I draw some grass blades near the stump with Meadow.
With Maize, I cover the beak and the feet. The beak should have a yellowish-orange color with a black tip.
I also add some Autumn Brown to the feet, especially to the webbing. I place the strokes on top of the yellowish base.
Real mallard drakes have bright orange feet. Unfortunately, we can’t find the exact color within the available range of tinted graphite pencils. Even a combination of them won’t get any close results. However, the artwork will look nice even with those limitations of color. Let’s take a creative approach!
With a moderately wet brush, I wash the colored applications. Sometimes it’s necessary to run the brush over an area several times to wash out the visible pencil strokes.
If you don’t want to mix colors in some of the adjacent areas (like bark and grass, grey and brown parts of the duck’s body), work on them separately. Let an area dry completely before moving to the neighboring one. Layering the colors will produce a an effect as if the colors were mixed.
You can lift the pigment with your brush and transfer it to another area of the drawing. For example, I’ve included some blue-green from the drake’s head to the grass and some orange from the feet to the underside of the body.

I’m going to add more colored details to the artwork. The most basic option is drawing directly with pencils and then washing the strokes – just as we did before. Be sure that the existing layers have dried before applying the pencils again. When the paper is still wet, it can easily be damaged.
Another option is to make an improvised palette. Draw several strokes with a chosen pencil on a spare piece of paper. (Pressure should be from medium to hard, ensuring that you’ll get enough pigment.) Then, moisten the swatch with a wet brush. Now you’re ready to paint!
Now I prefer the second option because it gives better control over subtle color nuances.
My brush is just slightly wet. I add more Ocean Blue and Dark Indigo to the drake’s head. In a diluted state, these colors may be applied to the light grey and brown areas, and even to the lower part of the beak.
I add more Chestnut to the breast, bark, and some of the wing feathers. This unites the drawing in terms of color.
With Cool Brown, I make the darker areas of the wing more solid.
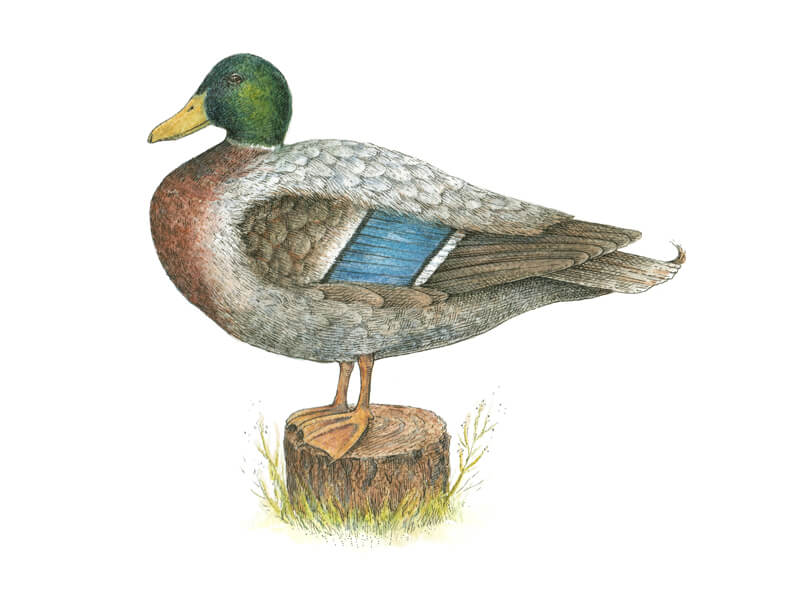
At this stage, the artwork looks slightly dull. It lacks contrast. With 0.1 ink liner again, I restore the texture and deepen the shadows.
I start with the head and upper part of the duck’s body. In the head, neck, and breast areas, I work mostly in a contour-hatching manner to create an illusion of volume.
When it comes to the smaller and softer feathers, I don’t outline their outer contours. I create shadows between them with sets of parallel lines.
The longer flight feathers allow for using sharper outlines.
I also darken the eye, leaving a small highlight in its upper part, and the tip of the beak.

With groups of ink hatches, I create a deep shadow on the bird’s belly. This area’s local color is light gray, but the lighting and the form of the body significantly affects the value. I also accent the shadow under the tail feathers.
I broaden the contour line in the lower part of the body to accent that this area is in shadow. Also, this makes the figure look more stable. I extend the lower contours of the feet as well.
As a finishing touch, I add some details in the bark and grass.
The artwork is now complete!
Conclusion
Congratulations – we’ve created a wonderful drawing! I hope that you’ve enjoyed working with water-soluble graphite pencils and ink.
The exploration of nature through art can take endless forms. Using rich, deep, beautifully subdued colors that tinted graphite pencils provide is just one of the possible routes that you can take.
I wish you much inspiration for your future art projects!
If so, join over 36,000 others that receive our newsletter with new drawing and painting lessons. Plus, check out three of our course videos and ebooks for free.