Distortion in Art
To distort is to pull or twist out of shape. Distortion is part of drawing and can make a subject look either correct or incorrect.
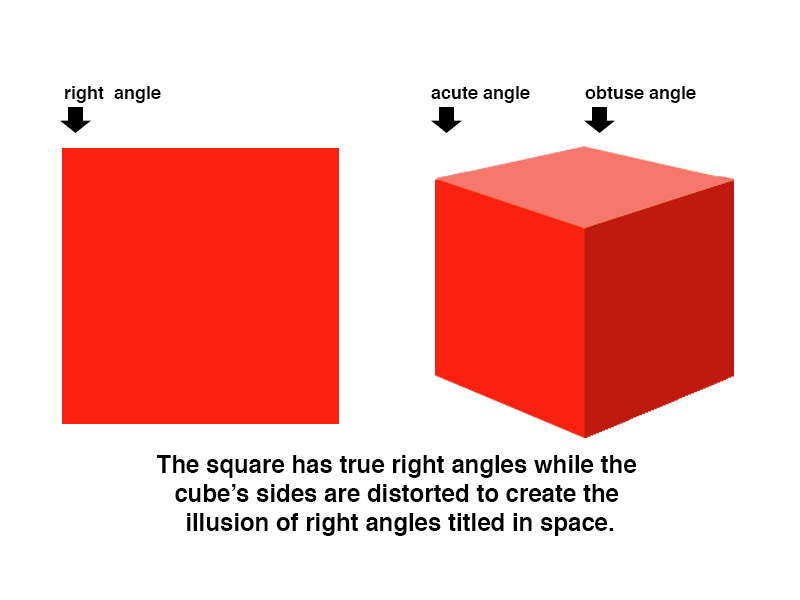
Think about a square. Adjacent edges form 90 degree angles. Now think of a cube. A cube is made of square-shaped sides. However, to accurately depict a cube in a 2D drawing, one must distort the sides. Look at the cube below. No two adjacent edges form 90 degree angles. Yet still, we understand the cube to have square sides.
Anamorphic Distortion in Art
Over time, a few artists have used anamorphic distortion in their art – not to better describe their subject but rather to obscure it. An anamorphic image only looks correct from one single vantage point. A fantastic example of Anamorphosis is found in the painting by Hans Holbein entitled, The Ambassadors. The stretched-out shape in the foreground is difficult to make out. However, when seen from the extreme lower left, the shape becomes a clearly rendered skull.

Anamorphic art has had a major resurgence in recent years and artists have used both photos and drawings to create incredible illusions. One such artist is known on YouTube as “brusspup”. Brusspup uses science to create illusions that can be categorized as art.
Here’s one of his videos that features anamorphic imagery…
How to Make Anamorphic Art
After seeing these images, you may think that creating anamorphic art requires some sort of wizardry. But, it’s easier than you think to create your own anamorphic images. Let’s take a look at how you can create your own amazing illusions…
To make an anamorphic image on a 2D surface you will need:
- A pencil
- An image, either a photograph or a drawing.
- A ruler
- A wide sheet of drawing paper or illustration board
- A medium of your choice to complete the drawing (ink, color pencil, paint, etc.)
Step One
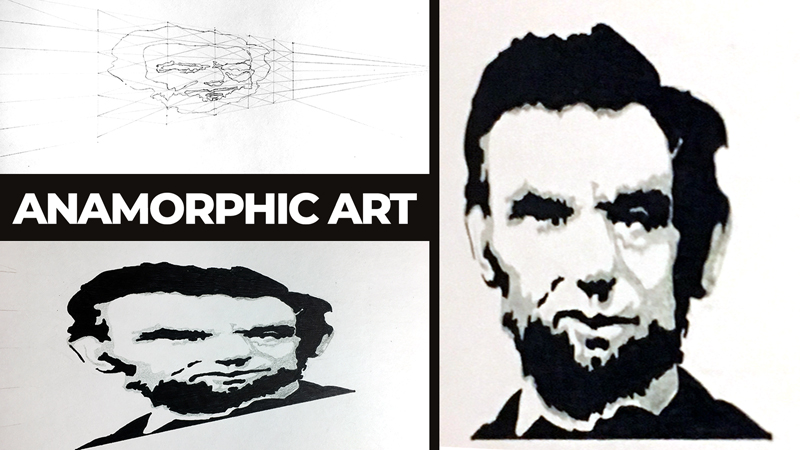
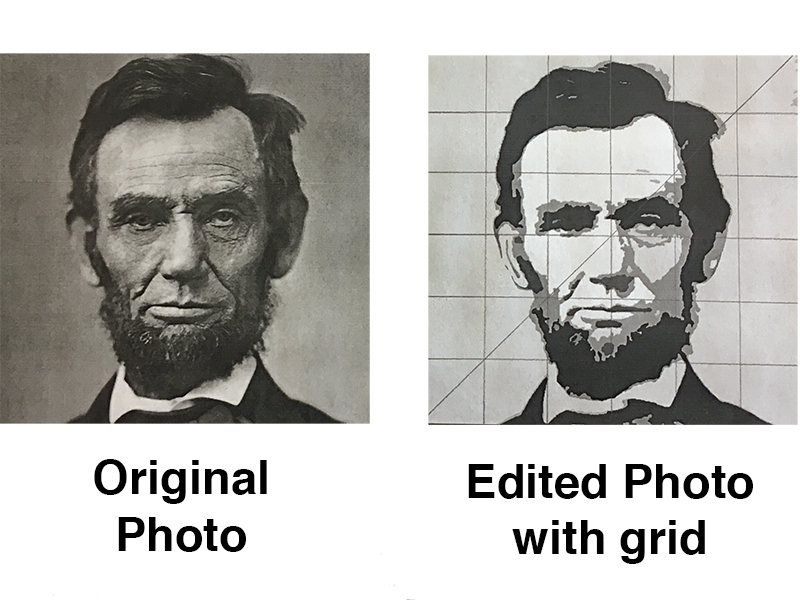
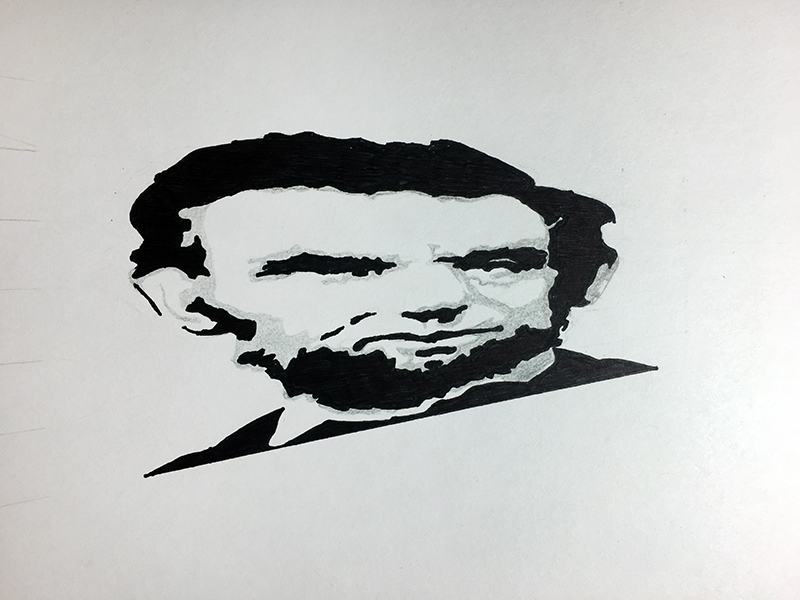
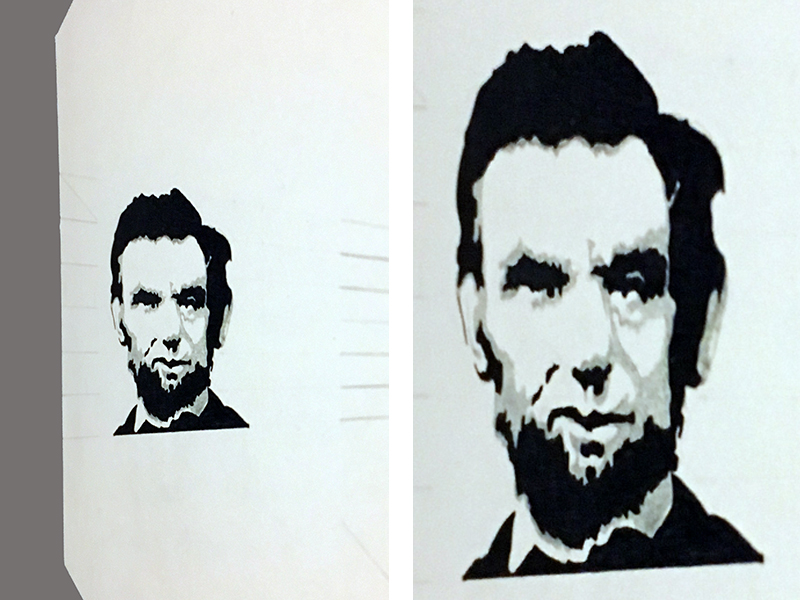
Draw a grid of squares over a preselected photo or drawing. The demonstration drawing is based on an iconic image of Abraham Lincoln. Using Adobe Photoshop, this image was simplified into value shapes. Don’t worry, if you do not have access to Photoshop you can still make an anamorphic image with a regular photo or drawing.
Step Two
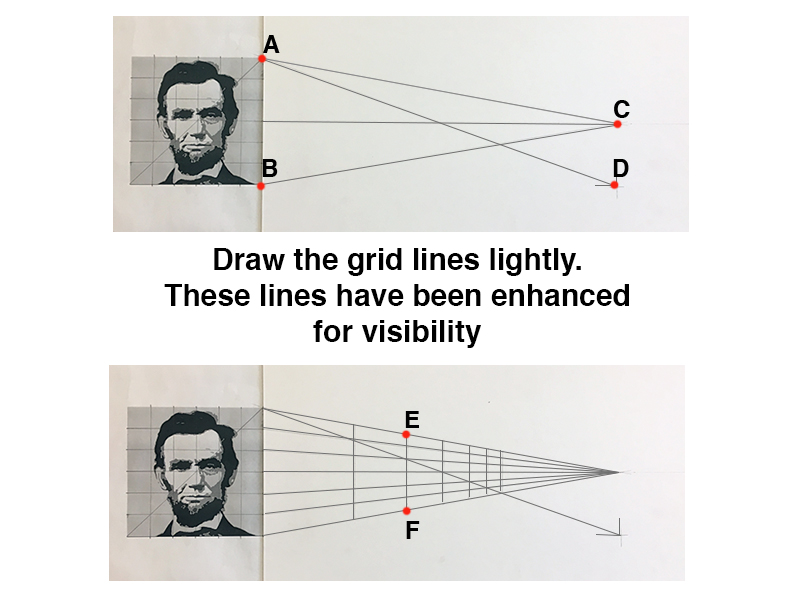
Tape your image to the edge of your paper/illustration board. Extend the center line of your grid to four times the width of your reference image. Now draw lines from the top and bottom corners of your reference (points A and B) to the farthest point of your center line (point C).
Step Three
Finishing the distorted grid requires a few more measurements. First, draw a line from each grid point along the right edge of the reference to point C. Then draw a vertical line downward through point C. Make the bottom of this new line (point D) even with the bottom edge of the reference photo. Connect point A to point D with a line. Draw vertical grid lines (EF) where the (AD) line intersects the horizontal grid lines.
Step Four
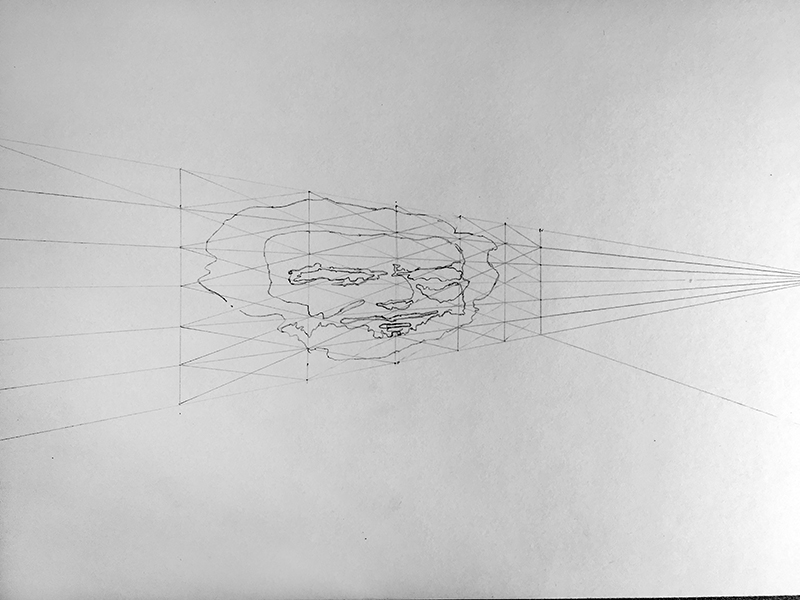
It is advisable to draw light lines that bisect the grid-blocks diagonally, effectively putting an “x” in each block. The “x” helps us to know where the center of each block is, resulting in a more accurate layout. You can erase these lines along with the original grid as you develop the image in the next steps.
Step Five
Block by block, draw all of the hard edges that you observe. The Abraham Lincoln example is made of all hard-edged shapes. If you are working from a less graphic photo you may still want to draw a few extra contours that follow the shadow in your reference.
Step Six
Render your anamorphic drawing in any medium you choose or feel comfortable using.
Step Seven
Look at your image from straight on. Now, from right side of the drawing, look down your image at a severe angle. Its distortion through space should create the impression of accurately drawn proportions, but only from the correct angle.
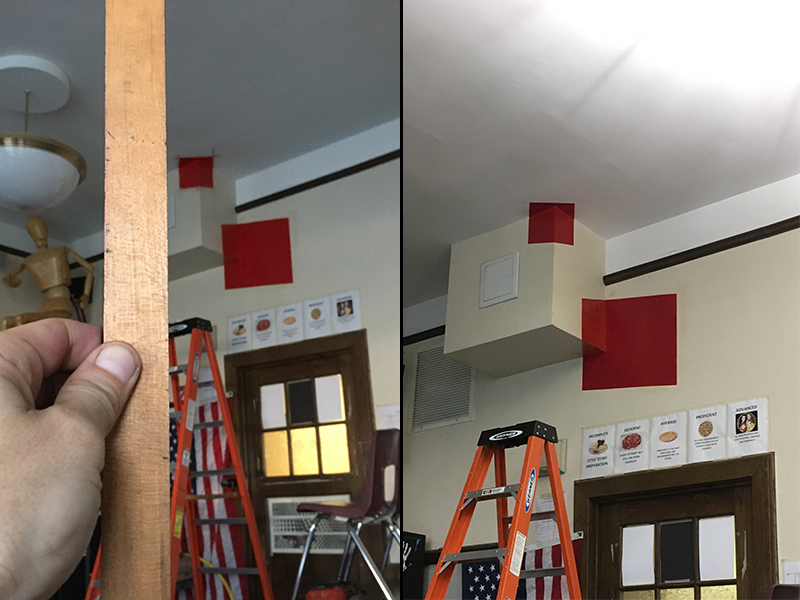
Anamorphic Distortion in 3D Space
A few decades ago Felice Varini, a Swiss artist, began creating non-objective artwork both across and inside of three dimensional spaces. Like a standard 2D anamorphic image, the viewer still had to look at Varini’s artwork from a specific vantage point for the image to come together.
Below is a simple artwork based on the art of Varini…
So how does one paint a flat shape, like the squares above, on multiple surfaces/planes at once?
There is more than one solution to the 3D anamorphic problem. Tracing a projection is a great solution. The projection method is the most straight forward approach but does it require a projector which many artists may not have access to. Not to worry. The two squares in the picture above were not made using the aid of a projector. Instead they were made with only . . .
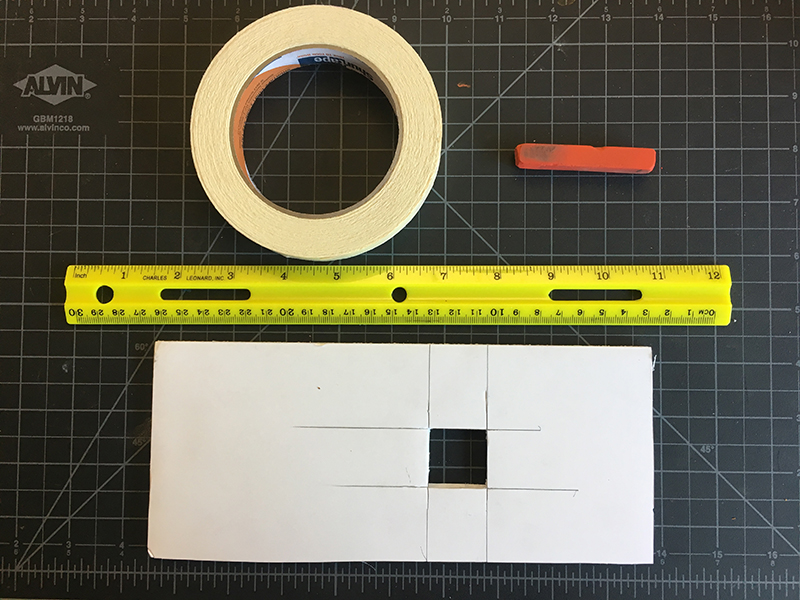
- Making tape
- Acrylic paint and a brush
- A ruler
- A cut-out square hole(optional)
When not using a projector to create a 3D anamorphic painting then trial and error are part of the process. The following procedure is specific to the painted squares seen in the image above.
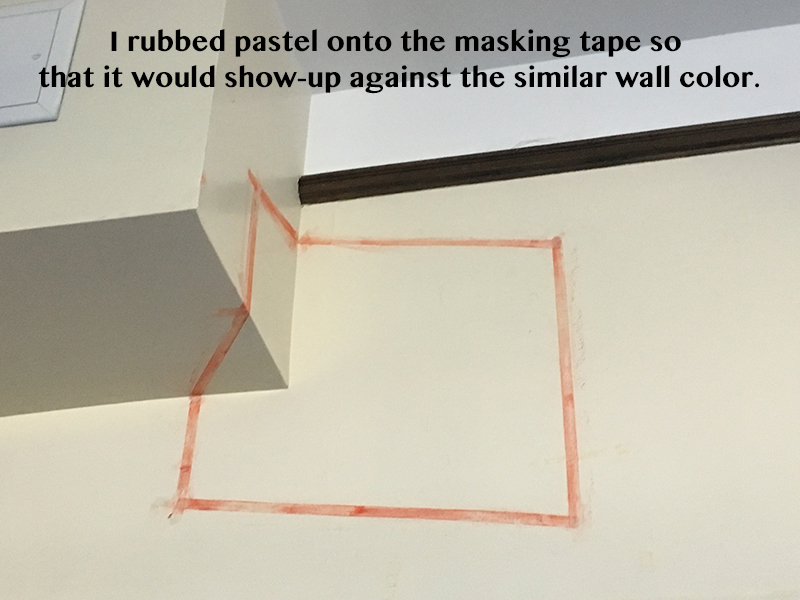
How to Create an Anamorphic Image on a Wall
Step One
The spot at which the anamorphic design must be viewed will be called “X”. To begin, the artist should stand or sit on X. Looking through the square cut-out or at a level ruler. Take a mental note of how it relates to the actual horizontal edges of the room (like where the wall meets the ceiling).
Then, quickly move to the wall and place a strip of tape on the wall at an angle that will look level from X. Now go back to X and check the tape strip against the square cutout or ruler. Does the tape strip appear level? Probably not yet. Adjust the strip as many times as necessary until it does appear level from X.
Step Two
Add the vertical edges and the second horizontal edge of the square with masking tape. Continue to check the tape strips from X, making adjustments a necessary.
Step Three
Simply paint the shape(s) in with a bold color. It doesn’t matter that the color looks lighter on some planes and darker on others. This variance creates a feeling of translucency, adding to the illusion that these shapes are not on the wall but rather floating in front of the wall.
Step Four
Peal the masking tape off of the wall and judge the shape using the ruler. Keeping your head still, move the ruler against each side. If any side is not perfectly straight, then add masking tape where necessary and repaint that edge.
Conclusion
Besides being fun to make, anamorphic art engages its audience. Make your own anamorphic art and watch how people enjoy moving into just the right position to see your creation.
If so, join over 36,000 others that receive our newsletter with new drawing and painting lessons. Plus, check out three of our course videos and ebooks for free.