When drawing mediums are combined, the artist can take advantage of the positive characteristics of the media used and make up for the weaknesses that may exist. As most of us know from experience, some combinations of media work well together while others simply do not.
Markers and colored pencils work well together. However, the order in which the material is applied is important. Colored pencil applications should be layered over the top of marker applications.

Markers cover large areas of the surface in a short period of time but don't produce sharp details. Gradations of value and color can be tricky to develop with markers as well. Colored pencils - while not capable of covering large areas quickly - produce sharp details, bold contrast, and gradations of color and value.
Recommended Materials for This Tutorial
(Some of the following links are affiliate links which means we earn a small commission if you purchase at no additional cost to you.)
Paper specially designed for marker applications is used in this lesson, however any surface that accepts marker and colored pencil applications can be used. Marker paper provides a supper smooth surface for applying media which produces cleaner edges and makes it a bit easier to develop gradations of value with the colored pencils.
Prismacolor Premier markers are used for the base applications, although any alcohol-based markers will suffice.
Wax-based colored pencils are used, but oil-based pencils will produce similar results.
While our goal is to produce a realistic drawing, we don't want to replicate a photo exactly. Instead, we should strive to create a piece of art that communicates the subject, but does so in a manner that adds to subject in some way. One way we can accomplish this is to exaggerate colors slightly to "pull out" a specified color scheme.
In this particular example, there are a number of reds, yellows, and blues that can be exaggerated. Because these colors already exist on the subject, we can strengthen them as we develop the drawing leading to a primary color scheme.
Before any marker or colored pencil applications are applied, a light sketch is drawn on the marker paper with a graphite pencil. Only the contours or outlines of the subject are drawn. Pressure placed on the graphite pencil is light, preventing indentations on the surface.
Large shapes of color are isolated and added with markers. (It is best to start with a lighter color or value since values can be darkened easily with additional applications.) Details are omitted at this point. Spanish Orange, 20% Cool Gray, and Dark Brown are applied for these larger shapes.
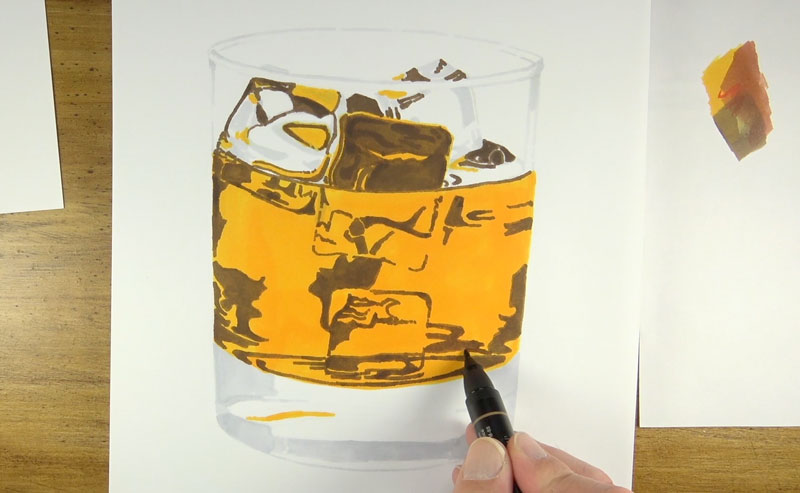
With large shapes of color in place, we can begin darkening values - increasing the contrast. 50% Cool Gray is added around the glass and within the ice cubes. Sienna Brown is also applied over the cola, leaving a few bits of the Spanish Orange to show through. 70% Cool Gray is added next, increasing the contrast of value even further. Light Tan is also applied in selected areas to darken values slightly in the cola and on the ice cubes.


Once we have a nice base of marker applications on the surface, we can begin applying colored pencils over the top. We'll use the colored pencil applications to refine edges, increase contrast, add details, and intensify colors. Darker values are addressed with Indigo Blue and Dark Umber. Yellows are strengthened with an application of Spanish Orange and various grays are applied. Highlights are added with the colors Sand and White. To ease transitions, colors are burnished with a colorless blender.
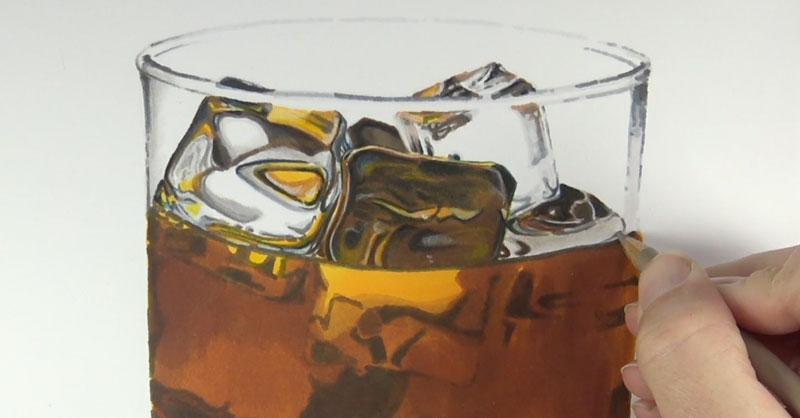
Colored pencil applications continue in the "cola" section of the glass. Less of the Indigo Blue is used here as the darker values are dominated by the Dark Umber. Gradations of value are developed with Dark Umber and Burnt Ochre. Spanish Orange is echoed here while reds are added with the addition of Crimson Lake. Colors are burnished here as well with a colorless blender before adding highlights with White.

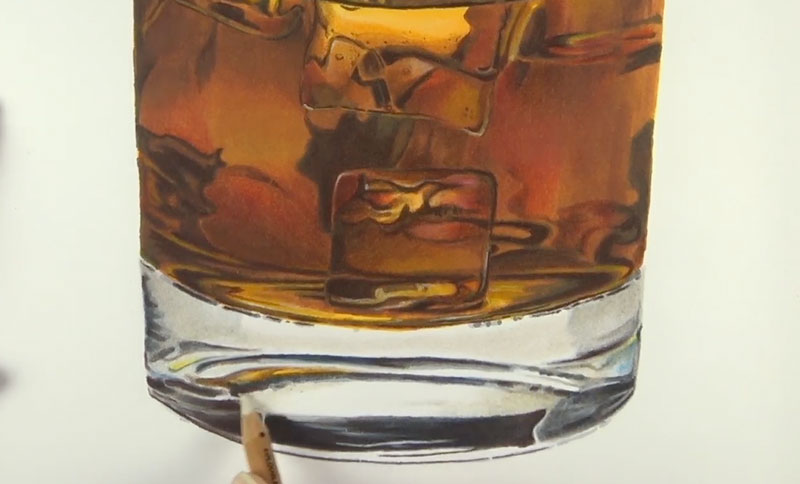
Blues are pulled out in the lower portion of the glass with light applications of Indigo Blue. Various grays are applied over the top. Darker sections are strengthened with a combination of Indigo Blue and Dark Umber. A bit of 50% French Gray is applied over the middle portion of this section. Here again, these applications are burnished with a colorless blender before highlights are added with White.
Darker values on the upper portion of the glass are strengthened with Indigo Blue and Dark Umber. A bit of 50% French Gray is used on either side of the glass and burnished with the colorless blender.
Underneath the glass, 70% Cool Gray is gently applied to create the illusion of shadow and slight reflection. This application is then burnished with the colorless blender to smooth the texture.
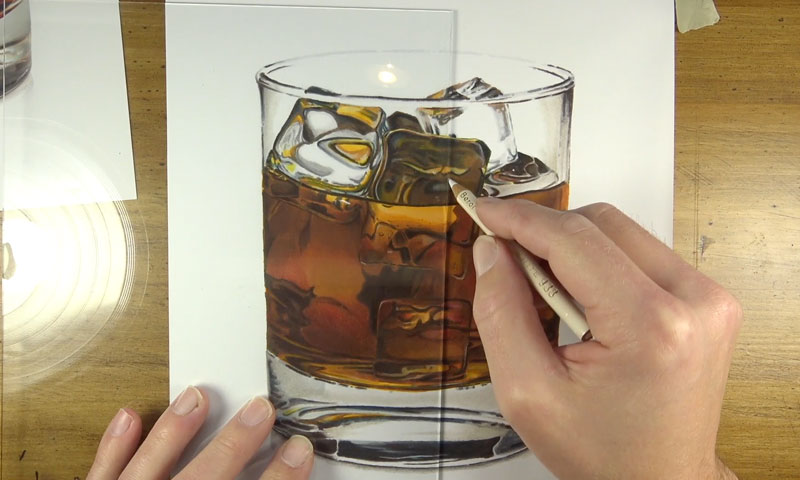
To create the reflections on the side of the glass, a plane of glass is laid over the drawing and used as a "straight edge" to guide a mark with a white pencil. A gradation of color is added from the edge, resulting in the illusion of reflection.
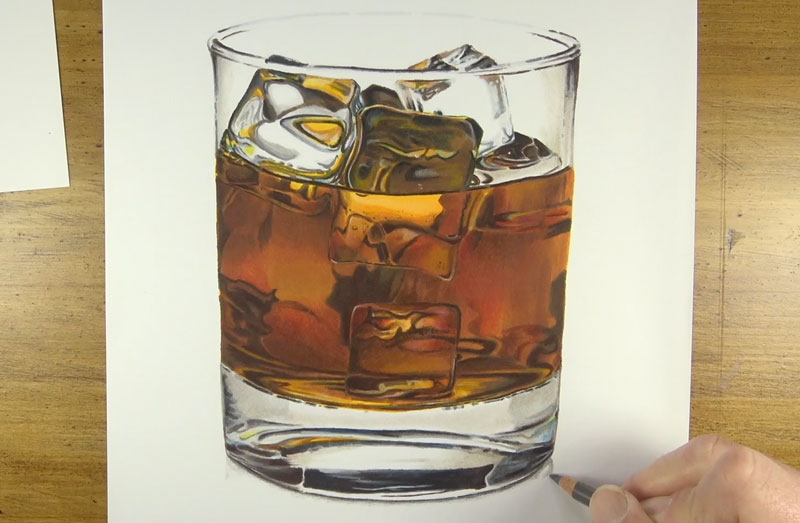
A few additional reflections are added with white to complete the drawing.
Combining markers and colored pencils in a drawing can produce impressive results. Keep order in mind. Marker applications should be applied first before defining details and increasing contrast with colored pencils. And like with all drawing and painting media, be patient. This process takes time and attention to detail.