by Matt Fussell
Some mediums and combination of media lend themselves to certain subject matter. Colored pencils are suited for precision while markers are great for covering larger areas in a short period of time. When these two mediums are combined, we can take advantage of each of the medium's strengths to make up for their weaknesses.
Far too many artists and students limit their media. I have heard many students (and artists) proudly proclaim that they only create in "this or that" medium. Many times, they limit themselves to only one medium and often, one subject.
"I am an oil painter" or "I only draw with pencil". I've heard so many variations over the years. Each time, it's simply some form of limitation. With such a vast world of drawing and painting media available to artists, we should not be limiting what we can create and how we can create it.
Instead, we should choose a medium (or a combination of media) that will produce the best results for our subject. We should be brave enough to work in any medium and if that medium is unfamiliar, we should take the time to learn how to use it. The basic principles of drawing and painting do not change from medium to medium after all.
(Some of the following links are affiliate links which means we earn a small commission if you purchase at no additional cost to you.)
Marker paper is specifically designed to accept applications made with a marker and provides a smooth surface on which to work. The paper discourages bleeding of color, which sometimes can occur with markers. The paper also responds well to colored pencil applications, surprisingly accepting multiple layers of colored pencils. Marker paper is suggested, but any drawing paper can be used.
In this lesson, wax-based Prismacolor Premier colored pencils are used, but oil-based pencils will produce similar results.
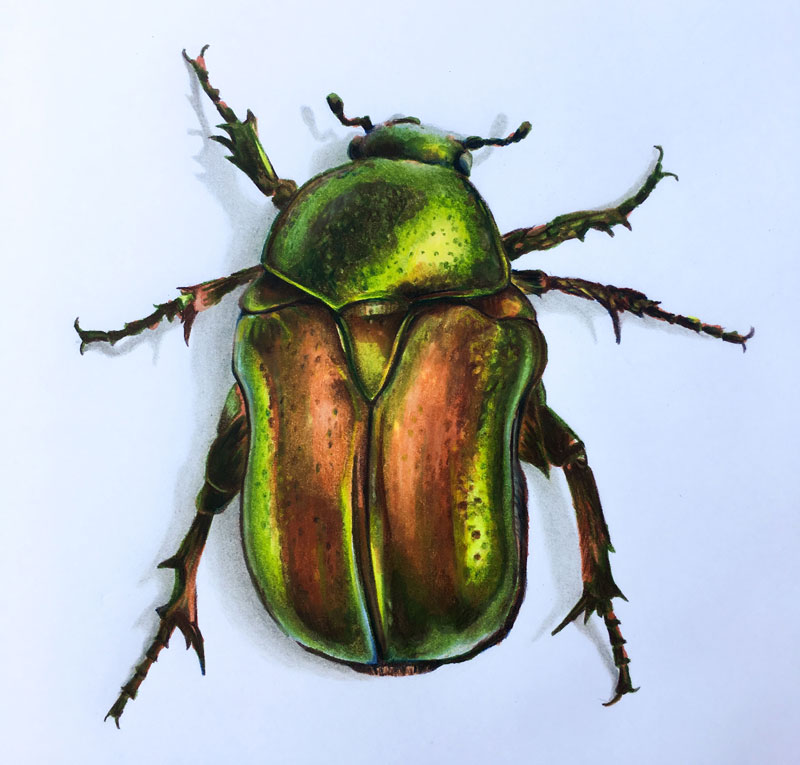
We'll begin by creating a light sketch of the contours (or outlines) of the beetle on the marker paper. An H graphite pencil is used for the initial sketch. Light pressure is used as to ensure that no grooves or indentations are created on the paper.
With a sketch in place, we can begin the process of laying down sections of color with the markers. We are thinking broadly at this point, without much concern for details. The details of the beetle will be developed later in the drawing process with colored pencil applications.
Large sections are covered with various colors. Chartreuse and Limepeel are used for the largest areas of middle value, while Dark Olive Green is used for the darker tones. Around the outer edge of the lower body and portions of the head, Light Cerulean Blue is applied.
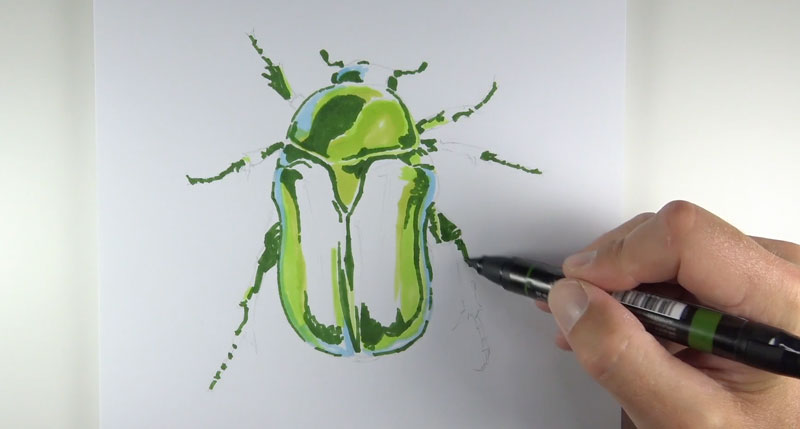
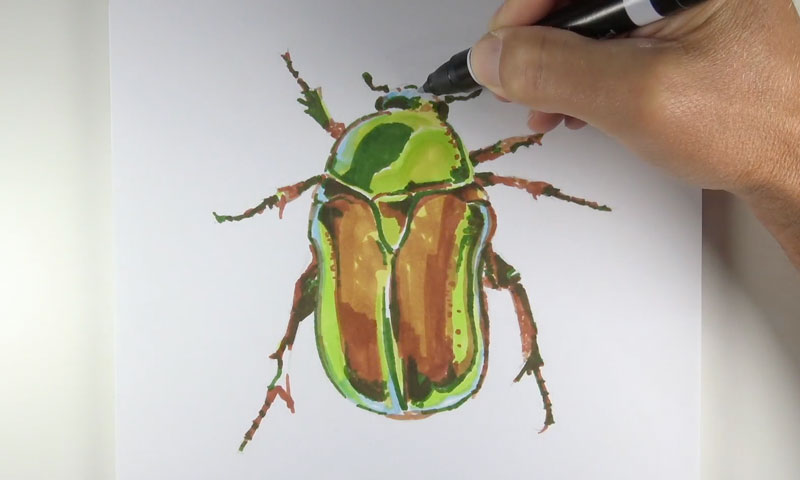
We'll continue layering marker applications with a bit of Sienna Brown and Light Tan on the back of the bug and legs. These colors are dispersed throughout the subject in order to ensure a bit of harmony in the work. Small dots of the color are used on the back to lay the groundwork for the illusion of texture. Over the top, a bit of Deco Yellow is applied over much of the remaining "open" spaces.
Now it's time to start the process of refining the details with colored pencil applications. The colored pencil applications that follow also add depth and saturation to the color.
The darkest areas are addressed with an initial application of Dark Umber, making small circular strokes in order to convey the texture. Over the top, Dark Green is applied.
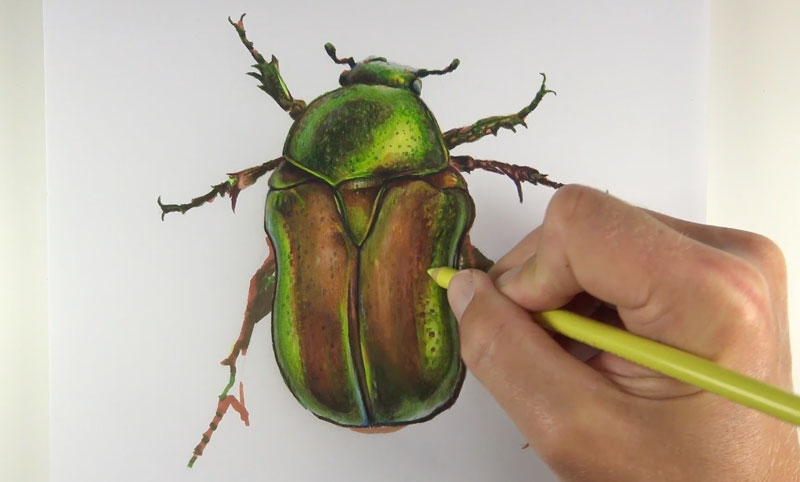
For the lighter areas, Chartreuse is applied. After working the transition of color and value, Dark Green is used to add a few textural marks over the Chartreuse.
A bit of Jade Green is used to accentuate the reflected highlight on the left side of the body of the beetle.
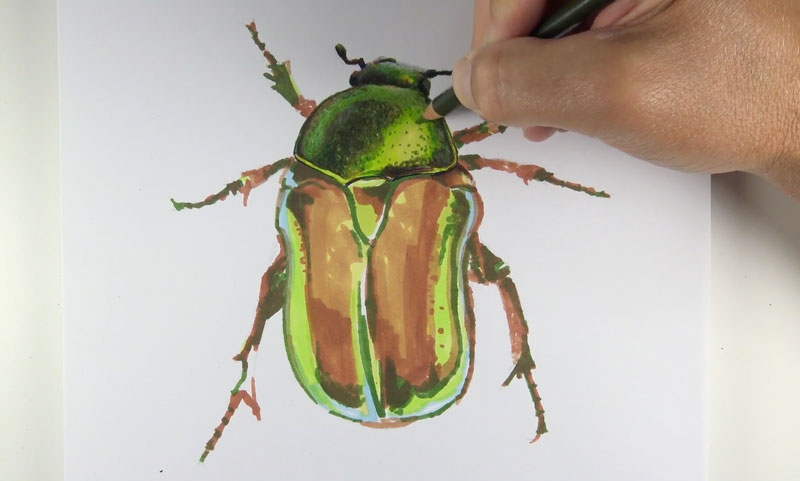
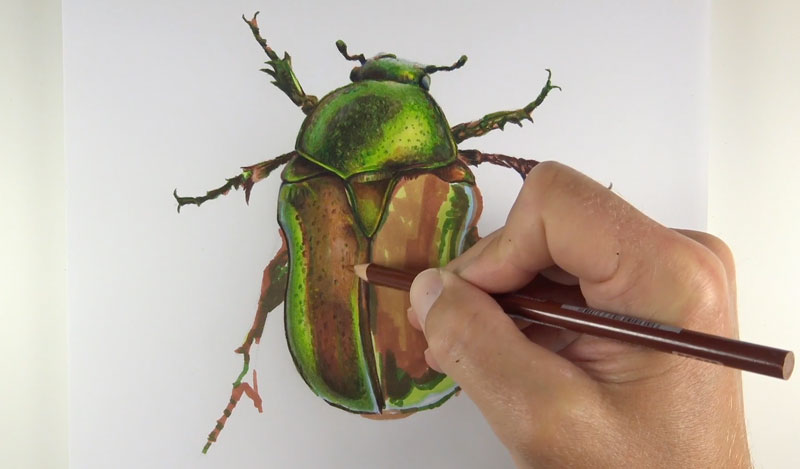
The legs and the middle section of the beetle are addressed with the same colors along with the addition of Burnt Ochre. To create a dark edge around each section, a combination of Dark Umber and Indigo blue is used.

Working our way downward, the lower sections of the body are next addressed. Lighter applications of Dark Green are applied first. Jade Green is used around the outer edge for the cooler highlight that exists here. Burnt Ochre and Chartreuse are also layered to partially cover the marker applications underneath. To darken values in areas, Dark Umber is applied.
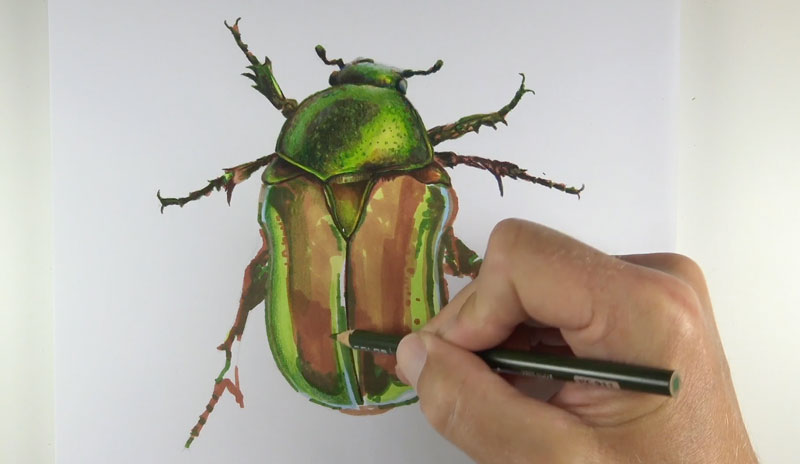
To help ease transitions of color and value, a colorless blender is applied to this section. A bit of Cream is used to lighten values.
Over the top, the texture is defined with small circular strokes made with Dark Umber, Indigo Blue, and Dark Green. To strengthen the relationship between the reds and greens, we'll apply a bit of Sienna Brown.
Darker edges around this section are again addressed with a combination of Dark Umber and Indigo Blue.
This process is repeated on the right side of the back of the bug using the same colors.
The bottom portion of the beetle is finished off with a combination of Indigo Blue and Dark Umber. The remaining legs receive applications of Dark Green, Burnt Ochre, and Indigo Blue. Some bits of the marker applications underneath are allowed to show through in areas.
To add a bit of depth to the drawing, a cast shadow is drawn underneath the body. Since the light source originates from the upper right, most of this shadow is found underneath and behind the beetle on the left side. 50% Cool Grey is used to defined the shape of the shadow before the application is burnished with a colorless blender.

The color of the shadow underneath is intensified with an additional application of 50% Cool Grey. The value of the shadow should be darkest right underneath the body and locations where the legs make contact with the surface.
By combining marker and colored pencil applications, we can produce added depth in the color through layering. We can cover larger areas in a shorter period of time thanks to the markers, but refine details because of the colored pencils.