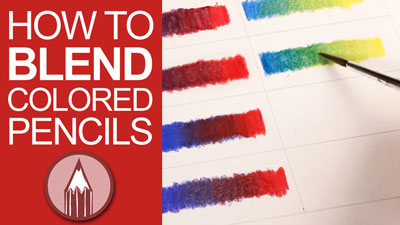
For example, watercolor can be fluid and vividly spontaneous. An ink pen gives a sense of control, allowing to add the necessary details. Together, they make a powerful combination. It’s possible to ‘mix’ graphite or colored pencils, markers, pastel, gouache or even apply digital tools to get a unique result.
By the way, there is a great course on combining ink with watercolor here on The Virtual Instructor: Line and Wash
What is especially great for beginners, the first modules of this course show the ink and watercolor techniques separately. There is also a demonstration of different approaches to combining and balancing both media. If you’re interested in this topic, I definitely recommend checking out this course.
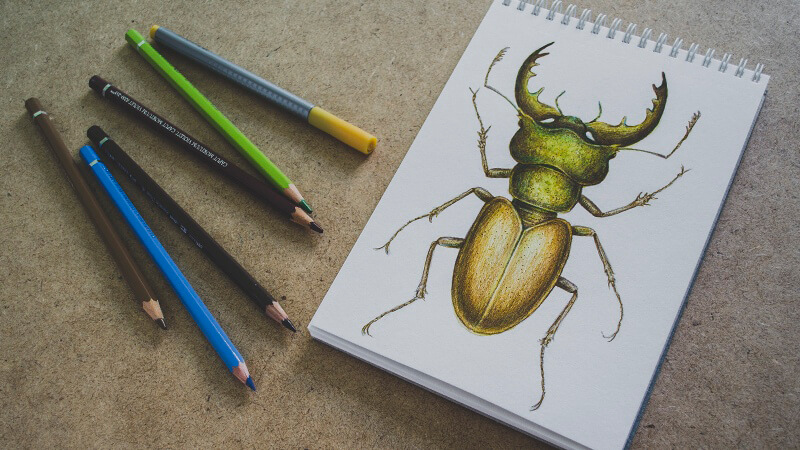
In today’s project, we’ll create a mixed media drawing of a beetle. Lately, I became greatly inspired by stag beetles, which are also called pinching bugs. The males of these insects have large and distinctive mandibles that resemble the antlers of stags.
Stag beetles are a group of about 1,200 species. In some of them, the whimsically branched and toothed mandibles may be as long as the insect itself. Most stag beetles are black or brown, but there are also examples of brightly colored species, like green or red with metallic shine.
It’s a great idea to do your own research before starting a drawing, especially if you don’t have a clue what these beetles look like. One of the options is looking at the images on any of the popular photography websites.
Of course, if the goal is to create an accurate scientific illustration, having a detailed reference is crucial. However, I’m going to depict rather a general concept of a stag beetle; the main purpose is to observe how specific artistic media work together.
The Art Supplies for This Project
I’ll be using three watercolor colors:
- Burnt Sienna
- Yellow Ochre
- Olive Green
My watercolor paints are “White Nights” by Nevskaya Palitra. This brand is quite popular in the region where I live. However, the brand of watercolors is not that important in our case. We’ll use the paints only as a subsidiary medium. I’d recommend choosing the colors in accordance with the concept of your drawing.
As we’re going to deal with watercolor, it’s necessary to pick up a thicker type of paper that can accept applications of water. I’ll be drawing in a sketchbook of A5 size with 280 gr/m² watercolor paper that has a subtle texture.
Of course, we’ll need some basic supplies like a container for water, a palette, and a brush; I’ll be using the ordinary squirrel brushes of the round type, sizes 5 and 3.
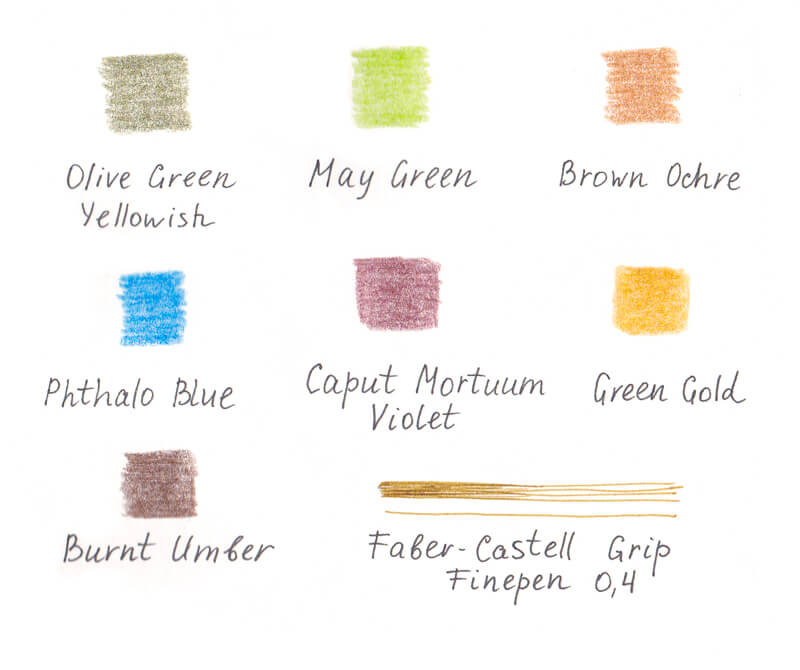
Also, I’ve selected seven watercolor pencils from my Faber-Castell Albrecht Dürer set (the samples of strokes are in the image below). Here is the list of my pencils:
- Olive Green Yellowish
- May Green
- Brown Ochre
- Phthalo Blue
- Caput Mortuum Violet
- Green Gold
- Burnt Umber
Limiting your colors may be useful – in this case, keep the end result in mind and stay focused. Maybe I’ll be adding water to the pencil applications, maybe I won’t – sometimes it is best to make decisions like this along the way.
See also: How to Use Watercolor Pencils – Watercolor Pencil Techniques
If you don’t have watercolor pencils, don’t be upset. Chances are that you have colored pencils instead – then you use them instead. You won’t be able to activate them with water, but sometimes it isn’t that necessary. Moreover, it’s possible to create stunning artworks by combining watercolor paints as an underlayer with colored pencils on top.
In the final part of the process, I’m going to use Faber-Castell Grip Finepen 0.4 in color Brown Ochre to add details and texture. It is a fibre-tip pen with ink based on food dyes (caution, it is not waterproof). You don’t have to use this particular pen to get a nice result. There is a variety of similar pens that create brownish lines; they often are marked with the label “Sepia”.
Also, you’ll need a graphite pencil and an eraser. A kneaded eraser will be a great addition to your supplies set, especially if you tend to leave heavy marks on paper.
Creating a Pencil Underdrawing of the Beetle
Before we dive into the fascinating world of color, we need to get an outline in place. A stag beetle has a relatively complex structure; however, anything complex can be presented as a set of simpler shapes.
The body of the beetle can be divided into several parts: head with the mandibles, thorax (the middle section of the body), and abdomen with the wing cases. Thin antennae and shorter palps grow from the head of the insect. There are also three pairs of long, thin legs.
A rough model of the insect can be presented as in the image below. The legs will be added later. At this stage, I just mark their foundations.
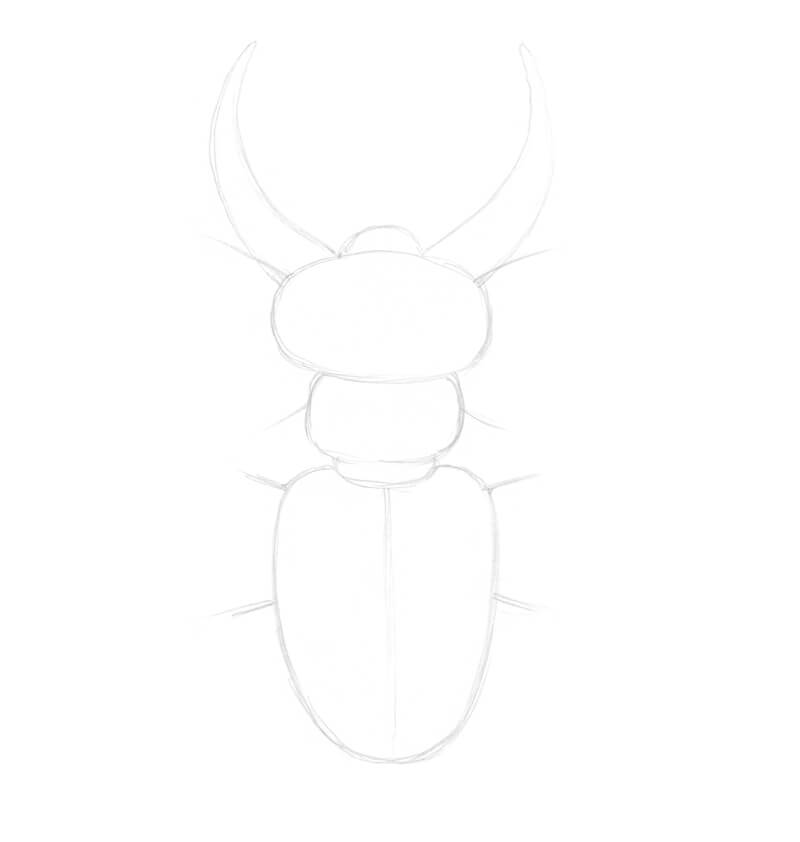
Now I refine the sketch. The lines should be as light as possible. Erase the unnecessary pencil marks as you go.
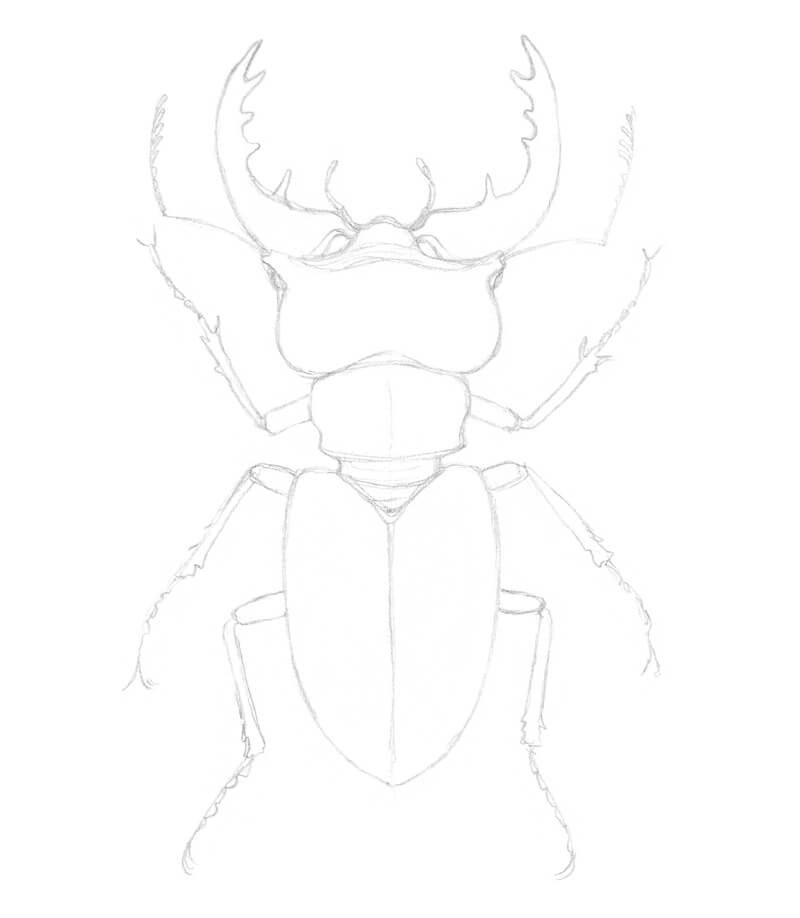
It’s necessary to remember that the mandibles are attached to the head. The eyes are located at the sides of the head.
When it comes to drawing natural creatures, the best option is to rely on your observational skills and do research beforehand. However, as long as the goal doesn’t involve creating an accurate scientific illustration, we can allow some stylization. For example, I simplify the legs quite a bit.
The Watercolor Applications
You may ask, why even bother starting this artwork with watercolor applications? We have watercolor pencils. Their strokes can be transformed into beautiful paint washes – just activate them with water.
Of course, we could get away only with pencils. Even the ochre-colored pen is rather a fine addition than a real necessity.

On the other hand, art and being creative is about the process full of experimentation and exploration, isn’t it? And this is another reason why mixed media projects are so wonderful.
Sometimes we buy a specific item at an art supplies store. We may not know yet how and for what kind of art we’ll use it. Often, we leave this item in our desk for a while. But one day a new idea strikes, and suddenly everything about a new project falls into place! How great it is that we already have this item waiting for us in our desk.
By the way, when I got that ochre-colored pen, I had absolutely no idea how exactly I would use it. I just trusted that secret impulse that told me to buy it. But look, we got distracted from the main point here.
A practical reason to use watercolor washes as an underlayer is that paints can create a light, soft, and relatively even covering on the paper. I find it more difficult to achieve this effect with watercolor pencils, although their behavior, once activated, is similar to that of watercolor.
This light covering allows starting from a subtle tint, which saves a lot of time in further stages of the process. If you have any experience with colored pencils, you know how much effort is required to get rid of small specks of white paper showing through the colorful applications. A prior watercolor layer can be the solution.
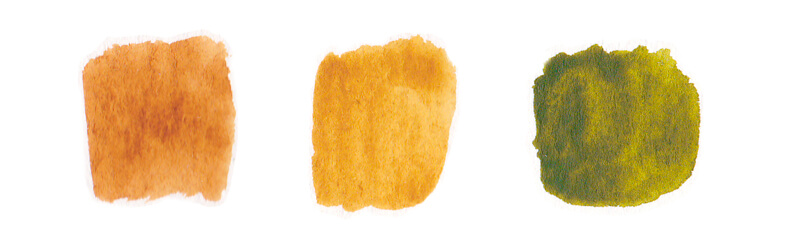
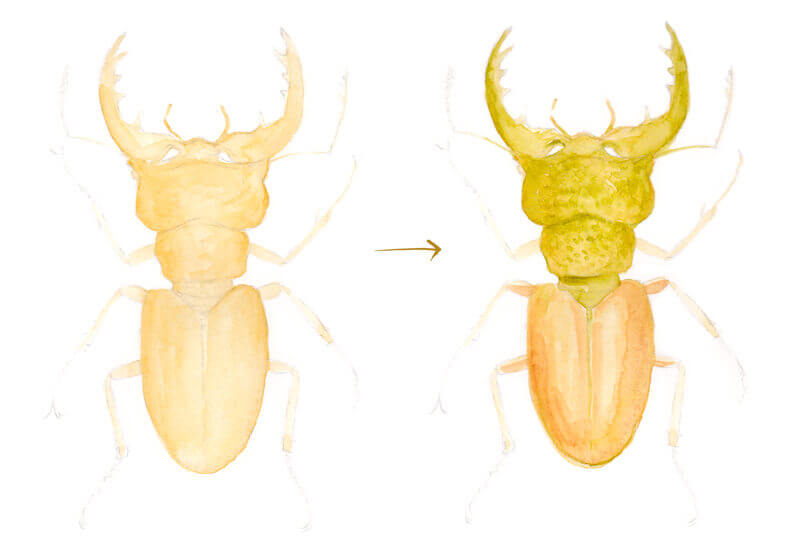
Before adding any paint, I soften the graphite marks with the kneaded eraser. Then, I start with Yellow Ochre, applying the diluted paint with my larger brush (the image on the left side below). This layer of paint should be pale.
When the wash is dry, I carefully add Olive Green, mostly to the upper part of the beetle’s body. I also include some applications of Burnt Sienna, this time – in the abdomen section. This step is presented on the right side of the image below.
If I need more control over my paint strokes, I use the smaller brush. Avoid rubbing the paper with a brush too intensely, it can damage the tooth of the paper.
Obviously, the artwork doesn’t look fantastic, but it’s a perfect underlayer for further applications.
I leave the thin parts like the legs or antennae almost untouched – we can elaborate on them later, with pencils. Don’t worry if the paint goes slightly beyond the contours, it may create a more spontaneous look.
As soon as watercolor layers dry completely, we can proceed to the next part of the process.
Drawing the Beetle with Watercolor Pencils
One of the reasons why I admire watercolor pencils so much is the flexibility of this medium – it provides options. Sometimes I wash the colorful applications to achieve a painterly look, sometimes just leave them as they are, creating a more graphic feel.
Please note that you absolutely can follow along with colored pencils instead of watercolor ones.
I start with Olive Green Yellowish, applying strokes with soft circular motions at medium pressure on the pencil.
The texture of the paper will interact with the colorful layers. Right now, the surface feels rough and grainy, but soon it’ll become smoother, more accurate.
The abdomen will be brownish, so I avoid making it too green at this stage. A subtle inclusion is enough.
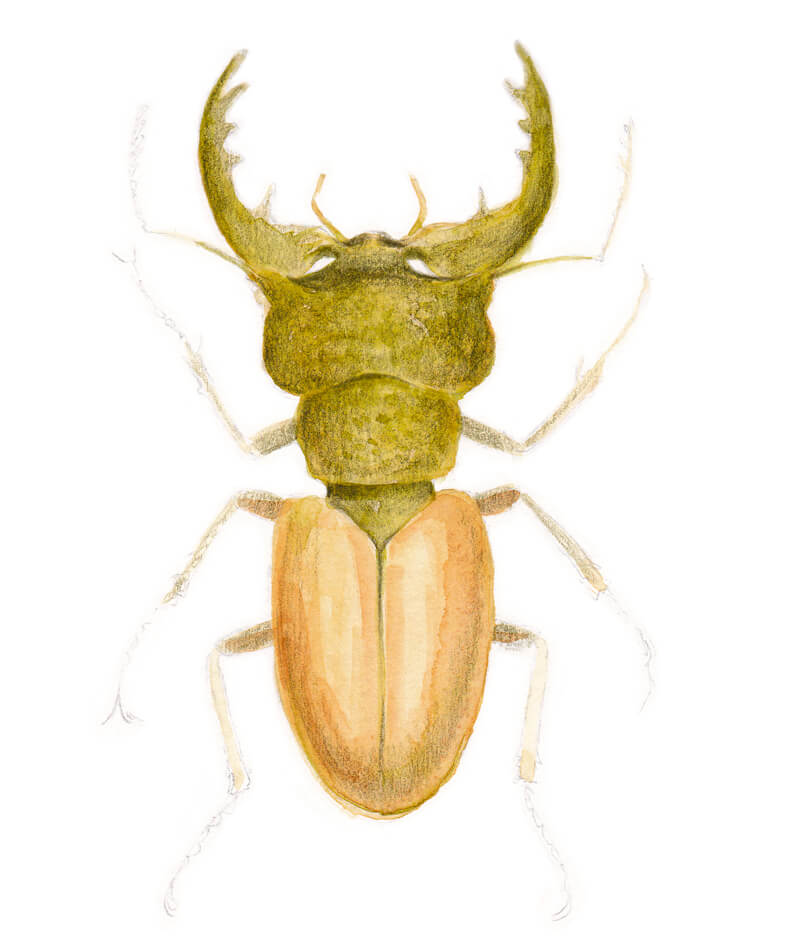
I use May Green to add some vivid nuances to the upper half of the body. Applied to an already tinted base, this relatively bright color seems rather restrained.
Also, I work on the abdomen area with the Brown Ochre. The upper parts of the wing cases remain lighter, creating an illusion of highlight. I add this shade to the head and legs, too – it will balance the artwork.
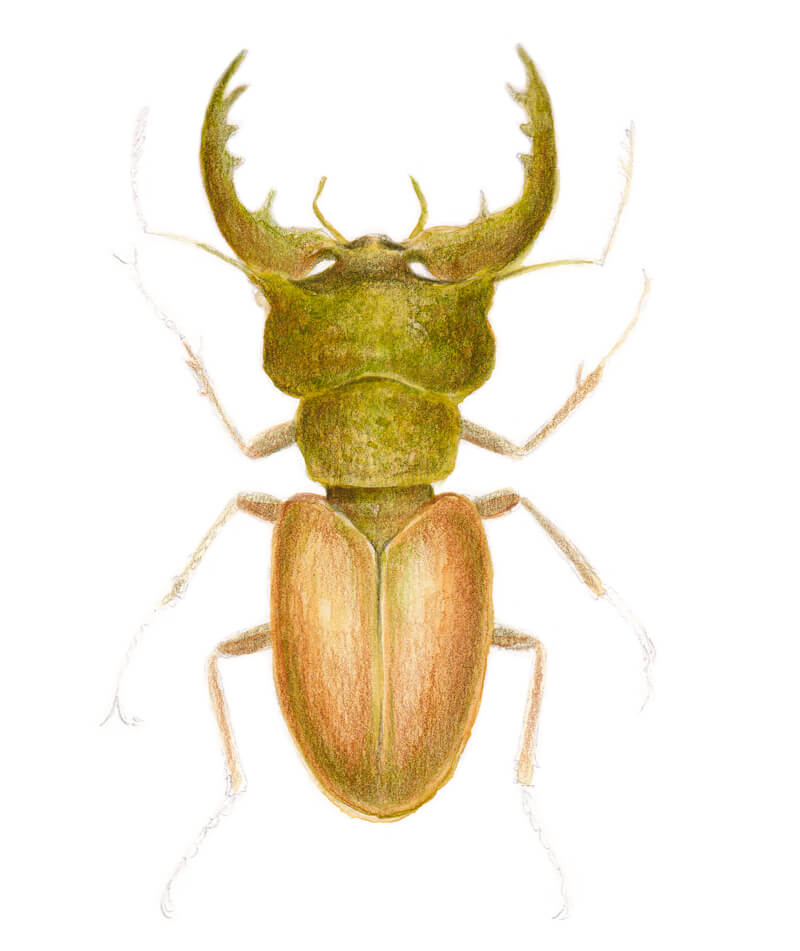
I think that a moderate addition of Phthalo Blue will create an interesting contrast, accenting the main colors of the beetle. I apply this vibrant blueish hue here and there, almost randomly. The upper part and sides of the head may get more of it. This is done to mark the core shadows and strengthen the illusion of volume.
Adding some Caput Mortuum Violet strokes is another way to make the artwork more dynamic. This hue works great both with the greens and browns. It’s possible to apply it on top of blue strokes, too.
Just look – this pair of colors do make a difference!
See also: Color Theory – The Elements of Art
I pick up a Green Gold pencil. It is applied mostly the abdomen area, creating a pleasant warm result and a denser covering.
I also touch head, thorax, and legs to unite the artwork visually.
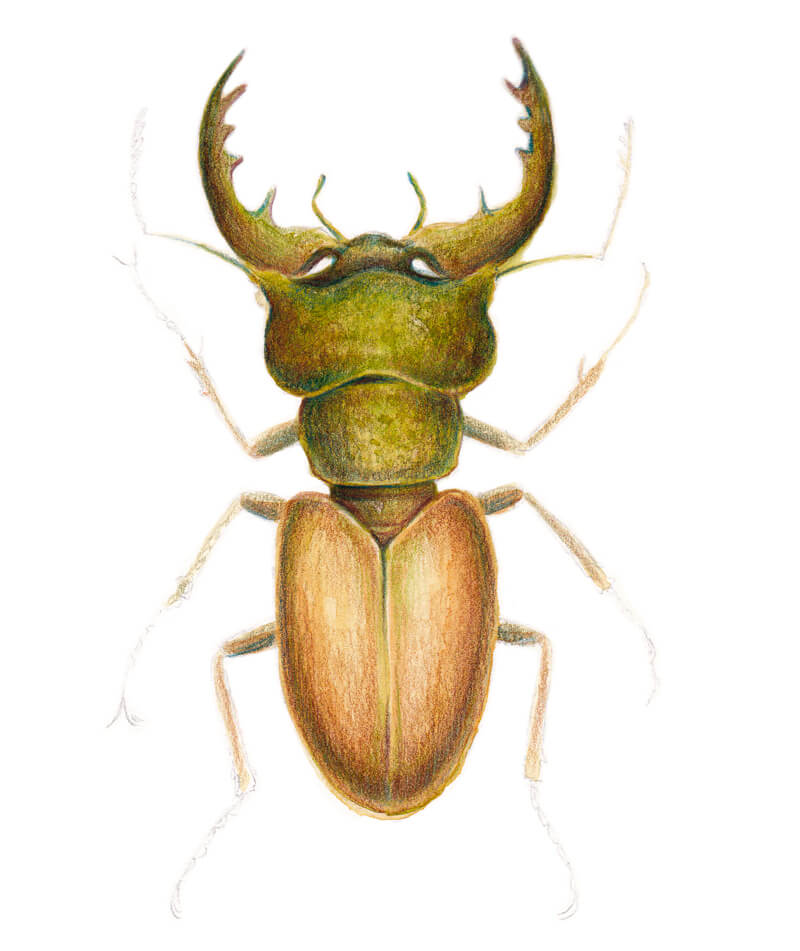
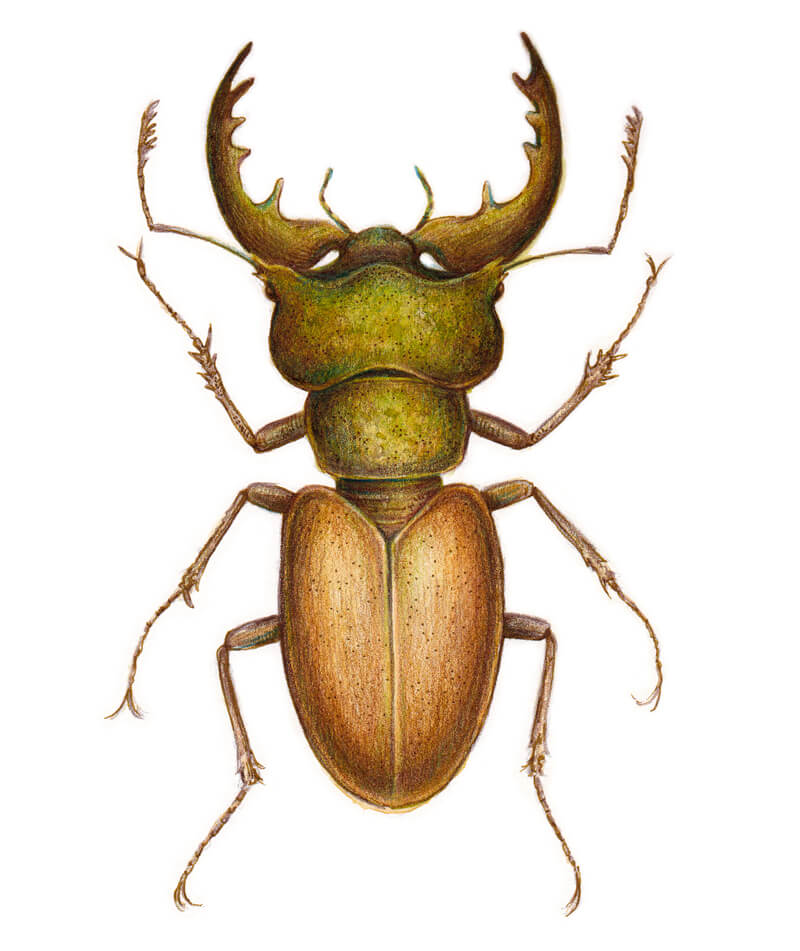
I add Burnt Umber to the core shadows. The upper parts of the mandibles usually are quite dark, so this shade is a perfect fit for accenting them.
Also, I outline the smaller details, like the crisp borders between the body parts, and the legs. The tip of the pencil should be sharp.
It’s a good idea to strengthen the contours of the beetle. But avoid making them monotonous. Vary the line slightly.
All the previous color applications beautifully show through now and the artwork is almost complete.
I deliberately leave the legs, especially their parts on the periphery, relatively light. The goal is to guide the viewer’s eye to the beetle’s body.

I really admire the result of our work! Although no water was added to our watercolor pencil applications, the artwork has rich colors and liveliness. This is another reason to admire working with quality watercolor pencils!
However, if you’re curious about how your creation may look with water applied, I encourage you to try it out. A safe option is to pick up a brush of a small size with a moderate amount of water. The colors may become slightly brighter after you activate them.
Generally, it’s possible to add a new ‘dry’ layer of pencil strokes after the wash is dried.
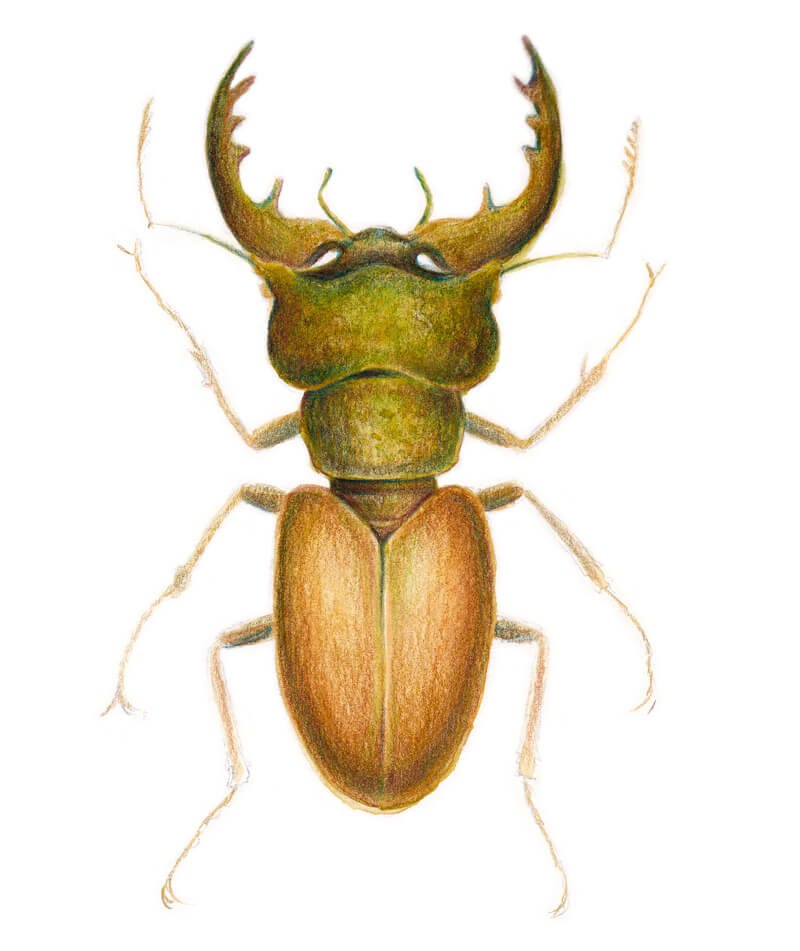
Adding Some Crisp Ink Lines to the Artwork
We have one more tool to try – the pen. I’ve left it for the last step deliberately.
As was mentioned above, ink loaded in Faber-Castell Grip Finepen is not waterproof. It just washes out if water is applied, so there is no sense to use it before you’re completely sure that no dilution or washing remains.
However, there are waterproof pens of various colors. If your pen has waterproof inks, you can easily change the order of actions in your process – drawing the ink outline first, then adding watercolor (or any other water-soluble media).
I add lines with my Brown Ochre finepen, making the contours of the body more accurate and filling in the details, especially those of the legs. Also, I darken the eyes and the upper parts of the mandibles just a bit.
If we compare the color of the pen lines with the existent artwork, we’ll notice how harmoniously they work together, almost blending into each other. The artwork has a soft, pleasant look.
Of course, it’s possible to use an ordinary black ink liner for this type of mixed media art. Black lines just would be much more contrasting, and this would affect the overall feel. Something worth trying!
I create an illusion of the rough texture of the head and thorax, leaving groups of small dots there. The surface of the abdomen (the wings) tends to be smoother, glossier, so that area doesn’t need too many marks.
Including the crisp lines and dots make a subtle change in our sketchy artwork, but this change makes it even more interesting. Details matter!
Conclusion
Congratulations – the artwork is complete. Thank you for being with me on this artistic journey!
I hope you liked both the process and the result. Did you enjoy combining various media? Do you have any ideas on how to apply similar principles to your own projects?
I wish you creative flexibility and endless inspiration!
If so, join over 36,000 others that receive our newsletter with new drawing and painting lessons. Plus, check out three of our course videos and ebooks for free.