The formula for a well managed classroom has many variables. A few characteristics common to well managed art rooms are . . .
- A safe environment for learning and creating.
- Established studio procedures.
- Challenges students without discouraging them.
- Clear disciplinary procedures and expectations.
One way to ensure that these characteristics describe your classroom is to plan around S.O.S. – Safe, Orderly, and Specific. Use S.O.S as a checklist when planning for a project, for a unit, and even for an entire year. Unlike the Morse Code distress signal, this SOS won’t leave you feeling stranded.
Safety in the Art Classroom
The art classroom is one of the more dangerous classrooms in any school building. Solvents, cutting tools, and kilns are the stuff dreams are made of but can quickly turn a student’s dream into your nightmare if used improperly. What can a teacher do to decrease the likelihood of an accident?
Be conscientious and aware!
Most accidents are avoided by simply slowing down. In the fast paced course of the school day, things can get messy. Work deliberately and slowly enough to avoid creating dangerous situations. Simple things like keeping the kiln area clear or locking the paper cutter blade down make all the difference.
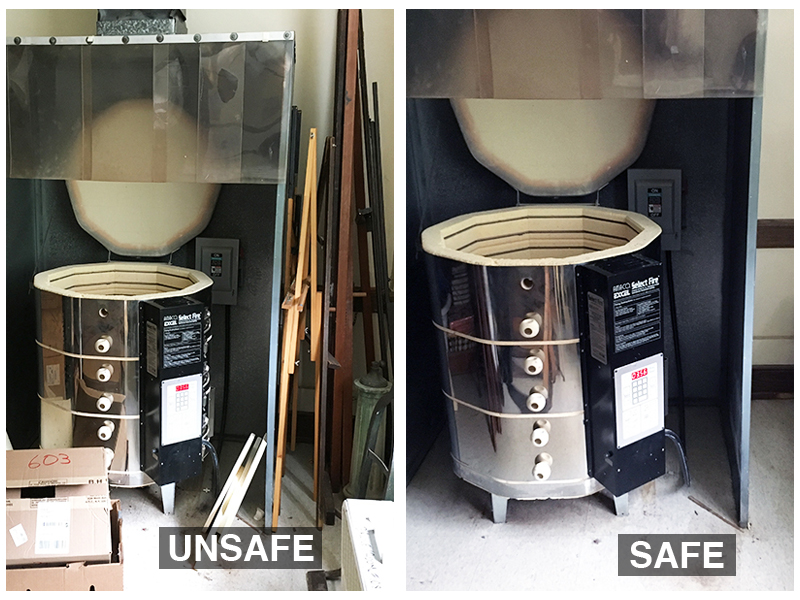
Take a look at the kiln area below. The first image is cluttered and filled with flammable objects right next to the kiln. This is an accident waiting to happen! Be sure your kiln room is free of clutter and fire hazards.
As an art teacher, you should always be one step ahead of any accidents. This means that you must foresee any potential accidents before they happen and take steps to ensure that they don’t.
Prepare for an emergency
Show students where the fire extinguisher is located. Have bandages and alcohol wipes on hand for minor cuts. Post important school phone numbers (school nurse, the main office, etc.) by the classroom phone. An emergency could involve the teacher, in which case a student may need to call for help.
Consider Safe Use of Tools and Equipment as Part of the Student’s Grade.
Most students are conscientious of their grade. Use this motivation to ensure safety by including safety procedures as part of their grade.
Many sculpture and printmaking tools are sharp. Demonstrating how to properly use saws, hobby knives, and carving tools is not enough. Give students a chance to demonstrate their understanding one at a time to ensure they proceed safely. This gives you the confidence that they are using the tools correctly. The time it takes to check each student is worth the peace of mind that no student will hurt themselves.
Keep the Art Classroom Orderly
An orderly and neatly organized classroom is essential. This organization not only applies to the materials the students are to use but also to the instruction that is delivered.
Supplies
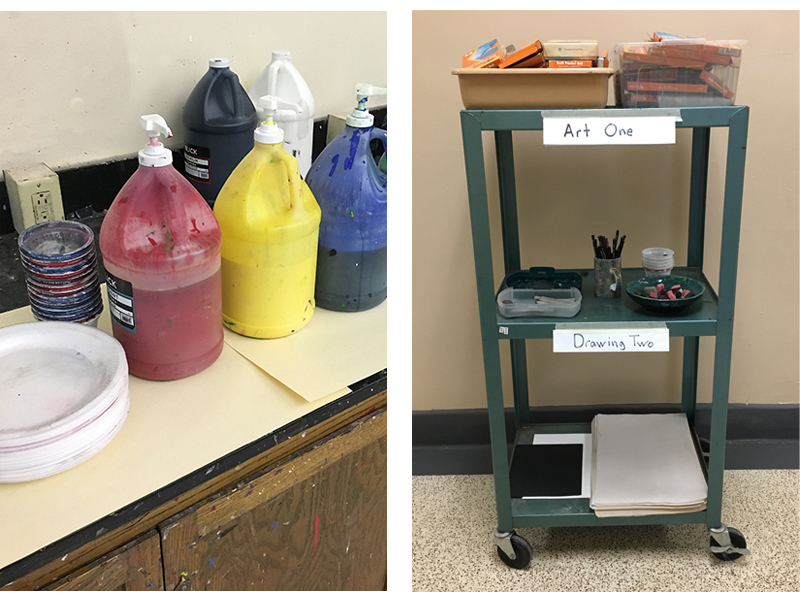
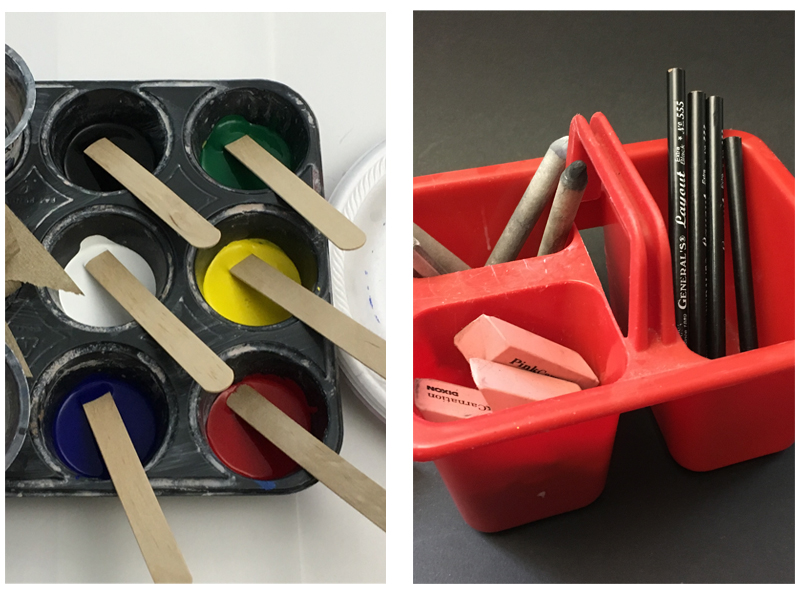
You can’t fly a plane while building it and you can’t teach students while you’re cutting paper, looking for erasers or any other task that should be done before instructional time begins. In upper level classes, a teacher can train students to retrieve and return supplies where they belong. The images below show art supplies grouped by class.
For younger children and lower level classes, all materials and tools should be available at each table. This will guarantee that students use the correct supplies and reduce the congestion in the classroom by keeping students in their seats. Containers with multiple sections are ideal for organizing supplies on each art table in a classroom. Collect as many containers as possible. Ask for containers from colleagues/faculty.
Organized Art Instruction
It goes without saying that lessons should be planned and the teacher should be fully prepared to deliver instruction. Making lesson plans isn’t always fun, but it’s essential. When presenting a lesson for the first time, make sure you have written down everything you want to communicate – perhaps even rehearse your delivery. Be sure to plan every minute of instruction – you cannot over plan.
Try to foresee any questions a student may have and include this in your presentation. Take note of questions that are asked when you deliver the lesson the first time. This way, you can refine your lessons so that they improve each time you present.
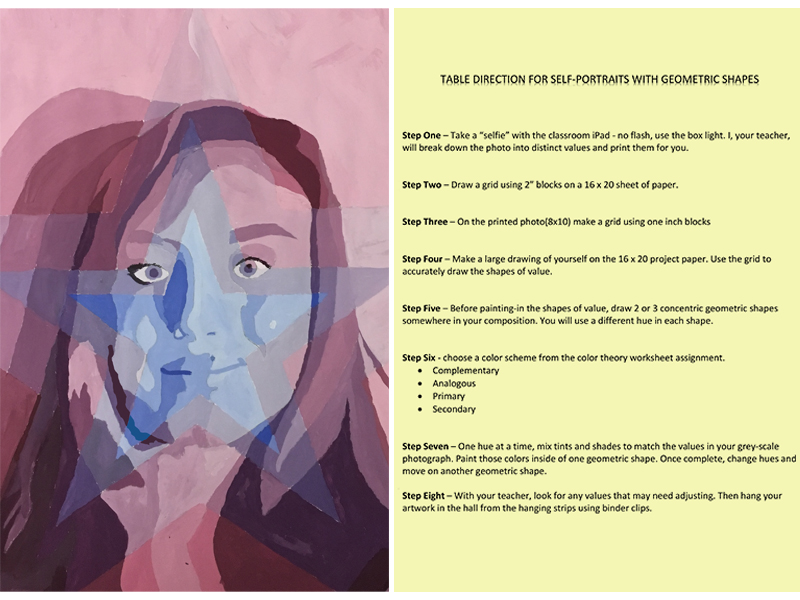
Be sure to include exemplary examples of the finished product. Three examples are optimal, while five or more is perhaps overwhelming. You may also include examples of what not to do, so that students are aware of any potential pitfalls.
When presenting a lesson for the first time, you may not have any student examples. This means that you must create one. In fact, every assignment you give students should be completed by you first. This gives you the chance to experience any challenges that a student may face in the process. When you present your lesson, you can address these challenges. The quality of the work your students create will be noticeably stronger.
In a perfect world, all students would listen to their teacher’s directions and then follow those direction without deviation. The world is, however, not perfect. Sometimes students are distracted, absent from school, or simply don’t understand the first time through. A written handout that restates the directions/process as demonstrated by the teacher is a great way to avoid answering the same questions over and over.
Sometimes written directions are enough for a previously absent student to get started until the teacher can carve out a moment for one-on-one instruction. Place written instructions that outline a project’s entire procedure available on each art table. If the classroom is equipped with the technology, cast the directions (along with examples) to a large screen or television.
See also: Art Lesson Plans for Middle and High School Students
Consider A “Bell Ringer”
Without a procedure in place, the first few minutes of an art class can seem like chaos. Some students are finding their project. Some are getting supplies. A few are just staring into blank space. One or two are lost, having just returned from an absence. All of this is happening while the teacher is trying to call roll. These first few minutes set the tone for the entire period, so this initial period is critical. Organization should begin as soon as a student enters your classroom.
One way you can establish an organized and expected procedure is to use a “bell ringer” during those first few critical moments of class. This is a five to ten-minute task that only requires students to come in, sit down and work in their sketchbook according to a prompt. The prompt could ask for a sketch, a design even just a written response to a piece of art.
The bell ringer might lead into a classroom conversation or it can simply help to focus the class. It gives the teacher a chance to address the class as a whole and also take the roll quietly. During this time, the teacher can answer questions that he/she anticipates students will need answered.
Some teachers feel that a daily bell ringer takes too much time. Bell ringers should only be 5 – 10 minute tasks and could be spread out over several days (perhaps sketching a small still life arranged in the room). A short bell ringer will pay dividends in the form of an orderly, well managed transition into art-making.
Part of classroom management is establishing yourself as the leader in the room. Using table-directions and implementing bell ringers show students that you are thinking ahead, prepared, and organized. Students respect the teachers that work hard and care about what they do.
Be Specific with Your Instruction
The curriculum is the same for each student but how it is delivered is at the discretion of the teacher. If the curriculum is delivered through assignments that are too easy or too difficult then students begin to lose interest. As a result, classroom management breaks down. Tasks must be specific according to a student’s skill level, not their grade or course level.

What does this mean and what does it look like?
Medical doctors prescribe medication specific to a patients’ illness. Students should have assignments tailored to their needs as well. In education, this tailoring is now called differentiation. Differentiation means having a few different options available for students within a specified learning goal.
For example, instead of assigning a non-objective, two point perspective drawing, a teacher could just assign a non-objective perspective drawing. The students could work towards completing a set of goals using either one, two, or three point perspective, depending on their experience and skill level. So instead of dictating that the drawing be completed using two point perspective only, the student has the option to use one point, two point, or three point perspective.
Not only does this ensure that most students find success, but it also allows them a bit of creative freedom.
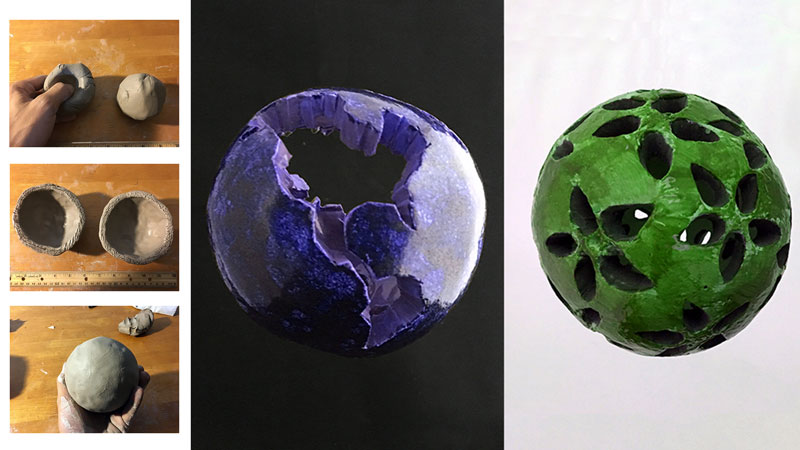
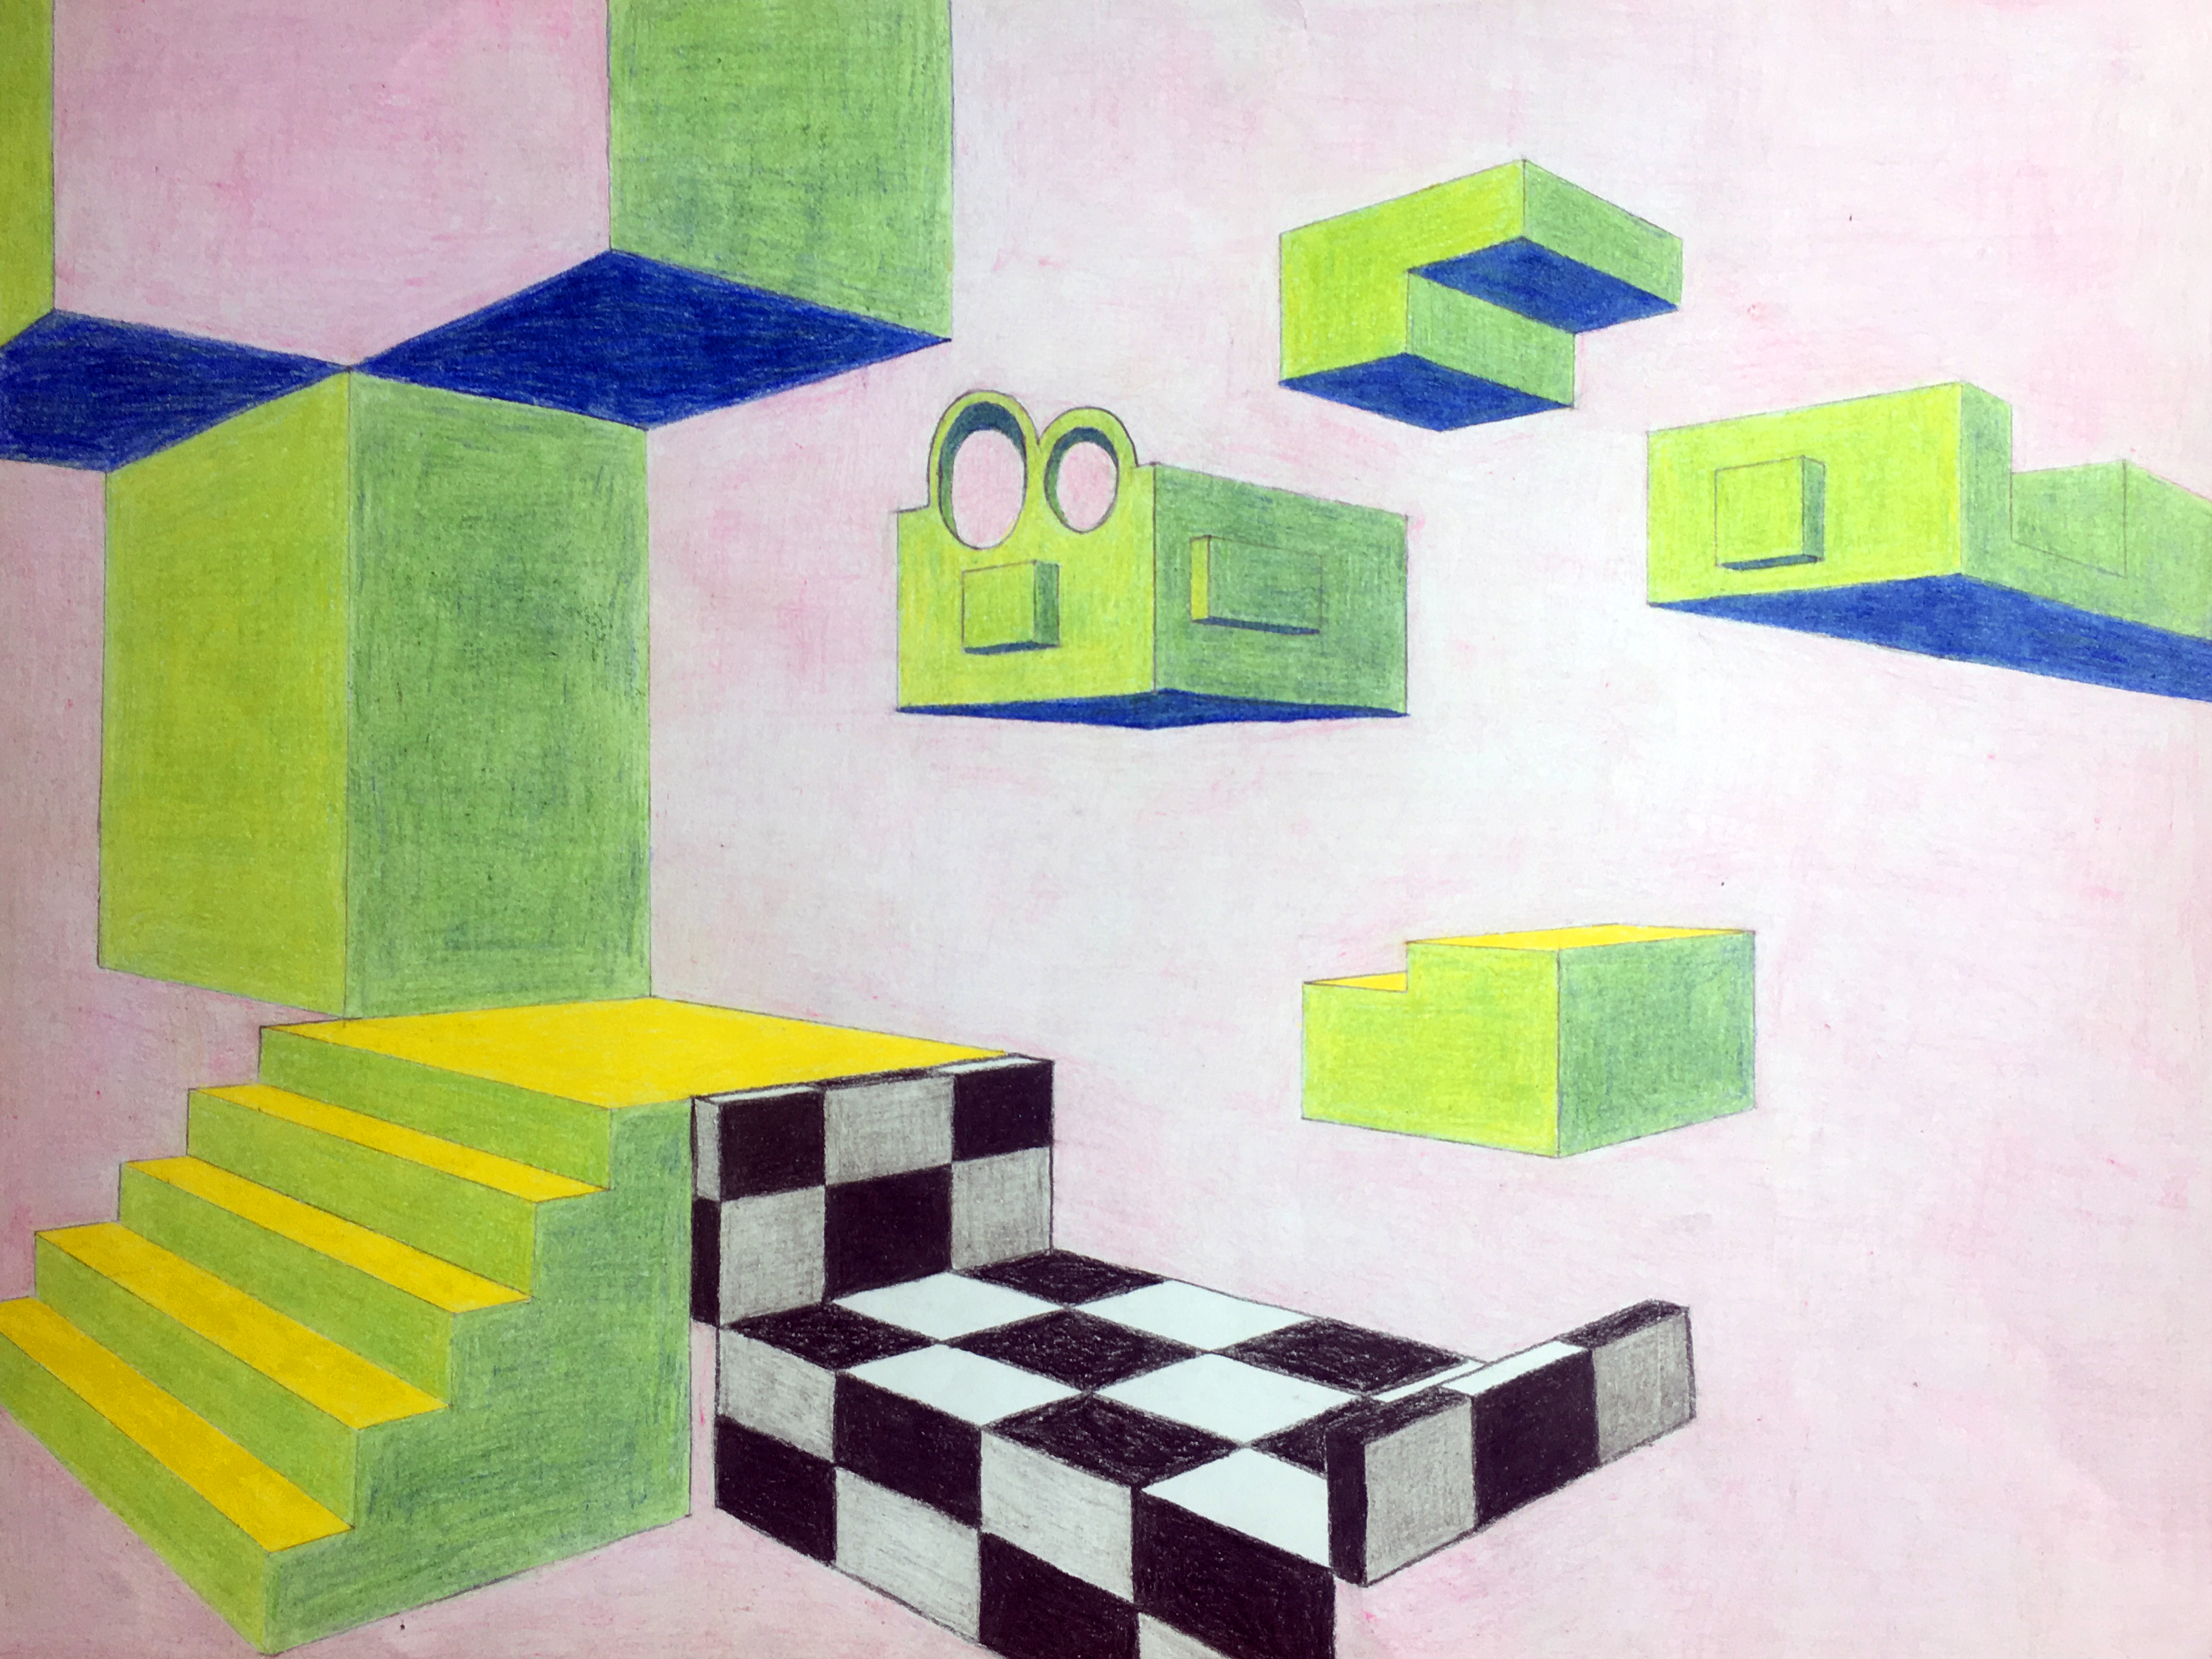
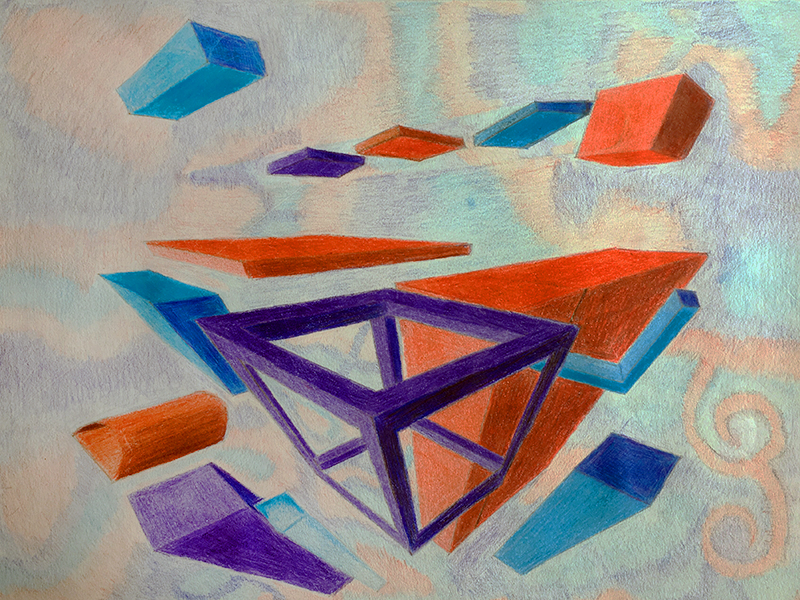
Look at the images below. Both of the images meet a specific set of goals.
These goals and expectations were…
- 30+ individual planes.
- An arch or ellipse.
- A form with negative space.
- The use of linear perspective.
One student chose two point perspective while the other used the more challenging, three point perspective. Both projects were successful.
Successful projects are indicative of a well-managed classroom. Of course, the teacher needs to identify his/her students’ personal skill level before effectively differentiating instruction. Good news! There is a tried and true method for that.
The Pre-Test
A pre-test is a test given prior to instruction. A short pre-test will give the teacher a good idea of the scope of content knowledge and skill level in any particular class of students. The data collected through the pre-test will direct the teacher as to where and how lessons should be differentiated. Meeting the students “where they are at” is better than rigidly delivering a curriculum that is beyond some students’ grasp.
Discipline
Discipline should not be overlooked when discussing the management of an art class. A well-managed class is also a well-behaved class. We’ve all had those students – but even the most unruly student can be tamed when you are clear and consistent with your discipline.
Expectations of classroom behavior should be clearly communicated and posted. Procedures for enforcing your guidelines should be clearly communicated to students as well. For example, if a student breaks the rules, they should know exactly what is to follow.

Clear communication and established behavior expectations make it easier to enforce rules when they are broken. When the rules are broken, you can calmly remind students of the discipline that will follow. This takes any personality conflicts between you and your student out of the equation.
You must be prepared to discipline students when your expectations of behavior are not met. This applies to every student in the classroom – not just the ones that drive you nuts. When a student breaks the rules, the disciplinary action that follows should be swift, consistent, and calmly explained.
Students respect teachers that enforce the rules. And when the rules are followed in your classroom – managing your classroom is vastly easier.

Conclusion
As we’ve discussed, a well-managed art classroom is safe, orderly, well-behaved, and challenges students on their personal level. Proper management results in happy teachers, growing students, and quality artwork. Remember, you are the teacher – the management of your classroom is also a reflection on your effectiveness as a teacher.
If so, join over 36,000 others that receive our newsletter with new drawing and painting lessons. Plus, check out three of our course videos and ebooks for free.