Thankfully, composition is one of those things that we can get right with a little planning and knowledge. It doesn’t require “talent” and it definitely isn’t about “guesswork”. There are a few “rules” we can consider when we plan our works so that we can be successful every time.
What is Composition in Art?
There’s obviously more to creating a successful work of art outside of mark-making and medium mastery. Our composition plays an important role in how our works are viewed and experienced by our audience.
But before we define composition in terms of art, let’s look at a related subject.
If you’re a musician, then you know that musical works can also be referred to as “compositions”. There is a structure to a song. Each musician plays “their part”. If a musician plays at the wrong time or plays the wrong notes, then the song becomes a mess. Each part is carefully crafted so that the song is the best that it can be. In some songs, the guitar may have more parts and dominate the song. In others, it may be the piano.
We can compare this musical analogy to art-making. Just like a song, each work of art that we create has a structure (or should have a structure). As artists, we plan this structure and execute it as we create the art.
If we don’t carefully plan the elements that we include, our art can become a real mess.
So when it comes to art, composition is the arrangement of elements within the pictorial space (or three-dimensional space with a sculpture). The positioning and arrangement of elements within a work affect how a viewer interacts with what we create.
Just like with a song, the possibilities are endless. We have total creative freedom regarding how we arrange the elements within our works. But even though the possibilities are endless, it doesn’t mean that we can approach composition with a haphazard approach without planning. We must craft our compositions, just as a skilled composer would.
In some works, a specific element may dominate. In others, a different element may dominate. However, we should always make sure that we don’t have too many elements competing for attention. In a song, we wouldn’t expect to have a guitar solo, a piano solo, and a drum solo all taking place at the same time. In a work of art, we also wouldn’t expect to have all of the elements we include competing for attention.
Instead, we should focus the attention of our viewer on one or two elements within the scene. These elements become the focal point(s). All of the other elements within the work then become the supporting cast members.
Creating Focal Points
A focal point is the area or areas within a scene that command the visual attention of the viewer. In most cases, focal points include the main subject. Every work of art should have at least one focal point.
Focal points should be limited. In many cases, only one focal point is required. You can have more than one focal point, but any number beyond three will be difficult to pull off. If your work has more than one focal point, then there should be one that dominates the others. In other words, there should be one main focal point and perhaps a supporting or secondary focal point.
Focal points can be created in a work using a variety of techniques. These techniques include…
- Contrast
- Isolation
- Placement
- Convergence
- The Unusal
Although we’ll briefly cover each of these techniques here, we cover them in more depth in these lessons…
Now, let’s briefly look at each technique for creating a focal point.
Contrast
Contrast deals with difference. This could be difference in value, color, texture, size, etc. When we include an area of strong contrast, it pulls the viewer’s eye to that location in the work and creates a focal point.
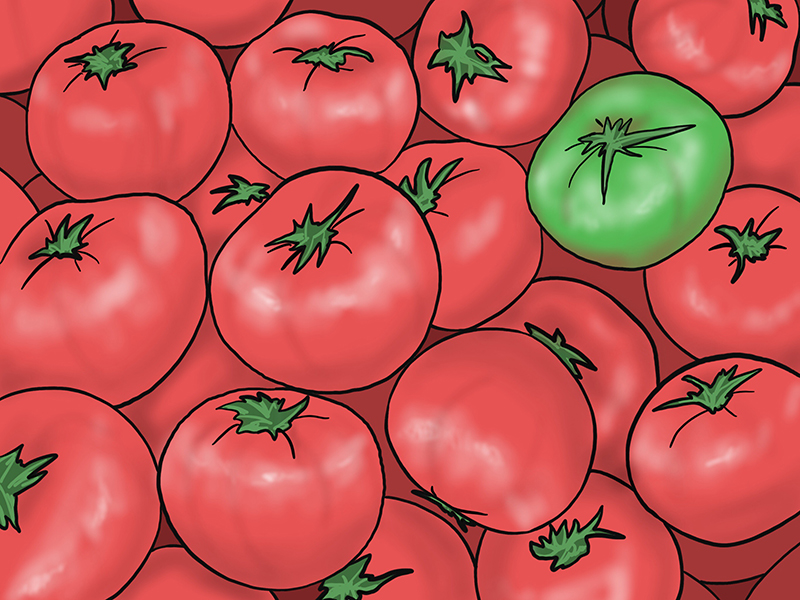
Isolation
If you ever got in trouble as a kid and the teacher put you in the corner, then you know what isolation is all about. When you’re sent to the corner, every other kid in the classroom stares at you. What a terrible punishment!
When we isolate a subject or an element in a drawing or painting, then this element naturally commands attention and becomes a focal point.
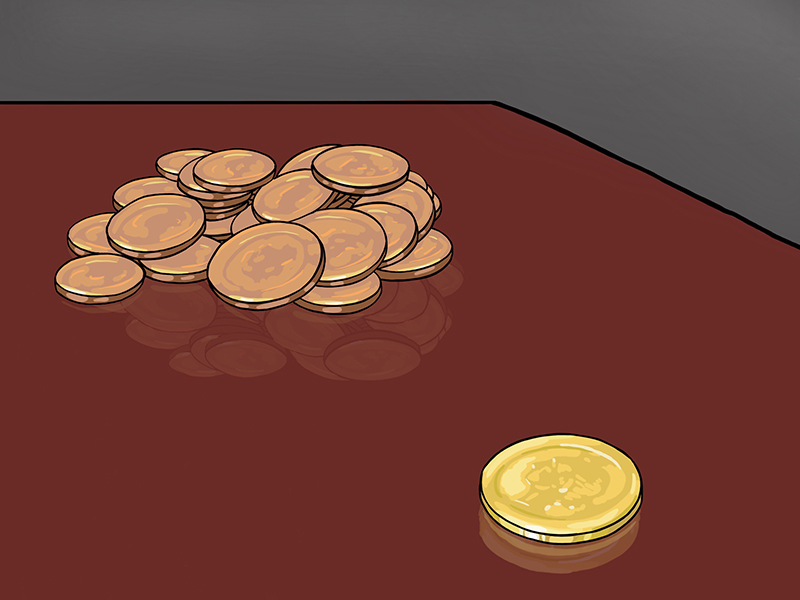
Placement
We are visually pulled to the center of shapes. If we think of the picture plane of our work as a shape such as rectangle, then we can expect our viewer to be pulled to the center. If we place a subject close to or exactly in the center of our picture plane, then this subject becomes a focal point.
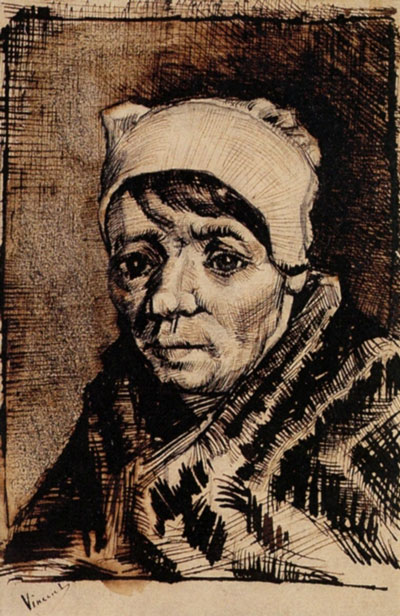
Although this technique works to create a strong focal point, it’s usually not the best technique to create a visually stimulating composition. When we place subjects in the center of the work, the result is typically static and boring. It’s better to place the subject slightly off center, or better yet – on one of the thirds. More on that in a moment.
Convergence
Convergence refers to the act of guiding a viewer’s eye within a work using visual cues. These may be lines, shapes, contrasting colors, etc. Each element that we include may guide a viewer’s gaze to the focal point. Sometimes, we are drawn to an area within a work simply because the artist has manipulated elements to force our attention to a specific area. We can do this too!
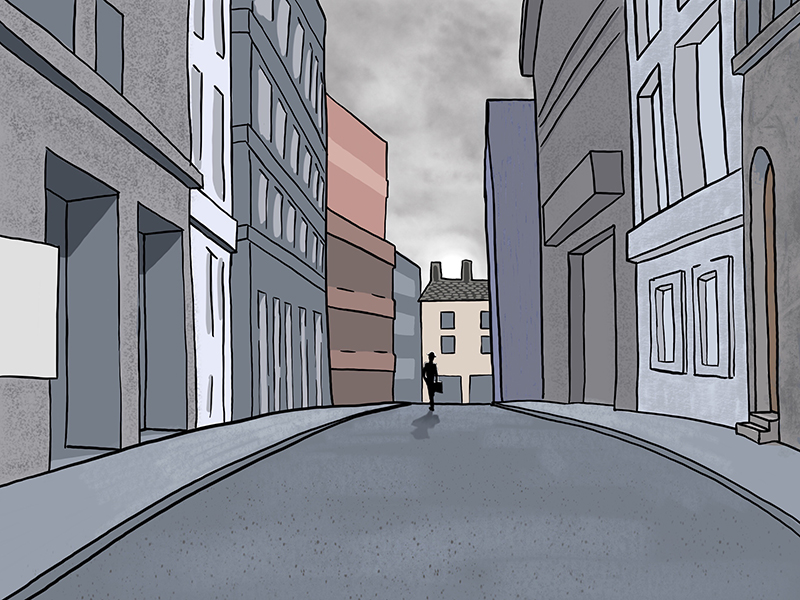
The Unusual
Anything out of the ordinary commands our attention. In the same way, anything that we include in our work that isn’t expected or is drastically different from the other elements within the scene will become a focal point.
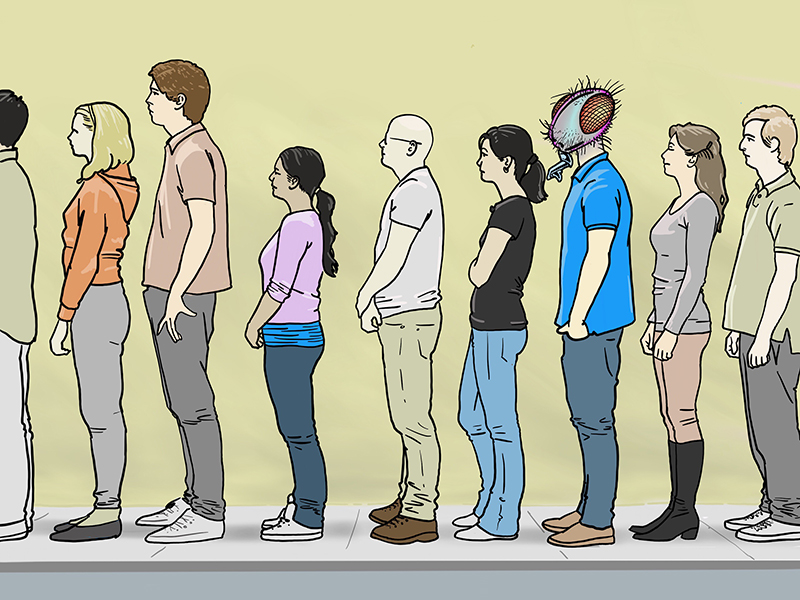
Creating a defined focal point is important in creating a strong composition, but there’s more to it than that. We also should consider a few of the principles of design.
The Principles of Design in Artistic Composition
The principles of design deal with the arrangement of the elements of art in work. The elements of art are the basic components or building blocks of art creation.
You can learn more about both the elements of art and principles of design here…
The eight principles of design are…
- Balance
- Proportion
- Movement
- Rhythm
- Harmony
- Unity
- Emphasis
- Variety
(Some art specialists also include contrast as a principle. But since contrast can create emphasis, most people leave it off of the list of eight.)
Not all of the principles of design directly affect our compositions, but most of them do. Here’s a closer look at the ones that do…
Balance
In terms of art, balance refers to the overall distribution of visual weight in a composition. Each object that we include in a work carries with it a visual weight. When we add an element to one side of our composition, we’ll like need to add another or several elements to balance the visual weight on the other side.
Visual balance can be achieved by adding elements or by using negative space. (More on negative and positive space in a moment.)
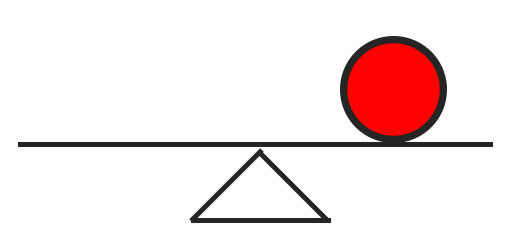
We can compare balance to a teeter totter or a seesaw. Imagine we have one large object (or person) on one side of the seesaw. The seesaw won’t be balanced.
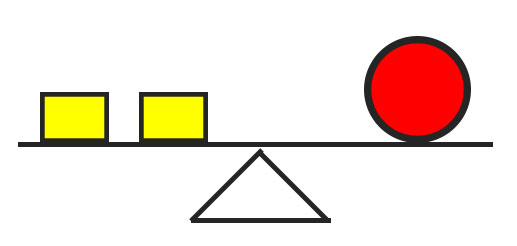
But, if we add a couple of medium sized objects (or people) to the other side of the seesaw, we achieve an equilibrium. The seesaw is now balanced.
If a work is not balanced visually, it may feel “heavy”. For example, if we include too much visual weight at the bottom of a composition, the weight will pull a viewer’s eye to the bottom. The composition will feel unsettling.

But if we counter-act this weight with an element or two at the top of the composition, then it becomes more balanced.

We should also be aware of how our composition is cropped as this can also influence balance.
Many times, we’ll have elements that extend beyond the confines of the picture plane. If the edges of these elements are positioned in a way so they are close to the edges of the picture plane, this will create added visual weight and perhaps unwanted attention.
Take a look at the images below. In the image on the left, notice how the bird is positioned too close to the edge of the picture plane. The edge of the branch at the top is also too close to the left side of the picture plane.
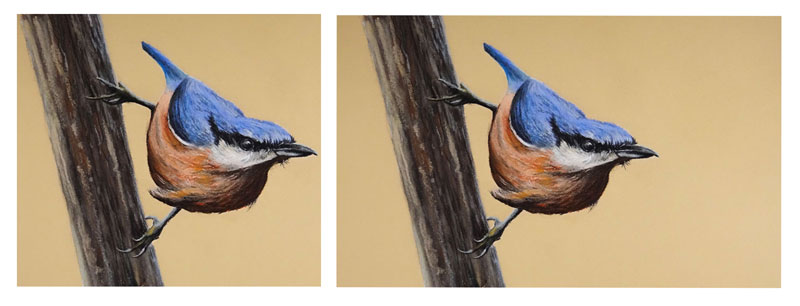
In the second image, there is enough space provided on both sides of the picture plane to provide a bit of balance resulting in a better composition.
If we position the subjects in our works so that their edges either end a bit further from the edges of the picture plane or extend well beyond the confines of the picture plane, then this visual weight is minimized.
We should also consider each one of the edges of the picture plane. If we have elements that extend off the picture plane on two sides, we may create too much visual weight on those two sides. But, if we allow the subjects to extend off the picture plane on all four sides, we may create a more balanced composition.
Movement
Movement can refer to the illusion of actual movement in a drawing or painting; or it can refer to the movement that a viewer’s eye takes when experiencing your art. In terms of composition, we are most concerned with the latter.
When a viewer interacts with your art, their eyes move from one element to the next. Usually the most commanding element demands immediate attention. After that, the viewer may move on to other supporting elements within the scene.
As artists, we can control this “eye movement” based on how we plan our composition. We can guide the viewer to the most important elements and many times, control how most people will “ingest” our creation. In most cases, we want the viewer’s eye to flow through the work in a certain oder.
Depending on the subject, the order may look something like this…
- The viewer is drawn into the work.
- The viewer is guided to the focal point(s).
- The viewer is guided to supporting elements.
- The viewer is guided out of the work or back to the focal point.
This visual movement is usually achieved by creating contrast, guiding lines, diagonals, and overlapping elements.
Take a look at the work below. When you examine it, take note of how your eyes move through the work.
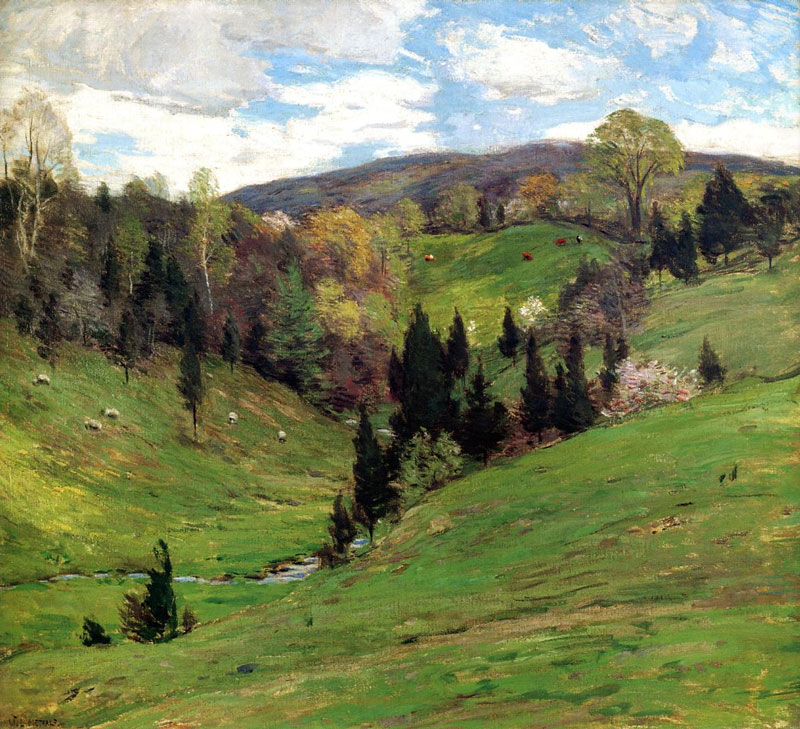
Perhaps your eye followed a similar route as mine. I entered the work at the bottom of the valley, near the stream. I was guided by the line of darker trees to the center of the pictorial space, then back into the forest. I then followed the line of trees, just in front of the distant mountains. From there, I was guided back to the center.
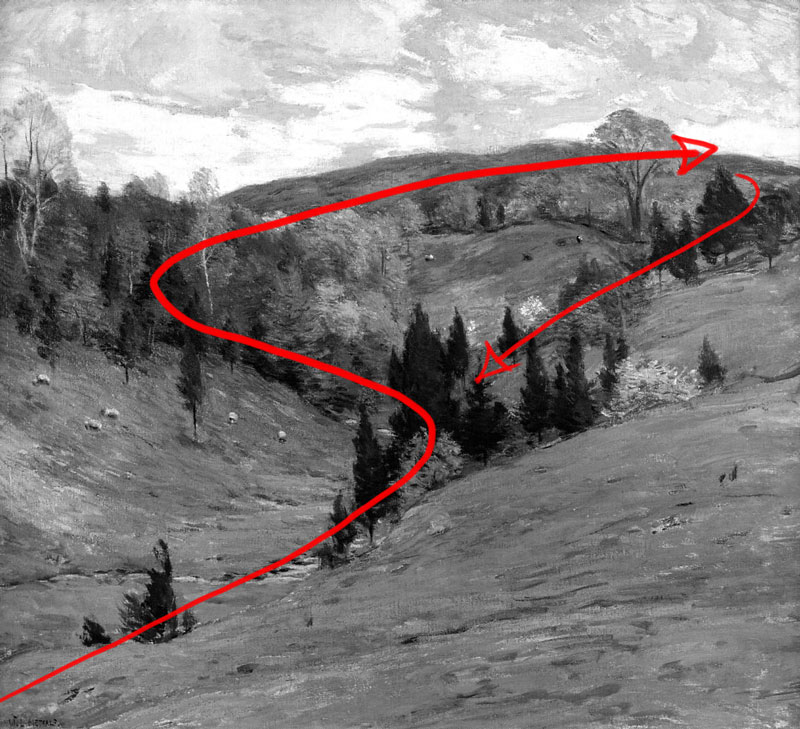
The positioning of these elements allowed me to see all of the important parts within the work, while appreciating each section of the painting on its own.
We can use the same techniques to have a bit of control on how a viewer interacts with our art. Although we can’t fully control how people will view our art, we can have some influence over their visual experience.
Rhythm
We understand rhythm through repetition. For example, we can hear the beat of a song and its rhythm because it repeats – many times in predictable way. Without repetition, there is no rhythm.
In art, the same is true. We must have repetition in order have rhythm. Visually, rhythm is created by repeating elements. This could be a regular or irregular pattern of repeating shapes or it could be a repetition of a specific subject. Either way, repeating elements produce a rhythm.
Take a look at the painting below. Notice how it has a sense of rhythm.
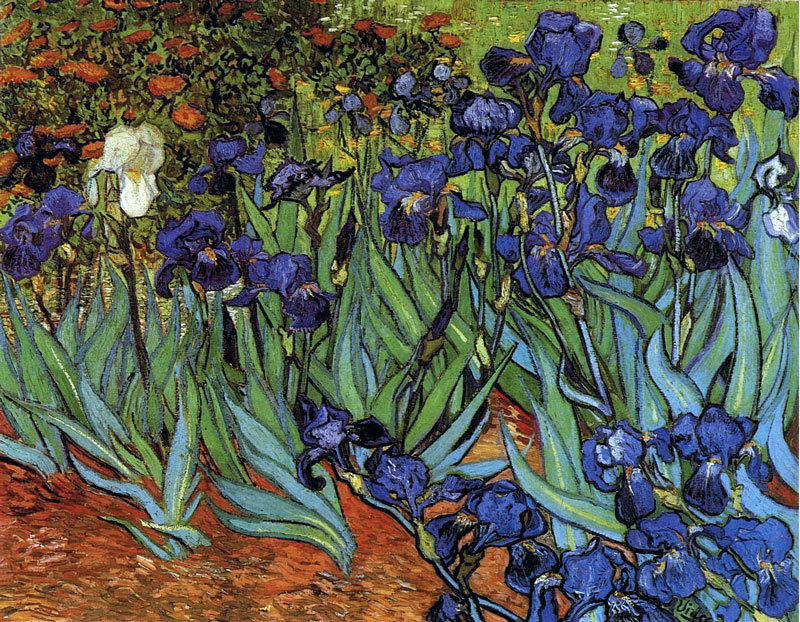
This rhythm is created through repetition. We can see here how the shapes created for the blades of the flowers are repeated…
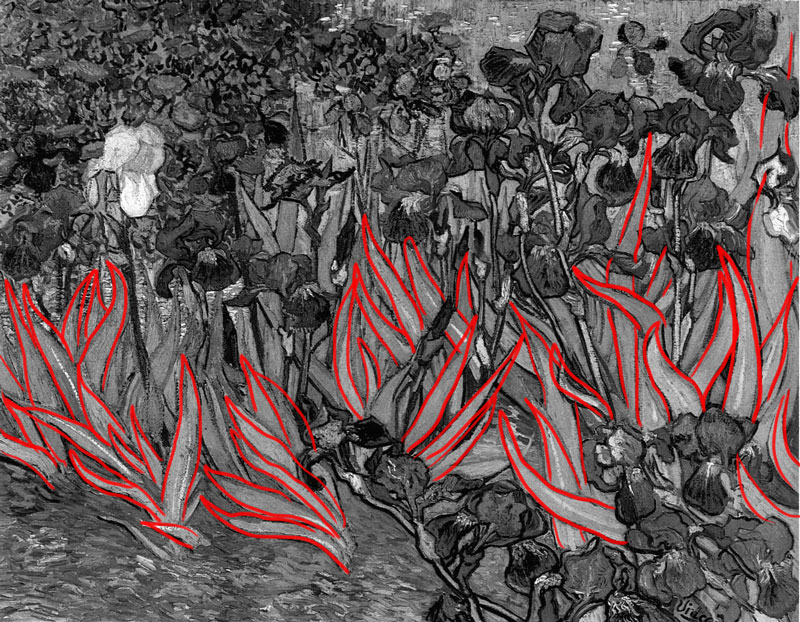
And also the shapes for the smaller flowers in the upper left corner…
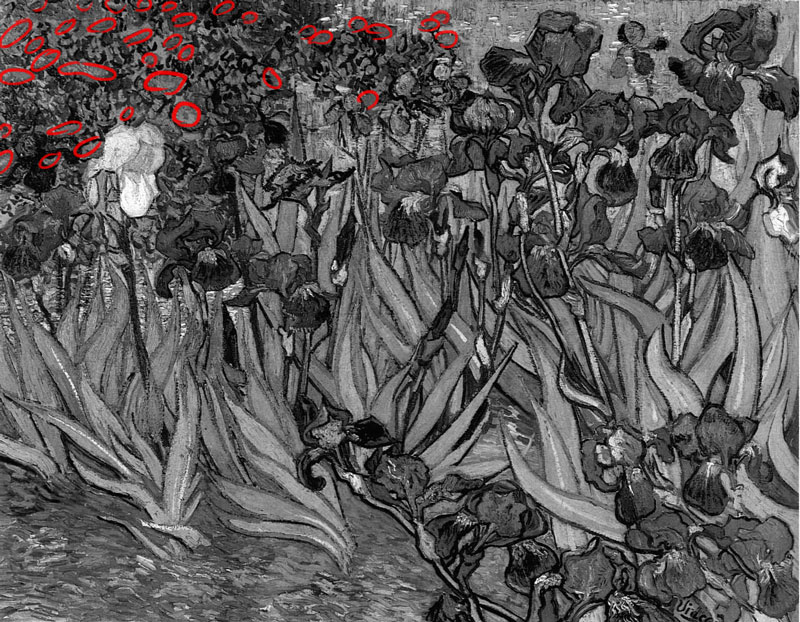
The shapes created for the irises are no different. They also repeat…
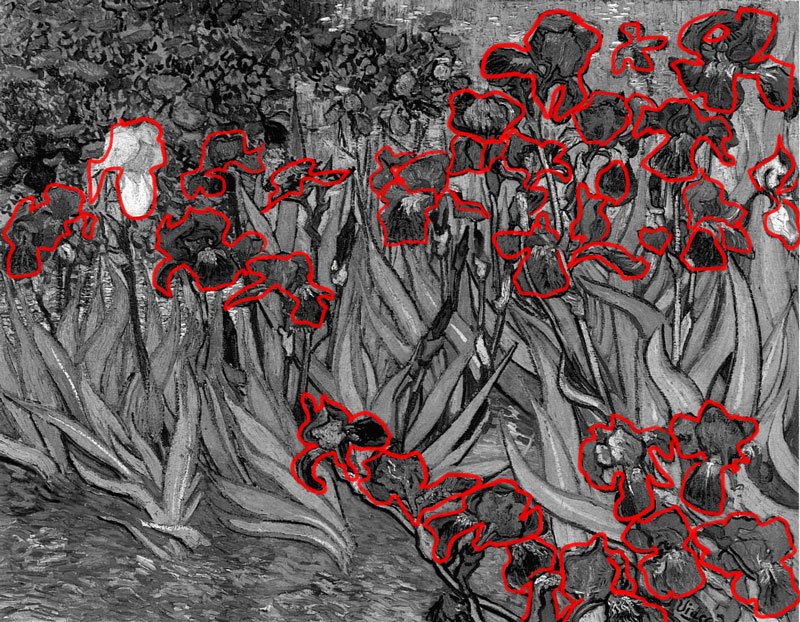
A repeating element within a work is often referred to as a “motif”. Including a motif in your work can often lead to a sense of harmony and unity.
Let’s go back to the music analogy. Most popular songs feature a consistent rhythm throughout the song. The dynamics of the song may change, but the time signature rarely does. And even though the notes may change drastically, the consistent rhythm unifies the song from start to finish.
Our artworks should have this consistency, which leads us to the next principles – harmony and unity.
Harmony and Unity
Our art compositions should also be harmonious and unified. Harmony and unity are so closely related that it’s easy to assume that they’re the same thing. They are very similar, but each should be considered separately in our compositions.
Unity deals with a feeling of “oneness”. This is usually accomplished in a work of art by using the medium in a consistent manner and to a level of completion. We can also think of unity in terms of artistic style. If the style and use of media are consistently used in a work and the work feels complete and finished, we usually can say that the work is unified.
Unity can also be created in a work through simplification. This can be achieved by simplifying shapes, subjects, or color schemes.
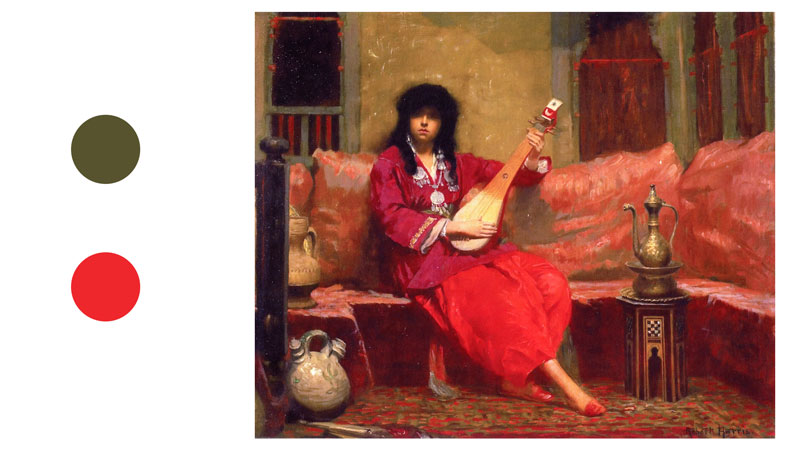
The work below is unified and harmonious for a number of reasons. The most obvious way it’s unified is through its use of color.
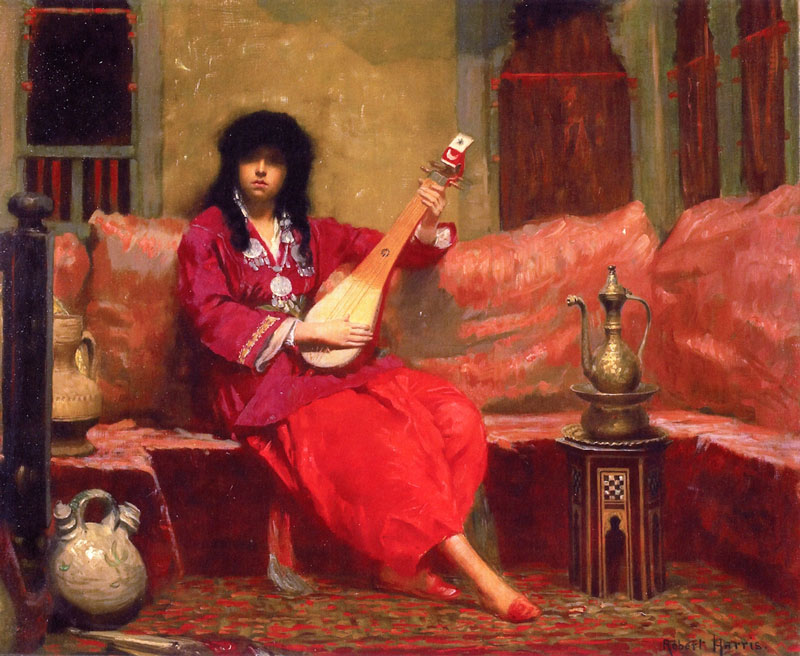
Harris has simplified the color scheme and used mostly the complementary colors of red and green. The green is very earthy, but still present.
Harmony helps to create unity in a work. While unity deals with the work of art as a whole, harmony deals more so with the individual parts of the work. If the individual parts of the piece all work together, then the art could be considered harmonious.
Another way to think of this is to consider a family. A family is made up of different members. Let’s look at a family in a traditional sense for this analogy. A family may have a father, a mother, a son, and a daughter. Each family member is different and is their own unique person – but the family is still a unit. Some families get along well with one another, while others don’t.
We can create harmony and unity in our compositions by…
- Using the medium in a consistent manner throughout the work.
- Simplifying shapes, subjects, or color schemes.
- Using a consistent style throughout the work.
- Making sure the work appears finished.
- Ensuring that each individual part of the piece works (and makes sense) with the other parts.
Emphasis
We often use emphasis to define the focal point or points within a composition. We’ve already discussed several ways an artist can create a focal point within a work. Each one of these methods relies on emphasis for its success. Emphasis is usually created in a work through some form of contrast.
Take a look at the work below. What do you think is emphasized?
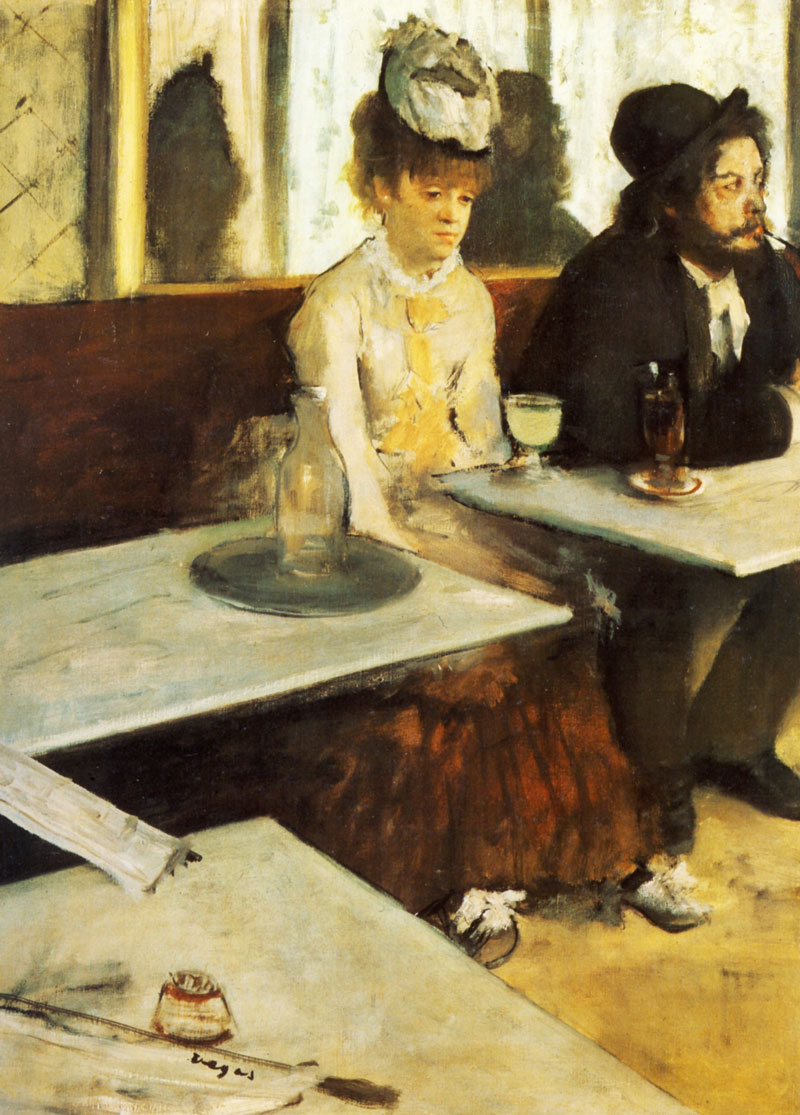
Most of us are drawn to the woman in the scene, more specifically – to her face. Degas has pulled our attention to her using several methods. For starters, she’s centrally located within the picture plane. There’s also strong value contrast around her. Notice how the man next to her is dressed in black, while she wears white. There’s even a dark cast shadow on the wall right next to her light face.
Then there’s the lines of convergence created by the tables and the back edge of the bench.
You’ll also notice that the face of the woman has more details compared to the other elements within the scene. This also helps to pull the viewer’s eye.
All of these characteristics help to influence how we interact with the subject.
Variety
Like emphasis, variety also deals with difference. Our drawings and paintings should include some variety.
Consider your favorite food for a moment. Now consider what life would be like if you had to eat your favorite food for every meal for the rest of your life. For breakfast, lunch, and dinner – you have your favorite food and nothing else. It may be great the first day – but after that, you’d grow very tired of your favorite food.
We can think of our artworks in the same way. We don’t want to bore our viewer’s with the same visual information. Instead, we should include some variety to keep them engaged and make our artworks more interesting.
The trick here is balancing both harmony and variety. If we take variety too far, the work will likely not be harmonious. If we take harmony too far, the work may be lacking variety.
Take a look at the image below. Notice how much variety is present…
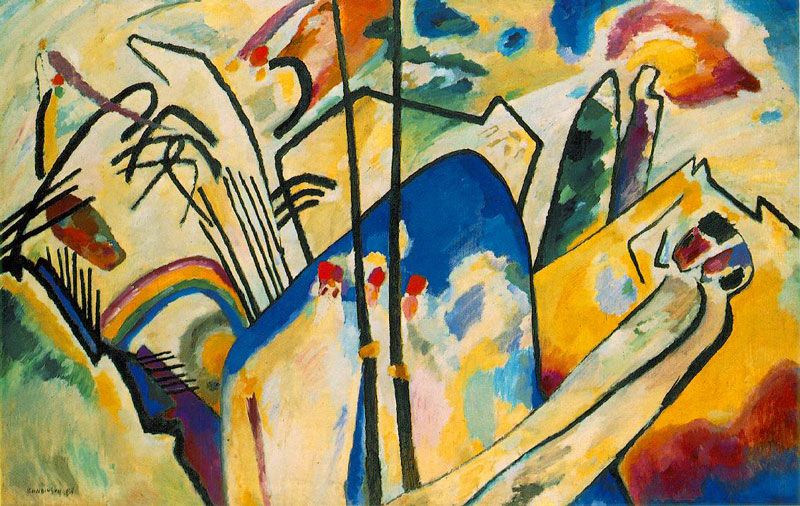
Kandinsky has created variety by using a broad range of color, but kept the painting unified through simplification.
Positive and Negative Space
Space is one of the seven elements of art. When we think of space, we often consider it in terms of depth or the illusion of depth in a drawing or painting. However, when it comes to composition, we can think of space in terms of the actual pictorial space on the drawing or painting surface.
The space that is taken up by important subjects or design elements is considered positive space. The areas that surround these locations are considered negative space. Often, it is the negative space that provides an area of “rest” for the viewer.
Take a look at the images below. We first see the original image on the left. In the middle image, the negative space is highlighted with red. In the third, we see the positive space highlighted with red.
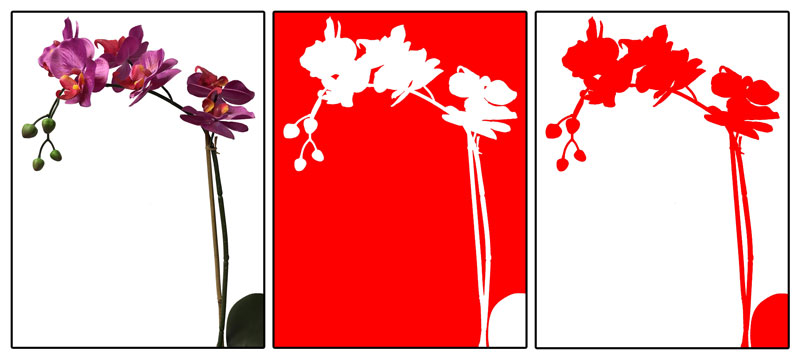
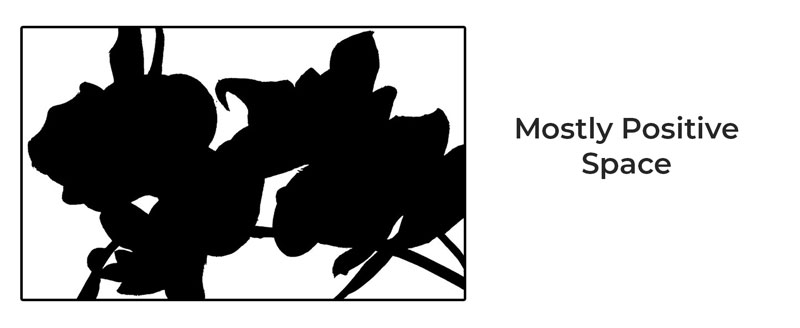
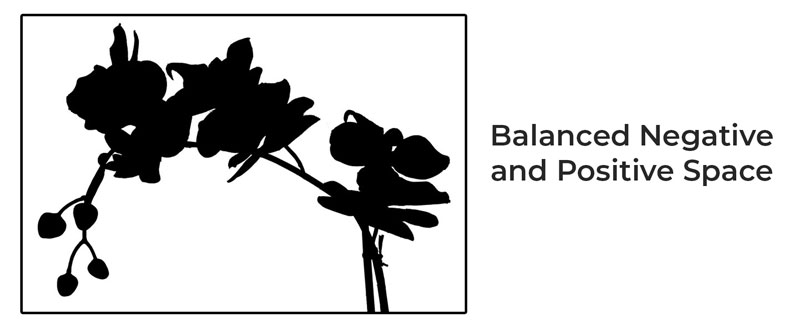
Positive and negative space work together to create the composition. A composition can be made up of mostly positive space, an even balance of the two, or mostly negative space.
The following image illustrates a composition made of mostly positive space…
Here’s an example of a composition made of equal parts of positive and negative space…
And here’s one made of mostly negative space…
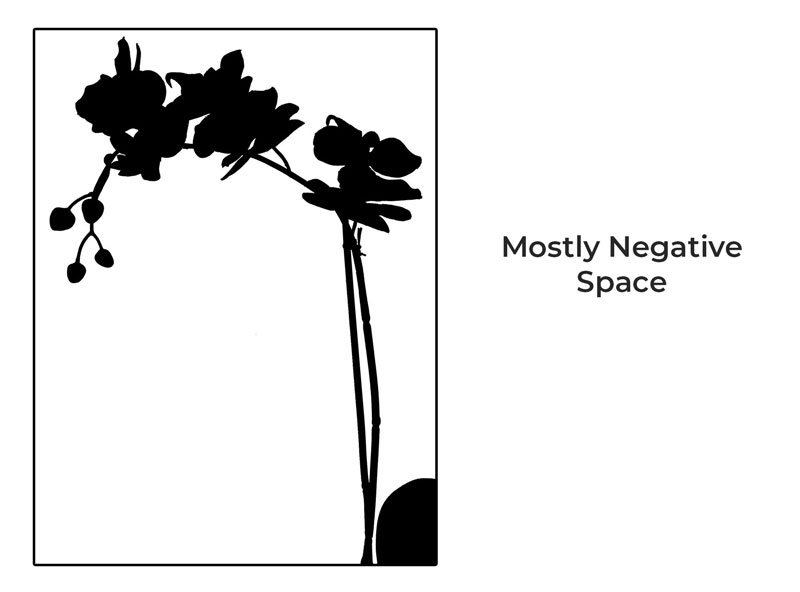
Each one of these compositions is derived from the same subject and each could be considered “successful”.
Successful use of positive and negative space within a composition is dependent on balance. How this balance is achieved will depend on the subject, the use of the medium, the level of detail included, contrast, and other visual factors.
The best way to craft a balance in a work and ensure that the positive and negative space works for the good of the composition is through careful planning.
Planning Your Composition
Planning is perhaps the most important aspect of finding success with your compositions. Unfortunately, it’s the step that most people skip completely.
Let’s say you decide to go on road trip to a place you’ve never been before. It wouldn’t make sense to just pack your bags, hop in the car, and leave without knowing how to get to your destination. You’d likely take a look at a map or enter your destination into your navigation system. You’ll never arrive at your destination without some form of preparation and guidance.
In the same way, we should plan our compositions before we attempt to execute them. We need to know “where we’re going” with our artworks. We should plan the final result before we set out to create it. We can change our ideas as we work if we wish, but we should have a general idea of what we want the finished work to look like before we dive in.
By planning, we can work out all of the compositional puzzles that go into making a strong piece of art. When we do this, we can focus on the actual process of drawing and painting since most of our decisions regarding composition have already been made.
In most cases, planning a composition involves creating small drawings that lack details. These small drawings are often called thumbnails or preliminary sketches. Thumbnails should be created quickly and should be approached with an attitude of experimentation. The more thumbnails that you create before starting on the final surface, the better your chances are at creating a successful composition.
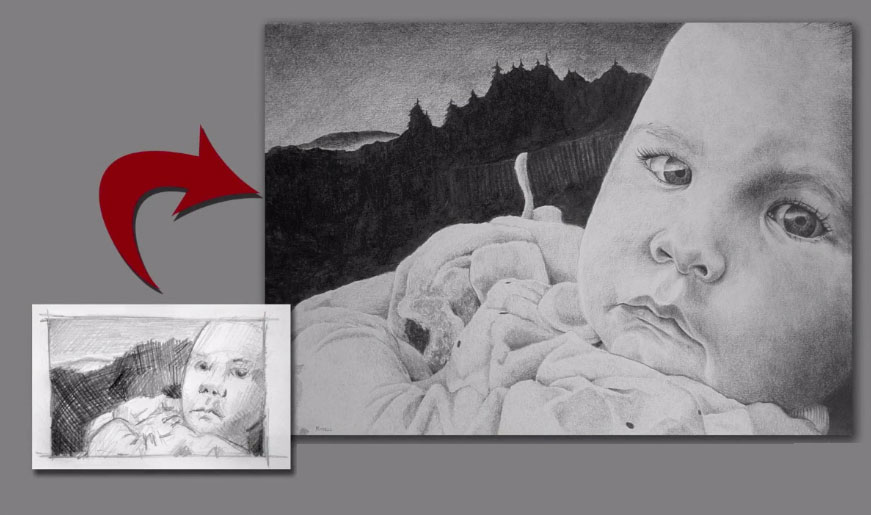
As you create your thumbnails, be open to trying different things. Experiment with the positioning of subjects and with the balance of positive and negative space. Consider how a viewer’s eye may move through the work. Try vertical-based compositions and compare them with horizontal ones. Experiment with different colors. Keep your mind open.
Many times, we have a vision in our minds of what we want to create and naturally assume that it is this vision that is the most successful. However in most cases, our initial vision is just the “tip of the iceberg”. With a little more “digging”, our original vision evolves into something much more successful. This only happens when we are open to experimentation and we take the time to plan.
The Rule of Thirds
The rule of thirds is a compositional theory that is based on the placement of subjects within a composition. It is based on The Golden Mean, which is a mathematical formula that deals with proportional relationships. Since the Golden Mean is quite complex, most artists and photographers rely on the rule of thirds to create a similar effect.
Here’s how it works…
Let’s take a composition and divide it by thirds – both horizontally and vertically. We can imagine lines that run along each of the thirds. These lines intersect in four locations within the picture plane. By placing important subjects or focal points on or near these locations of intersection, we create a more aesthetically successful composition.
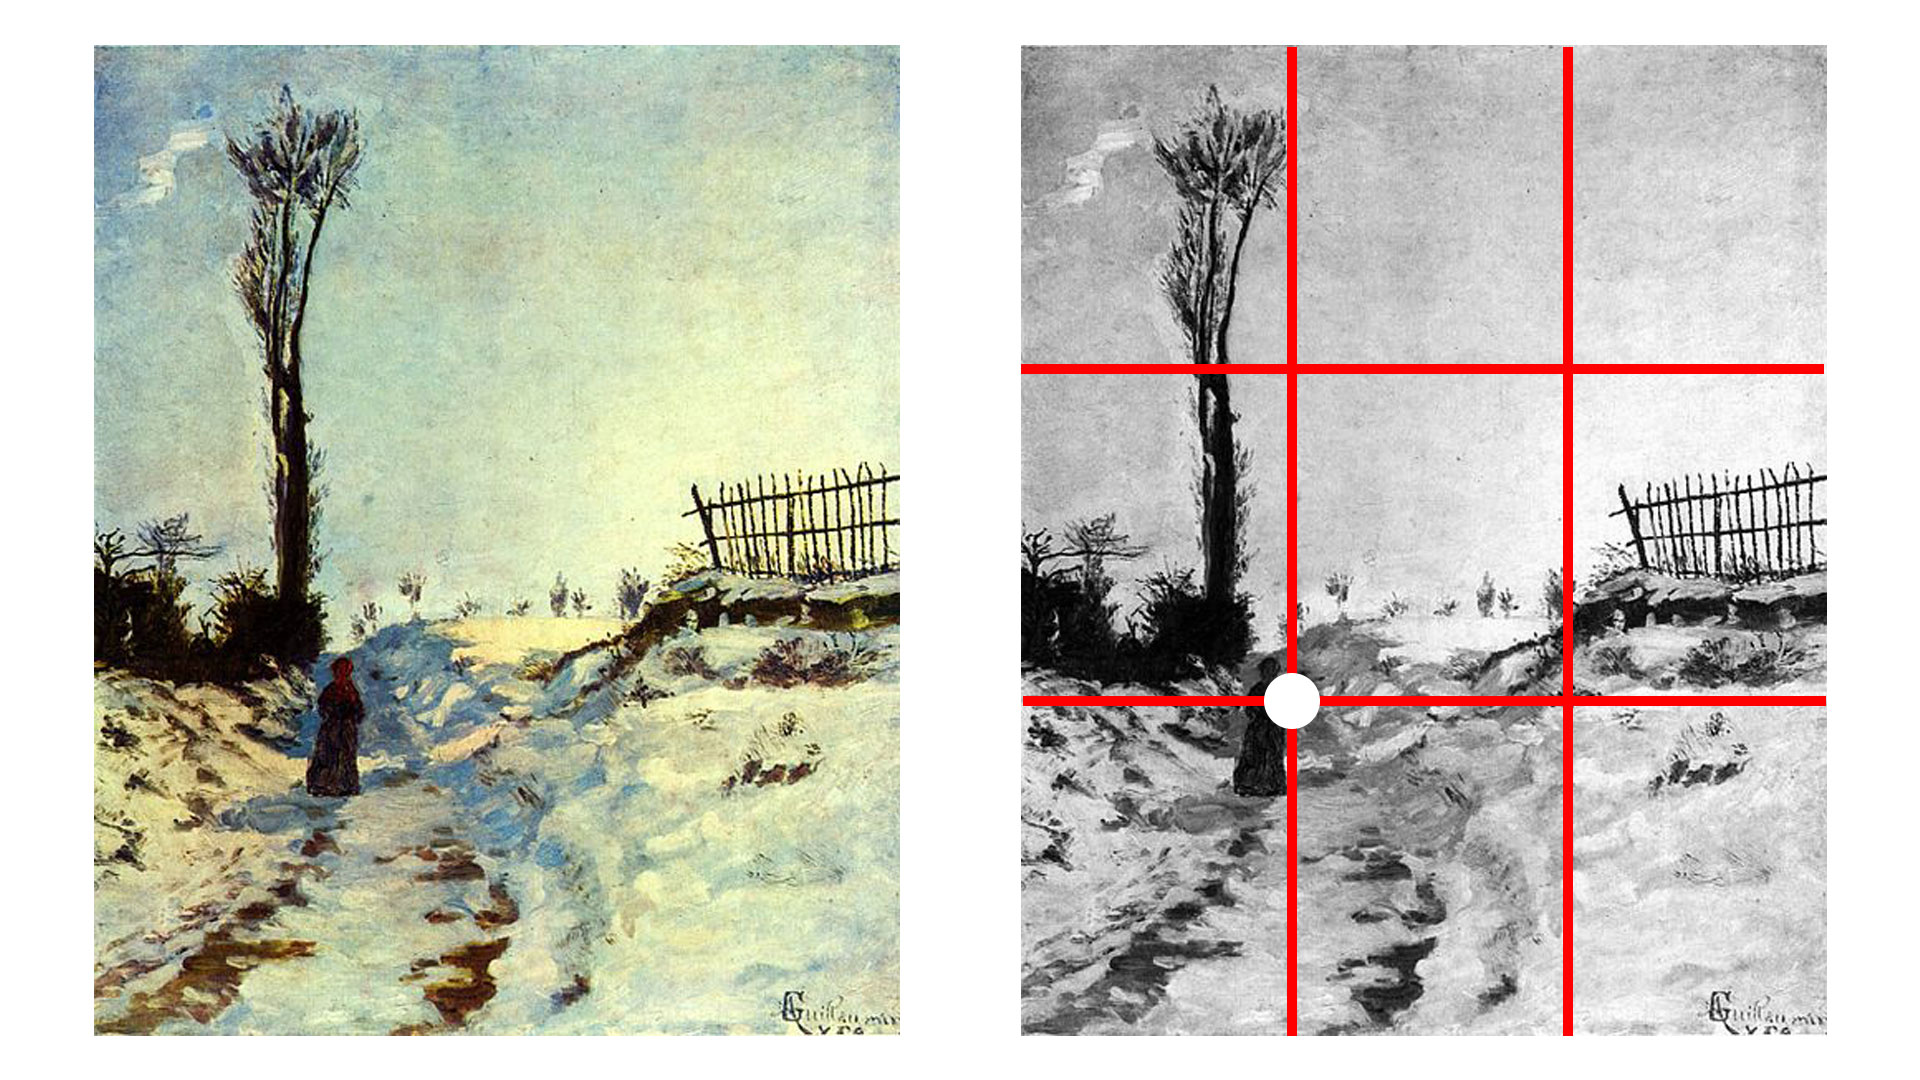
Notice how Guillaumin has positioned the figure almost directly on one of these points.
We can also create more dynamic and interesting compositions by placing subjects directly on these lines.
Creating Diagonals
Compositions can be dynamic or static. Static compositions are fairly straight-forward and direct. A static composition makes sense for an informational image – like a scientific illustration. In contrast, a dynamic composition creates a greater sense of story and engages a viewer. In most cases, we want our compositions to be dynamic.
Dynamic compositions can be created by incorporating diagonals into the work. These diagonals may be created with actual lines and shapes or implied lines. They can also be used to help guide a viewer’s eye through the work, as we discussed before.
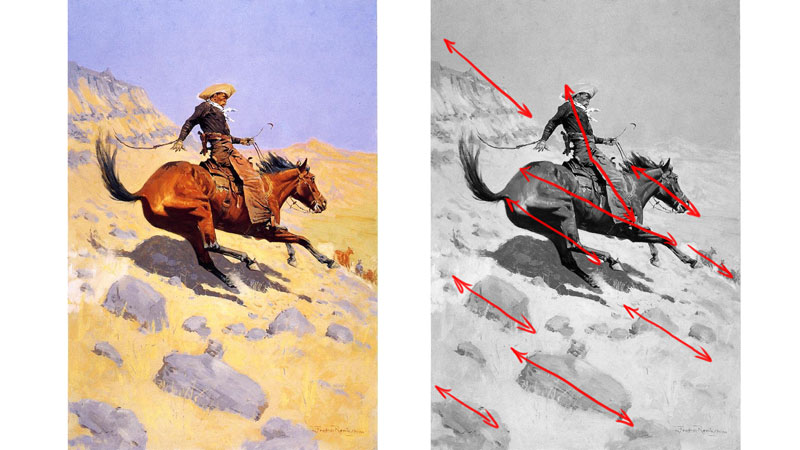
Look for interesting ways to include diagonals in your work. This may mean that you change the angle of the vantage point of the viewer. Instead of drawing or painting the subjects from a standard point of view, consider the view from above or below, or even from a tilted angle.
Odd Numbers Are Better
When we compose our artworks, we should also consider the number of subjects or elements that we include. The human mind finds balance in odd numbers. The most optimal number to use is 3. This means that if you are composing a still life, it’s best to use 3 objects. This doesn’t mean that we are limited to 3 objects. We can, of course, include more if we wish. But if we do include more, odd numbers are best.
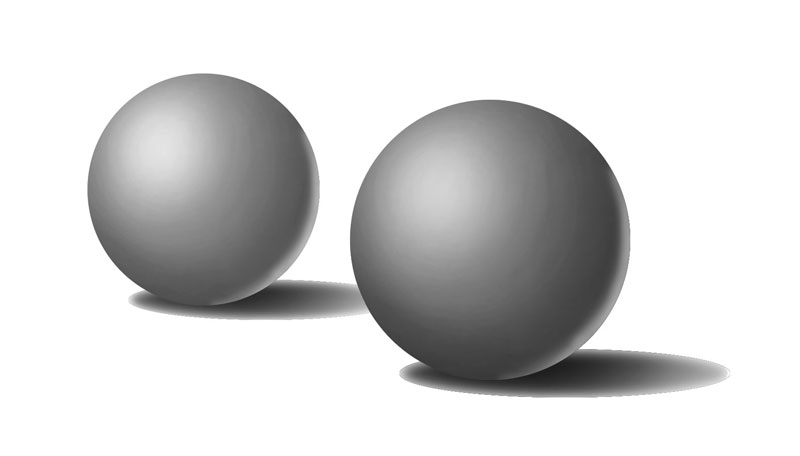
Let’s consider an image with two objects. With two objects, there seems to be a sort of visual competition between the two. It’s difficult to decide which subject is the focal point.
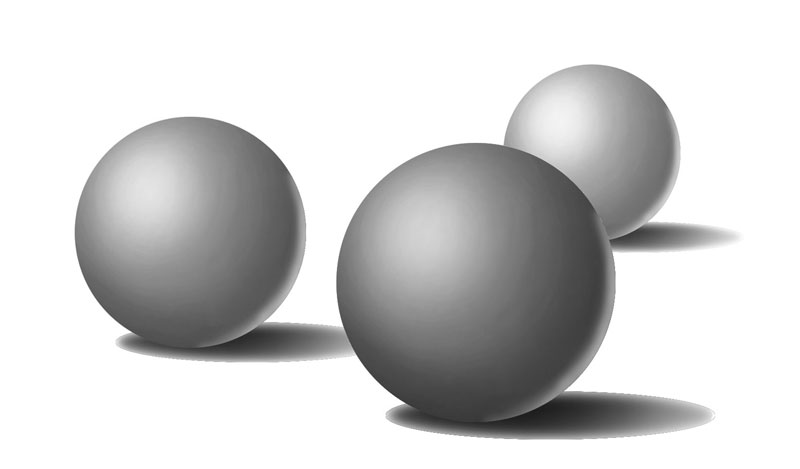
However, when we include a third, the other two subjects act to frame the third, resulting in a more balanced composition.
Conclusion
Composition is not “guesswork”. A great composition is not the result of luck and it’s certainly not about talent. It’s about understanding how a viewer will visually interact with what we create and careful planning.
We’ve covered quite a bit here. It’s a lot of information to soak in. But by practicing these concepts and incorporating them into your artworks, they will gradually become intuitive and your compositions will improve.
If so, join over 36,000 others that receive our newsletter with new drawing and painting lessons. Plus, check out three of our course videos and ebooks for free.
Lesson Discussion
Comments are closed.


I love the new clean look of your website. Very inviting. 😍
This was just an amazing presentation. So much info put together beautifully.Ill be watching this again. i am fairly new to drawing and seem to be moving to 2 or 3 mediums but the LIVE lessons no matter the medium are relaxing and I always learn something .
My biggest problem is always what should I draw and is it the best subject for graphite or watercolor pencil or brush. Don’t want to keep copying something i find online . Anyway, you are a really good teacher and the information here is just endless. Thanks for all the effort in putting together a great site . tom
Thanks Tom! Your comments are much appreciated!
Most of your points are very informative and I use most of them in my art. However it would appear that paintings that sell these days are ultra modern, have no real structure and seem to be painted by artists wearing a blindfolds. Do you have any suggestions for sure fire selling?
It is difficult to know what will sell for sure. I think art is an expression of you, so you should make art you get excited about and enjoy. Predicting what others will feel when they see your art. If making money is the primary goal you may find you are frustrated doing art that might not inspire you. I make jewelry too, and I look at trends, but make what I enjoy and do it to my best. It is validating when someone purchases it, but the real reward is creating.
Wow! A lot of insight and knowledge packed into this lesson!
As usual, various bits of knowledge brought together in a “balanced and unified” lesson….
This is a GREAT lesson! Thank you.
Your method for presenting this often confusing material simplifies and clarifies the lesson! Thank you.
Very informative. Learn a lot from your videos.
This was excellent, thank you.
A great mini lesson on composition. Thanks
GOT MY ANSWER TO ONE OF MY QUESTIONS..COMPOSITION.NOW I UNDERSTAND.I’M GLAD I SAW IT .i was going to make all the mistakes on my first art work.Thank-you..
Thank you reminding us of the basics, possibly we have heard some of it before but so easy to forget each of these steps and options. I love your site with the information easily understandable and pertinent. Thank you for many free lessons. You really appear to want us to produce art!!! Thank you!