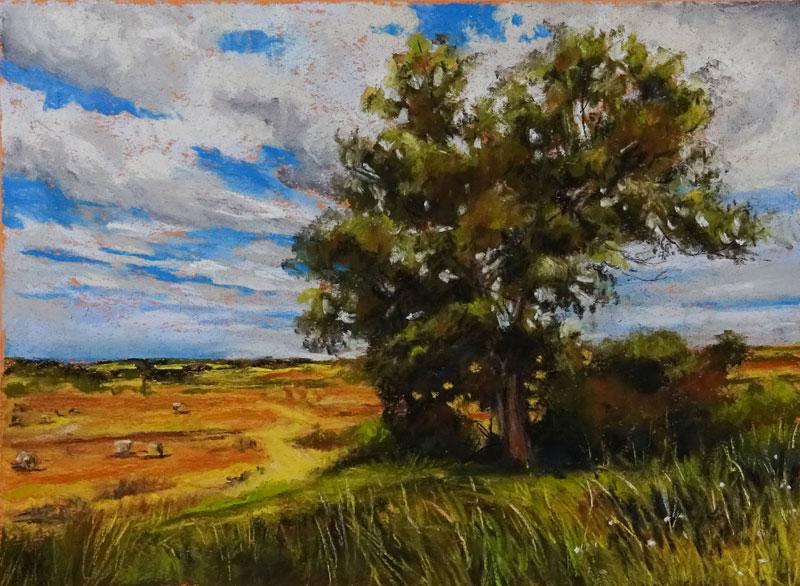
Materials for This Painting
For this lesson, we’ll use two different brands of pastels. (Keep in mind that soft pastels differ greatly from oil pastels. Although you can use oil pastels to create a similar image, the approach would be different.)
For broader areas and for more intense applications, softer Rembrandt pastels are used. For details and some refinements of color, the harder NuPastels are applied. In many circumstances, a combination of different forms of pastel are used to complete an image. This could be any combination of soft pastels, PanPastels, pastel pencils, or hard pastels (NuPastels).
- Rembrandt Soft Pastels
- NuPastels
- Vine Charcoal
- Canson Mi-Teintes Pastel Paper (Smooth side is used)
Preparing the Reference Photo
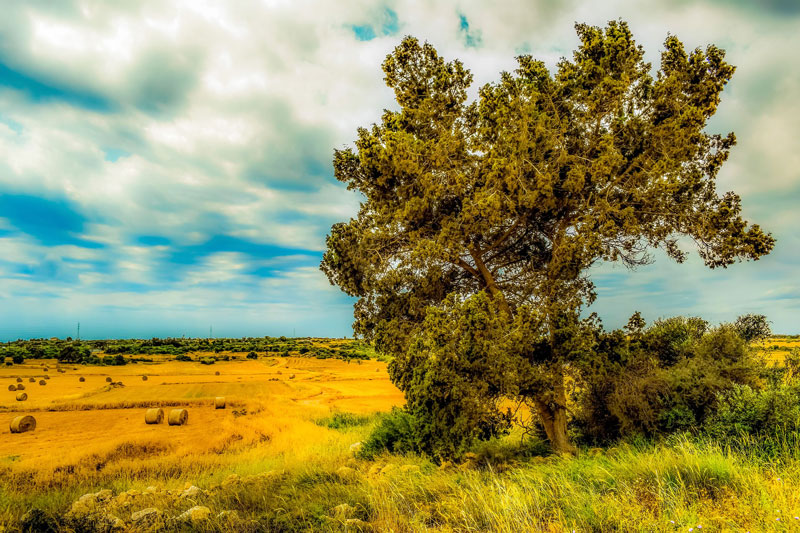
Pastels are inherently a looser medium. Although they can be used with a great level of detail, they lend themselves to a painterly approach where details are implied instead of described completely. To help us recognize the shapes of tone and color and to eliminate some the details, we can use Photoshop to prepare the reference image for painting with pastels.
The reference image that we’re using for this lesson comes from Pixabay.com, a free resource for images.
In Photoshop, we can use the Camera Raw filter to make the necessary adjustments. In this case, we’ll adjust the exposure, contrast, blacks and whites, and most importantly – the clarity. Here’s how to use the filter…
- Open the image that you wish to edit in Photoshop.
- Duplicate the “Background Layer” in order to preserve the original photo. (You may not like what the filter does and you’ll want to have the option to adjust the original image.)
- Make sure that you are on the duplicated layer and select Filter > Camera Raw Filter from the top menu.
- Use the sliders to make your adjustments and watch how the image changes as you make these adjustments.
By tuning the “clarity” option, we can tone down the details. This is especially helpful when creating a looser, more Impressionistic painting since we don’t want the details to impede us from recognizing the shapes of value and color.
If you don’t have Photoshop, or you don’t want to bother with these steps, you can always squint your eyes to remove some of the details.
See Also: Basic Photoshop for Artists (Course)
Here’s a look at the edited reference photo…
Step by Step Breakdown of the Process
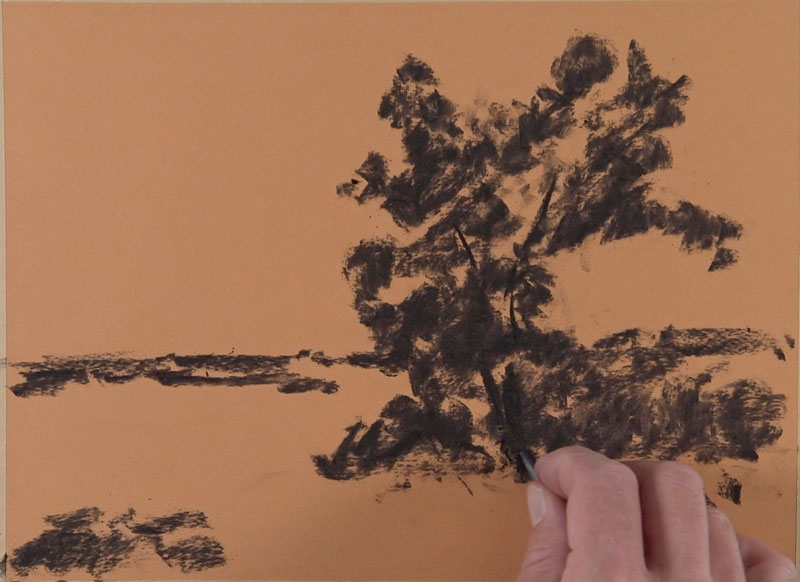
We’ll begin on toned pastel paper with a stick of soft vine charcoal. An orange surface is chosen since it will contrast nicely with the blues of the sky. It will also help to create a warmer feeling to the piece, reflecting a summer day.
Using the vine charcoal, we’ll begin blocking in the darker shapes of value along with the main shapes of the tree and the bushes underneath. The horizon is also defined along with a few of the darker tones that exist there.
See Also: The Ultimate Guide to Drawing Trees
Painting the Sky
Once we have blocked in the composition with vine charcoal, we’re ready to begin adding pastel applications. Since we can layer pastel applications, we address the background (sky) first. We’ll then move on the middle ground and foreground, working mostly from areas further away to areas that are closer to the viewer.
We’ll add the blues for the sky with a combination of lighter blue and a medium blue. We usually have a natural tendency to apply blues that are lighter than they should be when addressing the sky. For this reason, we’ll make sure to use a blue that is slightly darker to ensure strong contrast between the blue sky and the lighter clouds. We can always go back and make the blues a little lighter if needed.
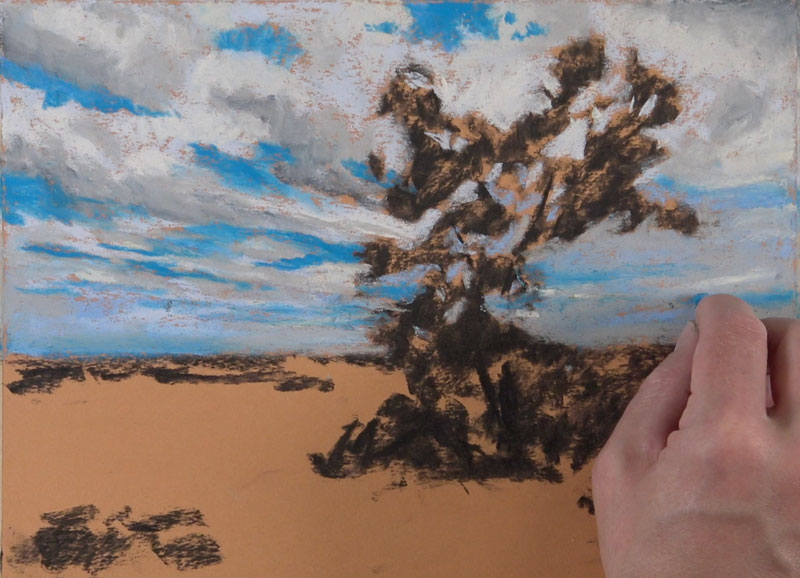
A much lighter blue is used for the shapes of the clouds, before adding a touch of gray for the subtle shadows. A very light yellow is applied for subtle highlights, before adding a darker gray to push a few of the shadows darker. We must not forget that clouds also have form, so we’ll need to develop both lighter and darker values to create this illusion.
The darker grays can be softened with an additional application of lighter gray to create a slight transition, while the highlights can be pushed lighter with a touch of white.
Painting the Middle Ground and Foreground
With the sky in place, we can begin developing some of the colors in the middle ground and foreground. We’ll start with the prominent tree since it will become the main focal point within the scene.
Using a dark yellow-green, we’ll block in the shape of the tree. We can apply the pastel directly over the charcoal sketch. As we do so, some of the darker charcoal will mix with the pastel, creating a slightly darker value. In locations where the shadow is strong, we can apply a light touch of black. This application is rather strong when it is first applied, but as we continue to layer colors, it will become less intense.
We’ll also apply the dark yellow-green to the mass of bushes under the tree and just underneath the horizon.
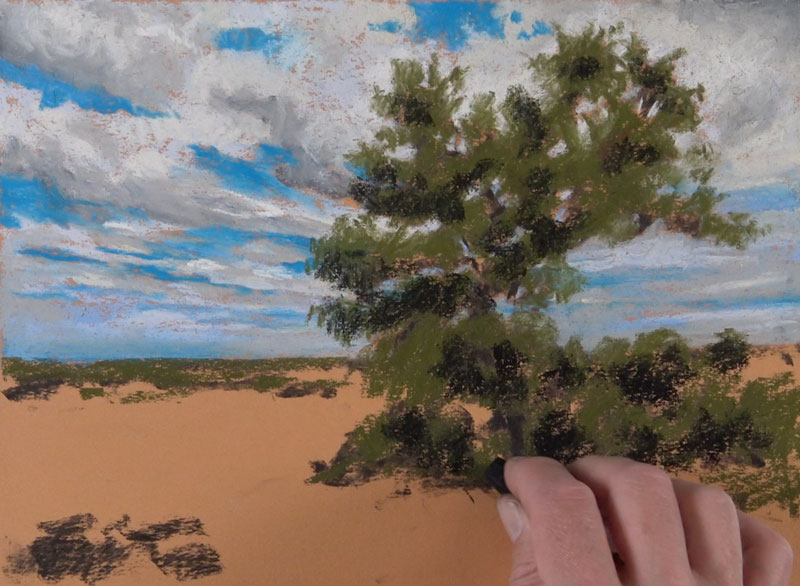
We’ll continue to layer observed colors to develop the mass of the tree. Lighter yellow-greens are applied to the highlighted collections of leaves, while darker yellow-greens are applied to the shadowed areas. A bit of burnt sienna is added in areas as well, including along the trunk and extending branches. A rich blue is layered over the shadows to create a cooler version of the color.
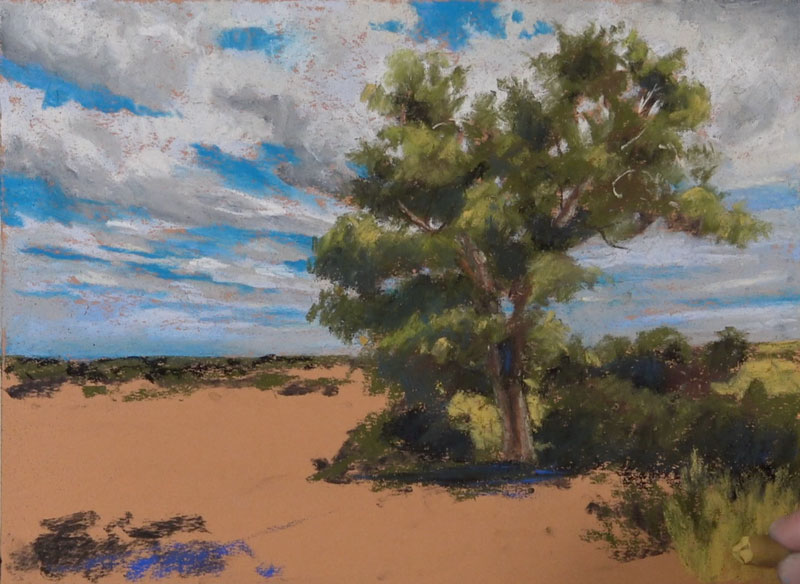
The process of patiently layering pastel applications continues. Yellow ochre is applied to the distant field and foreground along with a few bits burnt sienna.
On the tree, we continue to push the value relationships as the form begins to take shape. Around the outer contours, a light application of black is used to create a few impressions of leaves and branches. Since we have most of the tree blocked in at this point, we can paint in portions of the sky visible through parts of the tree. The light blue that was used for the shape of the clouds is used for this.
Within these negative spaces, we can add a few glimpses of branches using black and a very light cream.
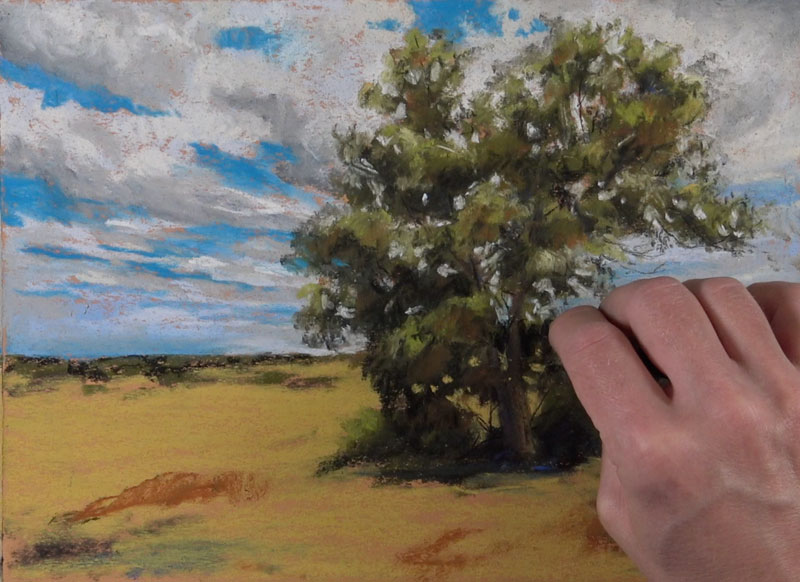
For the distant field, we’ll continue to generalize details with simple shapes of color and value. A variety of yellows, browns, and burnt sienna are used along with a light cream color for the highlights.
In the foreground, we can begin developing the tall grasses. A dark yellow-green is used for the initial applications using directional strokes that will help pull the viewer’s eye to the tree. Along with dark yellow-green, a bit of rich blue and burnt sienna is also applied.
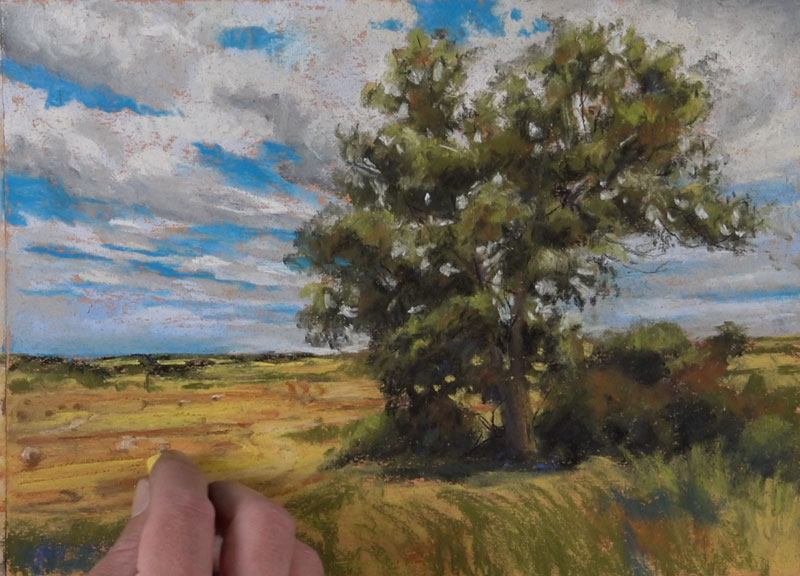
In most circumstances, the contrast of value is strongest in locations that are closest to the viewer. This image is no different as we see darker values next to lighter ones. A bit of black is used to create some of the darker tones and softened with an application of dark yellow-green.
Over the top, we can begin pulling strokes for the lighter grass blades with yellow ochre and lighter yellow-greens.
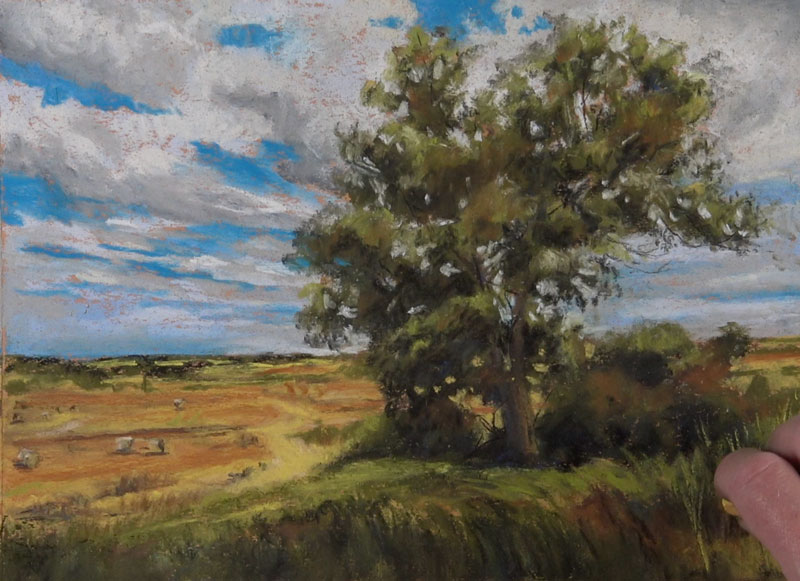
We’ll continue layering progressively lighter strokes to develop the grass blades in the foreground. Yellow ochre and light yellow-greens are applied. A very light yellow-green is used for the strongest highlights.
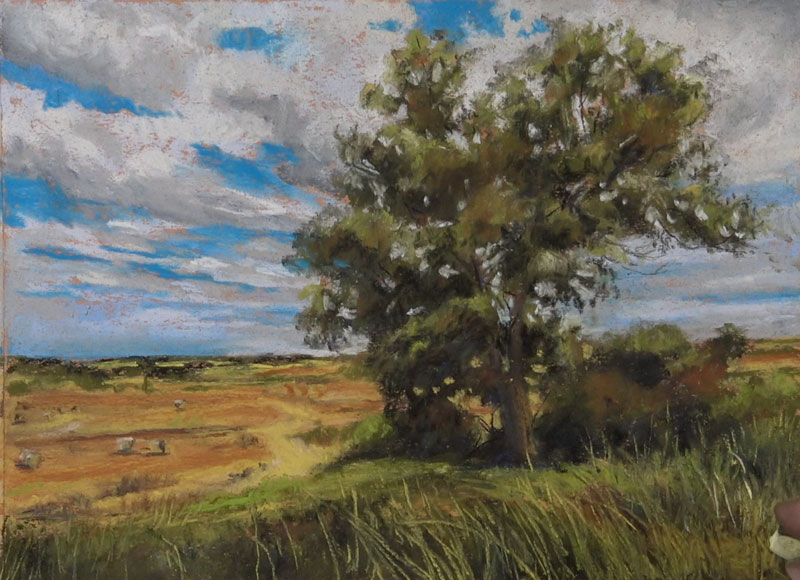
To complete the image, a few marks are made with a pure white to create the impression of a few wild flowers in the extreme foreground.

Conclusion
It’s important to remember that we shouldn’t allow the details to overcome us when painting with pastels. The key is to focus instead on the relationships of color and value. The “details” can be implied and are often filled in by the viewer’s mind. Stay loose and patient and allow the image to slowly develop. Success with pastels often requires multiple layered applications which results in colors that are rich and have depth.
If so, join over 36,000 others that receive our newsletter with new drawing and painting lessons. Plus, check out three of our course videos and ebooks for free.
Lesson Discussion
Comments are closed.


Awesome video, really inspires me, thanks for sharing your talent!!!!!,😊
Thanks Nelda!