Colored pencils are used to create beautiful colorful drawings. In the hands of a skilled color pencil artist, the medium can almost resemble a masterfully-crafted painting. But in order to produce results like these, you must have an understanding of the techniques that are used. Simply gripping a pencil and making marks is not going to lead expert results.
*NOTE: The brand of pencil that you use will affect its performance. Check out my comparison chart and see what brands I recommend here.
Let's take a look at a few of the most common techniques that are used to produce strong images with colored pencils.

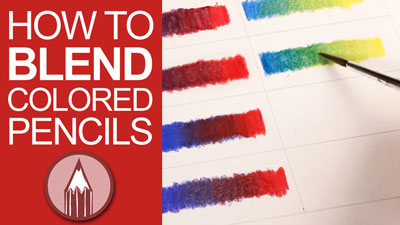
Hatching and cross hatching, commonly used interchangeably, are drawing methods that utilize lines to create the values and colors. As lines cross over each, layering occurs creating mixed colors and more intense hues. Value is also manipulated by the frequency of the crossing lines. As the layers are developed, the colors become more natural and convincing. Hatching and cross hatching is a quick way to get information on the surface using colored pencils. The next two techniques are a bit more time consuming.
Local color refers to the colors that are actually observed on a subject's surface. The spheres that are drawn in this tutorial are green, so green is considered the local color. When we work with colored pencils however, we want to "push" the colors that we see and mix them as much as possible. Since green is made by mixing the colors blue and yellow, we include them as local colors.
First, green is added to the sphere. Next blue is used in shadowed areas and yellow is used on the highlighted areas. The values are intensified using white and brown. The local colors are layered on top.
Since colored pencils typically consist of a waxy binder, layers become easier to mix as they are added. When a certain amount of colored pencil material is applied to the surface, the waxy binder works to encourage blending. At this stage and as more material is added, burnishing will occur. Burnishing results in a smoother surface with colors and values evenly blending together.
An underpainting is usually created to establish values or color temperature in a color drawing or painting. The "underpainting" is created first using just one color and the values of that color. The local color is layered on top of the underpainting. The values established in the underpainting will be noticeable and effect the finished drawing. Creating an underpainting first allows the artist to concentrate on values only in one stage of the drawing and the pure hue in the latter stages of the drawing.