
It seems simple enough – “draw what you see”. We’ve all heard it before and it is a fine suggestion because it does work. We do need to draw what we see. But if you don’t know what to look for, or perhaps more importantly – how to look for it, then this statement can be frustrating.
Fortunately, there are several techniques we can use to help us see – thus helping us to improve our drawing.
These seven techniques are designed to improve your accuracy in your drawings. They aren’t a perfect solution and they do require a bit of practice in order to master them. But keep in mind that drawing is a skill that can be attained by anyone if they are willing to put in a little work.
Each technique is briefly discussed below with links to detailed lessons on the subject.
1. Sighting / Measuring
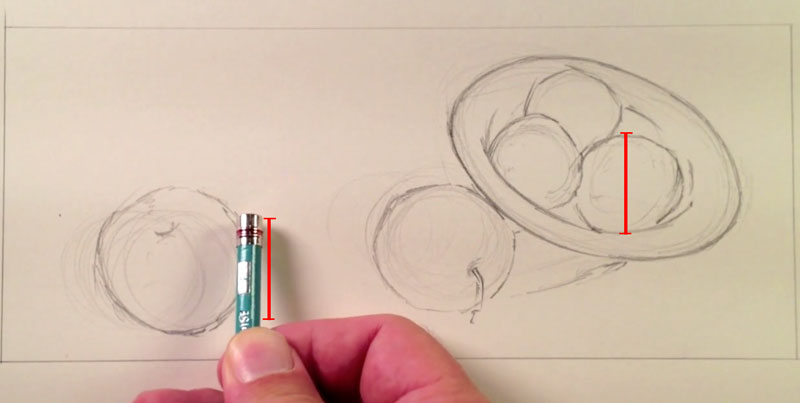
We can use “tools” to measure proportions of our subject in order to improve the accuracy of what we record in our drawings. We can use any tool that we wish, but a pencil works surprisingly well.
Here’s how it works. Begin by extending your arm out toward your subject with your pencil in hand. Be sure that your arm is extended completely without any bending at the elbow. Bring your line of sight down to your shoulder and close one eye. Use the end of your pencil (or the tip) and line it up with the top of the highest or widest point on the object. Use your thumb to mark the bottom.
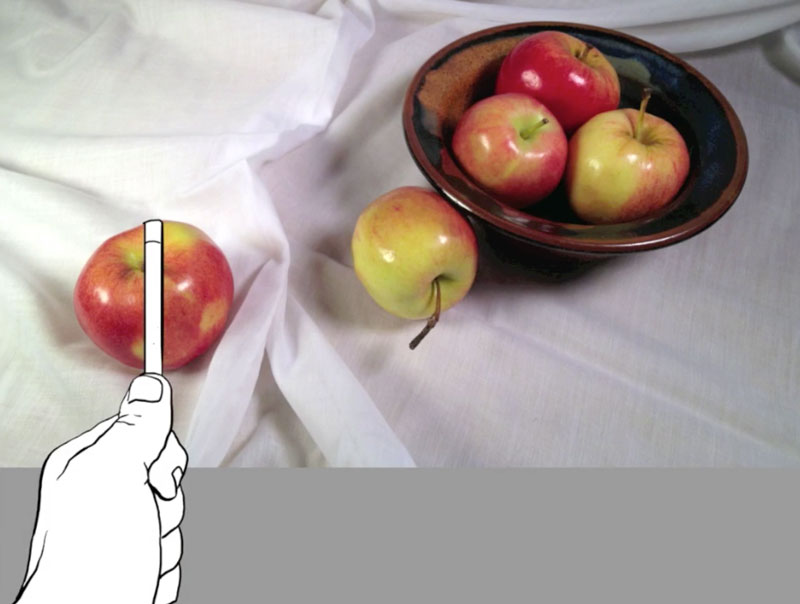 You now have a measurement “unit” that you can use to compare and record the size of the object on your drawing surface. You can use this measurement to record the object on the drawing surface or simply make comparisons to what you have already drawn.
You can use the pencil to measure other objects within the same scene in the same manner.
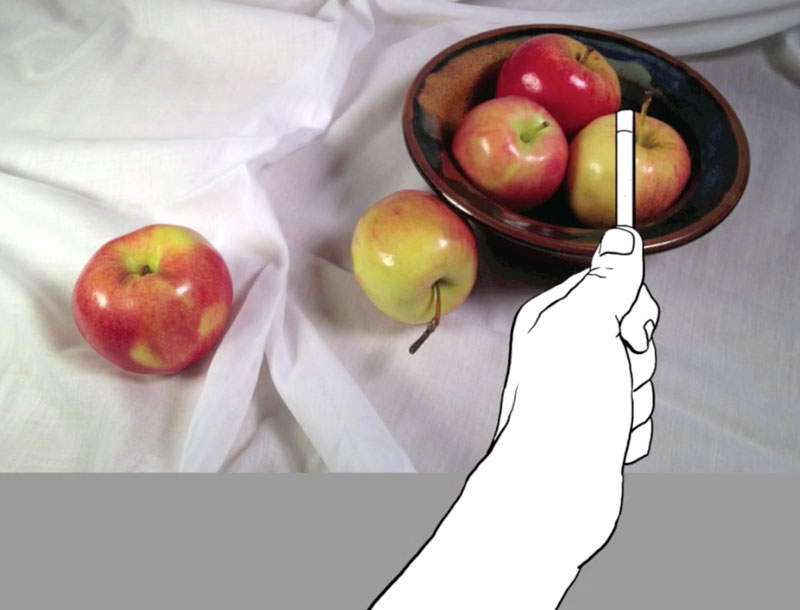
And use it to compare the proportional relationships with the other objects within the scene to ensure that the relationships are correct.
This technique works best when drawing directly from life. However, a modified version can be used when drawing from photos if the size of the photo reference is exactly the same size as the drawing surface. Simply take the measurement from the reference and bring it over to the drawing surface. There’s no need to keep your arm straight or close one eye since your paper is the same size as your reference.
- The Secrets to Drawing – Drawing From Life (Membership Required)
- Graphite Light Bulb Live Lesson Series (Membership Required)
2. The Grid Technique
The grid technique is an approach to drawing that breaks the subject down into “bite-sized” pieces of visual information. A grid is drawn over a photo reference while a proportional grid is drawn lightly on the drawing surface. Each square within the grid on the reference corresponds to a square on the drawing surface.
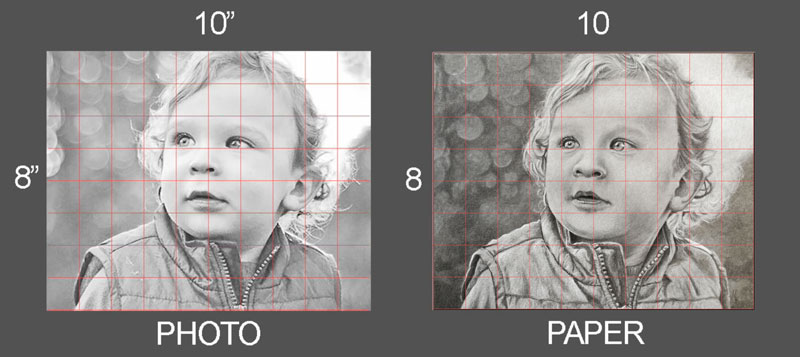
Since the subject is simplified into smaller squares, the lines, shapes, and values are also simplified making it easier to focus on what you are actually seeing.
This technique works for any subject that you draw, but it is most useful for portraits when accuracy is of the upmost importance.
When using this technique, be sure to draw your grid lines very lightly on the drawing surface. You don’t want the grid lines to be visible when the drawing is complete.
- How to Draw With a Grid
- The Secrets to Drawing – Drawing From Photos (Membership Required)
- The Colored Pencil Course – Transferring Images (Membership Required)
- Portrait Drawing The Smart Way – Grid Drawing Part One (Membership Required)
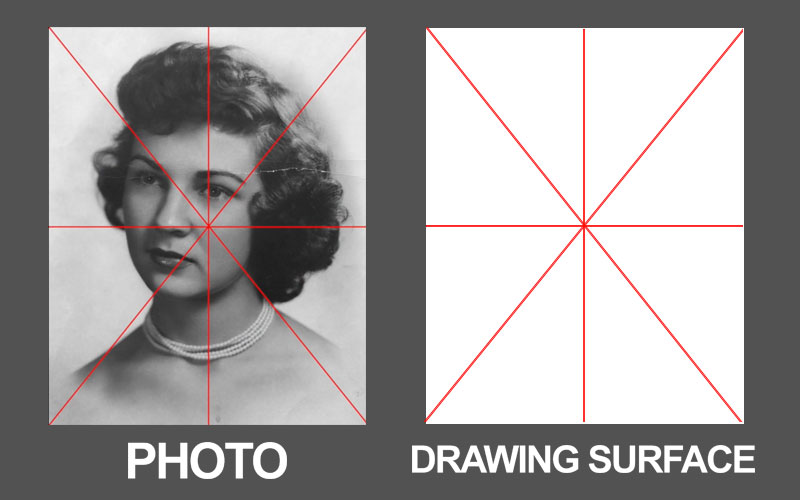
3. Triangular Grid Technique
An alternative to using the traditional grid technique is the triangular grid technique. This technique uses far less lines but requires a bit more from the artist.
With this technique, a grid made of triangles is created on both the photo reference and the drawing surface. This grid is created by dividing the length and width and then drawing lines diagonally from each of the corners. This creates eight triangles within the grid.
Using a compass or proportional divider, measurements can be taken from the photo reference and then transferred to the drawing surface. The end of the compass is positioned in the center as marks are made in locations where important bits of information cross over the lines of the grid.
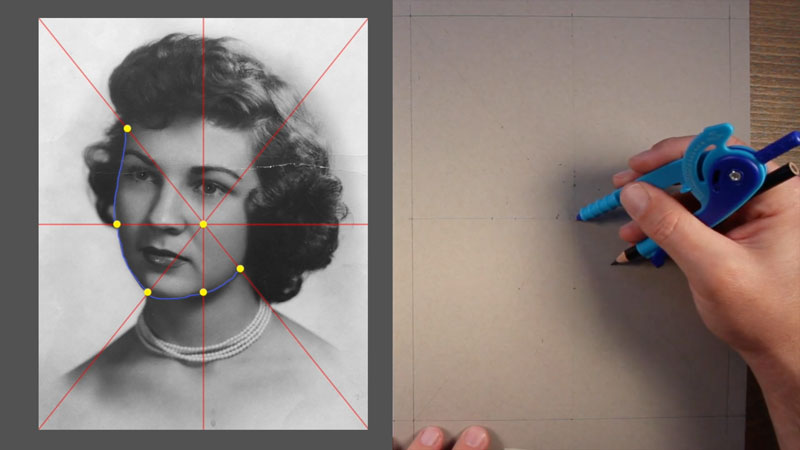
This essentially creates a collection of marks that can be used to draw the contour lines of the subject – somewhat like “connecting the dots”. Here again, this technique can be used for drawing any subject, but it is most useful for portraits.
- Portrait Drawing The Smart Way – Triangular Grid Part One (Membership Required)
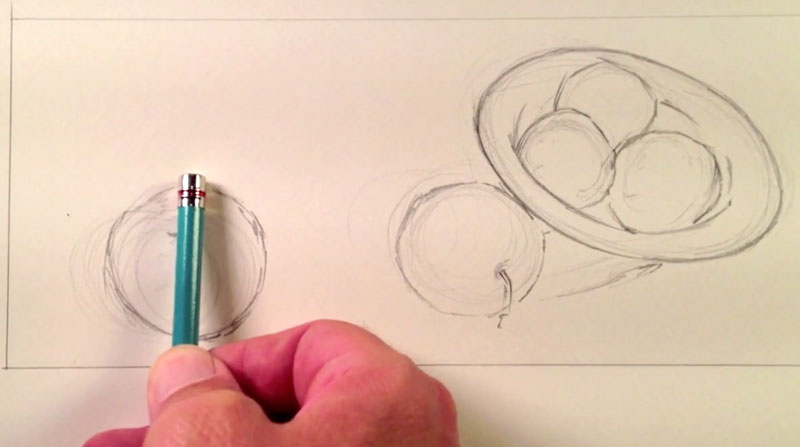
4. Identifying Basic Shapes and Positive and Negative Space
Many objects are quite complex, making them seem difficult to draw. However, even the most complex subjects can be simplified into basic shapes. When we break subjects down into basic shapes, it becomes easier to be accurate in our drawing. Instead of letting the details get in the way, we can focus on the simplified shapes and the relationships of those shapes – leading to greater accuracy in the drawing.
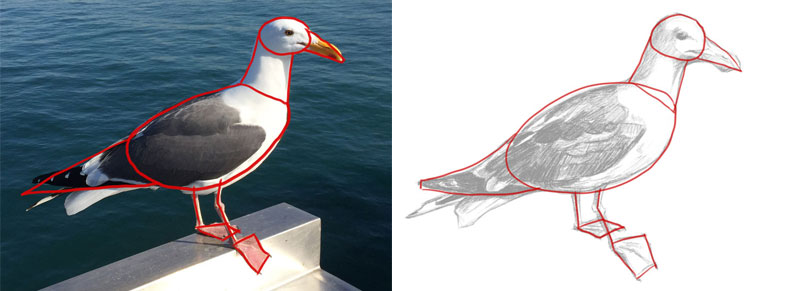
These shapes can be drawn loosely and as we become more confident with the shapes, we can add the details.
We can go even further with shapes when we lay out a drawing. We can pay attention to the relationships of positive and negative shapes (spaces) within the scene. The open areas around the subject form negative shapes.
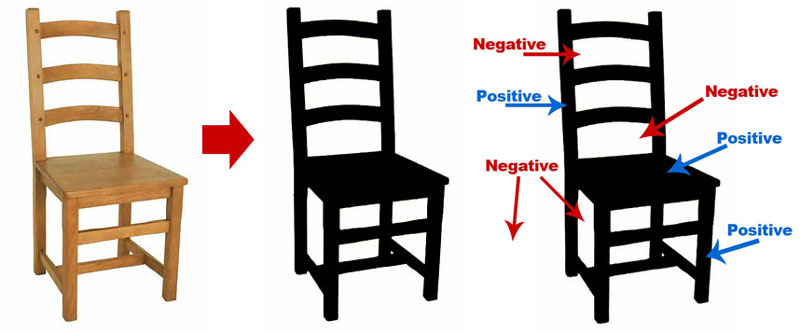
We can compare the relationships of the positive and negative shapes to ensure that the proportions are correct.
5. Linear Perspective
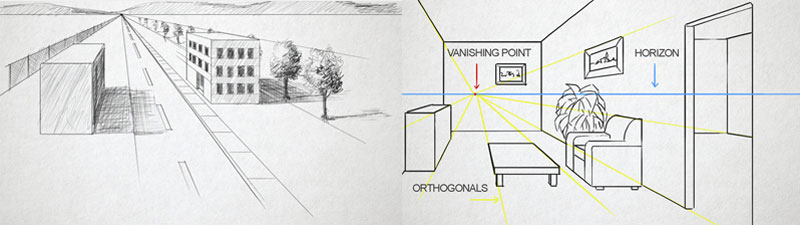
Linear perspective is a system that uses lines to aid the artist in creating the illusion of space in a drawing. It is a structured system that uses a vanishing point (or points) as a reference point for drawing forms. Although linear perspective can be used for drawing any object in space, it is mostly used for drawing architectural elements such as buildings, windows, doors, and interior scenes.
One Point Perspective – In this form of perspective, one vanishing point is placed on the horizon line. This type of perspective is typically used when the objects within the scene are viewed from a “flat” view. When this occurs, simple shapes (squares, rectangles, etc.) can be used to describe the objects. To create the illusion of depth, lines are drawn from the corners of objects back to the vanishing point.
- One Point Perspective
- The Secrets to Drawing – One Point Perspective (Membership Required)
- One Point Perspective – Recorded Live Lesson (Membership Required)

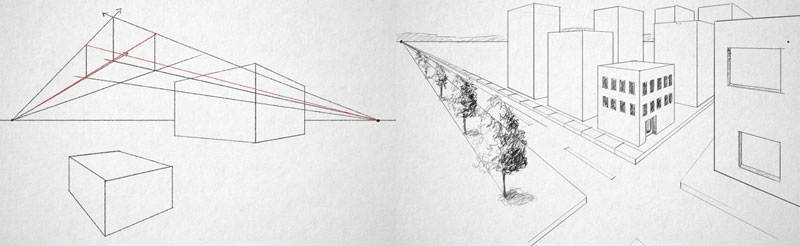
Two Point Perspective – Two point perspective differs from one point perspective in that it uses two vanishing points instead of one. Both vanishing points are placed on the horizon line with a good amount of space separating them. Instead of starting with the shape of the object like we do with one point perspective, the corner of the subject is typically drawn first. Lines are then drawn from each end of the corner back to each of the vanishing points to facilitate in creating the illusion of space.
- Two Point Perspective
- How to Draw a Maze with Two Point Perspective
- The Secrets to Drawing – Two Point Perspective (Membership Required)
- Two Point Perspective – Recorded Live Lesson (Membership Required)
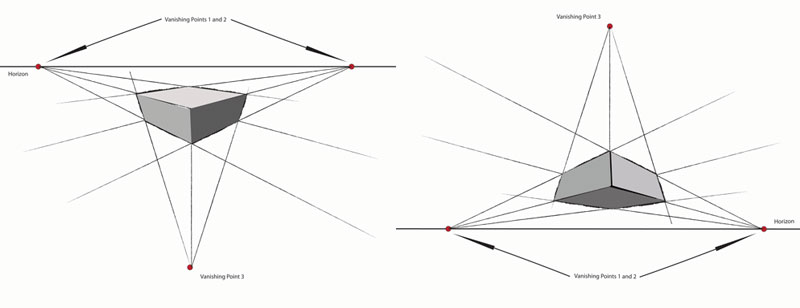
Three Point Perspective – Three point perspective is used to a lesser degree since it is mostly reserved for drawings that feature extreme angles. When drawing the subject from a “worm’s eye view” or a “bird’s eye view”, three point perspective can be extremely useful. As the name implies, three point perspective utilizes three vanishing points. Two of the vanishing points are placed on the horizon line while the third is either placed far above or far below.
- Three Point Perspective
- The Secrets to Drawing – Three Point Perspective (Membership Required)
- Three Point Perspective – Recorded Live Lesson (Membership Required)
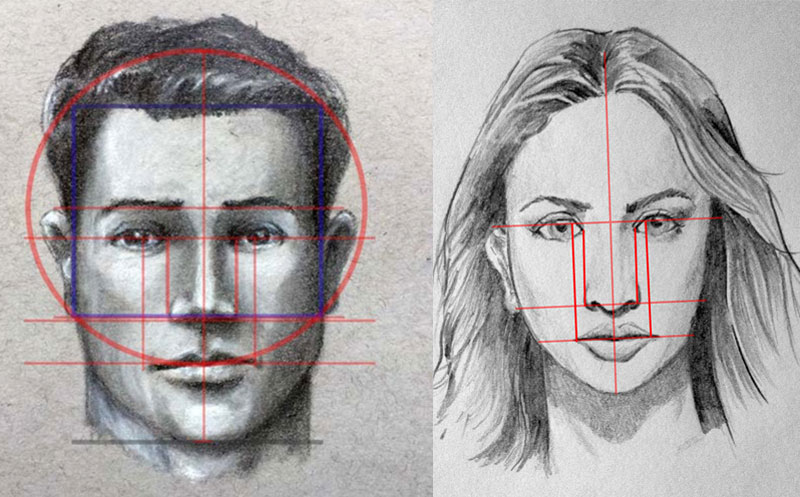
6. Basic Facial Proportions
Although every face is different, certain approximate facial proportions do exist. We can use these approximations to ensure that the features of the face are placed in the right locations and that the size of each of the features are natural. We still have to observe the face when drawing a portrait, but knowing the general locations of the eyes, nose, mouth, etc. can help us be sure that what we are putting to paper is “in line” with what we are observing.
- Basic Facial Proportions – How to Draw a Face
- The Secrets to Drawing – Facial Proportions (Membership Required)
- Portrait Drawing The Smart Way – Facial Proportions (Membership Required)
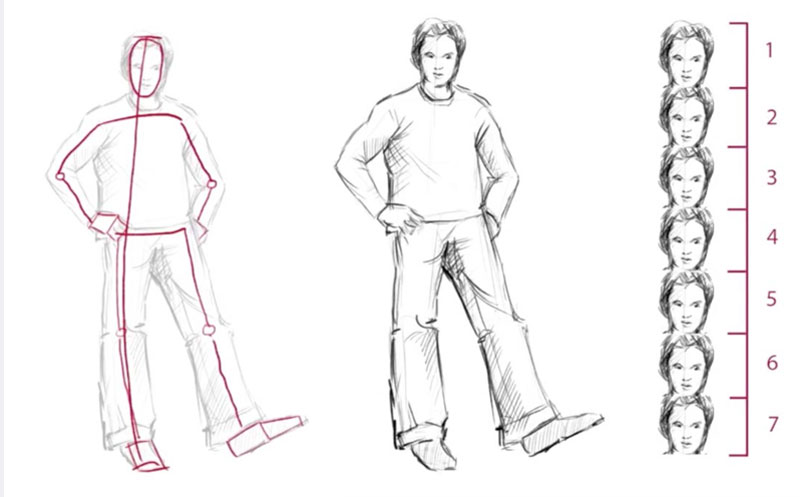
7. Figure Proportions and Gesture Drawing
Just as knowledge of basic facial proportions can be used to ensure accuracy in portrait drawing, knowledge of approximate figure proportions can aid in creating accurate figure drawings. Every figure is different so it’s important to recognize that there is no “one size fits all” solution to figure drawing. But combined with careful observation, knowledge of the basic proportions of the figure certainly helps in creating accurate drawings.
Gesture drawing can also be used to improve accuracy, especially when drawing the figure. Gesture drawing utilizes quick, loose lines and shapes to “find” the pose of the figure. Details are mostly omitted as the focus is to capture the weight and proportion of the figure in a short amount of time.
After the initial gesture is drawn, the artist can develop the details of the drawing after they are confident with the accuracy of the initial sketch. Gesture drawing is especially useful when the figure is in a position where the basic proportions are more difficult to recognize as is the case with foreshortening.
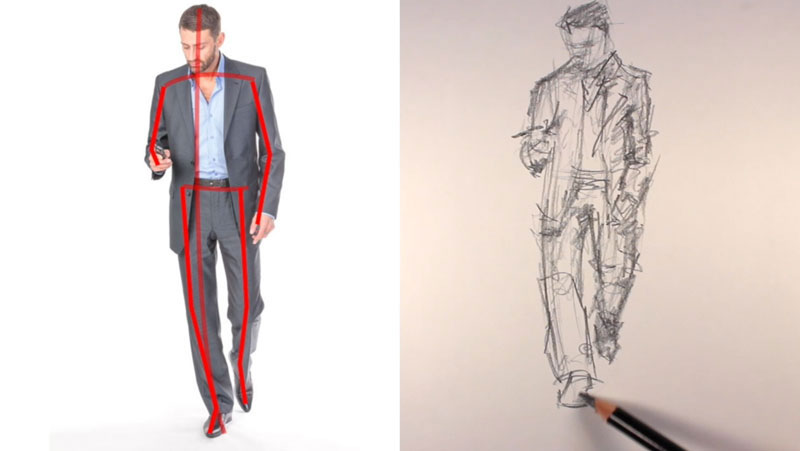
When combined, gesture drawing and knowledge of basic figure proportions often leads to success when drawing the human figure.
If so, join over 36,000 others that receive our newsletter with new drawing and painting lessons. Plus, check out three of our course videos and ebooks for free.


Lesson Discussion
Comments are closed.
I really like the tip to divide the paper into a grid of triangles, and to focus on drawing smaller triangles within those to get accurate proportions. I have started to get into drawing as one of my hobbies, and I always have problems with combining different body parts with the correct proportions. I will be sure to try this tip the next time I am drawing to get more accurate proportions!