The grid technique is a method used to create accurate drawings from photos. Sometimes when we, as artists, are creating drawings and paintings, the need arises for accuracy. The grid technique is a great "tried and true" method to create accurate drawings from photos. It is used by many portrait artists and illustrators and can actually help you improve your observation skills. And improving your observation skills will result in improved drawing skills.
First you'll need a photo. Draw a grid over the top of the photo. You may choose to draw the grid directly on the photo or if the photo needs to be preserved, you may create the grid on a piece of acetate and place the acetate on the photo. The size of your grid squares will be dictated by the size of the photo. Obviously, the smaller the photo, the smaller the grid squares. On the flip side of this, larger photos would require larger squares. It is essential that you make sure that the grid that you draw on the photo and the grid that you draw on your paper are proportional to each other. If they aren't, then you will have distortion in your drawing.
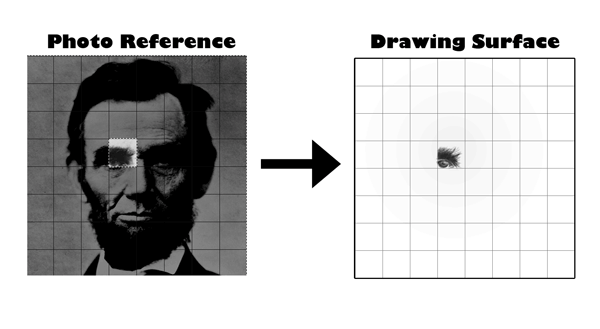
Now you will draw a grid that is proportional to the grid on your photo on your drawing surface. For example, if your photo is 8" by 8" and you have made a grid made of inch squares, your drawing paper could be 8" by 8", 16" by 16", 24" by 24" and so on. If you choose to work on 16" by 16" paper, your grid squares will need to be 2", since 2" is 2 times larger than 1 inch. If you choose to work on 24" by 24" paper, your grid squares would need to be 3" and so on for other proportional sizes. A good way of checking to see if your drawing grid matches your photo grid is counting the number of boxes. You should have the same number of boxes on both grids. If you don't, then you've done something wrong.

Next, draw what shapes, lines, and values that you see in each square on the photo to the corresponding square on the drawing surface. Pay special attention to the positive and negative shapes in each square. Try not to think about what object you are drawing. Instead, concentrate on just the shapes, lines, and values. Draw each square and take your time. In the end, you'll find that you've created an accurate drawing from a photo.