
Subjects with Pen and Ink: Flowers
This course features:
Over 8 Hours of Instruction
32 Videos
6 eBooks
30 Day Money Back Guarantee
Course Curriculum
Lesson Description
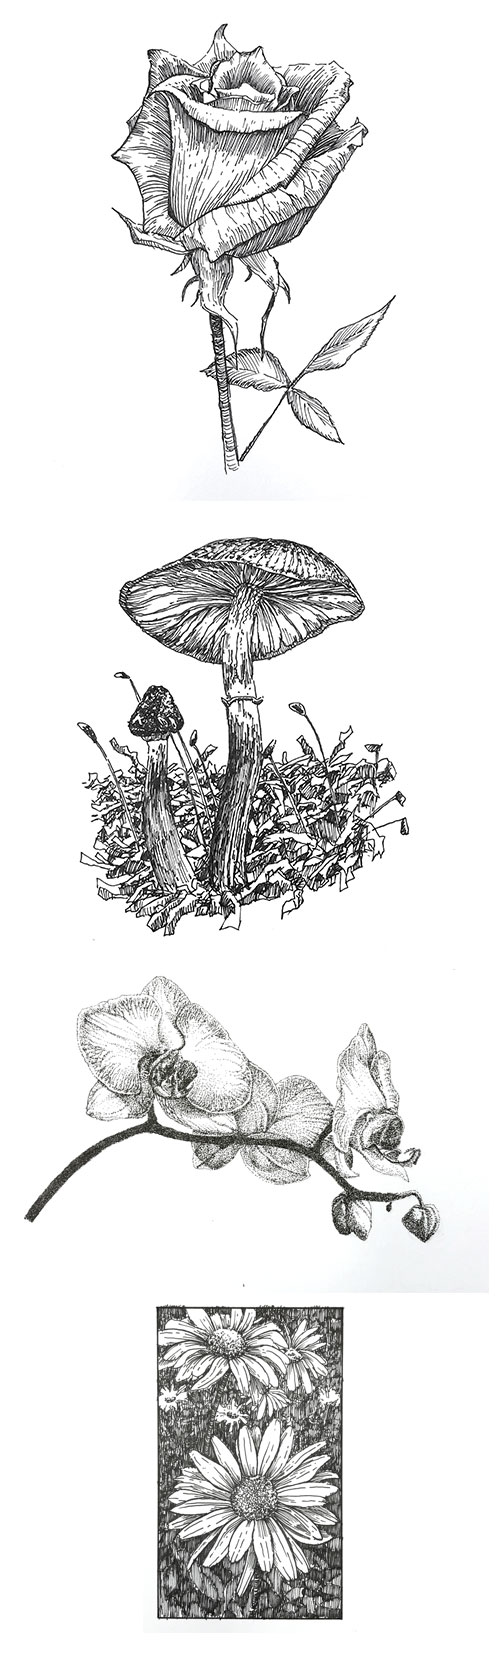
In this lesson series, we’ll draw several flowers (and fungi) with pen and ink.
Lesson 6 - Rose
In lesson six, we use technical drawing pens and hatching to create a drawing of a rose on smooth Bristol paper.
Lesson 7 - Orchid
In lesson seven, we use technical drawing pens and stippling to create a drawing of an orchid.
Lesson 8 - Mushrooms
In lesson eight, we use technical drawing pens and cross hatching to create a drawing of mushrooms.
Lesson 9 - Daisies
In lesson nine, we use technical drawing pens and hatching to create a drawing of daisies.
Lesson Materials
- Technical Drawing Pens
- Dip or Nib Pens
- Bottled Ink (Carbon Black)
- Smooth Bristol Paper
- 2H, H, or HB Graphite Pencil
- Kneaded Eraser
Lesson Resources
References
Download eBook
Reference Images
Finished Drawing
I am so enjoying these daily lessons- a nice way to structure my days.
Odd, it is actually 4:00 something PM here.
Learned a lot from this – Inking is improving as I begin to accept the tediousness of it. At first, I was mindlessly making marks. Appreciate these daily prompts. Otherwise, I would be thinking about what I might like to draw all day rather than actually drawing. Thank you for this wonderful lesson in mindfulness.
Great theme with these pen and ink lessons! I have also seen some very interesting and expressive ink drawings where the artist used a “dot hatching” technique. It could be interesting to see an example of this as well. Just a suggestion. 🌞😊
Stippling Oh yeah, patience is the word Matt. i should have scaled this one down but now i want to see see it thru and focus on the values. Love this series of lessons. Thinking of doing again and using these subjects for a little wash . may be a way to start learning watercolor. tom
the references are missing now.
Ken,
The photo references are linked to above. The link is in the blue box marked “Resources”. The link reads “Photo References – Series 2”.
Matt, I’m halfway through the flowers series. I have a question. These are your reference photos and you provide the excellent lessons for each one. I’m thinking that you have copyright over the illustrations that I do using your photos and lessons. People are asking me for my work. Do you want me to give you credit? I think I should. But, what if I do one that is not up to your standards? I am telling everyone about your courses.
Hi Susan,
I get this question a lot. You are welcome to do whatever you wish with the drawings and paintings that you create from the lessons on this site. However, keep in mind that hundreds – potentially thousands of other people have done the same drawings and paintings. This really takes away from the originality of what you create. I would suggest taking what you learn during the creation process and then apply your knowledge to your own drawings and paintings. This is the best approach.
Hi Matt, for this drawing do we HAVE to use Bristol Paper? I don’t have it- it costs quite a lot on Amazon and the art shops aren’t open yet due to Quarantine. Can i use normal A4 paper or textured Cream-coloured Mixed-Media card instead?
Hi Eugene,
Yes, you can use any surface that you wish. I would try to stay with a white paper if possible so that you have the maximum contrast.
Matt, I feel compelled to say that watching this particular method by your hand was as awesome as anything that I have seen yet on your website. And there is much at this website that is really exceptional. If asked before hand to do something like this, I would have thought that it could only be done digitally with something like Corel Paint. I don’t know what the time lapse video did for the overall time that it took but in any case, the method and skill was a joy to watch over and over. Most of the lessons I do as a dutiful student looking for a voice. This video has me trying to do everything I see as stippling. I hope that I live long enough to get past this but thank you for this video!!!
Hi Matt, this was great to try and get me into a more structured approach to drawing again after a couple of months of having my brains scrambled and my focus taken away by Covid lockdown (things are much better here in Norway now, thankfully). A couple of questions though:
I like the effect of the broken lines you use sometimes for the contour lines, but I can’t always figure out how you decide where to break the line. I suspect it’s something to do with where the light falls but for this photo I really couldn’t see it – any hints?
Also, with these ink drawings in general I feel like I have to use a thicker pen than you do to get my lines looking even approximately like yours (so for this I used a 0.2 rather than a 0.1 pen, for example). Do you think it’s to do with my technique (pressure? angle? just lack of some magical artists’ touch) or just that I’m probably using different paper than yours? I couldn’t find Bristol paper last time I went to my local art store but could order some online – do you think that would make a difference? At the moment I’m just using some relatively cheap drawing paper I found in a bookstore.
(Also agree with what everyone else is saying about patience, sigh. Bane of my life. But practice is good …)
Hi Matt, this was great to try and get me into a more structured approach to drawing again after a couple of months of having my brains scrambled and my focus taken away by Covid lockdown (things are much better here in Norway now, thankfully). A couple of questions though:
I like the effect of the broken lines you use sometimes for the contour lines, but I can’t always figure out how you decide where to break the line. I suspect it’s something to do with where the light falls but for this photo I really couldn’t see it – any hints?
Also, with these ink drawings in general I feel like I have to use a thicker pen than you do to get my lines looking even approximately like yours (so for this I used a 0.2 rather than a 0.1 mm pen, for example). Do you think it’s to do with my technique (pressure? angle? just lack of some magical artists’ touch) or just that I’m probably using different paper than yours? I couldn’t find Bristol paper last time I went to my local art store but could order some online – do you think that would make a difference? At the moment I’m just using some relatively cheap drawing paper I found in a bookstore.
(Also agree with what everyone else is saying about patience, sigh. Bane of my life. But practice is good …)
Hi Ashild,
Typically, you’ll want to use broken lines in areas where you want to define an edge, but perhaps this edge is in light. Here we would see a highlight, but we still need to define the edge simply because we’re working with line. A broken line defines the edge, but does so in a more subtle way.
It’s hard to say why you need to use a thicker pen to create smaller lines. It could have something to do with the pressure that you place on the pen. If you are heavy-handed, then a thinner pen would produce thicker marks. The opposite of this is true as well. A broader pen could produce thinner lines, if you place very light pressure on the pen.
This is such a lovely delicate way of portraying orchids. It lends itself to the delicacy of the petals. As a matter of interest, what do you think of dot pens? On the slowest setting you have greater control over where the dots are going.
I recently completed a Camelia using this method ( without a dotspen) and can see where I went wrong in that I used a solid line for the outline of the flower not dots as you have used. I love this picture and can’t wait to give it a go.
Hey Matt, after being half way through your pen and ink course for ages I know the techniques.
I’m wondering though are there anymore techniques for pen & ink, I’m doing an Elvis portrait I donated as a prize for ‘Elvis quiz’
I’m a huge fan and we all part of a stream he does once a week.
Anyway I don’t feel that the techniques will work for the Elvis photo ref I’m doing.
I got this large 72 pack of just greys and I didn’t.know there was that many variations !!!!
I won’t use them all but they have the lightest ones and I’ve already worked out that with other packs of greys by faber castell, Sakura Koi.
So I’m doing shading similar to pencil, I think it’s going to turn out well I think.
The 72 pack are Arteza, I’m starting to really like their brand.
They are America and now they have in UK which is great because I do like their stuff.
I know I can’t put it in the members minute because of copyright (rightly so).
It’s actually an American Lass who won my drawing and in giving her the original.
It’s going off to Utah.
If I’ve said this before I apologise because it’s this fibro fog ya get with Fibromyalgia !!!!
It’s good to be back, this year is my ‘learning more year !!
If it wasn’t for my health conditions and constant pain and fatigue, last year there were more chunks of being ill and tired.
Anyway I know ya know about what I go through but I love art so much and I honestly didn’t think j would get back to it after art teacher was a bit of a pain, she made me paint everything and there was one painting she loved and it was a tiger because I love them and still do.
It wasn’t enough to get a grade 2, it was a good grade but I needed a grade 1 to get a GCSe, when I was at school many moons ago ha ha lol.
Well they had CSE and GCE and they merged it by time my kids got to big school.
So it was a CSE, I was glad i got one painting into the school exhibition and people liked it.
I should of stuck to it but needed work ya know.
So sorry I’ve babbled again again Fibromyalgia, it’s not nice.
All the best Matt, your the best tutor!!!!!! 🤩 xxxxx
Stippling is a never ending story, right? But it looks amazing.