
The Oil Pastel Course: Black-eyed Susans
This course features:
Over 4.5 Hours of Instruction
22 Videos
7 eBooks
30 Day Money Back Guarantee
Course Curriculum
MODULE 1: INTRODUCTION AND MATERIALS
MODULE 2: APPLICATION TECHNIQUES
MODULE 3: THE BASICS OF COLOR
MODULE 4: BASIC FORMS
MODULE 5: BLACK-EYED SUSANS
Composition and Contours (8:11)
Base Layers (12:12)
Family of Flowers (5:46)
Masses of Grasses (15:09)
MODULE 6: IMPASTO SKY
MODULE 7: COLORFUL PORTRAIT
Lesson Description
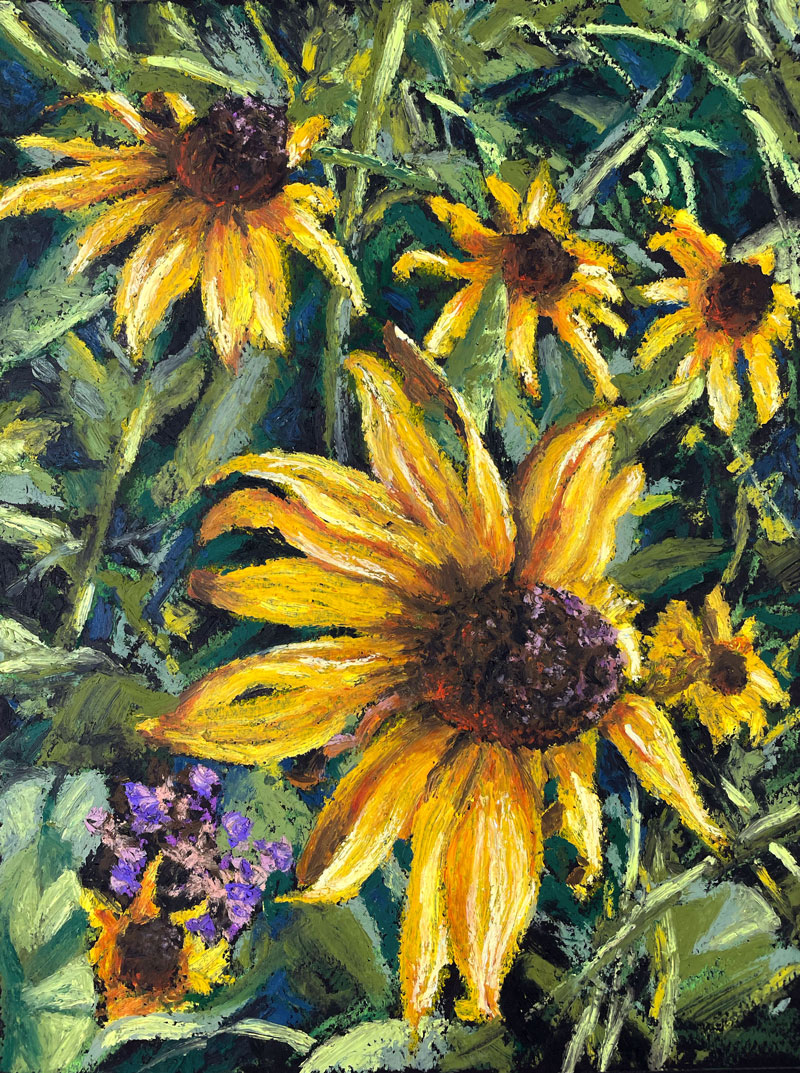
In this module, we work on black paper and create a colorful and bright image of several Black-eyed Susans.
Lesson 1 - Composition and Contours
In this lesson, we analyze our composition and draw the contour lines of the subject with graphite pencil.
Lesson 2 - Base Layers
In this lesson, we apply our initial applications of oil pastel and begin layering colors on the main flower.
Lesson 3 - The Cone
In this lesson, we develop the supporting flowers.
Lesson 4 - Finishing Touches
In this lesson, we complete the image by addressing the background.
Lesson Materials
- Black Canson Mi-Teintes Pastel Paper
- Oil Pastels
- H-2H Graphite Pencil
Matt_
Omg! Thank you sooo much for these beautiful and helpful lessons! I am so happy you are doing these flowers as I have some flowers of my own I wanted to paint. This is an amazing lesson and you have been so inspiring to me. THANK YOU! PS_ I have mentioned I became an artist when Pandemic and you and Ashley have been the best teachers ever and my motivation to keep painting every single day. These lessons always make my days the happiest! and the Virtual Instructor and its the best thing that ever happened to me.
Blessing to you and family
S
Hi Matt,
would it be possible to add a little more light on your right screen where you do your examples of line drawings ill admit I am visually challenged but they are so dark I have to guess my way through my line drawings thank you Terri Rich
Thank you, enjoying the lessons! I got some oil pastels for my birthday that are more of a kids set type quality, what is the difference between the oil pastels you have chosen to use, why did you choose two brands, and what might I expect to be the difference between those brands and what I have besides, I’m assuming, price?
I’m having the same issues. For me, they don’t have nearly enough pigment and don’t rally blend very well.
*really
Enjoying this lesson. I have bith sets of oil pastels. Is it possible for you to list which colors you used specifically? Thank you.
Hi Michelle,
I would try to work by matching the colors that you see. This will help you make better decisions regarding color when you create your own art – which is what you want anyway.
Yes! Thank you Matt. I am working on my need for perfection, which ultimately keeps me from enjoying. I love how this lesson progressed, I trusted the process you presented (sometimes not understanding the choice of darker colors), but in the end it was beautiful and unique. The oil pastels (and soft pastels) give me “wiggle room” when I perceive mistakes…the mistakes can be blended into something that works in the overall piece.
Since the oil pastel doesn’t ever fully dry how do you store your finished artwork?
Hello Matt,
You are a great teacher and I admire how you can explain and simplify the process of creating artwork. I am a newbie with oil pastel. I have two questions for you.
1. Should I avoid blending colours while using oil pastel, as opposed to dry pastels? When is it more desirable to blend or not?
2. I noticed that you have headphones on in your video. What are you listening to while creating? I always listen to music while creating. I am curious about the importance of the work environment when I watch people create.