
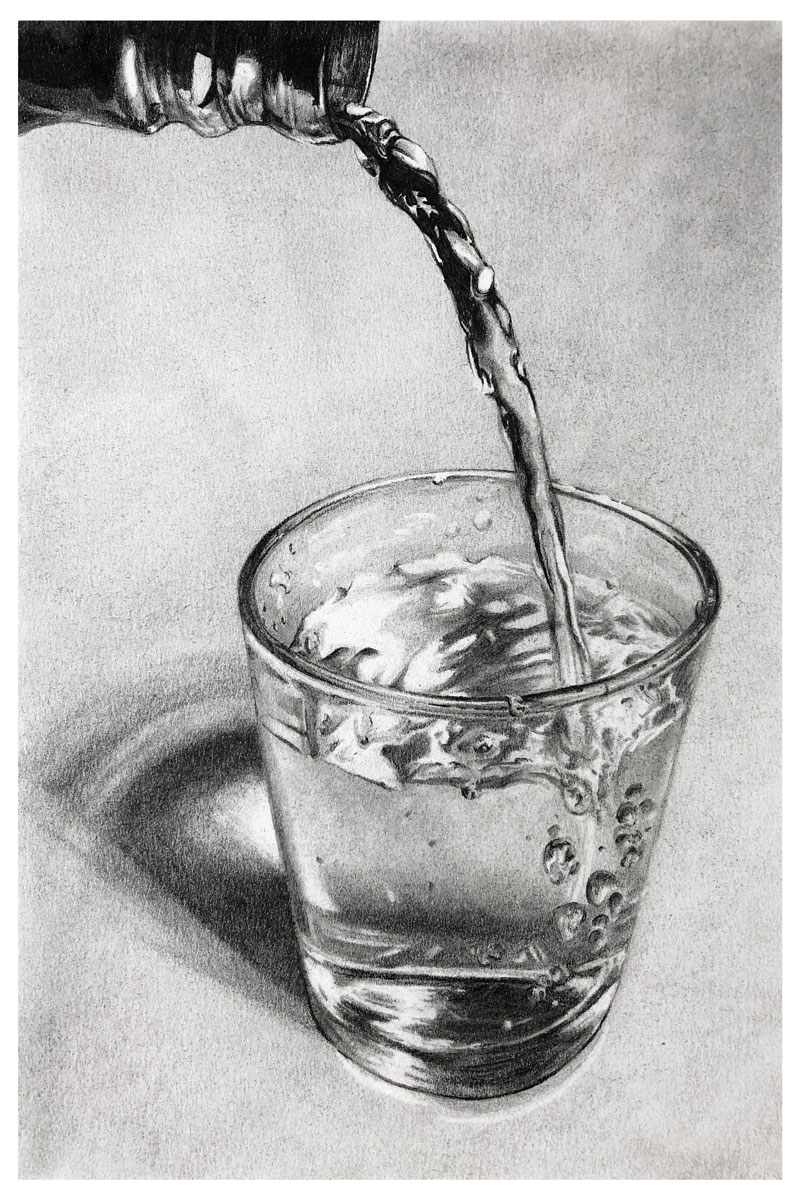
Realistic Pencil Drawing: Sighting - Glass of Water

Course Curriculum
Lesson Description
This module focuses on developing accurate observation skills through the sighting method. This lesson teaches artists how to measure proportions, angles, and relationships directly from a subject and translate them accurately onto paper. Using a glass of water as the subject, students learn how careful measurement and observation are essential for achieving realism.
Understanding the Sighting Method
The lesson begins by introducing the sighting technique and explaining how artists use it to judge relative proportions. You’ll learn how to use your pencil as a measuring tool to compare heights, widths, and angles. This method trains your eye to see relationships more clearly and helps prevent common drawing errors caused by guesswork.
Establishing Accurate Proportions
A major emphasis of this module is establishing correct proportions from the very beginning. You’ll learn how to carefully observe the glass of water and translate its dimensions onto the drawing surface. The class demonstrates how to check and recheck measurements throughout the drawing process, ensuring that the structure remains accurate as the drawing develops.
Drawing Transparent Forms
The glass of water provides an excellent subject for learning how to draw transparent objects. You’ll explore how edges, distortions, and reflections define glass and water. The lesson explains how value changes, rather than outlines, create the illusion of transparency, helping the object appear realistic and convincing.
Developing Value and Subtle Transitions
Once the structure is in place, the class demonstrates how to introduce values gradually. You’ll learn how to observe subtle shifts in light and shadow and translate them into soft graphite transitions. Emphasis is placed on restraint and precision, allowing highlights and reflections to remain clean while darker values provide contrast and form.
Improving Observation and Accuracy
Throughout the lesson, observation is reinforced as the most important skill in realistic drawing. You’ll learn how to slow down, compare relationships, and make adjustments as needed. These habits help improve accuracy not only in this drawing but in all future realistic subjects.
A Critical Skill for Realistic Drawing
By the end of this module, you’ll have a carefully observed drawing and a solid understanding of the sighting method. This lesson provides a crucial skill for realistic drawing, giving artists the confidence and tools needed to tackle complex subjects with accuracy and control.
Specific Lessons
Lesson 1 - Materials and Sighting
In this lesson, we take a look at the materials used to complete the drawing. We use sighting and measuring to place the subjects within the picture plan and create the contour line drawing.
Lesson 2 - Bottle and Water Stream
In this lesson, we begin developing the value and texture of the bottle and water stream at the top of the picture plane.
Lesson 3 - Upper Glass and Water
In this lesson, we continue working down the picture plane, addressing the upper portion of the glass and water.
Lesson 4 - Finishing the Glass of Water
In this lesson, we complete the drawing by addressing the bottom of the glass and cast shadow behind it.
Lesson Materials
- Stonehenge Polar White Drawing Paper
- Lead Holder
- Graphite Grades (2H, HB, 2B, 4B)
- Blending Stumps
- Precise Vinyl or Plastic Eraser (Tombow Mono)
- Kneaded Eraser
- Powdered Graphite
- Mop Brush
Lesson Resources
References
Download eBook
Photo Reference
Finished Drawing

Founder of The Virtual Instructor, artist and teacher. Matt makes learning art easy to understand and enjoyable.
Love these lessons I am having a lot of fun. Matt you are an extraordinary Instructor so glad I found your classes.
Having just begun to learn to draw, I’m focusing on learning to draw realistic, representational images using graphite. Though I’m tempted to venture into other media (pen and ink which will be my next venture, colored pencils, watercolor, line and wash), for now I’m focused mainly on graphite. (Guess it stems from my love of b/w photography.) All that’s to say, I really appreciate these lessons. Thanks so much for providing them.
So I have a question in regards to arches (or any) cold press paper and graphite. I recently read a book on realistic animal drawing where the artist only used cold pressed paper and a layering process. I was curious if you have tried this method and what your thoughts are on the topic.
Using on hatching, cross hatching, no blender, rarely eraser. Would be cool live lesson imo.
What is powdered graphite? I cannot find it at the art supply stores I shop at in Canada. Is there something else I can use ?
Get graphite stick and use razor on side. Or just use your pencil with sandpaper over a plate to catch powder.
Hi Lynne, Yes, hard to find in Canada. Trever already gave you a good tip. If you can find woodless graphite pencils (just make sure they are graphite, not charcoal) you can simply rub those on 150 grit sandpaper then shake the powder into a dish or use a metal funnel over a small jar. Or, you can use a sharp knife (X-acto type) as suggested by Trever as well. There are a few suppliers online that carry the powder in jars such as Delta Art and Opus Art but it quickly becomes expensive.
Can you please clarify the paper size for the Water Glass exercise? The Polar White Stonehenge comes in 22.25 x 30.5 sheets. I was not sure what size to cut it, so I used PS to find the actual size of the finished drawing. Then I made the photo reference equal to finished drawing, and used a ruler to compare exact distances. I am not sure I got the point of the measuring and mapping part of the lesson. Maybe if I know the dimension of the paper you are working with, it will make more sense.
Hi Susan,
Measuring and mapping can be approached differently depending on your resource – photo or life. You could definitely do what you did by printing out the photo and making your drawing surface exactly the same size. Using a ruler may prove to be too cumbersome, so you may get used to using your pencil to save time. You can also observe the reference image placed on an easel or even on your computer. By stretching out your arm, you can take a measurement with your pencil and then mark the measurements on your paper. In this case, the size of the paper is really irrelevant. Obviously, you can use this method in the same way with a live subject. It’s not a perfect method, but it does help to get relationships of angles, shapes, etc. in place proportionally. You may check out this lesson for some further clarification…https://thevirtualinstructor.com/members/25-days-to-better-drawings-day-nineteen-sighting-measuring-and-mapping/
Matt, is there a difference between stonehenge polar white 90lb drawing paper and regular white paper?
Matt, I am so proud. I just finished the falcon and it’s really a success for me. And I learned that being patient ends with a great result. I’m very happy with may drawing. Youppi! Thank you. Now, the gass of water.
Awesome to hear, Lucie!
Matt, thank you for these wonderful lessons. I have not been able to get the ebooks however. Is there something I am not accessing correctly.
Hi Cheri,
Look for the “Resources” tab above these comments and below the video. There you will find a link to open the ebook for this module.
This is amazing!
Hi Matt. Your courses and instruction are amazing. I’m on my 7-day trial right now but, I’m hooked. Heading over to Join. I am so happy I found you. I have lots to learn. I’m excited. Thank you.