
Live Lessons: "Portrait" with Charcoal
Lessons
About This Lesson Series...
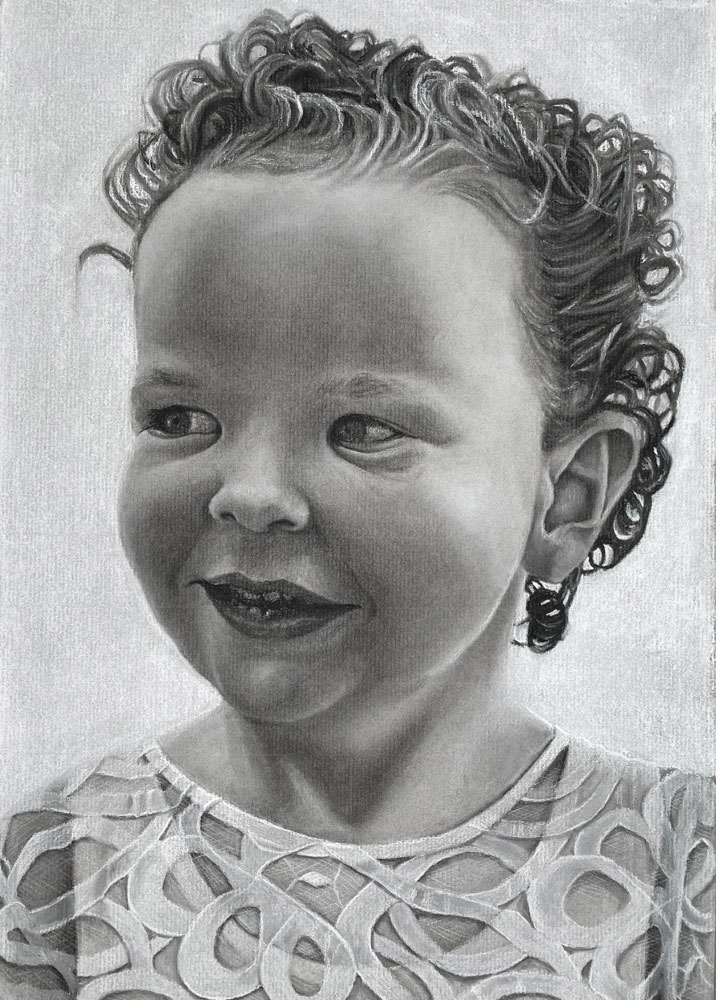
In this lesson series, we develop a portrait with charcoal on gray paper.
Lesson 1 (1:10:38)
In lesson one, we discuss the materials and surface and begin adding vine charcoal to the surface.
Lesson 2 (1:02:25)
In lesson two, we continue work on the "underpainting", addressing the main features of the face.
Lesson 3 (1:12:56)
In lesson three, we complete the "underpainting" with vine charcoal.
Lesson 4 (1:04:54)
In lesson four, we begin refining the drawing and adding details by layering compressed charcoal. We begin this process with the hair.
Lesson 5 (1:09:51)
In lesson five, we begin working down the face, modeling the forehead and starting work on the left eye.
Lesson 6 (1:08:22)
In lesson six, we complete the eyes and work on the nose.
Lesson 7 (1:09:29)
In lesson seven, we address the mouth and lips.
Lesson 8 (1:10:49)
In lesson eight, we finish the cheek and the ear.
Lesson 9 (1:15:38)
In lesson nine, we address the clothing and complete the drawing.
Resources for this Lesson...
Distributing any content downloaded from this site is strictly prohibited and against the terms and conditions of use.
References
Here's what you'll need...
- Toned Gray Paper (Ingres)
- Vine Charcoal
- Compressed Charcoal and Charcoal Pencils
- White Charcoal and White Charcoal Pencils
- Kneaded Eraser
- Blending Stumps or Tortillions
(Disclosure: Links to art materials are affiliate links which means we make a small commission if you purchase at no additional cost to you.)
Should the vine charcoal be extra soft, soft, medium or hard? Same question goes for the white charcoal. Sadly I can no longer be at the live lessons now that the semester started. I teach nights. 🙁 I’m trying to keep up with your lessons at a later time. Thanks.
Hi Kimberly,
There is actually very little deviation between the different grades of charcoal, but if you had to choose – I would go with medium.
Also, what brand is the gray-tone Ingres paper? I’m having a little hard time finding it.
Hi Kimberly,
It is made by Canson.
I’m caught up. Looking forward to tomorrow’s live lesson. Looks great Matt. Thank you!
Enjoying doing this one, though not live. Its great learning, and listening to the banter, looking forward to getting sketchy too. To the person who asked about zest-it, i use it a lot with pastelmat, the secret is only putting a small amount on otherwise it does bleed. I tend to keep away from the edges, then push into edges with a clean brush.
I think I ve guessed the paper chioce for your coloured pencil lesson .
Love the “discussion” about the 4 hour circle! Made my day!
Awesome
What time are your live lessons in Minnesota
HI Tanya,
Live Lessons are broadcast each week at 8:00 PM EDT on Wednesday. There is a countdown timer on the Live Lesson page.