
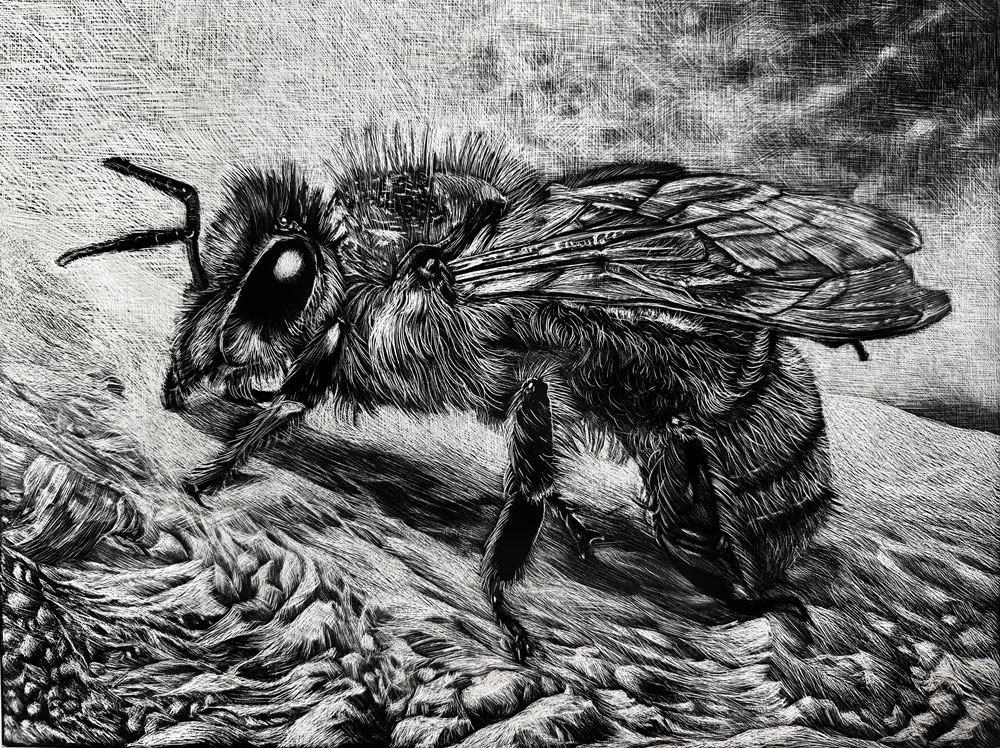
Bee with Scratchboard

Lessons
About This Lesson Series...
The Scratchboard Bee class is an in-depth exploration of scratchboard art, a unique medium that allows for striking contrast and detailed imagery. In this lesson, you’ll learn how to create a realistic and visually compelling image of a bee using scratchboard techniques. This class is perfect for artists interested in experimenting with a medium that emphasizes fine detail, texture, and precision.
Introduction to Scratchboard Techniques
Scratchboard is a medium where a black ink layer covers a white clay-coated board, and the artist removes the black surface to reveal the white beneath. This class begins with an introduction to the tools and techniques needed to navigate this high-contrast medium. You’ll learn about different scratch tools, pressure control, and how to achieve a variety of textures, from soft gradients to crisp lines.
Planning and Composition
Before beginning the scratchwork, careful planning is essential. The class covers how to analyze your subject, in this case, a bee, and translate it into a clear, effective composition. You’ll learn how to simplify complex forms, position elements to create visual interest, and maintain proportional accuracy while preparing your board for scratching.
Capturing Detail and Texture
A primary focus of the class is rendering detail realistically. You’ll explore how to depict the intricate textures of a bee’s wings, the segmented body, and delicate hairs using varied line techniques. The instructor demonstrates methods for layering strokes to suggest depth and dimension, giving the final piece a lifelike quality that captures the essence of the insect.
Light, Shadow, and Contrast
Because scratchboard relies entirely on removing ink to reveal highlights, understanding light and shadow is crucial. This class emphasizes value control, teaching you how to strategically scratch away areas to create realistic lighting, reflections, and shadows. You’ll learn to manipulate contrast to guide the viewer’s eye and enhance the three-dimensional appearance of the bee.
Working with Tools
Scratchboard requires specialized tools, and this lesson explains their uses and effects in detail. You’ll learn how to handle different styluses, blades, and scratch knives to produce varied textures. The instructor provides tips on pressure, angle, and stroke direction, ensuring that each mark contributes meaningfully to the overall composition.
Adding Fine Details
As the piece develops, attention shifts to refining the smallest details that bring the bee to life. You’ll learn how to carefully render delicate lines in the wings, subtle textures on the body, and tiny features such as antennae and legs. These fine touches elevate the artwork, demonstrating how meticulous detail contributes to realism without overwhelming the composition.
Enhancing Depth and Dimension
This class also covers how to create a sense of depth in a scratchboard piece. Techniques such as layering lines, controlling edge sharpness, and varying line density are explored. By strategically applying these methods, you can suggest atmospheric perspective and dimensionality, making your bee appear to occupy a real space rather than existing flatly on the board.
Materials and Practical Tips
Throughout the class, Matt provides guidance on selecting and preparing materials. You’ll learn about scratchboard surfaces, tools, and protective measures to ensure clean, controlled work. Tips for maintaining tools and preventing mistakes are shared, helping you work confidently and efficiently throughout the process.
A Complete Scratchboard Experience
By the end of the Scratchboard Bee class, you will have created a detailed, polished artwork while gaining a comprehensive understanding of scratchboard techniques. This lesson equips you with skills in texture, contrast, light, and precision that can be applied to other subjects and projects, making it an essential study for artists seeking to expand their technical repertoire and explore a unique and rewarding medium.
Specific Lessons
Lesson 1 (1:08:52)
In lesson one, we experiment with scratchboard, take a look at the tools and surfaces, and create a small sketch of a sphere. We also transfer the contour lines of the bee to the finished surface.
Lesson 2 (59:53)
In lesson two, we begin work on the bee. We begin adding details to head and scratch out parts of the background.
Lesson 3 (1:03:56)
In lesson three, we continue work on the bee, adding details to the thorax.
Lesson 4 (1:03:34)
In lesson four, we define the edges of the left side of the bee and create a bit of shadow underneath. We also begin work on the wings.
Lesson 5 (1:10:01)
In lesson five, we work on the wings of the bee, adding transparency and reflection with directional stroking and highlights.
Lesson 6 (1:05:39)
In lesson six, we complete the wings and begin work on the abdomen of the bee.
Lesson 7 (1:08:31)
In lesson seven, we continue work on the abdomen and hind legs.
Lesson 8 (1:04:05)
In lesson eight, we complete the abdomen and begin work on the foreground.
Lesson 9 (1:42:20)
In lesson nine, we complete the image by developing the foreground.
Resources for this Lesson...
Distributing any content downloaded from this site is strictly prohibited and against the terms and conditions of use.
References
Here's what you'll need...
- 9" by 12" Scratchboard Panel
- Scratchboard Tools
- White Pastel
- Pencil or Ball Point Pen
(Disclosure: Links to art materials are affiliate links which means we make a small commission if you purchase at no additional cost to you.)

Founder of The Virtual Instructor, artist and teacher. Matt makes learning art easy to understand and enjoyable.
Love scratchboard so thanks for this live lesson. Sorry that I cannot make the live lessons but Gettin’ Scetchy starts at 11.30pm and these live lessons start at 1.00am here in the UK and I cannot stay awake! So just watched the recording. Love insects also. I used the rainbow scratch-paper for this lesson – my bee looks cool.
Just a note: With my scratchboard kit I received a little bottle of Indian Ink which they recommend to use if you need to correct anything. You just need time to let the ink dry.
You should do a lesson using the Rainbow Scratchpaper. I’m sure the students will absolutely love it.
Hi
I’m from the UK and I’m having trouble getting scratchboard. I’m able to find scratch paper but was wondering if any fello UK people would be kind enough to point me in the right direction
Thank you xx
Hi Sharon
I have received my scratch-boards via an art subscription box but I find that the scratch paper works just as well. Have you tried the rainbow version? It gives lovely effects
This was an amazing test of patience and ability. Fantastic result!
Matt do you have a cold? as there is a noise now and again that sounds like sniffing
Maybe.