
Pencils on Polyester

Course Curriculum
Course Description
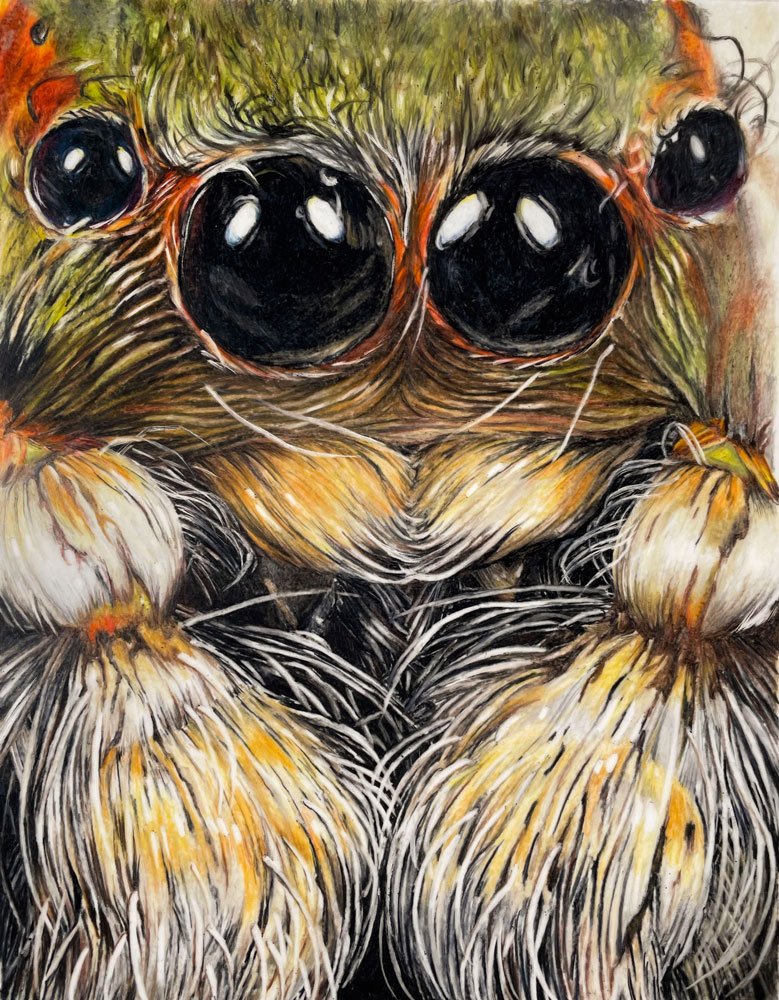
The Pencils on Polyester: A Different Way to Colored Pencil course is an innovative and comprehensive exploration of using colored pencils on polyester film to create vibrant, detailed artwork. In this course, students learn how to adapt traditional colored pencil techniques to a non-porous surface while creating a stunning drawing of a colorful spider. The experience challenges artists to rethink how they apply and layer pigment, offering unique results that differ from traditional paper surfaces.
Introduction to Polyester Film as a Surface
The course begins by introducing polyester film as an alternative drawing surface. Unlike conventional paper, polyester is smooth and non-absorbent, which requires a different approach to layering and burnishing colored pencil pigment. Students learn why polyester film is ideal for achieving exceptionally bright color, sharp detail, and luminous highlights. The lesson explains how the surface interacts with pencil pigment and why this medium combination can elevate colored pencil artwork to a new level.
Materials and Preparatory Techniques
Before beginning the artwork, the course covers the materials needed and how to prepare them. Students explore the types of colored pencils that work best on polyester film, how to secure the film to a stable drawing surface, and techniques for achieving consistent application without damaging the film. This introduction ensures that artists feel confident in handling the unique demands of this medium.
Sketching the Spider Design
The creative process begins with sketching the basic outline of the spider. Students learn how to translate the subject’s proportion and form onto polyester film, maintaining accuracy and clarity in the initial drawing. Special emphasis is placed on establishing a strong composition, as the clarity of pencil lines on film makes early choices especially important.
Layering and Building Color
Once the outline is established, students begin layering colored pencils to build rich, vibrant color. Because polyester film does not absorb pigment in the same way paper does, the lesson demonstrates how to gradually develop color depth through careful layering, blending, and burnishing. Artists learn techniques that allow colors to remain luminous and intense, taking full advantage of the film’s smooth surface.
Refining Detail and Enhancing Texture
As the piece progresses, focus shifts to refining the spider’s details and creating texture across its body and legs. Students learn how to capture subtle shifts in color and tone, highlight reflections, and suggest surface texture that makes the image feel lifelike. The instructor provides guidance on achieving contrast and sharpness that truly let the subject stand out.
A Unique Colored Pencil Experience
By the end of the Pencils on Polyester course, students will have completed a bold, colorful spider drawing that showcases the unique potential of colored pencils on polyester film. This course expands artistic techniques and highlights how experimenting with different surfaces can produce striking and memorable artwork.
Specific Lessons
Lesson 1 - Introduction and Materials (7:19)
In this lesson, we look at the unique characteristics of polyester film and compare it to traditional drawing surfaces. We also cover the materials used to create the colored pencil drawing to follow.
Lesson 2 - Drawing with a Grid (8:48)
In this lesson, we develop the pencil underdrawing using the grid technique.
Lesson 3: Applying Colored Pencils (15:11)
In this lesson, we begin with colored pencil applications gradually layering light applications of color.
Lesson 4: Developing Texture and Depth (15:51)
Colored pencil applications continue along the upper portion of the picture plane.
Lesson 5: The Eyes Have It (15:53)
In this lesson, we complete the eyes of the spider.
Lesson 6: A Furry Face (14:03)
In this lesson, we work across the middle of the picture plane addressing the overlapping hairs of the spider.
Lesson 7: Hairy Legs (15:45)
In this lesson, we complete the drawing by developing the complex hairy legs of the spider.
Lesson Materials
- Polyester Film
- Paper for Underlayment
- Graphite Pencil
- Eraser
- Ruler
- Drafting Brush (optional)
- Colored Pencils
Lesson Resources
References
Photo Reference
Gridded Photo Reference
Finished Drawing
Download eBook

Founder of The Virtual Instructor, artist and teacher. Matt makes learning art easy to understand and enjoyable.
So excited about this course. I ordered the Dur-Lar film a bit ago and have yet to use it. This course is the push and instruction I need!
I was at a show of botanical art last year and saw one artists work with colored pencil on polyester type material. I became quite interested and was excited to get the email about this new course.
But Matt, what were you thinking?! A spider! Do you know how many of us have arachnophobia? Oh well, I’ll just have to pretend it is something else….
hahah – I had the same thought. Now if it was a snake – I would not have been able to even attempt
🙂
I can’t wait to have a go at this too but agree with you Adi, did it have to be a spider lol 😂. Please Matt, could you do something else too which is a bit more pleasant to look at 😁
BTW – Have you seen work by Joseph Crone done with black colored pencil on Graphix Dura-Lar. Incredible
You have inspired me to try coloured pencil on polyester paper. It certainly looks especially good for animal pictures. Thank you.
Just a note:
Sorry, Matt, I find the red grid on the gridded reference photo very hard to see, either on screen or when printed. I was able to use photo editing software to adjust it and make the lines heavier and a lime green, which seemed to show up better for me, but other folks might not have this capability. Can you adjust it, this late in the game?
Hi Mary,
I’m glad you were able to find another solution. I have provided a gridded reference and one without a grid. Other students can create their own grid over the ungridded image, if the one I provided is hard for them to see due to it being red. The gridded image that is provided is more than adequate and should be fine for just about everyone. It is the reference that I used.
Hi, I can’t find that product, but when I googled it show grafting paper. Is it the same?
Thanks
I meant Drafting paper. Is it the same?
Thanks
So happy to see you demonstrating this technique. I’ve recently discovered the very detailed pet portraits being made by British artists, and needed a fun, small project to experiment with—and yes, I find that 4-eyed spider rather cute!
Yes it’s the same different supplier
Sweet spider, Matt!
Also, it was easier to navigate the content.
Thank you for all you do.
Ara
I’ve seen drawings on this paper that are really beautiful. The artists say that if they have little vacant spots without the coverage they want, they just draw on the back side of the paper as well.
Matt, thank you so much for this lesson! What kind of archival spray should we apply to the finished drawing please?
Thank you!
Hi, Matt! Quick question ❓❓❓Are you going to erase the grid lines? Since Dura-lar is translucent couldn’t you draw a grid in ink on another paper and place it under the Dura-lar??? The grid will show through and saves having to erase the grid. That is how I do grid drawings when I use tracing paper. Then, once I get my outline on the tracing paper, I transfer it to my final surface. (I learned this time saving tip in a book by Carrie and Rick Parks.)
Hi Linda,
Yes, there are different ways to do the grid. Use whatever works best for you. Although, I imagine it may be hard to see lines through the paper. Even though the paper is translucent, it’s not like tracing paper. Erasing light pencil marks isn’t very difficult on this surface.
Can’t do this one Matt, I hate spiders, I’m really scared of them , can’t even look at pictures
I’ve never heard of drawing on that Matt.
All the best Chris x
I am sooooooooo scared about spiders, but this one looks like I could like it. Very colorful, hairy, nice little guy. Thanks Matt!
Thanks Buddy – I think so too.
Hi Matt, this looks so cool! I am about to order the Dura-Lar.
What are the specifics, please, I didn’t see the info in the ebook or in Lesson 1.
Are you using the 5 mil or 3 mil?
Is it 9×12 ?
Thanks!
Hi Jill,
My pad is 11″ by 14″ and the designation of the thickness is .005. I hope this helps. Either thickness will work just fine for this drawing.
I am using the Dur-lar film that you have used on this lesson. I am using the Faber Castile colored pencils to do a pink and white flower with green leaves. I am having trouble getting the colors to be smooth and blended. Is it because they are oil based? Should I use a sharp point or dull point on the pencils? Also, how many layers should I expect to do? If these questions have been answered, I apologize. Thank you, Phyllis H.
You talk about oil based pencils and wax based pencils as if they are two different things. It is actually a continuuum. My husband who has a PhD in organic chemistry told me this. There are certainly some differences. Prismacolot Premier are more waxy and Faber Castell are more oily. The Luminance pencils are in between the two but more like the Prismacolor Premier. Prismacolor Premier have the annoying tendency to melt or shatter.
Hi Carol,
Yes, they may be on a continuum and they may be related – but with the colored pencils – oil-based pencils are different from wax-based pencils. The binders are different and as a result – they behave slightly differently.
Hi Matt,
Thank you for showing us this new and different approach to coloured pencils. I’m very interested in trying this out. I’m wondering about the slice pen cutter you use to pull out little hairs on on the surface of the polyester sheet. Apart from that surface and medium, have you found it useful with other projects? Would love to hear about it. Thanks!
Hello All – I’m glad to find this lesson working on drafting film. I bought some of the Dura-Lar a couple years ago but only did one small drawing then forgot about it.
Something I didn’t see mentioned in your video which I felt was a definite advantage to this film is that you can turn it over and color over areas you want to increase in intensity or show an under-color for. I may have missed it on this video, so I’ll revisit, but for me it is worth mentioning.
Also for those with arachnophobia, this is a great opportunity to practice drawing shapes and areas rather than “seeing” the subject!
I’m sorry Mat but I just can’t do this spider. I was traumatized by a wolf spider dropping down from my rearview mirror while I was driving! True story. I hope you will do another CP drawing on the film.
Likewise, I too am struggling.
I am Australian and our spiders are nightmare fuel.
I am happy to provide a nice picture of my Kellie for Matt to demonstrate this surface on for those of us who can’t do the spider thing.
Matt I am finding it difficult to find Duralar paper here in Ontario ( Kingston). I could get it on Amazon but there are many different kinds. Could you tell me some specifics? Thanks Linda
Why not do the grid and pencil drawing on the opposite side of the colored pencil?
I agree
Matt just worsened my arachnophobia with that intro music.
Hey Matt. I saw this question before but it was not answered. Do you need some sort of fixative, and if so, what kind and how do I use it? Many thanks!!! 🙂