
Jellyfish with Graphite

Lessons
About This Lesson Series...
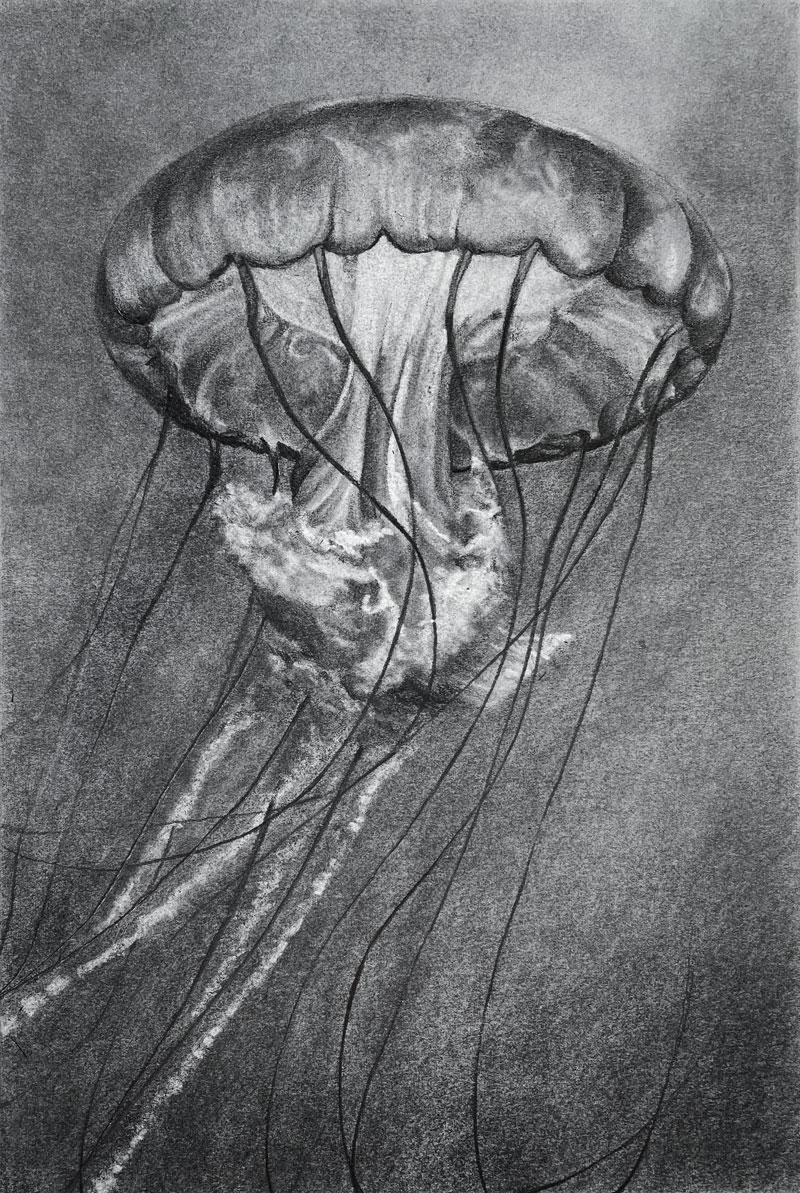
The Jellyfish with Graphite Pencils lesson series is an in-depth, multi-part drawing course dedicated to creating a detailed and expressive graphite illustration of a jellyfish. Taught through approximately five hours of instruction across five videos, this series guides students step-by-step through every stage of developing a compelling drawing using traditional graphite pencils, powdered graphite, and a variety of erasers on high-quality Stonehenge Polar White paper. :contentReference[oaicite:0]{index=0}
Composition and Contour Drawing
The series begins with a foundational discussion about composition and subject placement. In the first lesson, students lightly sketch the jellyfish’s overall form and contours using a 2H graphite pencil. This stage emphasizes structure and proportion, ensuring the dynamic shape of the jellyfish — with its flowing bell and tentacles — is well established before value work begins.
Powdered Graphite and Erasing Techniques
In lesson two, the focus shifts to applying powdered graphite across broader areas of the drawing. Powdered graphite allows for smooth value transitions and acts as a versatile underpainting that can be shaped and refined with erasers. Students learn how to use tools like vinyl, kneaded, and electric erasers to lift graphite and begin defining the jellyfish’s soft body and delicate structures against the paper.
Increasing Contrast on the Jellyfish Head
The third lesson dives deeper into value control. Here, students add and subtract graphite strategically to intensify the contrast on the jellyfish’s head, carefully balancing light and dark areas to create form and dimension. This process involves layering graphite with pencils of varying grades and then sculpting the surface with erasers to enhance highlights and shadowed regions.
Developing Tentacles
In lesson four, work continues on the jellyfish’s head while beginning to develop the long, flowing tentacles. This lesson teaches how to suggest movement through subtle value gradations and controlled graphite application. Students refine edges and value transitions so the tentacles appear fluid and natural, helping reinforce both realism and artistic expression.
Final Details and Adjustments
The final lesson focuses on completing the remaining tentacles, making final value adjustments, and refining details to unify the drawing. This stage often includes strengthening key contrasts, cleaning up edges, and ensuring the entire piece feels cohesive and balanced. By the end of the series, students walk away with a polished jellyfish drawing as well as a deeper understanding of how to use powdered graphite, traditional graphite pencils, and erasing techniques in concert.
Essential Materials and Skills
Throughout the series, students work with graphite pencils, powdered graphite, blending stumps, and various erasers on Stonehenge Polar White drawing paper. The lessons emphasize both additive and subtractive techniques — adding graphite to build value and using erasers to create highlights and refine form. This combination supports a dramatic range of values and helps artists develop confidence with graphite as a highly expressive medium.
Specific Lessons
Lesson 1 (1:08:38)
In lesson one, we discuss the composition and draw the contours of the jellyfish with a 2H graphite pencil.
Lesson 2 (1:12:43)
In lesson two, we apply powdered graphite and begin erasing out the jellyfish.
Lesson 3 (1:10:35)
In lesson three, we increase the contrast on the head of the jellyfish by adding and subtracting graphite.
Lesson 4 (1:02:43)
In lesson four, we continue work on the head and begin developing some of the tentacles.
Lesson 5 (1:04:13)
In lesson five, we complete the remaining tentacles and make a few last adjustments to complete the drawing.
Resources for this Lesson...
Distributing any content downloaded from this site is strictly prohibited and against the terms and conditions of use.
References
Here's what you'll need...
- Graphite Pencils
- Vinyl Eraser
- Electric Eraser
- Kneaded Eraser
- Blending Stumps
- Stonehenge Polar White Drawing Paper
- Powdered Graphite (Optional)
(Disclosure: Links to art materials are affiliate links which means we make a small commission if you purchase at no additional cost to you.)

Founder of The Virtual Instructor, artist and teacher. Matt makes learning art easy to understand and enjoyable.
where is the “spider” lesson?
if you mean the pencil on polyester, then go to courses then scroll down.
Hello there! Your Stonehenge paper, is it sold as a pad or sheet? I can only find sheets of 22 x 30 (I’m in Canada).
Hi Myriam,
Yes, I did purchase my paper in the larger sheets as you describe. Not sure if this paper is available as a pad.
Hello Myriam! It seems that Delta Art sells this online in 22 in. x 30 in. in Polar White – $5.19 per sheet. Opus Art Supply also has it. Finally, Omer DeSerres also sells the sheets. You would have to check directly with each of these suppliers.
The important thing to know is that this drawing paper is 100% cotton, 250 gsm (90lbs).
I couldn’t find Polar White in pads, but they do have White and Warm white.
Patricia.
i just joined. and this is my first drawing thanks matt
which graphite pencils did you use?
Hi Matt & Ashley,
Can’t figure out how to chat during live lesson of “Jelly Fish”? Did it once but can’t remember how?
Thx so much! I stream you over to my TV using Roku and it’s so much bigger that way!!
love your classes!
awesome series so far
I’m excited to learn your next module will be on charcoal. I started with graphite and have just begun using charcoal and love the shading that can be achieved using that media.
I’ve never bought store-bought graphite powder. I’ve always made my own. I’ve found that woodless pencils in a sharpener work really well for this. I usually use 44-8b. Love this photo ref. I think I might have tinted the paper first and and then sketched out the jelly. I also think I might try this in a monotone watercolor.
Oh no! I just put on the graphite powder and everywhere I used my soap eraser, the graphite stuck in darker streaks and splotches!
Maybe since soap is made with fat and lye, a soap eraser also contains some kind of oil? Now to decide whether to start over or just carry on… probably carry on- its a learning experience!
Guess I should have used a vinyl eraser.
I found this lesson series hugely enjoyable and I learned so much from doing the drawing. Thank you so much, the way you teach has encouraged me to believe in my own ability.