
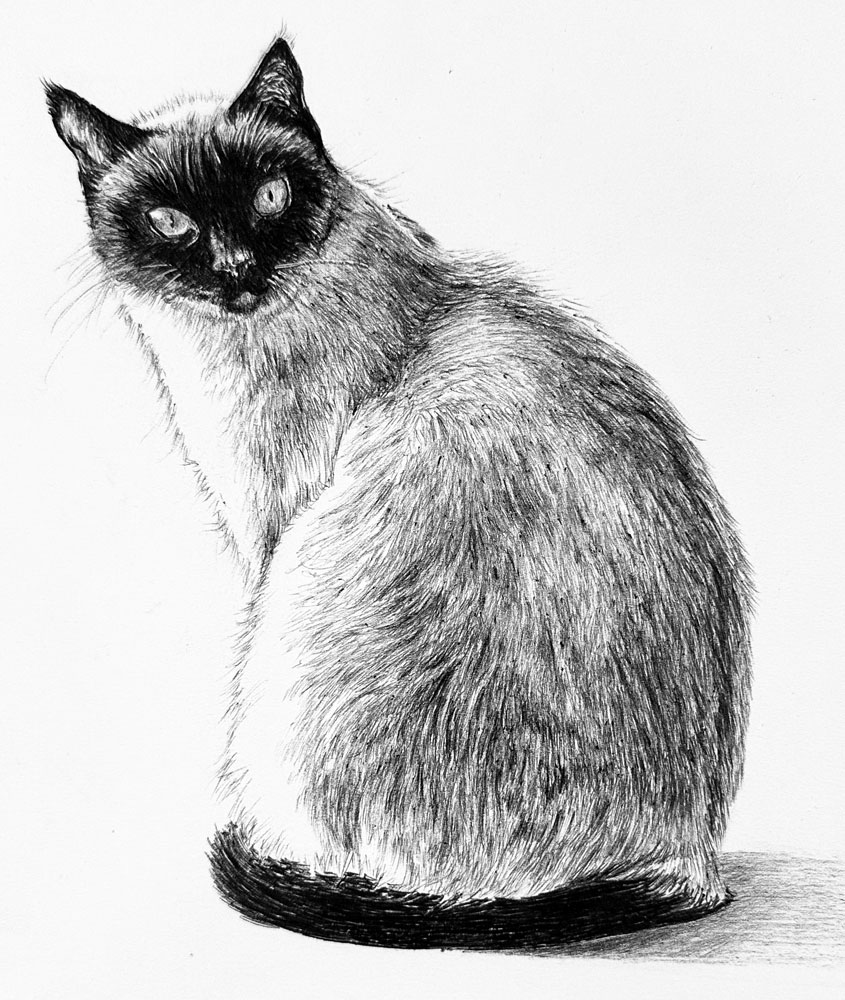
Cat with Ball Point Pen

About This Lesson Series...
The Cat with Ball Point Pens class is an in-depth, step-by-step lesson series that teaches artists how to create a detailed and expressive cat portrait using a ballpoint pen. This class focuses on observation, line quality, and value through various pen-and-ink techniques. By exploring the versatility of a simple ballpoint pen, you’ll learn how to convey texture, depth, and personality in your drawings while developing precision and control.
Planning the Drawing
The class begins with planning and sketching the cat’s basic form. You’ll learn how to break down the complex anatomy of a cat into simple shapes to establish correct proportions and positioning. This stage ensures that the foundation of your drawing is accurate, which is essential before committing to permanent ink lines. Careful planning helps you capture the cat’s pose, expression, and character from the start.
Understanding Line and Texture
A key aspect of working with ballpoint pen is mastering line and texture. The lesson explores how different types of lines—hatching, cross-hatching, stippling, and varied stroke direction—can be used to suggest fur texture, shadow, and form. You’ll learn how to vary line weight to indicate depth and emphasize focal areas, creating a three-dimensional effect on a flat surface.
Building Value with Pen Techniques
Value is essential for creating realistic depth and dimension, and this class demonstrates how to develop a full range of values using only pen strokes. You’ll learn how to layer lines and control density to produce dark shadows, midtones, and highlights. Techniques for blending and softening edges without smudging allow you to create smooth transitions and maintain clarity throughout the drawing.
Capturing Fur and Facial Features
Rendering realistic fur and facial features is central to this class. You’ll learn how to observe the cat’s unique markings, the direction of its fur, and subtle tonal shifts that define its form. The instructor shows how to suggest softness in fur while maintaining contrast and structure, as well as how to emphasize the eyes and nose to capture the cat’s expression and personality.
Refining the Drawing
As the artwork progresses, you’ll focus on refining details, enhancing contrast, and unifying the composition. The class demonstrates how to evaluate the drawing as a whole, making adjustments to lines and values that improve balance and realism. Attention is given to ensuring that small details, such as whiskers and subtle markings, add depth without overwhelming the image.
A Complete Pen-and-Ink Experience
By the end of the Ballpoint Pen Cat Drawing: Pen and Ink Techniques class, you will have created a polished, detailed cat portrait while mastering essential skills in line work, texture, and value. The techniques learned in this lesson are applicable to a wide range of subjects, making it an excellent exercise for artists who want to improve their precision, observation, and confidence with pen-and-ink drawing.
Specific Lessons
Lesson 1 (41:07)
In lesson one, we discuss the materials, experiment with the oil-based ballpoint pens and create the contour drawing of the cat with a graphite pencil.
Lesson 2 (26:05)
In lesson two, we begin with pen and ink applications on the face and head of the cat.
Lesson 3 (44:17)
In lesson three, we complete the ears and begin working down the middle section of the body of the cat.
Lesson 4 (59:23)
In lesson four, we complete the drawing by addressing the lower part of the body, the tail and the cast shadow.
Resources for this Lesson...
Distributing any content downloaded from this site is strictly prohibited and against the terms and conditions of use.
References
Here's what you'll need...
- Stonehenge Paper
- Zebra Ballpoint Pens
- Graphite Pencil
- Kneaded Eraser
(Disclosure: Links to art materials are affiliate links which means we make a small commission if you purchase at no additional cost to you.)

Founder of The Virtual Instructor, artist and teacher. Matt makes learning art easy to understand and enjoyable.
Love it Matt, I recently have been working on a piece using these pens for the first time. When sketching, I had some troubles with inky spots on my paper. I wanted to ask around tomorrow on Live Classes and here you are!!!
Will sit, watch, learn andhave fun.
Thank you so much for this brand new course,
Buddy (who is practicing with purpose) 😉
Dear Maki,
Thank you so much for sharing your increadible art and technique with us. I always have been a fan of your pieces and am so happy, Matt liked the idea to try out these pens.
Thanks,
Buddy
My pleasure! Thank you so much for your very kind words. Hope you will be happy with your own drawings with this pen!
I enjoyed watching this “class” and like the idea of having more of them (classes) with a variety of media and/or papers. Thanks for being so responsive to the requests from your members.
Matt,
What a wonderful course. Will you be adding more to this course?
I have truly enjoyed it and have done some doodling with my pens. I am getting ready to do this course after watching through this course.
It is so inspiring to always have something new to learn. your hard work and dedication is very inspiring to the creativity we are developing on this journey and you.
Greetings to your family,
Teri
Hello Matt,
One thing that I forgot to say is that this class reminded me of the art-along that you did on YouTube last year. Those were really enjoyable to do.
A live class where we can work along side the whole way without the distraction of the chat and all.
Don’t take me wrong. The live classes are something I wait for every week, as well as the critiques. It’s a way I can have interaction with others.
Everything that you are doing to improve the website does not go unnoticed.
Thank you for constantly expanding.
Teri (again
It’s nice to see this little course on drawing with ballpoint pen! I made a few drawing with ballpoint pen myself. A tip to minimalise the blobs of ink that comes out often, is I like to have a scrap piece of paper next to my work. Sometimes you can see those blobs on the tip of the pen. When you see them or when you expect them coming, you can smear them off by making some marks on that scrap piece of paper. You can’t get rid of them completely, but that’s how I minimise them and sometimes you can hide the blobs by making the surroundings a bit darker in your artwork. Just blend them in.
Are we gonna see a live lesson series of a getting sketchy episode with ballpoint pens as well? Would be lots of fun!
Hello Matt,
Me again. I used a small dull crochet needle for indenting and it worked wonderfully.
Teri\
Hi Matt, thank you for developing and offering this new lesson with a Zebra ballpoint pen.
Your cat is marvelous…s/he is not scary at all, I can only see CUTENESS!
Seriously, thank you for choosing a cat as the subject despite being so allergic to them.
I totally agree with everything you are talking here…techniques, style development, most difficult part of drawing, patience… I had a really good time watching the whole videos!
If you are planning to prepare some other lessons with a Zebra pen, I would recommend owls or fruits as the subject. They are such challenging subjects which require a really, really smooth transition of values gradation to make them look believable.
Thank you!
Maki
Where do you get your images for your artwork? I always wonder where you find such thought provoking photos.
Am anxious to begin your Pen and Ink course with Zebra pens. But my order arrived from Blick (a box of 10 identical pens marked “Zebra Sarasa MarkOn 0.5″ ??? ) . These are the wrong size, aren’t they” How do I identify what I want for your course? Thanks Matt.
Regards,
Tony Hathaway
Hi Tony,
under the video you should see the tab named “Materials”. If you click on that tab, you can see there is a link for the Zebra pens. Just click on that “Zebra Ballpoint Pens” and it will take you to the amazon page directly to the pens you need.
Hope that helps.
Is something like this doable in just a ball point pen? This of course is fantastic.
You may want to reserve your highlights using a white colored pencil. I used Prisma color PC938. Erase the ink where you think the highlight should be. The colored pencil will keep the ink from sticking and the white of the paper will show through.
You may have to reapply the ink in that area to darken up around the highlight but is definitely easier to darken the ink around a highlight you can already see.
Thank you for the inspiration! This class is amazing! Like many others on this forum, I would love to see more content on ballpoint pens.
I’ve recently become quite passionate about ballpoint pens and bought a pack of Zebra 0.7 mm and a few 1.0 mm ones. It can be challenging to order these in the UK; I had to order mine from Japan, which cost me extra.
It’s strange how every shop offers Zebra pens, but not this model, unfortunately.
However, a more accessible pen that I find very similar is the BIC Crystal, which you can find everywhere in the UK at a very reasonable price. I went a step further and bought a few different sizes; I particularly love having the BIC 1.6 in different colours, but mainly black.
Please let me know if you have tried different pens and how they perform. I believe there is great potential for this medium, even for colour drawings. I should mention that the type of paper also makes a difference, although it doesn’t have to be expensive.