
Duck Painting with Acrylics

Lessons
About This Lesson Series...
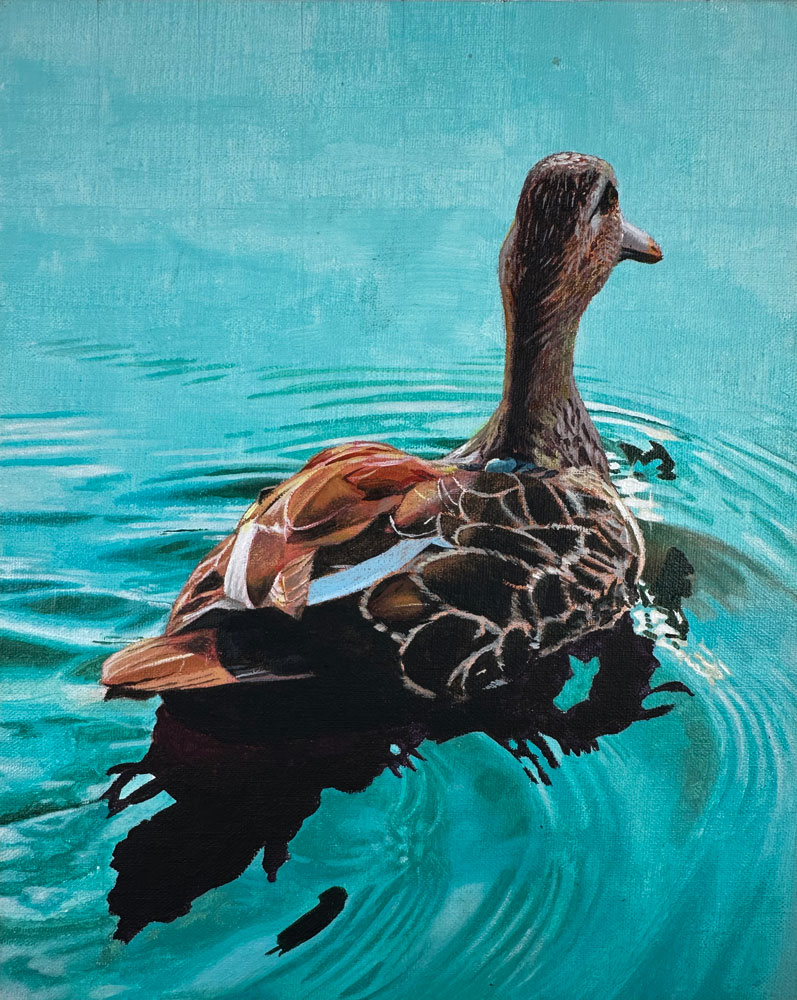
The Duck Painting with Acrylics class is a complete, start-to-finish demonstration focused on capturing realism, texture, and personality using acrylic paint. In this lesson, you’ll learn how to approach animal subjects with confidence while developing a strong understanding of color, value, and brushwork. Acrylics are used for their versatility and fast-drying nature, allowing you to build layers efficiently while maintaining control throughout the painting process.
Planning the Painting
The class begins with the planning stage, where careful observation and preparation set the foundation for success. You’ll learn how to analyze the reference image, identify major shapes, and establish correct proportions before applying paint. This step emphasizes simplifying complex forms, ensuring that the duck’s structure and pose feel natural and believable from the start.
Blocking In Color and Shape
Once the initial drawing is established, you’ll move into blocking in the main colors and shapes with acrylic paint. This phase focuses on working broadly and avoiding unnecessary detail early on. You’ll see how to establish the major value relationships that define light and shadow while keeping the paint loose and flexible. This approach allows for adjustments as the painting develops.
Understanding Color and Value
A strong emphasis is placed on understanding how color and value work together to create form. You’ll explore how subtle shifts in color temperature help describe the rounded forms of the duck’s body and head. The lesson demonstrates how to mix believable colors for feathers, highlights, and shadows without relying on straight-from-the-tube paint, resulting in a more natural and cohesive appearance.
Creating Texture with Brushwork
One of the highlights of this class is learning how to suggest feather texture using controlled brushwork. Rather than painting every feather individually, you’ll discover how to imply texture through strategic strokes, value changes, and layering. This method keeps the painting lively and prevents it from becoming overworked, while still conveying the softness and complexity of the duck’s feathers.
Refining Details and Features
As the painting progresses, attention turns to refining important features such as the head, beak, and eye. You’ll learn how small adjustments in value and edge quality can dramatically enhance realism and expression. The instructor explains how to decide where detail is necessary and where it can be minimized, helping guide the viewer’s eye to the focal point of the painting.
Background and Composition
The class also addresses how to handle the background in a way that supports the subject. You’ll see how simple color transitions and soft edges can create contrast without competing with the duck. This section emphasizes the importance of composition and negative space, ensuring the subject remains the clear focus of the artwork.
Layering and Finishing Touches
Acrylics allow for quick layering, and this lesson demonstrates how to build up paint gradually to strengthen form and contrast. You’ll learn how to make final adjustments, unify colors, and add highlights that bring the painting to life. Guidance is provided on knowing when to stop and how to avoid overworking the surface.
Materials and Practical Tips
Throughout the class, materials and techniques are discussed, including paint selection, brushes, and surface choices. You’ll gain practical insight into how acrylics behave and how to work with their fast-drying properties effectively. These tips can be applied to a wide range of future acrylic painting projects.
A Complete Acrylic Painting Experience
By the end of the Painting a Duck with Acrylics class, you’ll have completed a finished animal painting while gaining valuable skills in observation, color mixing, and texture. The techniques taught in this lesson are applicable to many subjects, making it an excellent study for artists looking to improve their acrylic painting skills and confidence.
Specific Lessons
Lesson 1 (1:08:28)
In lesson one, we discuss the materials and surface and draw the contours of the duck with a graphite pencil.
Lesson 2 (1:07:39)
In lesson two, we begin applying acrylic paint to the water around the duck.
Lesson 3 (1:05:15)
In lesson three, we continue developing the water ripples around the duck.
Lesson 4 (1:08:50)
In lesson four, we continue developing the water ripples and begin to increase contrast.
Lesson 5 (1:06:37)
In lesson five, we begin work on developing the body of the duck.
Lesson 6 (1:11:05)
In lesson six, we work down the neck of the duck and begin developing the body.
Lesson 7 (1:08:08)
In lesson seven, we begin work on the back feathers of the duck.
Lesson 8 (1:06:54)
In lesson eight, we continue work on the back feathers of the duck.
Lesson 9 (59:44)
In lesson nine, we complete the painting of a duck.
Resources for this Lesson...
Distributing any content downloaded from this site is strictly prohibited and against the terms and conditions of use.
References
Here's what you'll need...
- 8" by 10" Linen Canvas Panel
- Acrylic Paints
- Nylon Brushes
(Disclosure: Links to art materials are affiliate links which means we make a small commission if you purchase at no additional cost to you.)

Expert teacher and visual artist. Ashley is encouraging and makes creating art easy to understand.
If you get the canvas too wet the paint will not stick to it. Very lightly mist it and paint.
I’m using golden open acrylics and they stay wet like oils!
I use chalk instead of pencil to draw the grid and the picture.
june 20/24 I have had the same problem with golden caps, have to use a towel to open them often
fantastic, this will be my first acrylic painting and would like to do more of them in the future.
many thanks
Donna
HI
I’ve only ever used the Galleria. Didn’t even know about the Windsor Newton. I’ve always found them to work well. I heard you say you underpaint with acrylic for oils. That’s something I never thought of doing.