
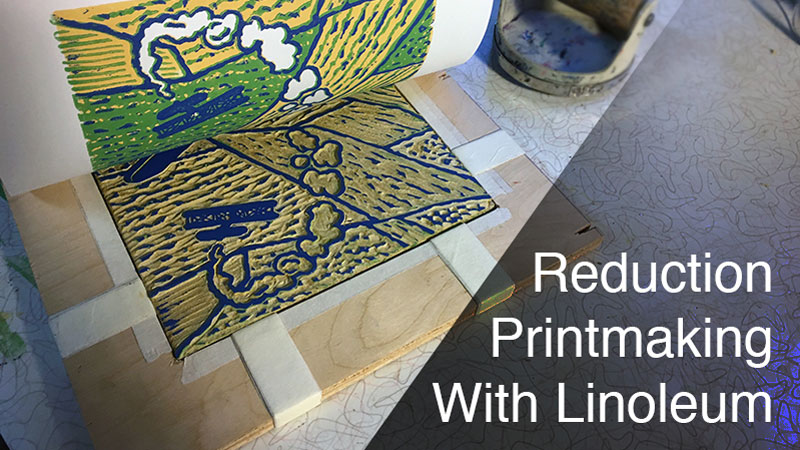
What is a Reduction Print?
Printmaking is often defined by high-contrast, single-color images. A reduction print includes several colors. The artist carves away or “reduces” portions of a printing block, printing at intervals, one color at a time. Colors are usually printed from lightest to darkest since dark colors cover lighter color better than the reverse.
There are two broad categories that most printmaking processes fall into: relief and intaglio. Intaglio processes include engraving and etching. Intaglio images are made from recessed grooves in the surface of a metal printing plate.

Relief processes, by contrast, print from raised areas on the printing plate. Wood and linoleum are ideal for relief printing, linoleum being the more user-friendly option. The reduction process is appropriate for relief, but not intaglio printmaking.
Materials for Reduction Printmaking
The sample reduction print shared in this post was made from linoleum instead of wood. Therefore, the required and suggested materials below are specific to that medium. Also, this article’s focus is the reduction print process and not linoleum printmaking in general, so the list includes materials needed to make a registration board (used to properly line-up each color-layer).
Standard Linoleum Supplies
- Linoleum (mounted or unmounted)
- Linoleum gouges
- A brayer (used to roll ink onto the linoleum)
- A barren or wooden spoon (used to apply pressure to the back of prints)
- Block printing ink (red, yellow, blue, white and black)
- A palette (for loading ink onto the brayer)
- A palette knife/spoon/case knife (to move and mix ink on the palette)
- Paper (80lb. drawing paper works fine)
- Bench hook (optional – holds the linoleum block still while carving)
- Graphite transfer paper (optional)
Reduction Print Supplies
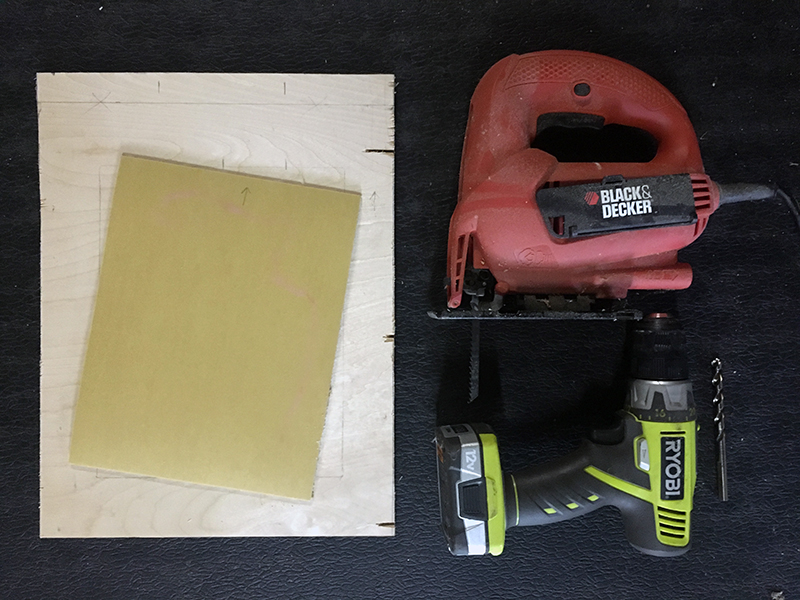
- Half-inch thick plywood (must be larger than linoleum block)
- Jig-saw
- Drill bit, 1/4 inch or larger
- Small dowel rod (substitute a pencil for this item)
- Wood Glue (Elmer’s is fine too)
The Reduction Print Process
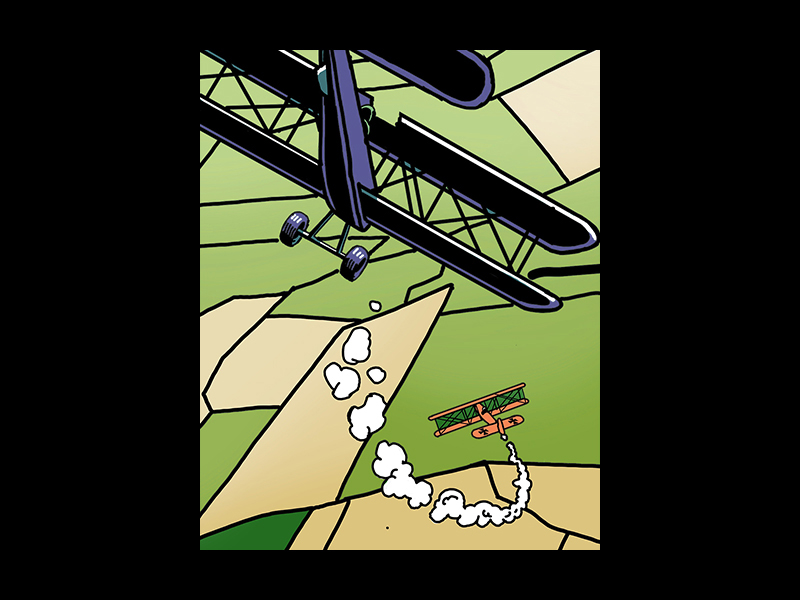
Step One: Fully develop an image. Reduction printing requires the artist to plan ahead. Besides the subject matter, the artist must decide how many colors to be used during this planning stage. I developed my “image plan” on an iPad using an application called Procreate. Doing so required access to a printer since a hard copy is helpful in the next step. In the past, I have used markers or colored pencils to create my “image plan”. The media used for this step is not important. My image has four colors plus black and white for a total of six colors.
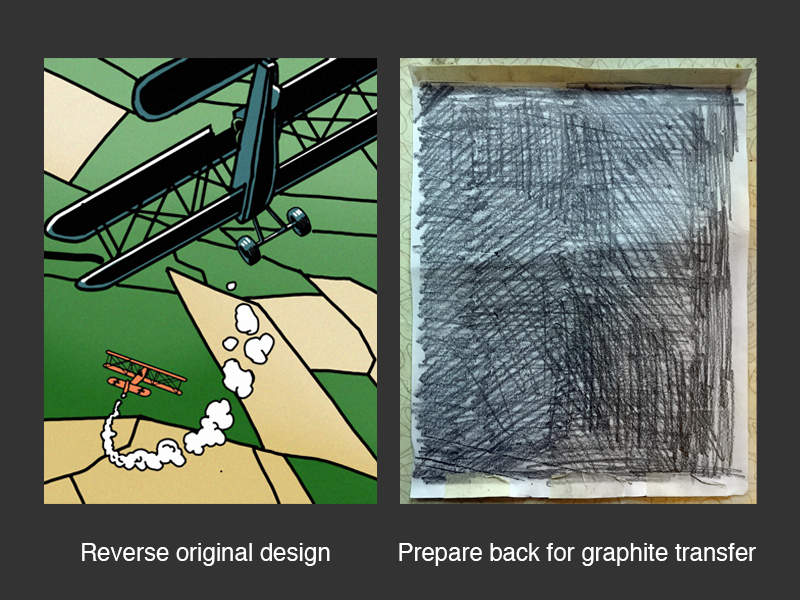
Step Two: Move the image from paper to linoleum. There are a few ways to transfer the drawing but before doing so, it is worth remembering that the final print is a mirror image of what is on the linoleum block. So before making the transfer, look at the “image plan” in a mirror to be sure it reads properly in reverse. If not, it must be flipped horizontally before transferring it to the linoleum block. (If you have text in your image, then this step is especially important!)
To flip the design horizontally, I recommend three options.
- Use a light box and trace the backside of the image.
- Flip the image horizontally using Photoshop, Procreate, or any other image editing application.
- If neither of the two previous options are available, then just put the drawing up against a window on a sunny day. The image will show through the back of the paper and can be traced just the same.
Apply soft graphite to the backside of the “design plan” with a pencil. Now the design plan is ready to trace.
Place your drawing, image side up, on the linoleum block. Some artists apply a bit of tape to one edge to help hold things in place.
Next, use a hard pencil or ball-point pen and trace the drawing with moderate pressure. The pressure placed on the drawing with transfer the soft graphite on the back of the drawing to the linoleum surface. Remove the drawing from the linoleum to reveal the transferred image.
Trace the graphite transfer with a permanent pen now. This will prevent the image from washing away when cleaning ink from the linoleum.
Step Three: Prepare a registration board or sheet. A registration board will ensure that each layer of ink that we print lines up with the visual information of the previous ink applications. If the colors do not properly line-up, then the final print may look blurry or have colors that overlap incorrectly.
Registration sheets and boards help the artist line up their paper with the block in a consistent way for each layer of color. A registration sheet is a large piece of paper with marks on it that show where to lay the linoleum block and where to lay the printing paper over the linoleum block. They work better than no registration tool at all but not as well as a registration board.
Registration boards are durable. The design pictured below is my own and not the only registration board configuration that you can make. I made my registration board to use with 8 x 10 inch linoleum blocks. My plywood is approximately 12 x 16 inches. Using a jig-saw, I cut out an 8 x 10 inch rectangle. The rectangle is 4 inches from the top and 2 inches from the sides and bottom.

I then glued the 8 x 10 inch cut-out to the underside of my 8 x 10 inch linoleum. After placing my mounted block of linoleum in the registration board’s window, I found that it was a little loose – no problem. Wrapping masking tape around the opening created a snug fit.
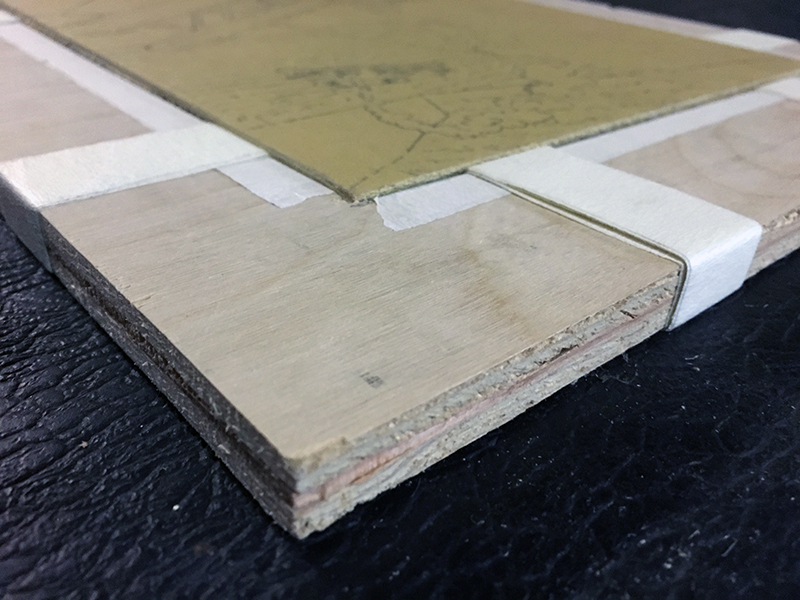
The registration board also needs pegs for the printing paper to fit over. Using a drill bit that is about the diameter of a pencil, drill two holes one half inch from the top of the board. Place small dowel rods into these holes. (I used pieces of a pencil instead of dowels.) Again, add some masking tape so that the pegs fit tight but do not glue the pegs into place. They should remain removable.
The board is now ready.
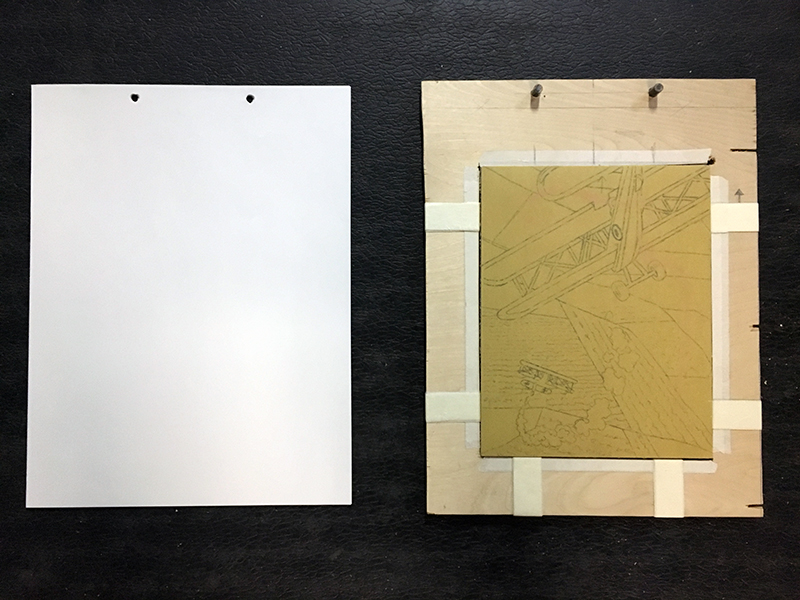
Step Four: Preparing the paper. I am going to make an edition of 10 prints. After cutting 10 sheets of paper that match the size of my registration board, I removed the pegs and place the 10 sheets, one at a time, over the board. Using my thumbs, I pressed down on the paper where it laid over the holes. Doing so left an embossed impression of the holes in the paper.
I then simply used a hole puncher and punched holes in the paper according to the impressions. (A hobby knife will work just as well.) Now when I place my paper over the pegs, it will fall across the linoleum block exactly the same way each time.
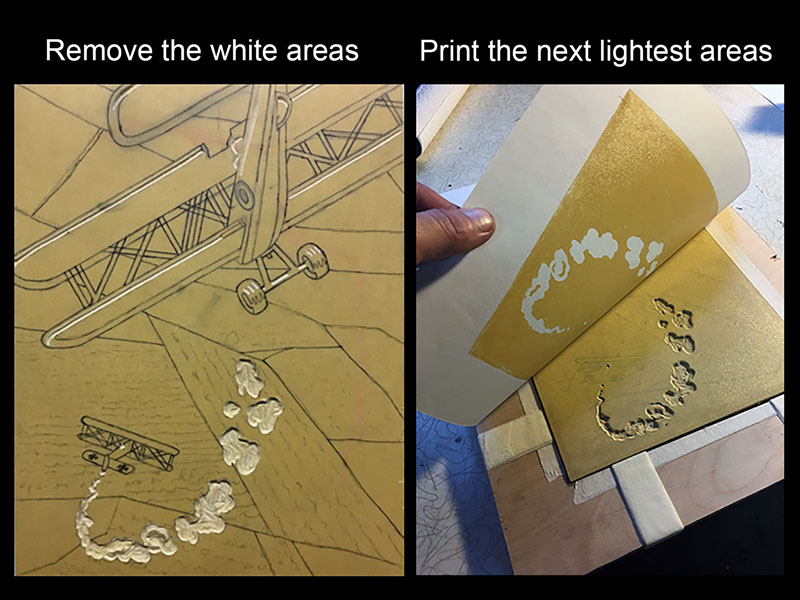
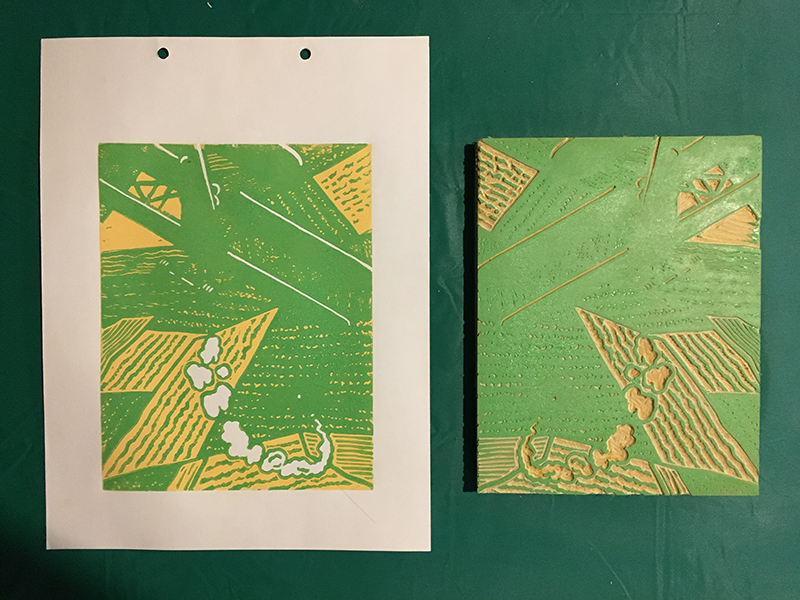
Step Five: Time to carve and print. Since my paper is white, I identified all of the white areas in the design plan and removed them from the linoleum with my gouges. If there was no white in the design, I would print my lightest color before carving anything.
After removing all of the white, I applied yellow ink with the brayer to the entire linoleum block and began making prints on all 10 sheets of paper. Now the white is locked in. No matter what else I do to the linoleum block, the white areas will remain white.
Wash the linoleum block with water before applying a different color.
Next, I turned my attention to the parts of the block that needed to remain yellow. Remember, the prints are currently only white and yellow. Whatever I carve away at this point will remain yellow when the next color goes down.
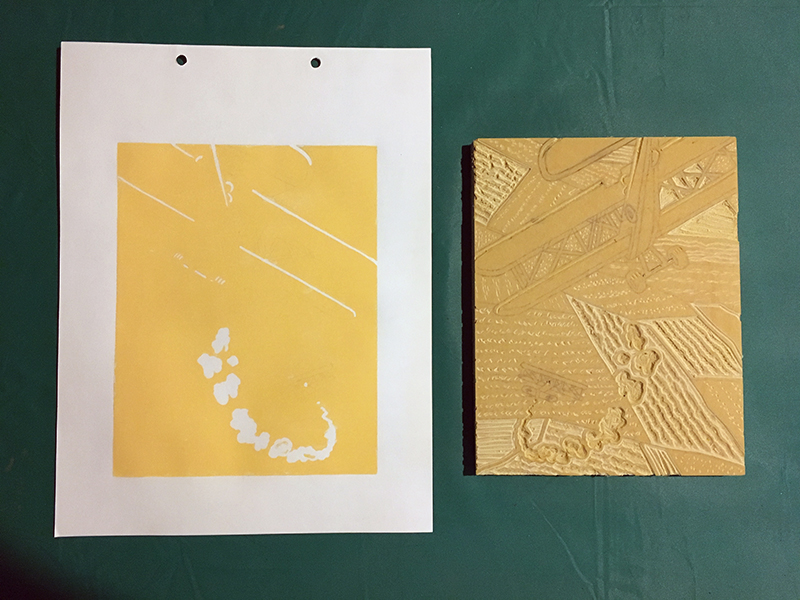
The next darkest color in my design is green. Once I finished carving the yellow parts I printed over the yellow with green. With the green in place, the yellow takes shape. With reduction printmaking, you are always carving away the color that was most recently printed.
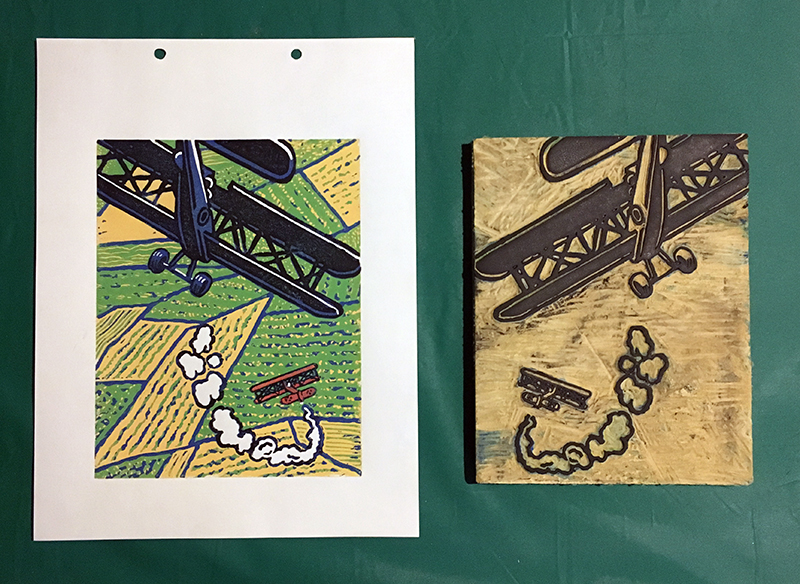
I repeated this printing/carving pattern with both blue-violet and black, according to my original design. The small red plane in the design is so small and isolated that I painted it red by hand, after printing the blue-violet layer.
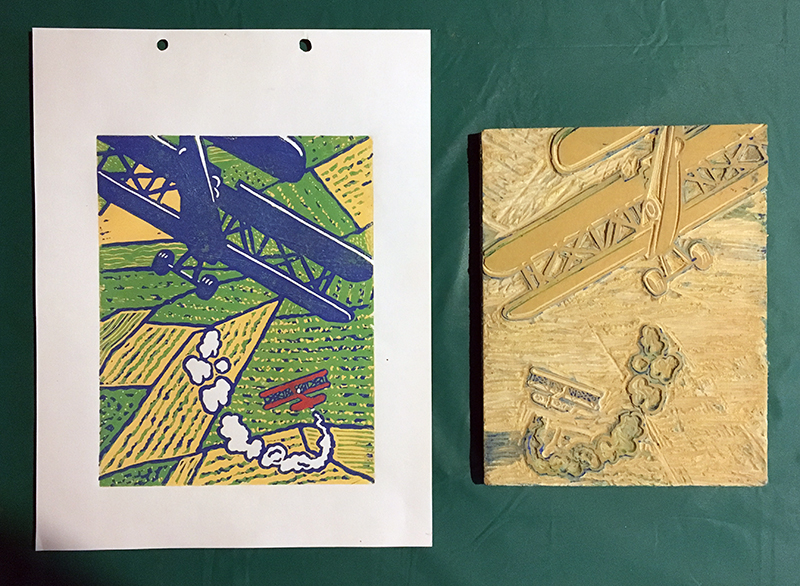
After carving away what needed to remain blue-violet, the block is reduced to it’s final state. Only black remains.
Final Thoughts
Reduction printing is a little more complex than creating a single relief print. If you haven’t made a print with a single color, then I’d start there.
Here’s a lesson on relief printmaking where we create a print with a single color… Relief Printmaking
When you “mess up” a single-color print (use too much or too little ink) you throw it away and print again – no problem. If you “mess up” a reduction print while applying the forth color, then you have to throw away hours or days of work.
A single-color print does not require registration so you can focus on your carving and inking skills until you feel ready to move on.
Printmaking is not harder than drawing or painting but it does require patience and attention to detail. Stay focused and you will soon have a colorful edition ready to share or sell.
If so, join over 36,000 others that receive our newsletter with new drawing and painting lessons. Plus, check out three of our course videos and ebooks for free.

Lesson Discussion
Comments are closed.
Hello
Your blog is very nice I like your blog.
Please share some information about Art courses for beginners.