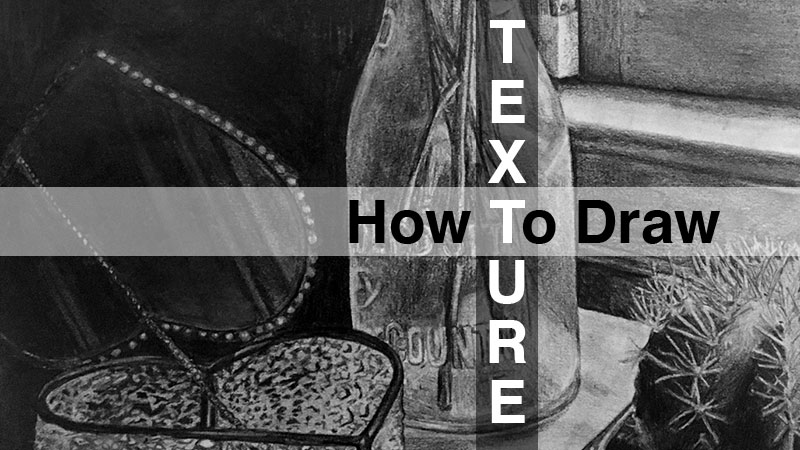
Introduction to Texture
Not once did my drawing mentor talk about texture with me. Texture is one of the seven elements of art and design. So why did my drawing teacher never discuss it?
The answer is this – texture is subordinate to all the other elements of art. Simply put, texture is both the least important and the most challenging. My drawing professor instead focused on the basics, value and proportion. He taught me to do the same.
In some ways texture needs the other elements of art (shape, form, value, color, line) more than they need texture. For example, a portrait can capture the likeness of it’s subject without showing each strand of hair. Conversely, a bunch of stringy lines where the hair goes will not contribute to a portrait’s likeness. Why is that?
How to Draw Hair
It is because shape and form (3-Dimensional) do more to help us recognize a subject than does texture. Shape and form must take first priority. Only then can texture be used with satisfactory results.
Think of texture as icing on a cake and think of the cake as form. Icing makes a cake look great but even without the icing it is still a cake. Without the cake, however, the icing is just a pile of goop.
Don’t worry, texture can add both beauty and grit to your artwork and this article is still about drawing texture, just don’t forget to see the form underneath.
So What Is Texture In Art?
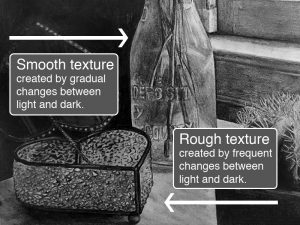
Texture is the way something feels to the touch or looks as if it may feel if it were touched. For many, the word texture implies roughness but texture should refer to any tactile quality; smooth, rough, shiny, fuzzy, bumpy, soft, etc.
*NOTE* The following concepts about drawing texture apply to drawing pattern as well. Texture and pattern are like siblings. They both perform similar functions in art. They add visual weight and emphasis to a subject.
Common Texture Problems?
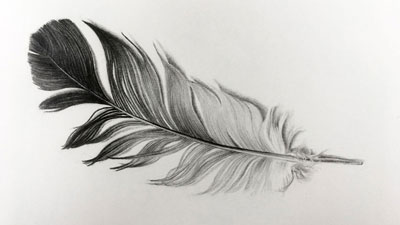
Of all the textures in all the world, the question I get most is about drawing hair. Grass and leaves are a close second while things like rocks and wood are not far behind.
All of these rough surfaces are created by placing many light and dark marks close together. It is the character of the marks, however, that accounts for the many different textures. By using a variety of light/dark, narrow/broad, hard/soft marks, any texture is drawable. A measure of patience is required as well.
Types of Texture
There are four types of texture in art. These types are best understood as a set of pairs.
Actual vs. Implied – Actual texture is touchable. It’s real. Think about a drawing that makes use of collage. The collaged element would stand in relief against the supporting paper, giving the artwork a texture you can both see and feel. Implied texture is the illusion of a textured surface created through changes in value using mark-making.
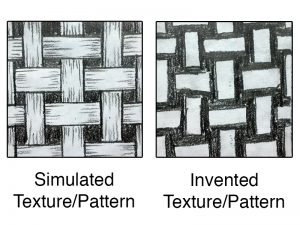
Invented vs. Simulated – Invented and simulated texture are really two sub-types of the implied texture mention above. Both create an illusion of texture so the difference is slight. Simulated texture attempts to copy the nuance of a surface as exactly as possible. Invented texture is typically a simplification of sorts, still communicating the essence of a texture or pattern.
How To Practice
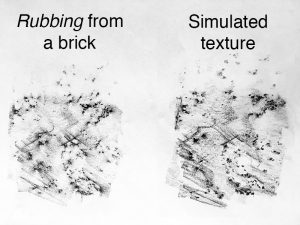
A great way to practice simulating texture is to first make a rubbing of a textured surface and then attempt a freehand copy of that rubbing.
To make a rubbing you will need a thin sheet of paper (copy paper works great), a soft drawing medium (charcoal or ebony pencils are perfect) and a rough surface (bricks, a basket or tree bark work well).
1. Lay your paper on the textured surface. Use tape to hold your paper if the surface is vertical.
2. Using the side of your drawing tool (not the tip) make side-to-side strokes across your paper. Try to keep the strokes together and avoid any gaps.
3. Start with light pressure. If the marks are not apparent enough then increase pressure gradually until the texture begins to appear. Too much pressure may actually obscure the texture you intend to capture.

Once you have captured a few textures using the rubbing technique try to recreate the marks as exactly as possible on a separate sheet of paper. This exercise will help you develop both the delicate touch and the patience to work-up a simulated texture.
*NOTE* It feels a bit like cheating but you can even use rubbings in your actual artwork as long as your drawing paper isn’t too thick.
The Bottom Line
Drawing texture boils down to mark-making and edge quality (hardness and softness of a contour). If you make the same type of marks with your drawing tools you will get the same texture over and over. Each unique texture requires a unique mark. Compare the surface texture of the five spheres below.
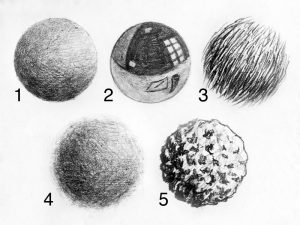
Spheres 1,2 and 4 appear smooth because there are few gaps of raw paper showing through the pencil strokes. These three spheres are different types of smooth textures due to edge quality. Spheres 1 and 2 feel hard because their edges are sharp. Sphere 4 feels soft because it’s edge is irregular and made with loose marks.
While both spheres 1 and 2 feel hard, one seems to have a matte surface and the other a shiny/reflective surface. It is the sharp shapes and highlights within the shape of sphere 2 that create that impression of a reflective surface.
Spheres 3 and 5 are obviously more roughly textured than 1,2 and 3. Though neither are smooth, 3 feels soft next to 5, again, because of the looser edge quality. Sphere 3 is made of lines while sphere 5 is rendered with little dark shapes.
Both of the rough spheres demonstrate how a mingling of light and dark create the impression of texture. Note that, except for the reflective ball, the spheres all demonstrate a clearly defined light source, creating an even change from light to dark. Value and form must always dominate texture.
Conclusion
I’ll leave you with three main points concerning drawing textures…
- Each texture requires a unique mark.
- Value creates texture.
- Form dominates texture.
For some us, it is best to think about shading with textured marks. Approach texture this way and you will never loose the light.
If so, join over 36,000 others that receive our newsletter with new drawing and painting lessons. Plus, check out three of our course videos and ebooks for free.